 12-11-2013, 05:01 PM
|
#1 (permalink)
|
|
Human Environmentalist
Join Date: Aug 2010
Location: Oregon
Posts: 13,044
Thanks: 4,378
Thanked 4,558 Times in 3,504 Posts
|
Balance charging NiMH Robot Packs
I have both a Roomba and Neato robotic vacuum cleaners that use NiMH battery packs. After just over a year with the Neato, the battery only runs the robot for 5min before it heads back for a recharge. The Roomba only runs a few seconds.
I also have a Lacrosse NiMH battery charger that has features for testing individual cell capacity and refreshing weak cells. The problem is that it's designed to accept only AA and AAA sized cells.
I'm wondering how I can best test the larger welded cells in the robot packs? I don't want to destroy the pack by cutting the welded tabs, and I haven't found a device that can clamp onto the ends of the cells.
Any ideas how best to balance charge and test the cells? I'd be willing to buy other chargers and testers since I plan on needing to do this more in the future. I was thinking it should be possible to connect leads to individual cells in the pack and then connect those leads to the Lacrosse. I am able to open the Lacrosse charger up and get alligator leads onto the charging contacts, but connecting them to the cells is problematic. Would there be any issues connecting a larger capacity cell to the Lacrosse than it was designed for?
|
|
|

|
 Today Today
|
|
|
|
 Other popular topics in this forum...
|
|
|
|
 12-11-2013, 07:54 PM
|
#2 (permalink)
|
|
Human Environmentalist
Join Date: Aug 2010
Location: Oregon
Posts: 13,044
Thanks: 4,378
Thanked 4,558 Times in 3,504 Posts
|
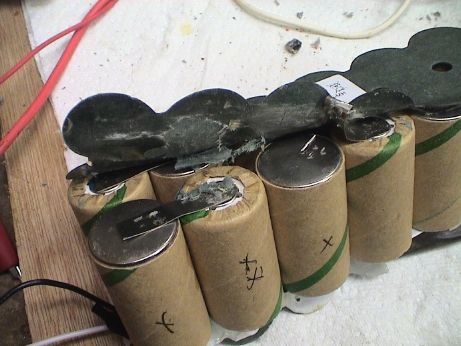
There was a tough paper substance covering the terminals of the Roomba battery that I was finally able to remove. Peeling back the paper insulator revealed the tabs that are soldered to the cells.
I've got alligator clips going from a cell on the Roomba battery to my Lacrosse charger, and I'll see if I can determine the capacity of each cell in the pack, and hopefully revive it. If need be, I have a couple of new cells I can replace the bad ones with.
This is what the battery looks like with part of the paper insulator removed

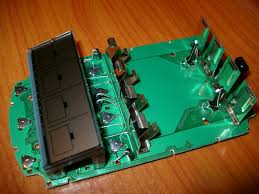
This is what my battery charger looks like dissembled. The charging pins are now exposed so that alligator clips can connect to them.

Last edited by redpoint5; 12-12-2013 at 07:07 PM..
|
|
|

|
|
The Following 2 Users Say Thank You to redpoint5 For This Useful Post:
|
|
 12-11-2013, 09:16 PM
|
#3 (permalink)
|
|
Master Novice
Join Date: Jan 2008
Location: SE USA - East Tennessee
Posts: 2,314
Thanks: 427
Thanked 617 Times in 451 Posts
|
I had some solar path lights and discovered, before constant battering from harsh UV destroyed the plastics, that the factory NiMH batteries were junk, only 800mAh capacity. Just because I had some hanging around, I replaced them with some off-the-shelf Energizer rechargeables. It made a huge difference in brightness through the night, and they would go three nights in spite of nonstop overcast. Big, big difference.
It makes me wonder what you'll discover about your factory batteries in the Roomba.
__________________


Lead or follow. Either is fine.
|
|
|

|
|
The Following User Says Thank You to elhigh For This Useful Post:
|
|
 12-11-2013, 10:25 PM
|
#4 (permalink)
|
|
EcoModding Apprentice
Join Date: Oct 2010
Location: winterpeg, manisnowba
Posts: 211
Thanks: 9
Thanked 18 Times in 18 Posts
|
did you google it?
multimeter's work wonders for testing stuff
|
|
|

|
 12-12-2013, 08:03 PM
|
#5 (permalink)
|
|
Human Environmentalist
Join Date: Aug 2010
Location: Oregon
Posts: 13,044
Thanks: 4,378
Thanked 4,558 Times in 3,504 Posts
|
Yesterday I did a charge/discharge/test of 1 cell from each of the 2 Roomba batteries using the Lacrosse charger. Apparently using the charger on the larger capacity batteries works, but there would be no thermal detection, so the charge process relies on change in voltage detection only.
The Lacrosse showed 1 cell having only ~200mA, and another cell having ~2100mA (out of 3000 rated).
I'm now testing 4 cells at a time, all from different battery packs; 2 Roomba, and 2 Neato.
If I determine that 3 or less cells need replacement, I'll revive the pack by replacing the failed cells.
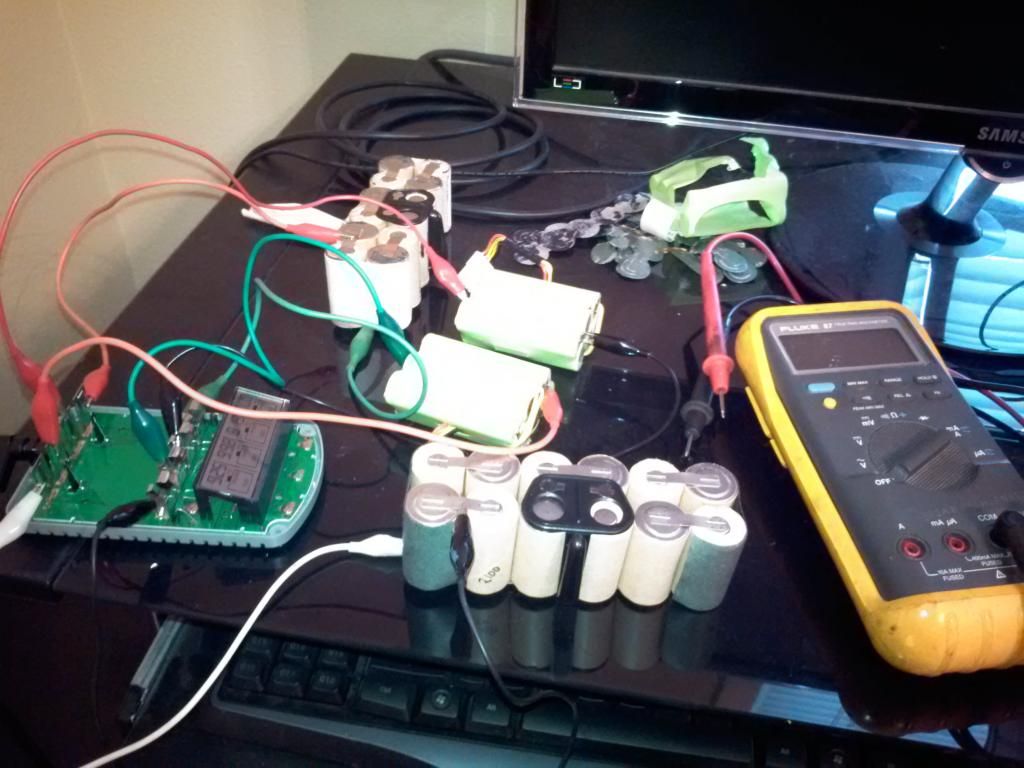
Here is my actual setup, showing the stripped down Lacrosse charger and various batteries. As I left for work today, I connected 4 batteries and set them at a charge rate of 1000mA, or 1/3 C.

Part of the reason I want to become familiar with battery maintenance and repair is that I plan to buy a used Prius and want to know what to do to keep it going. I might even buy one with a bad traction battery, or one with a branded title to save money. Plus, all of this is fun! |
|
|

|
|
The Following User Says Thank You to redpoint5 For This Useful Post:
|
|
 12-13-2013, 06:04 PM
|
#6 (permalink)
|
|
Administrator
Join Date: Dec 2007
Location: Germantown, WI
Posts: 11,203
Thanks: 2,501
Thanked 2,589 Times in 1,555 Posts
|
Sounds like a fun project to learn about nimh chemistry.
|
|
|

|
 12-18-2013, 09:33 AM
|
#7 (permalink)
|
|
Human Environmentalist
Join Date: Aug 2010
Location: Oregon
Posts: 13,044
Thanks: 4,378
Thanked 4,558 Times in 3,504 Posts
|
I've completed the testing/balancing of the 2 battery packs used in the Neato robot.
The robot has 2 NiMh battery packs rated at 7.2V 3200mAh.
Battery 1 had the following cell capacities in mAh:
2840
2900
2760
2820
2790
2830
Battery 2 had the following capacities in mAh:
2890
2770
2720
2860
3020
2350 Refresh cycling brought this up to 2670
As you can see, the batteries generally have 88% of the rated capacity, with 1 cell dipping down to 73%. Cycle charging brought it up to 83%. This seems acceptable to me.
However, I tossed the batteries back into the Neato, and it immediately said the batteries were low. I selected the menu option "new battery installed" so that it would reset what it thought the capacity was, and then placed it onto the charging pad. It charged for about 15min before showing fully charged.
Excited, I pressed the clean button and watched the Neato go to work. It ran marvelously for about 4min before declaring the battery weak, and heading back to the charging pad. It charged for about 20min and then resumed cleaning where it left off, this time going for about 6min before heading back for a charge. Again, after charging for 15min, it ran for about 11min before giving up and heading back for a charge.
The Neato gives up its cleaning mission if it cannot complete it in 3 cycles.
I just don't understand why seemingly good batteries don't give the robot a longer run time. I've thoroughly cleaned everything to make sure there isn't an excessive load, and the robot itself appears to run and function just perfectly, minus the short run time.
Any ideas as to how my battery might be failing prematurely? I've decided to buy 2 new batteries to get the thing running again, and keep the old batteries around to scavenge cells when the new pack gets weak.
|
|
|

|
 02-15-2015, 06:03 PM
|
#8 (permalink)
|
|
EcoModding Lurker
Join Date: Feb 2015
Location: Maryland
Posts: 1
Thanks: 0
Thanked 0 Times in 0 Posts
|
NotSo Neato Batteries..
Quote:
Originally Posted by redpoint5

Any ideas as to how my battery might be failing prematurely? I've decided to buy 2 new batteries to get the thing running again, and keep the old batteries around to scavenge cells when the new pack gets weak.
|
I'm curious after a little bit of time, whether the new batteries you ordered did the trick?? I have a "refurb" neato vac, and it's doing the same thing.. It ran for about 60 minutes the first two times, then it started doing it's 5 minute at a time thing.. I upgraded the firmware, because they say it had some battery issues, and then did a "new battery" trick on the Neato, and let it calibrate again, and it worked again TWICE and is now failing again..
If this is a problem with the batteries, then I guess I'd be OK buying a new set, even though I think they would owe it to me on warranty, but if it's a charger problem, and/or just a fact of life with Neato, then I may just want to cut my losses here...
I couldn't tell from your pictures - How were the neato's batteries wired? There's a 4 pin plug.. Can I gain any insight, and/or do at least a partial balanced charge through the exposed connector? I have a balancing charger meant for LiPos for an RC airplane that would work fine if so...
Thanks!
Steve |
|
|

|
 02-16-2015, 07:34 AM
|
#9 (permalink)
|
|
Master EcoModder
Join Date: Nov 2010
Location: US
Posts: 1,016
Chief - '06 Pontiac Grand Prix 90 day: 26.7 mpg (US) SF1 - '12 Ford Fiesta S 90 day: 30.95 mpg (US)
Thanks: 195
Thanked 247 Times in 190 Posts
|
To avoid stripping down your charger. Take a wooden broom stick (dowel) cut to the appropriate length. Take carpet tacks, small nails or screws to attach the color coded wires to each end. Put in place of the battery. No need to disassemble the charger.
It will be interesting to see your results. For my Roomba I would call it a fail. Although some individual cells were salvaged for other projects.
|
|
|

|
 02-16-2015, 01:36 PM
|
#10 (permalink)
|
|
Master EcoModder
Join Date: Dec 2008
Location: Southern WI
Posts: 829
Thanks: 101
Thanked 563 Times in 191 Posts
|
Hi,
I my estimation, any battery pack having more than one cell, really should make use of a decent BMS.
Each cell has varying capacity, and when the pack starts to get exhausted, there are high chances one or more cells can reverse by the stronger ones.
Same goes for battery packs used in electric drills and such.
The BMS would constantly monitor every cell, and shut down the device if any one cell gets close to reversing.
Obviously, in your case, topping off the pack does help, but only on the top end of the voltage spectrum.
Jim.
|
|
|

|
|
The Following User Says Thank You to 3-Wheeler For This Useful Post:
|
|
|