Go Back   EcoModder Forum > EcoModding > Motorcycles / Scooters
Register Now
 Register Now
 

Reply  Post New Thread
 
Submit Tools LinkBack Thread Tools
Old 05-25-2014, 07:44 PM   #51 (permalink)
EcoModding Lurker
 
Join Date: Feb 2012
Location: Sandy, Utah
Posts: 68

Ninjette - '05 kawasaki EX250
Thanks: 2
Thanked 20 Times in 17 Posts
Plan "A" to use coroplast to skin the frame is not going to work - at least on the curved top section of the tail. The rear bulkhead is too tight of a radius and the coroplast wants to crease vs. curve. I will now go to plan "B" whatever that is.

The frame is painted and I am now wiring the lighting. The cargo compartment floor and sides are in (removable coroplast).

Moving right along.

Jeff

  Reply With Quote
Alt Today
Popular topics

Other popular topics in this forum...

   
Old 05-25-2014, 11:11 PM   #52 (permalink)
EcoModding Lurker
 
Join Date: Dec 2011
Location: Michigan
Posts: 82
Thanks: 12
Thanked 23 Times in 16 Posts
Maybe if you heated the plastic uniformly in a very hot bath of water then put it over a relatively smooth form til it cools. It would seem that would make it less prone to sharp creases. But the very nature of corrugated material would still have it creasing. Though after heat forming, (sort of) it may crease less severely in several places over a larger area rather than large creases in only a few places. What you would have then is a surface with several small flat surfaces something like the planking on a boat giving it a smoother curvature rather than only a few flat surfaces like a barn roof.

I've done CF & FG in wet lay up in a form that I made for the curved top piece and CF & FG wet lay up on the glass of an old storm door of all things. And it gives flat panels that are glass smooth. The curved form gives pieces with an almost mirror smooth finish as well. They are simply pop riveted to hardware store aluminum angles and seams are covered with reflective tape.

The Carbon Fiber and Fiberglass cloth materials I got for dirt cheap some years ago off ebay. So it's not like it has that super high quality high dollar CF look. I am thinking of roughing that glossy finish with some very fine sandpaper so that a light color paint will stick better. That shiny black carbon fiber sure looks nice but it gets HOT HOT HOT!! in the sunlight

My curved form developed a crack about a foot from the narrow end during the winter. I stop drilled it to prevent the crack from migrating further. My bad as I did not secure it fully before putting in away. Still it is quite usable; It's just that If pieces are to be made so that it comes all the way to a point at the end, then that last foot of the shape would need to be made using a few parts. No big deal really IMO. I plan to use it to make a Kammback style fairing for one of my other scooters.

Here is a link to the thread about the 2007 Honda Reflex I have been working on. It is only a little further on in progress since these pics were taken but I don't have current pics yet.

http://ecomodder.com/forum/showthrea...tml#post378656

What kind of dimensions are you needing for the curved top piece? Wide end height? X width? Angle that it has from top down to the bottom --- Narrow end height X width and angle down from top to bottom (if important) ---

I don't have the exact measurements on hand of the curved top section that I have done here but the front is about 24" wide X 16 or 17" tall and whatever shallow angle deviation from 90* that you can see in the pic. The narrow end was only a few inches tall and about 1.5 inches wide. Bottom base line is about 68" and at the top of the curve it is about 72" long. Of course any pieces I do now would be about a foot less in length along the base and the narrow end at that point would be about 5.5 inches wide.
Just an added note; the material I've used has some flexibility and the width and height at the front wide end can be changed some merely by squeezing it together. It is not overly heavy or floppy and will stay up on its own yet becomes surprisingly rigid with the addition of a bulkhead and the aluminum angle stringers and a couple cross pieces.

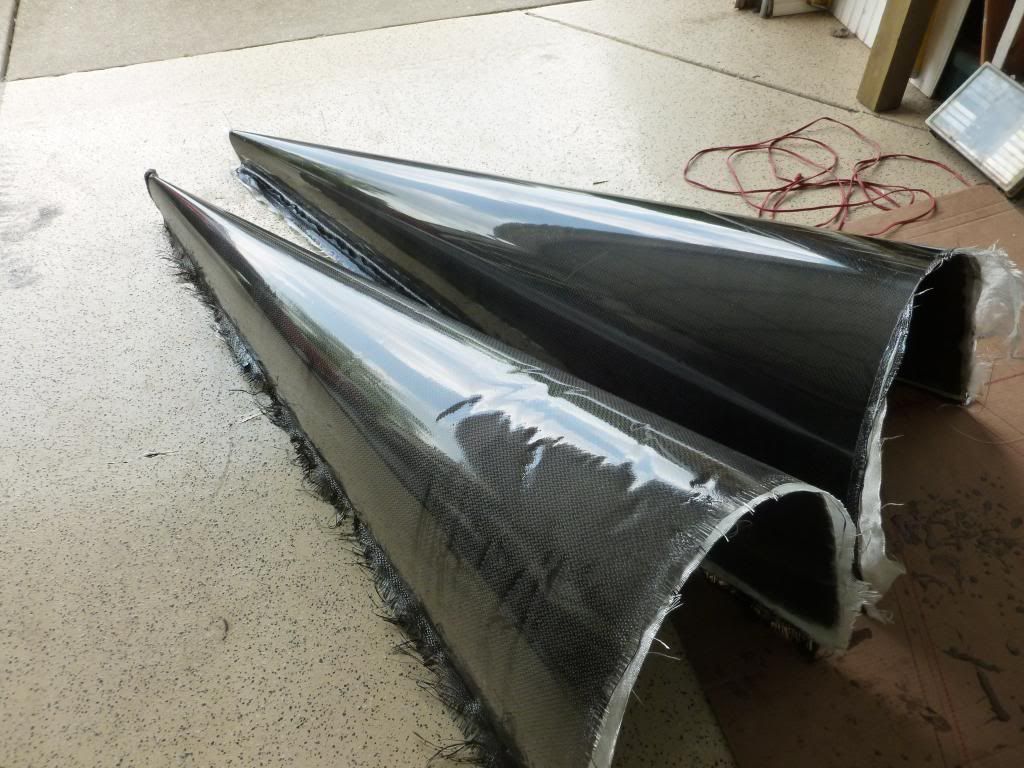
Here is a pic of the first 2 pieces of composite work I have ever done. the first got wrinkles because I brought the form out into the sunlight to warm it to help with the cure process. (so I thought) Then at night the temps went down and the form shrank a little causing the lay up to be compressed and subsequently wrinkled. The 2nd far better engineered piece came out that way because I kept the temperature a steady 85* for the entire lay up cure time. Big difference in outcome. It's a learning process.

Last edited by stiletto2; 05-25-2014 at 11:30 PM..
  Reply With Quote
Old 05-26-2014, 12:58 AM   #53 (permalink)
EcoModding Lurker
 
Join Date: Jan 2012
Location: California
Posts: 40

Hyosung - '07 Hyosung gt250r
90 day: 55.49 mpg (US)

Burgman - '07 Burgman 650 k7
Thanks: 8
Thanked 7 Times in 6 Posts
I would use thin 30 gauge aluminum. You can get it for $20-25/sheet (3'*12') at your local metal supply store. I regret using 24 guage (.020") as it's too heavy, and might downsize to 30 guage. The 24 guage cost me $35/sheet.
  Reply With Quote
Old 05-26-2014, 07:28 PM   #54 (permalink)
EcoModding Lurker
 
Join Date: Feb 2012
Location: Sandy, Utah
Posts: 68

Ninjette - '05 kawasaki EX250
Thanks: 2
Thanked 20 Times in 17 Posts
I think I see plan "B" um, unfolding. Looks like the key is to remove most or all of the flutes on the inside of the coroplast where you want to have a curve. I will have to try it.

A little web searching led me to this little homemade tool to cut out the flutes.

There is a bunch of folks that use coroplast to build R/C combat aircraft and one guy removes the inside fluting with a homemade cutter that looks like this:


Removing the inside fluting makes the coroplast very easy to curve. I am going to give it a try. The worst I can do is screw up $20 worth of coro'.

Stiletto, great looking layup.

Thanks for the suggestions.

Jeff
  Reply With Quote
The Following User Says Thank You to JeffM For This Useful Post:
renault_megane_dci (05-28-2014)
Old 07-02-2014, 05:14 PM   #55 (permalink)
EcoModding Lurker
 
Join Date: Feb 2012
Location: Sandy, Utah
Posts: 68

Ninjette - '05 kawasaki EX250
Thanks: 2
Thanked 20 Times in 17 Posts
Update

Cutting the inside flutes of the coroplast worked great. It is a bit labor intensive to do but the coroplast panel curves great.

I have just about finished wiring up the tail, license plate, and turn signal lights.

Almost there.

I'll post up some photos when the bike actually looks like something.

Jeff
  Reply With Quote
Old 07-05-2014, 06:16 PM   #56 (permalink)
EcoModding Lurker
 
Join Date: Feb 2012
Location: Sandy, Utah
Posts: 68

Ninjette - '05 kawasaki EX250
Thanks: 2
Thanked 20 Times in 17 Posts
Getting there. The top skins are on temporarily for fit hence the wrinkles. Need to add the sides, change the gearing (15/39 waiting for a master link), tidy up some details then go for a ride

I will worry about making it pretty later.


  Reply With Quote
The Following User Says Thank You to JeffM For This Useful Post:
Patrick (07-05-2014)
Old 07-06-2014, 03:15 AM   #57 (permalink)
Master EcoModder
 
Join Date: Feb 2009
Location: France - Paris
Posts: 762

la_voiture_de_courses - '03 Renault Megane Estate
OldContinents
90 day: 44.34 mpg (US)

xiao lan - '01 Audi A2
90 day: 38.88 mpg (US)

Brit iron - '92 Mini Mini
90 day: 45.5 mpg (US)

Prius - '09 Toyota PRIUS Lounge
90 day: 47.37 mpg (US)

Beemer - '06 BMW F800 ST
90 day: 53.06 mpg (US)
Thanks: 188
Thanked 33 Times in 30 Posts
Vetter ready ?
__________________
  Reply With Quote
Old 07-06-2014, 03:31 AM   #58 (permalink)
EcoModding Lurker
 
Join Date: Feb 2012
Location: Sandy, Utah
Posts: 68

Ninjette - '05 kawasaki EX250
Thanks: 2
Thanked 20 Times in 17 Posts
Quote:
Originally Posted by renault_megane_dci View Post
Vetter ready ?
Yes, it will hold four bags of groceries

My plan is to attend the Wendover, UT mileage challenge.

Speaking of Wendover, Alan Smith stopped by this morning, with riding buddy Dave, to see how my build was coming along. He was on his way to the Vetter Fuel Challenge at the AMA Vintage Days, Mansfield,Ohio .

Our bikes:


Alan, in the red shirt, with his streamliner and Dave with his Vstrom 650.

Last edited by JeffM; 07-07-2014 at 08:43 AM.. Reason: Update
  Reply With Quote
Old 07-06-2014, 07:59 PM   #59 (permalink)
Master EcoModder
 
Patrick's Avatar
 
Join Date: Apr 2008
Location: Northern Florida, USA
Posts: 510

Hot Tamale - '10 Toyota Prius III
Thanks: 27
Thanked 96 Times in 70 Posts
Any difficulty getting on and off the bike?
  Reply With Quote
Old 07-06-2014, 08:17 PM   #60 (permalink)
EcoModding Lurker
 
Join Date: Feb 2012
Location: Sandy, Utah
Posts: 68

Ninjette - '05 kawasaki EX250
Thanks: 2
Thanked 20 Times in 17 Posts
Quote:
Originally Posted by Patrick View Post
Any difficulty getting on and off the bike?
When I sat on Alan's bike it was no different than getting on a bike with panniers and a top box. Same with mine. The side panels on Alan's bike are removable to mount the bike.

Jeff

  Reply With Quote
Reply  Post New Thread


Powered by vBulletin® Version 3.8.11
Copyright ©2000 - 2024, vBulletin Solutions Inc.
Content Relevant URLs by vBSEO 3.5.2
All content copyright EcoModder.com