Go Back   EcoModder Forum > EcoModding > DIY / How-to
Register Now
 Register Now
 

Reply  Post New Thread
 
Submit Tools LinkBack Thread Tools
Old 08-30-2011, 12:50 PM   #291 (permalink)
Master EcoModder
 
NeilBlanchard's Avatar
 
Join Date: May 2008
Location: Maynard, MA Eaarth
Posts: 7,907

Mica Blue - '05 Scion xA RS 2.0
Team Toyota
90 day: 42.48 mpg (US)

Forest - '15 Nissan Leaf S
Team Nissan
90 day: 156.46 mpg (US)

Number 7 - '15 VW e-Golf SEL
TEAM VW AUDI Group
90 day: 155.81 mpg (US)
Thanks: 3,475
Thanked 2,950 Times in 1,844 Posts
Oh, I will video record the first piece of foam I cut for CarBEN EV!

CFECO -- do you have a thread or build log on the 2+2 car in your avatar?

__________________
Sincerely, Neil

http://neilblanchard.blogspot.com/

Last edited by NeilBlanchard; 08-31-2011 at 08:20 AM..
  Reply With Quote
Alt Today
Popular topics

Other popular topics in this forum...

   
Old 08-30-2011, 03:17 PM   #292 (permalink)
CFECO
 
CFECO's Avatar
 
Join Date: May 2008
Location: Vail, AZ.
Posts: 552

X-Car - '11 Homemade 2+2

Velbly1 - '17 Toyota Camery XSE
90 day: 29 mpg (US)

Velbly2 - '13 Toyota Tundra
90 day: 18.03 mpg (US)
Thanks: 174
Thanked 60 Times in 56 Posts
No Neil, after missing the funding for the X-Prize, and having to relocate, the only work I have been able to do is peripheral. The picture is the closest representation I have made, ( Free photoshop trial for MAC) since losing my SolidWorks ,due to the move. At present I have no shop space either.
  Reply With Quote
Old 08-31-2011, 08:20 AM   #293 (permalink)
Master EcoModder
 
NeilBlanchard's Avatar
 
Join Date: May 2008
Location: Maynard, MA Eaarth
Posts: 7,907

Mica Blue - '05 Scion xA RS 2.0
Team Toyota
90 day: 42.48 mpg (US)

Forest - '15 Nissan Leaf S
Team Nissan
90 day: 156.46 mpg (US)

Number 7 - '15 VW e-Golf SEL
TEAM VW AUDI Group
90 day: 155.81 mpg (US)
Thanks: 3,475
Thanked 2,950 Times in 1,844 Posts
You should try going the SketchUp route, maybe? It is free and works with the PhlatPrinter III; which is about $1,300.

Until I clear out my garage (and do some repair work on the doors) I am working on my screen porch.
__________________
Sincerely, Neil

http://neilblanchard.blogspot.com/
  Reply With Quote
Old 09-03-2011, 10:03 PM   #294 (permalink)
Master EcoModder
 
NeilBlanchard's Avatar
 
Join Date: May 2008
Location: Maynard, MA Eaarth
Posts: 7,907

Mica Blue - '05 Scion xA RS 2.0
Team Toyota
90 day: 42.48 mpg (US)

Forest - '15 Nissan Leaf S
Team Nissan
90 day: 156.46 mpg (US)

Number 7 - '15 VW e-Golf SEL
TEAM VW AUDI Group
90 day: 155.81 mpg (US)
Thanks: 3,475
Thanked 2,950 Times in 1,844 Posts
I have now laid out 4 sheets of foam with (almost) 7 sections:


7 sections finished and layed out on 4 (2'x8') sheets of foam; and the 8th section is started! Only 77.5 sections to go... :-)

Section F0 is on the right end, and it is at the highest point of the roof. F1 through F7 are each ~2" forward of the previous. You can see the "ball and socket" joints, and the 1/2" diameter alignment holes. The support rollers come on Thursday so I will probably make the first foam cuts next weekend!

The bottom piece of F7 is going onto the next sheet of foam, so these four sheets will build just less than 14" of the length of the CarBEN EV. They cost about $36... Of course the fiberglass will be more.
__________________
Sincerely, Neil

http://neilblanchard.blogspot.com/
  Reply With Quote
Old 09-04-2011, 09:04 AM   #295 (permalink)
Gen II Prianista
 
Rokeby's Avatar
 
Join Date: Jul 2009
Location: Ballamer, Merlin
Posts: 453
Thanks: 201
Thanked 146 Times in 89 Posts
Neil,

Thanks for the update. What you're doing is way cool.
Wish I were there.

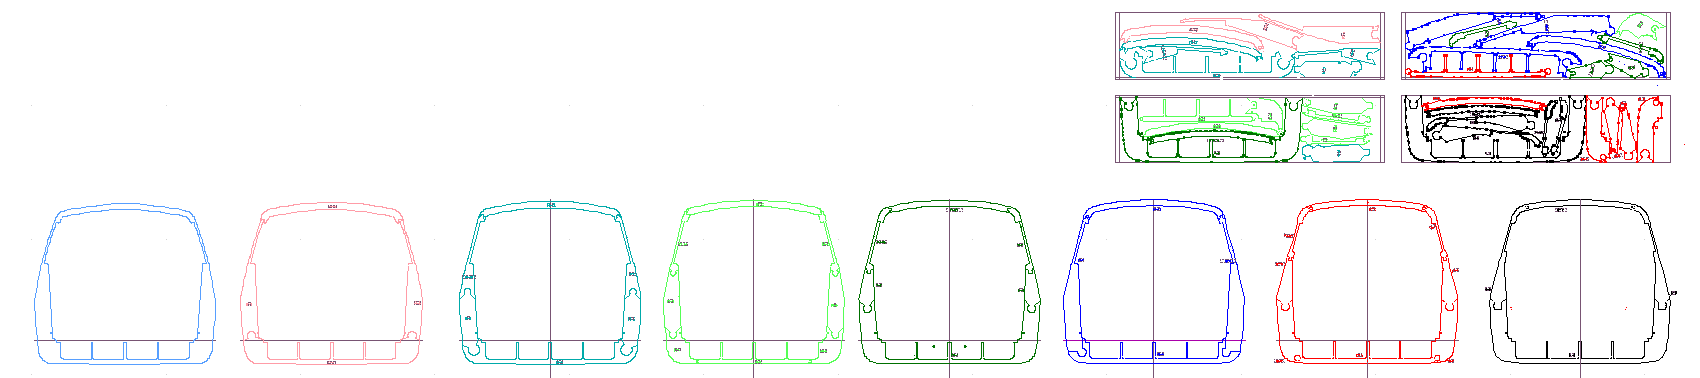
For a while there I wasn't "getting it." I thought that you were cutting each
layer -- a boat builder would call it a "lift" -- as a single piece. Now I see the
tightened up, very efficient layout of constituent parts.

Does the layout of the joints holding the pieces together include offsets so
that the joints are a tolerance fit without a gap the width of the cutter head
which would allow for alignment difficulties when the pieces are joined? This
might be a difficult thing to achieve. But it would save a lot of fiddling with
critical alignments later on given the narrowness of the side and top pieces.
If the joints on all the pieces are identical, I guess that it could be plug-in
sub-routines inserted in the cutting program as needed.

FWIW, I think that the joints you're using are typically called "jigsaw puzzle
joints" or just "puzzle joints." They are the new-fangled way to join numerous
pieces of plywood to make single sides for kayaks, canoes, etc instead of butt
or scarph joints. (There is a CNC "stepped scarph" that is self aligning, but it
takes multiple cutting passes, the number dependent on the depth and length
of the steps. Also, this joint isn't self-connecting like the puzzle joint is.)

The advantage of the puzzle joint being that they can be cut on a CNC machine,
lie flat, are essentially rigid in the 2D plane, and require no further hand
work. I know for a fact that you don't want angular movement between the
pieces as is suggested by a "ball and socket joint."

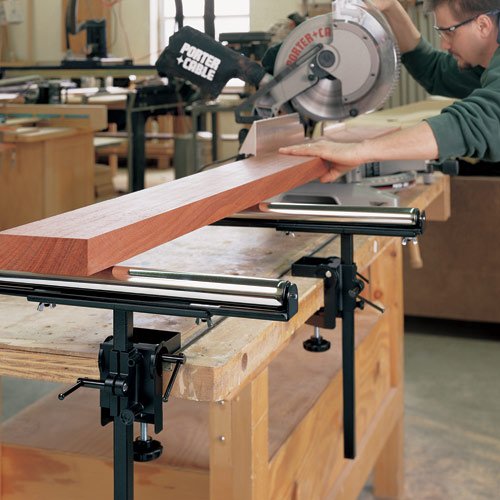
A caution on feed rollers: full width rollers can be the most frustrating
things in the world. The problem being that that they "feed" only in the
direction of a line perpendicular to the roller axis. They need to be very
accurately placed/aligned else they will feed at a slight angle to the cutter,
whether it be band saw, table saw or Phlatprinter. Much better would be a 2
ft. bar with 6 or 8 of these spheres evenly distributed along its
length:


One last point. On reviewing various Phlatprinter projects on the 'Net, I find
that when cutting "long" stock there is a possibility of the stock slipping a
little and inducing some radial cutting errors with resultant shape warping.
The smoothness of the bare steel pressure rollers and the thinner-than-
Saran-Wrap fiim on the two sides of the blue board may be the cause.

The typical fix is to install guide fences or pins along the feed path. I don't
know the exact width of the throat on the Phlatprinter. But if fences or pins
are needed -- or felt important to ensure shape fidelity -- this might make it
necessary to reduce the width of the foam cutting blanks to less than 24".

Given all the layout work that you've done already, I hope and pray that a
complete redo would not be needed.

Puzzle Joint Example Here.

Last edited by Rokeby; 09-04-2011 at 01:34 PM..
  Reply With Quote
The Following User Says Thank You to Rokeby For This Useful Post:
NeilBlanchard (09-04-2011)
Old 09-04-2011, 09:34 AM   #296 (permalink)
EcoModding Lurker
 
Join Date: Aug 2010
Location: florida
Posts: 4
Thanks: 4
Thanked 1 Time in 1 Post
Neil

Great inspiration.

Things that make America great!

On another note have you tried to find investors to bring this project to a full completion in a shorter amount of time. It looks like you got something good here.

Best of luck
  Reply With Quote
The Following User Says Thank You to bobby02 For This Useful Post:
NeilBlanchard (09-04-2011)
Old 09-04-2011, 03:44 PM   #297 (permalink)
Master EcoModder
 
NeilBlanchard's Avatar
 
Join Date: May 2008
Location: Maynard, MA Eaarth
Posts: 7,907

Mica Blue - '05 Scion xA RS 2.0
Team Toyota
90 day: 42.48 mpg (US)

Forest - '15 Nissan Leaf S
Team Nissan
90 day: 156.46 mpg (US)

Number 7 - '15 VW e-Golf SEL
TEAM VW AUDI Group
90 day: 155.81 mpg (US)
Thanks: 3,475
Thanked 2,950 Times in 1,844 Posts
My brother Nathan, who works for UPS suggested those omnidirectional rollers, and I was going to try and use them, but the rollers I am getting are ready to go:


(click on image for link)

I've ordered four of them, which should do the trick.

I will be making an alignment jig, once I figure out how to set up the USB CNC program. I am leaving 1.5" at each short edge and .375" on each long edge -- the friction rollers need 1.25" minimum to keep a "grip" on the sheet and there is a .25" tongue/groove on the long edges.

Jigsaw puzzle joint makes sense to me. The slowest part of this process is that I have to "sum" the two adjacent sections -- they are cut starting at the high point of the roof, and the ones I am working on are cut "looking" forward of this. I then cut the next section, and layout the inside profile -- and then I copy the entire second section over the first one. I then erase all the lines on the inside; keeping the outer-most lines only. This makes the stepped form will always be larger than the finished shape, and I will only have to *remove* the steps to get the actual form of the car.

This was the major lesson of making the quarter scale model -- I had lots of voids wherever the shape "grew" from the previous section. And on the full size one I am now doing, it is the *inside* surfaces that need to be taken into account!
__________________
Sincerely, Neil

http://neilblanchard.blogspot.com/
  Reply With Quote
Old 09-17-2011, 10:13 PM   #298 (permalink)
Master EcoModder
 
NeilBlanchard's Avatar
 
Join Date: May 2008
Location: Maynard, MA Eaarth
Posts: 7,907

Mica Blue - '05 Scion xA RS 2.0
Team Toyota
90 day: 42.48 mpg (US)

Forest - '15 Nissan Leaf S
Team Nissan
90 day: 156.46 mpg (US)

Number 7 - '15 VW e-Golf SEL
TEAM VW AUDI Group
90 day: 155.81 mpg (US)
Thanks: 3,475
Thanked 2,950 Times in 1,844 Posts
First successful cuts on PhlatPrinter 3!

On the Phlatprinter 3, I changed out the tension wheels for bearings and it cuts the foam! Woohoo! They had a fair amount of friction, and it now cuts the big pieces (over 5' long) with less than 1/16" error!


I need to eek out a little more cutting depth it is a bit less than a 1/4" left and cutting it out leaves a rougher edge than I'd like -- the bit cut edges are smooooooooth. I also need a tweak or two on the layout -- and I'm cutting the next piece of foam "for real"!

Here's the bearings as tension idlers:


The good thing about the idler wheels is the timing belt has greater contact with the small drive pulley. I need all the torque I can get!

And here are the first 4 pieces sitting on top (in their approximate position) of the quarter scale model.


The original 24th scale and 12th scale egg crate models are on the right. These pieces are from my second test sheet, so the bigger pieces were all cut up from the earlier aborted starts, and you can see a few stray cuts on the right side passenger window piece. You can just make out the jigsaw puzzle joints at the apex of the sides and the roof.

Wish me luck tomorrow!
__________________
Sincerely, Neil

http://neilblanchard.blogspot.com/
  Reply With Quote
Old 09-18-2011, 10:18 PM   #299 (permalink)
Master EcoModder
 
NeilBlanchard's Avatar
 
Join Date: May 2008
Location: Maynard, MA Eaarth
Posts: 7,907

Mica Blue - '05 Scion xA RS 2.0
Team Toyota
90 day: 42.48 mpg (US)

Forest - '15 Nissan Leaf S
Team Nissan
90 day: 156.46 mpg (US)

Number 7 - '15 VW e-Golf SEL
TEAM VW AUDI Group
90 day: 155.81 mpg (US)
Thanks: 3,475
Thanked 2,950 Times in 1,844 Posts
The first "real" sheet cutting went *almost* well enough to use, but the sheet skewed a bit and two pieces ran off the edge.


I had to assemble it anyway to see the full scale of it. It looks big, but that may be because it is in the house. I'll take it outside tomorrow an see it in relation to my car.


I have to solve a cotton candy problem -- the relatively deep cuts bung up the bit when they don't line up, so I think I need to rig up an air nozzle to cool the bit and move out the shreds. I also need to get it cutting faster -- I had to slow it down to 25" per minute, so this took about 2 hours to finish. I was blowing it with my air brush, but I need a proper nozzle and a larger compressor.
__________________
Sincerely, Neil

http://neilblanchard.blogspot.com/
  Reply With Quote
The Following 2 Users Say Thank You to NeilBlanchard For This Useful Post:
JethroBodine (09-19-2011), Sven7 (09-21-2011)
Old 09-19-2011, 10:05 PM   #300 (permalink)
Master EcoModder
 
NeilBlanchard's Avatar
 
Join Date: May 2008
Location: Maynard, MA Eaarth
Posts: 7,907

Mica Blue - '05 Scion xA RS 2.0
Team Toyota
90 day: 42.48 mpg (US)

Forest - '15 Nissan Leaf S
Team Nissan
90 day: 156.46 mpg (US)

Number 7 - '15 VW e-Golf SEL
TEAM VW AUDI Group
90 day: 155.81 mpg (US)
Thanks: 3,475
Thanked 2,950 Times in 1,844 Posts
I have some thoughts on how to avoid the cotton candy issue, like making shorter pieces so the bit doesn't heat up as much and gets lifts out of the groove frequently, or erasing very small bits of the edges and adding a separate "path" to split up the long cuts and to get the bit to lift out periodically. I will also try to cut through the foam (getting the full 2" is a challenge) so that the cutting dust will fall out of the slot, and I can add tabs (an auto function) so that the pieces remain attached.

Also, with some wheeled guides on the sides, I can prevent the sheet from skewing (which is very important for the accuracy of the pieces) AND it will let the bit only cut on the bottom inch or so. ALL the cotton candy globs are forming at the top of the flutes; when the cut strays from the first groove. I'll clean the filter in the vacuum (it is central system) so that there is as much velocity from that as possible.

Here's some pictures of the F1 section next to my Scion xA for a scale comparison:


__________________
Sincerely, Neil

http://neilblanchard.blogspot.com/
  Reply With Quote
The Following 2 Users Say Thank You to NeilBlanchard For This Useful Post:
Rokeby (09-19-2011), Sven7 (09-21-2011)
Reply  Post New Thread


Powered by vBulletin® Version 3.8.11
Copyright ©2000 - 2024, vBulletin Solutions Inc.
Content Relevant URLs by vBSEO 3.5.2
All content copyright EcoModder.com