 06-01-2011, 02:40 PM
|
#11 (permalink)
|
|
PSmodder lurker
Join Date: Jan 2009
Location: Chino
Posts: 1,605
Thanks: 26
Thanked 911 Times in 522 Posts
|
Very viable. Some alignment concerns because of the tapered sides. It would require wider track platforms for the two sliding shells. Weather-seals around the top & sides. Lock down pins and you're good to go.
Use as your idea board and good luck on your project.


Last edited by botsapper; 06-01-2011 at 03:21 PM..
|
|
|

|
|
The Following 3 Users Say Thank You to botsapper For This Useful Post:
|
|
 Today Today
|
|
|
|
 Other popular topics in this forum...
|
|
|
|
 06-01-2011, 03:38 PM
|
#12 (permalink)
|
|
Master EcoModder
Join Date: May 2011
Location: Indiana
Posts: 1,194
Thanks: 112
Thanked 511 Times in 213 Posts
|
Nice pics! I'm not sure if I'l actually make the sections telescoping. For one thing, I don't like the sudden steps (which would be necessary if the sections telescoped). Maybe someday, but right now I'm trying to keep things simple, study, and practical. I'm thinking 3 fixed sections and using some rubber strips (maybe weatherstriping) to overlap the joints and keep the water out--attach the stips to the front section and overlap the rear section.
|
|
|

|
 06-01-2011, 07:58 PM
|
#13 (permalink)
|
|
EcoModding Apprentice
Join Date: Apr 2011
Location: Houston
Posts: 228
Thanks: 0
Thanked 23 Times in 17 Posts
|
It sounds like a good idea to me, and fairly do-able.
|
|
|

|
 06-01-2011, 08:47 PM
|
#14 (permalink)
|
|
T-100 Road Warrior
Join Date: Apr 2008
Location: The Woodlands, TX
Posts: 1,921
Thanks: 3,502
Thanked 1,395 Times in 968 Posts
|
Kinda reminds me of the AirZooka...
ThinkGeek :: Airzooka Air Gun
__________________
Dark Aero-The world's first aerodynamic single wheel boat tail!

|
|
|

|
 06-02-2011, 06:59 AM
|
#15 (permalink)
|
|
Recreation Engineer
Join Date: Dec 2009
Location: Somewhere USA
Posts: 525
Thanks: 333
Thanked 138 Times in 103 Posts
|
Quote:
Originally Posted by botsapper

Very viable. Some alignment concerns because of the tapered sides. It would require wider track platforms for the two sliding shells. Weather-seals around the top & sides. Lock down pins and you're good to go.
Use as your idea board and good luck on your project.

 |
Your CGI skills are first rate. A picture is worth a thousand words. Very cool! 
|
|
|

|
 06-02-2011, 11:36 AM
|
#16 (permalink)
|
|
Master EcoModder
Join Date: May 2011
Location: Indiana
Posts: 1,194
Thanks: 112
Thanked 511 Times in 213 Posts
|
Ok, so my drawings aren't nearly as pretty, but here's the general shape that I thinking of. I still have to re-draw the rib profiles into my 3-section idea. Basically what I did is slope the center peak downward at 11 degrees and slowly transition from the cab shape to a sideways half-oval shape. This way there are no steep transitions.
|
|
|

|
 06-02-2011, 01:42 PM
|
#17 (permalink)
|
|
Master EcoModder
Join Date: Feb 2011
Location: Phillips, WI
Posts: 1,019
Thanks: 192
Thanked 467 Times in 287 Posts
|
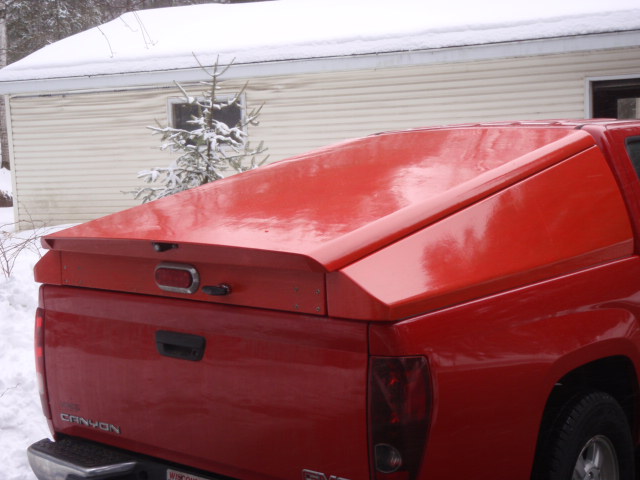
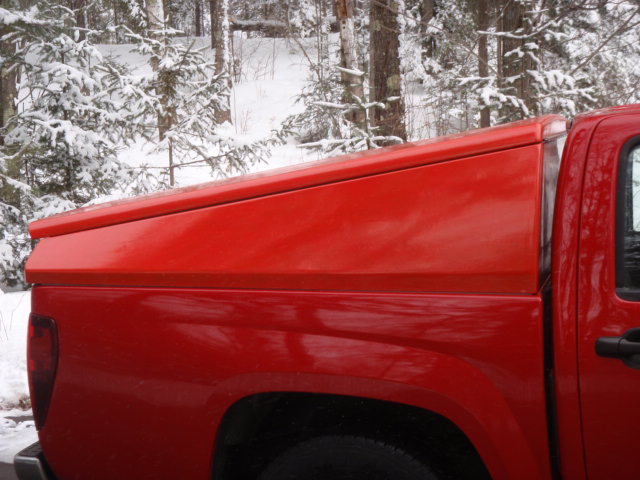
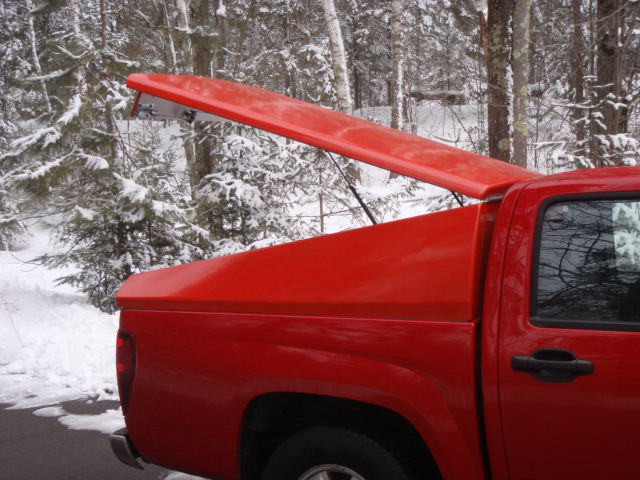
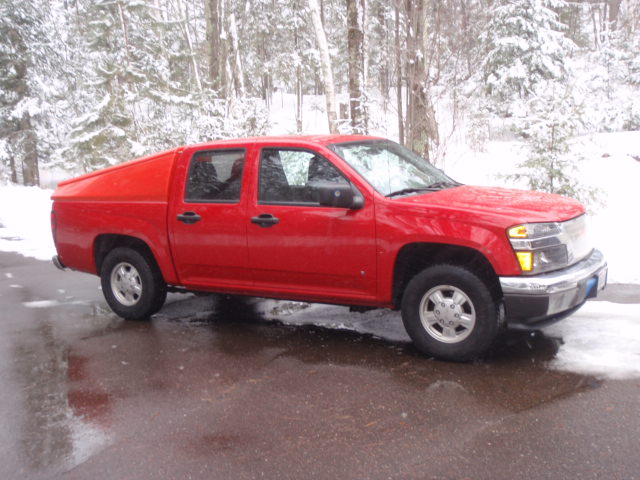
Take a look at the hinged aero topper I built for my truck. Photos are in my profile. It is built in four pieces that bolt together. The top can be removed in a few minutes - unplug wire harness, unclip the gas struts, pull hinge pin, lift off.
The largest (and unexpected) benefit is that I can stand under it when loading stuff.
|
|
|

|
 06-02-2011, 02:51 PM
|
#18 (permalink)
|
|
Master EcoModder
Join Date: May 2011
Location: Indiana
Posts: 1,194
Thanks: 112
Thanked 511 Times in 213 Posts
|
JR, I like your cap. It looks really sharp! No offense to some of the others who have put together aero-caps, but I want something that doesn't look like some garbage duct taped together.
What type of epoxy did you use? Did you use 1 or 2 layers of 1/4" plywood?
|
|
|

|
 06-02-2011, 10:05 PM
|
#19 (permalink)
|
|
Master EcoModder
Join Date: Feb 2011
Location: Phillips, WI
Posts: 1,019
Thanks: 192
Thanked 467 Times in 287 Posts
|
The top is two layers of underlayment luaun (sp?) plywood nominally 1/4" thick, but actually 3/16" thick, so the total thickness is 3/8". The sides are one layer of that plywood because the spans are shorter. Years ago I built a topper with one layer of 1/4" fir plywood. That one sagged between the ribs after a year or two.
All joints were glued with Titebond II or III or whatever. It's the latest and greatest Titebond.
After sanding and filling defects with Bondo, I sealed with one coat of West System epoxy. I buy it in the gallon resin / quart hardener size and leave the pumps on the cans. I use the 206 slow hardener. I've been buying it from Aircraft Spruce.
Sand off the high spots, spray on some sandable primer, use up a whole tube of spot glaze, finish the second spray can of sandable primer, and brush on gloss enamel from the local hardware store. Wet sand the enamel, brush on another coat, repeat until sick of painting, put on truck. Done.
|
|
|

|
|
The Following 2 Users Say Thank You to JRMichler For This Useful Post:
|
|
 06-03-2011, 07:13 AM
|
#20 (permalink)
|
|
Recreation Engineer
Join Date: Dec 2009
Location: Somewhere USA
Posts: 525
Thanks: 333
Thanked 138 Times in 103 Posts
|
Quote:
Originally Posted by Diesel_Dave

JR, I like your cap. It looks really sharp! No offense to some of the others who have put together aero-caps, but I want something that doesn't look like some garbage duct taped together.
What type of epoxy did you use? Did you use 1 or 2 layers of 1/4" plywood?
|
Quote:
Originally Posted by JRMichler

The top is two layers of underlayment luaun (sp?) plywood nominally 1/4" thick, but actually 3/16" thick, so the total thickness is 3/8". The sides are one layer of that plywood because the spans are shorter. Years ago I built a topper with one layer of 1/4" fir plywood. That one sagged between the ribs after a year or two.
All joints were glued with Titebond II or III or whatever. It's the latest and greatest Titebond.
After sanding and filling defects with Bondo, I sealed with one coat of West System epoxy. I buy it in the gallon resin / quart hardener size and leave the pumps on the cans. I use the 206 slow hardener. I've been buying it from Aircraft Spruce.
Sand off the high spots, spray on some sandable primer, use up a whole tube of spot glaze, finish the second spray can of sandable primer, and brush on gloss enamel from the local hardware store. Wet sand the enamel, brush on another coat, repeat until sick of painting, put on truck. Done.
|
I agree - looks nice. Linking pix here for convenience.


Short of your own thread it would be good to know about how much it weighs. Also what MPG difference with versus without the cap.
|
|
|

|
|