Go Back   EcoModder Forum > EcoModding > DIY / How-to
Register Now
 Register Now
 

Reply  Post New Thread
 
Submit Tools LinkBack Thread Tools
Old 07-13-2011, 04:21 AM   #1 (permalink)
Enthusiastic EcoModder
 
Join Date: Dec 2010
Location: San Diego
Posts: 90

Gnatmobile - '96 Geo Metro LSI
90 day: 44.68 mpg (US)

theRAV - '01 Toyota RAV4 NV
90 day: 21.07 mpg (US)

ACCELICA - '95 Toyota Celica GT Convertible
Last 3: 23.46 mpg (US)

The Van - '05 Chevrolet Uplander LS LWB
90 day: 21.04 mpg (US)
Thanks: 4
Thanked 31 Times in 12 Posts
How-To: Metro Kammback with Window!

First I must thank metroMPG for his inspiring innovation, measurements and suggestions, they were invaluable in making this happen. My goal was simply to mimic the shape and size of his kammback but construct it more simply with aluminum and coreplast and the addition of a plexiglass window for improved rear view.
Here are the tools/supplies needed:
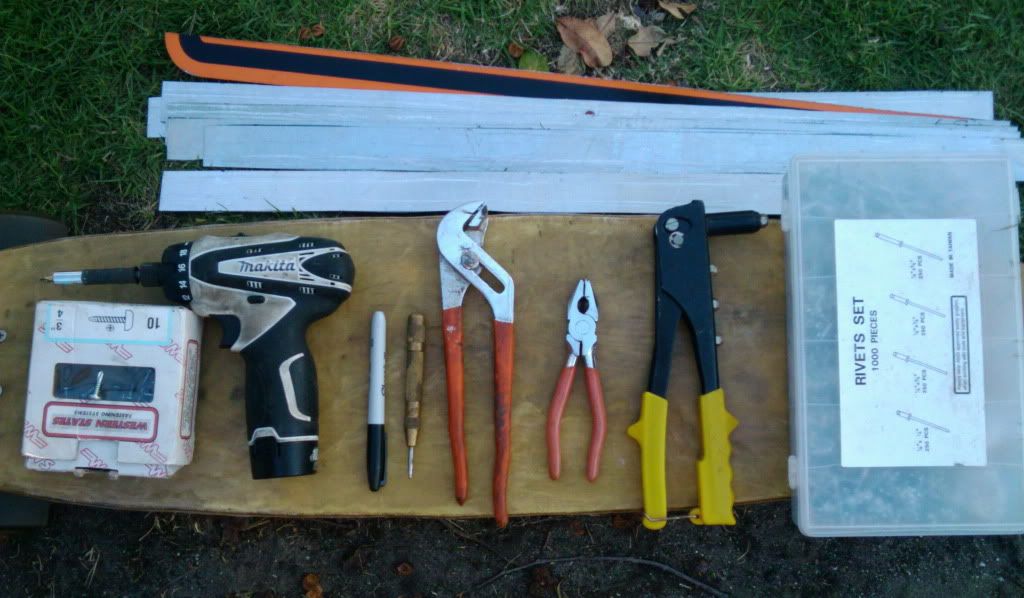
  • Aluminum bar stock or strips. (I cut up an aluminum construction sign I purchased at a scrap yard)
  • Self Tapping Screws
  • Tinsnips (these worked amazingly well for aluminum trimming/cutting)
  • Drill with drill bits and screwdriver bits
  • permanent marker
  • Metal Punch (optional but helpful)
  • two sets of pliers (for bending the aluminum)
  • Rivets/Rivet tool (optional - I ended up not using it)
  • Coreplast
  • plexiglass
  • Boxcutter or razorknife
  • Tape for sealing/smoothing edges
  • Time - about 5 hours
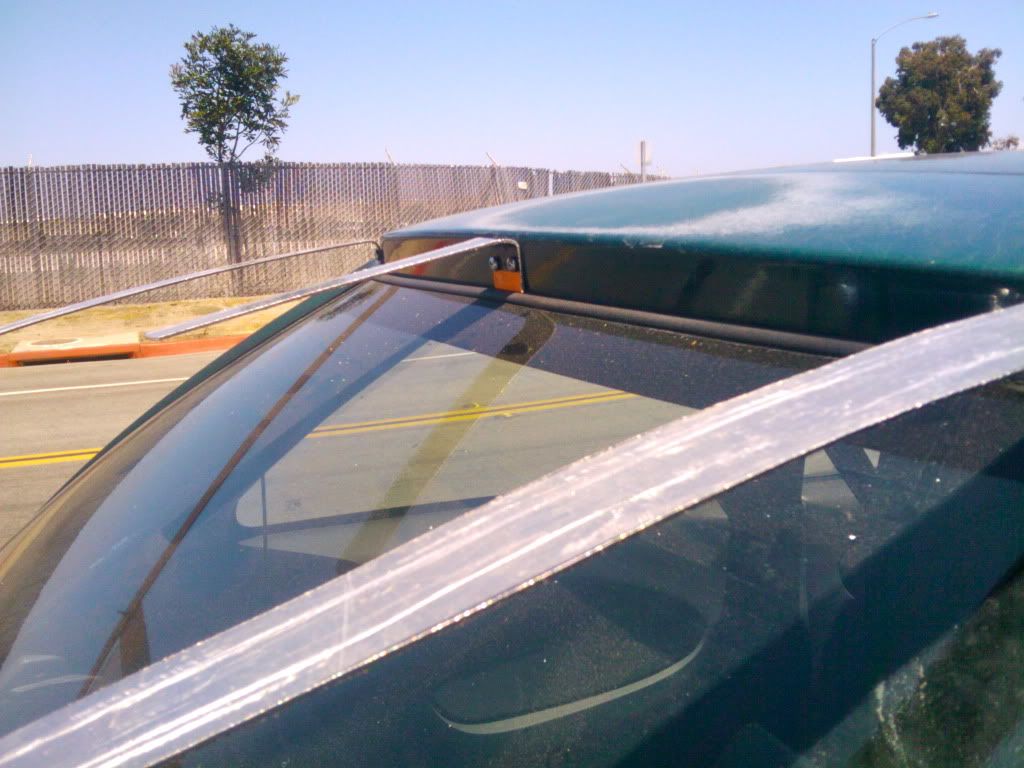
STEP 1: Using the self-tapping screws attach two equal lengths of aluminum to the hatch above the window (Yes I drilled into the car) right around the width of the drip rails. Bend them roughly to a 15% angle from the roof and be sure your bend is about 1/4 inch short of the actual roofline (so the coreplast will sit flush when attached on top. I recommend you 1) use both sets of pliers to grab and bend the aluminum precisely where you intend to, and 2) hold the aluminum in place and use the metalpunch to mark the spots you want to install the screws. Step 1 should look something like this:
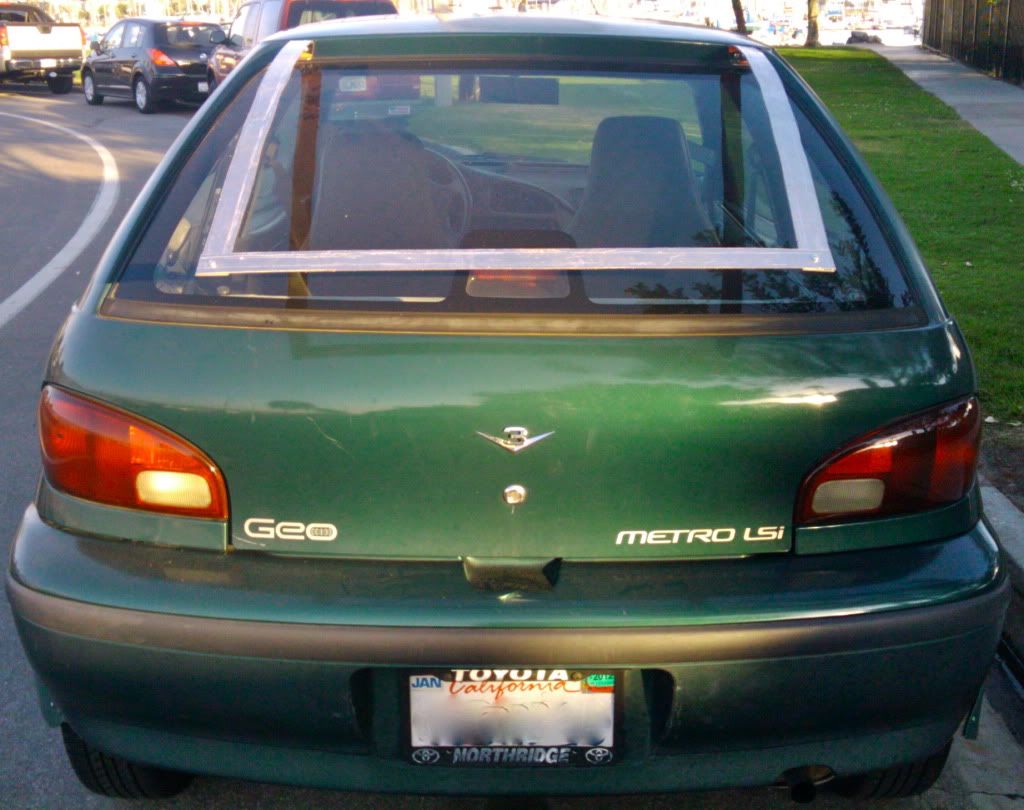
Step 2: cut a strip of aluminum to be roughly the same length as the distance between drip rails and - using the self tapping screws (even if you plan on riveting later - because you'll be adding lots more layers to these drill points) - attach the ends to the ends of your first two pieces so that you have something like this:
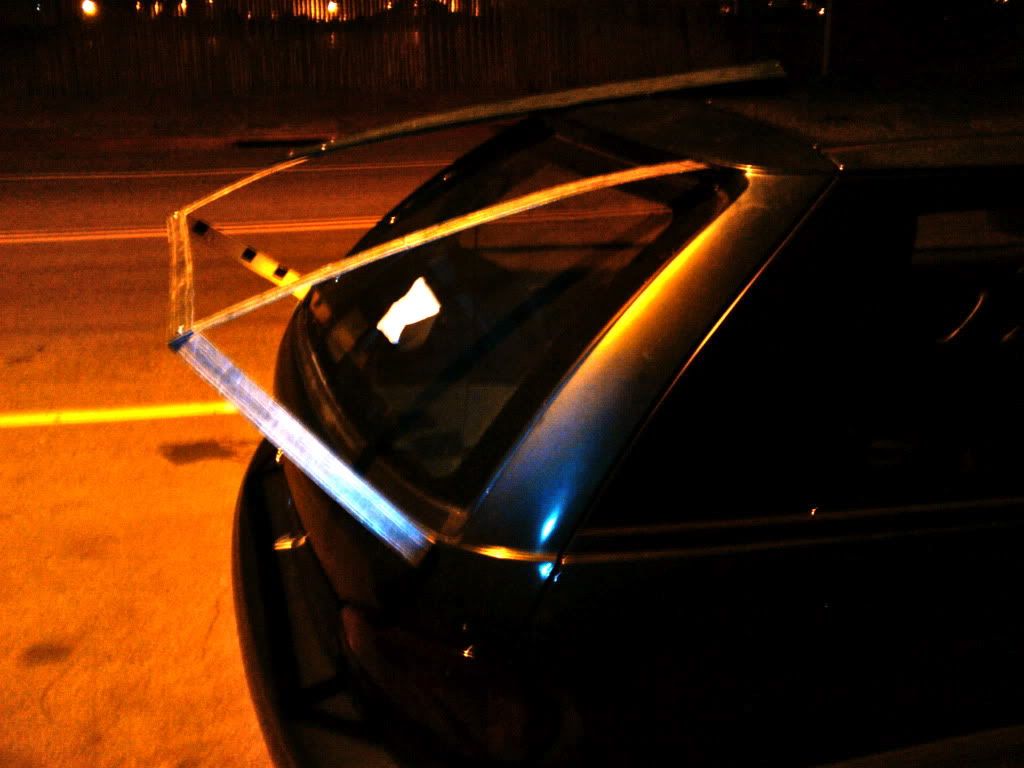
Step 3: Build the bottom outside braces. For these I chose to screw into the hatch again, this time between the taillights and the hatch window. Bend them so they will make a correct angle toward the ends of your trailing cross piece (again leave about 1/4 of an inch to accommodate the coreplast you'll be adding). Ensure you have the correct angle then using the pliers bend the end not attached to the car so that it will hold up the rear corner of the kammback. The angle will be funky and leave some extra aluminum sticking out, mark it with the marker and trim it with the tinsnips. Do this on both sides and then screw the braces in using your existing self-tappers. Should look something like this (except hopefully you're working in the day):
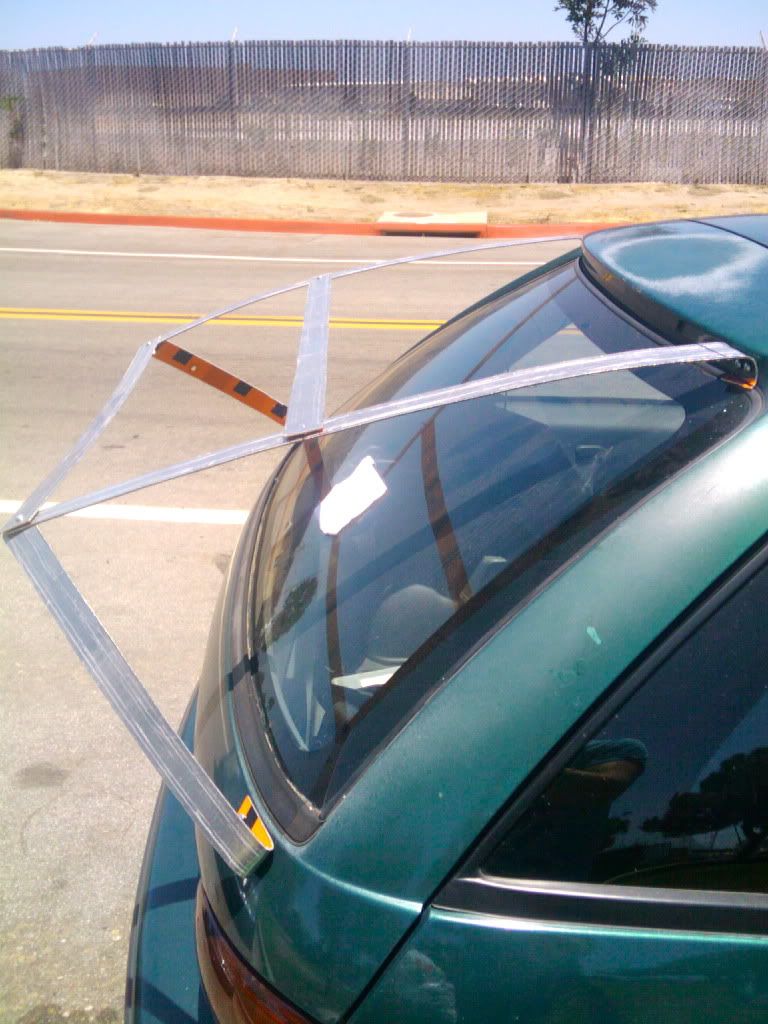
Step 4: I fitted a plexiglass scrap I picked up at the plastics place to ride across the top of the kammback overlapping the aluminum all the way to the trailing edge. I then tied in one more crossmember of aluminum to act as a support for the leading edge of this window. I suggest you lay it in place then screw it on then mark and trim it. I originally made it match the length of the trailing crossmember but it need up kinda closing the width of the whole thing so I undid those screws and redrilled. You can see the crossbrace here:
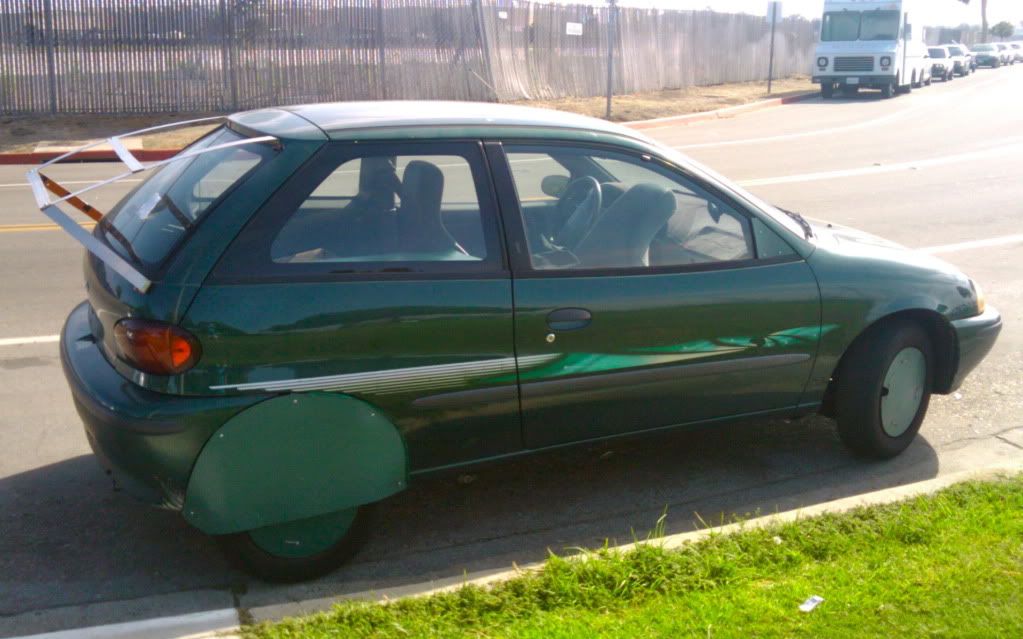
Step 5: Step back to admire your skeleton and compare it with MetroMPG's (his was tuft-tested and adjusted to near perfection). At this point I began to get excited:
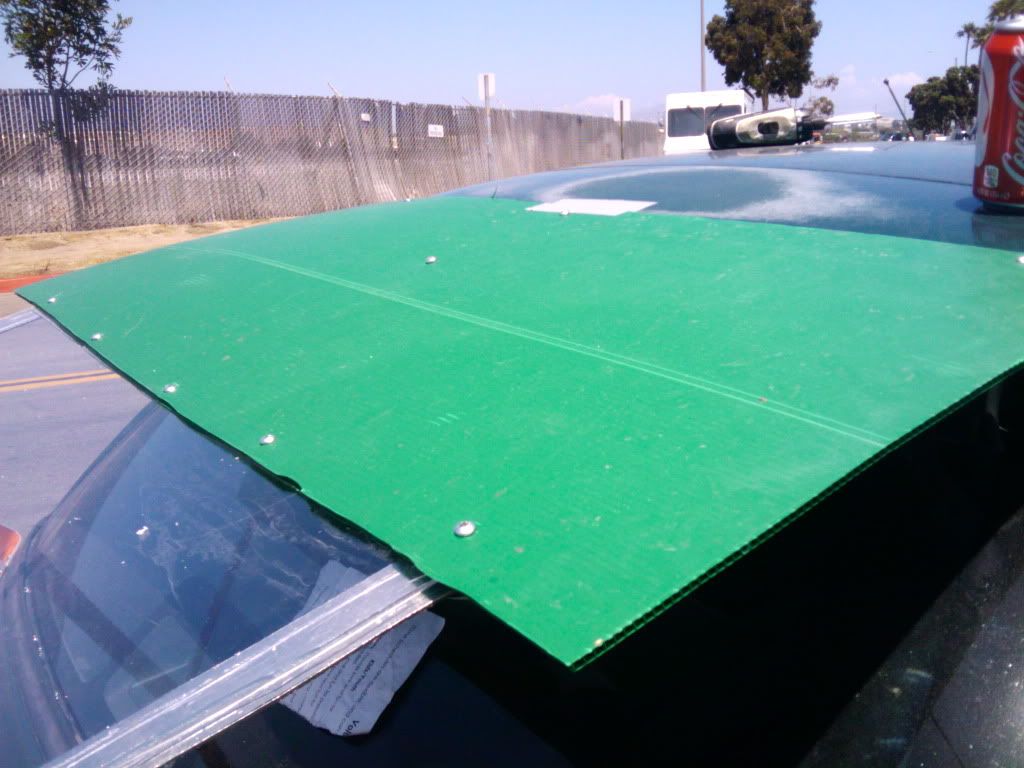
Step 6: Cut a generous piece of coreplast to the rough shape of the roofline, width of the kammback top, so that it extends down over top frame of the window. Should look something like:
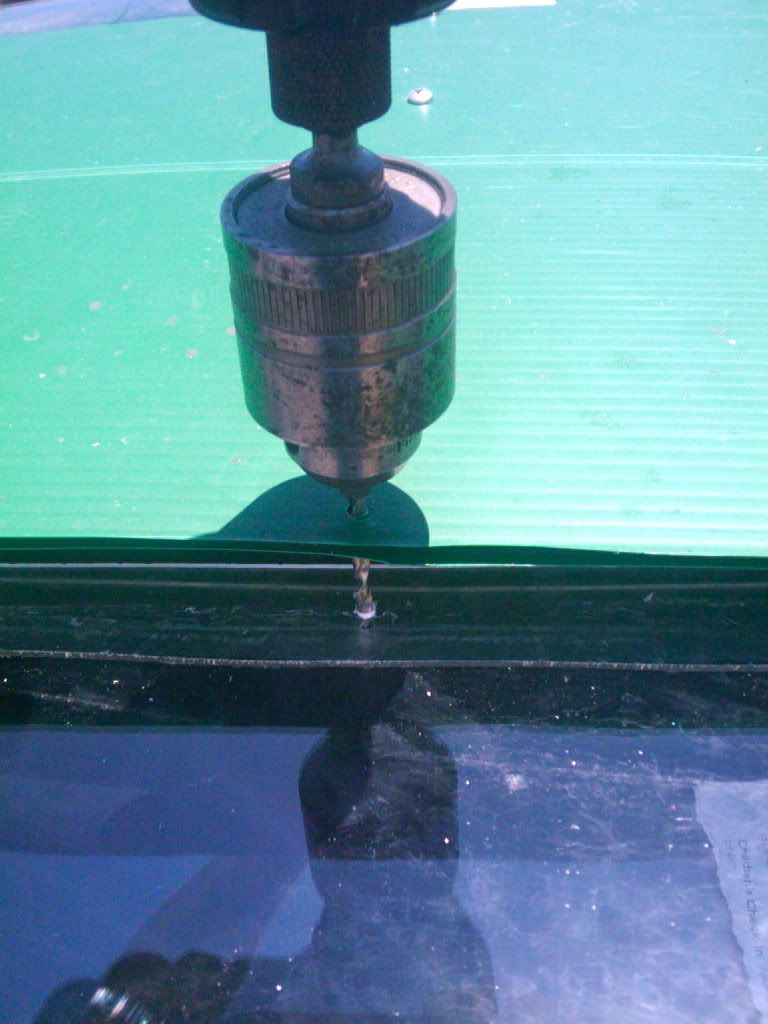
Step 7:One at a time pull the screws that make up the kamm-window frame, carefully mark and drill through the plexiglass and install it over the top of the frame. Be really careful to pre-drill, I recommend you do not use self tappers until you've predrilled and definitely don't use the metalpunch to mark your drill spot. Once this is done, begin securing the coreplast to the plexi, to the aluminum. You can see that here:
This was feeling a little flimsy in the middle so I added another brace at the top of the hatch. It looks like this:

Once everything is in place trim the coreplast top layer along the side edges of the kammback top so that it can be bent down.
Step 8: Hold a piece of coreplast along one side of the kammback and trace a marker around things to make a good template for the side. Cut it like so:
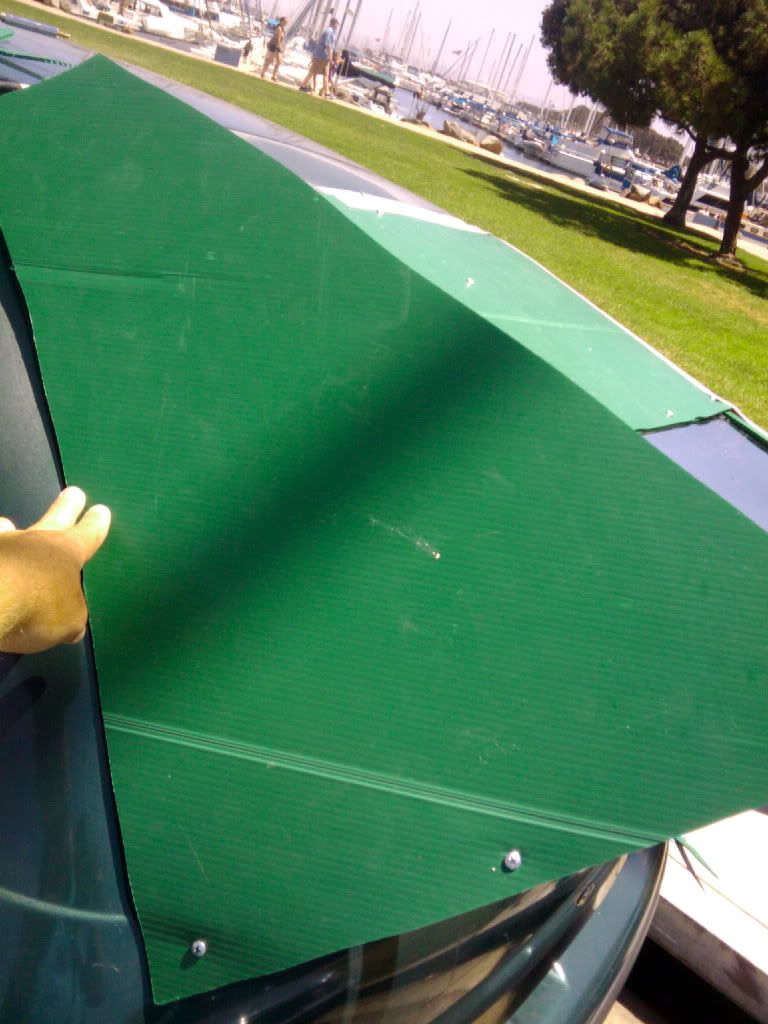
Step 9 Trim the top layer of the coreplast side pieces along the side edges of the kammback top so that it can be bent to and attached from the top. Should look something like this:
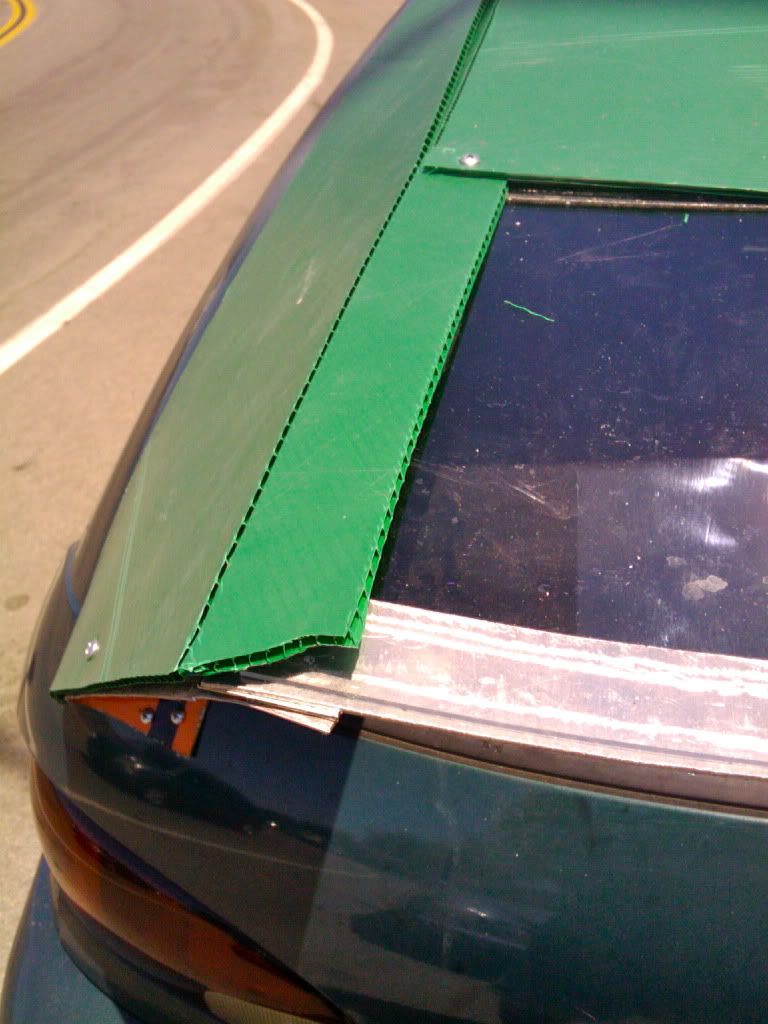
Tep10: Attach coreplast with a generous amount of screws and figure out how you'll trim/overlap the extra bits like so:
from this...
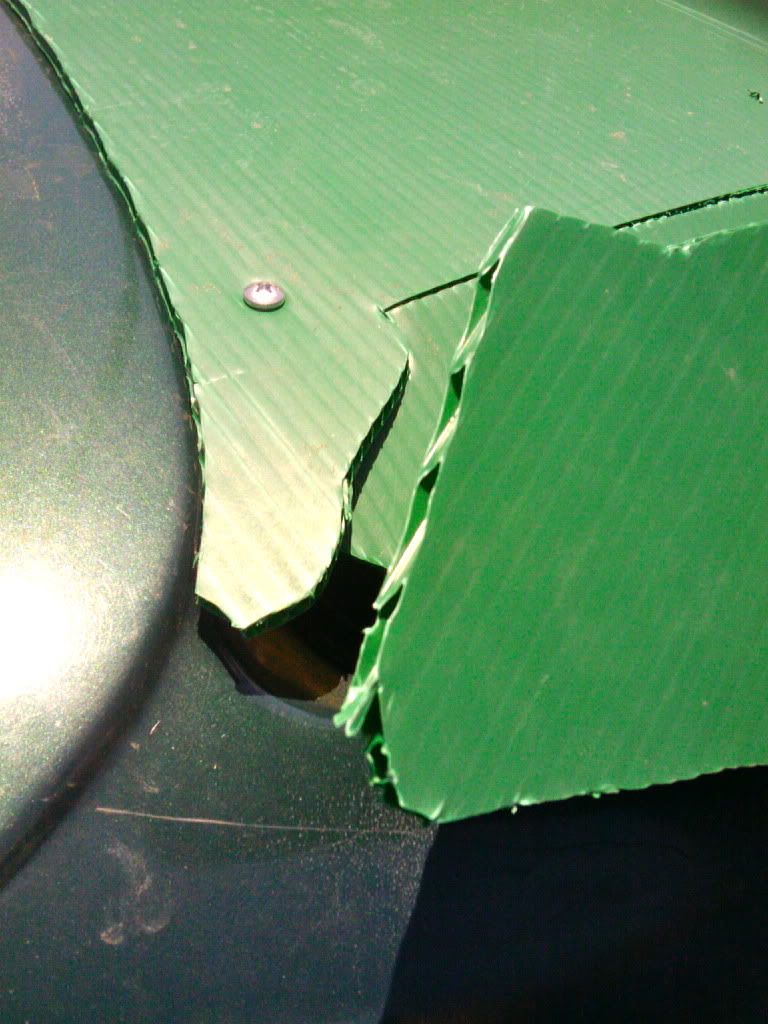
to this...
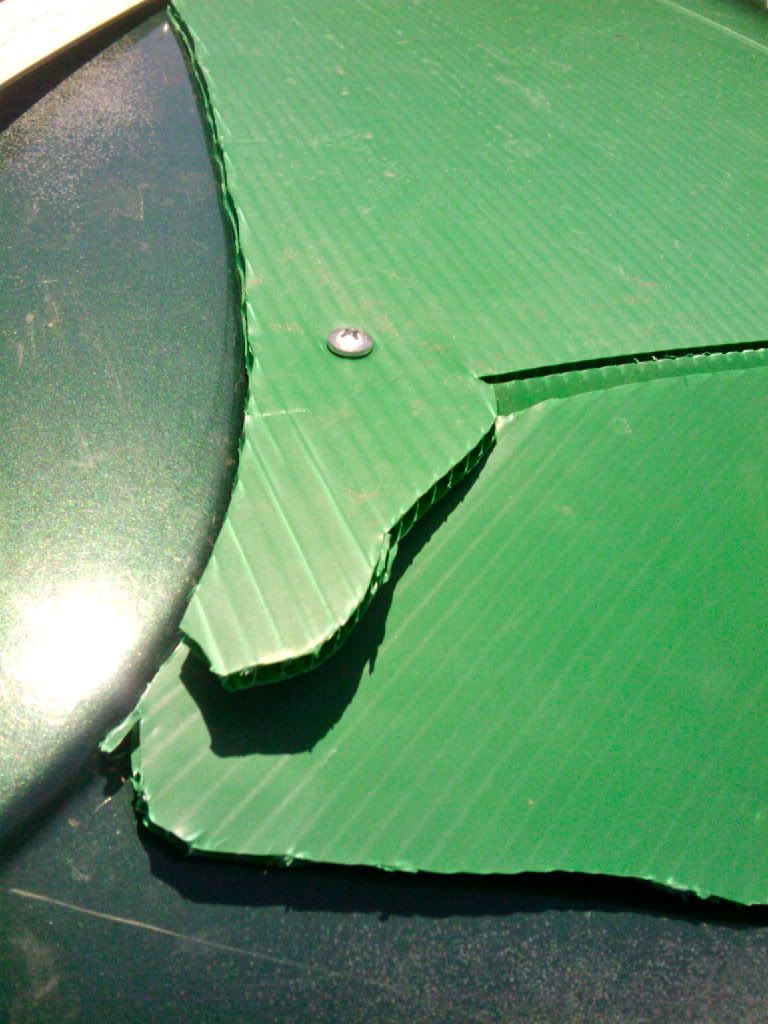
and this...
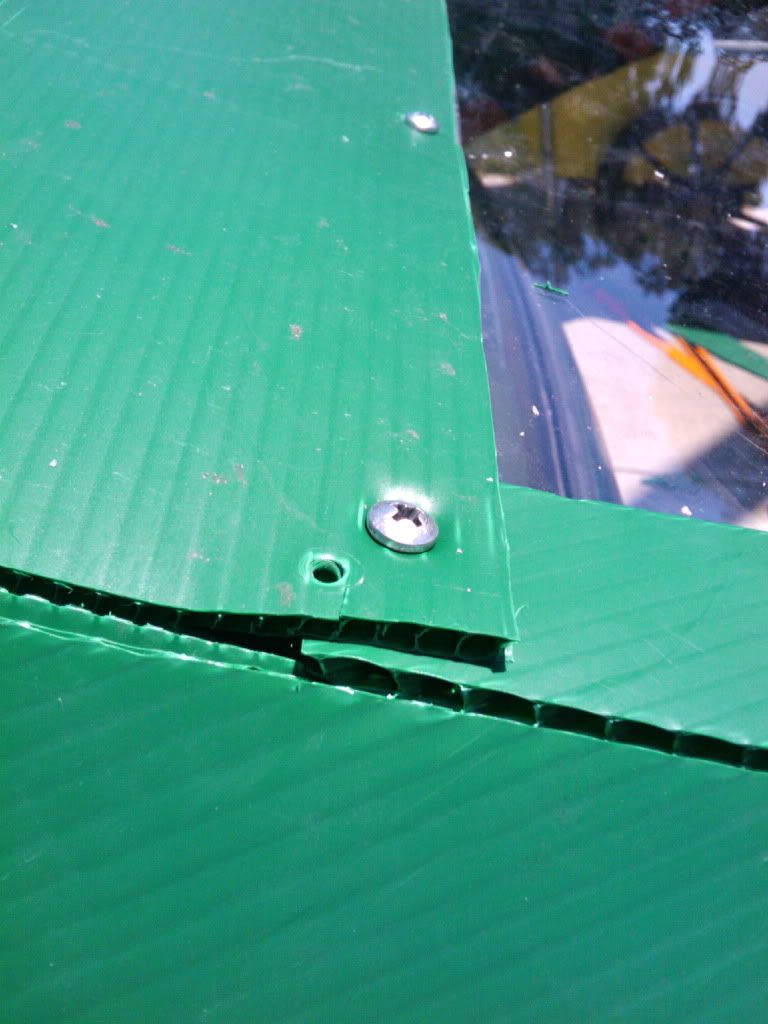
Step 11: At this point the whole thing is pretty solid but i wanted to be sure air wasn't catching on things and would flow smoothly so I added tape to the car's connection points like so:
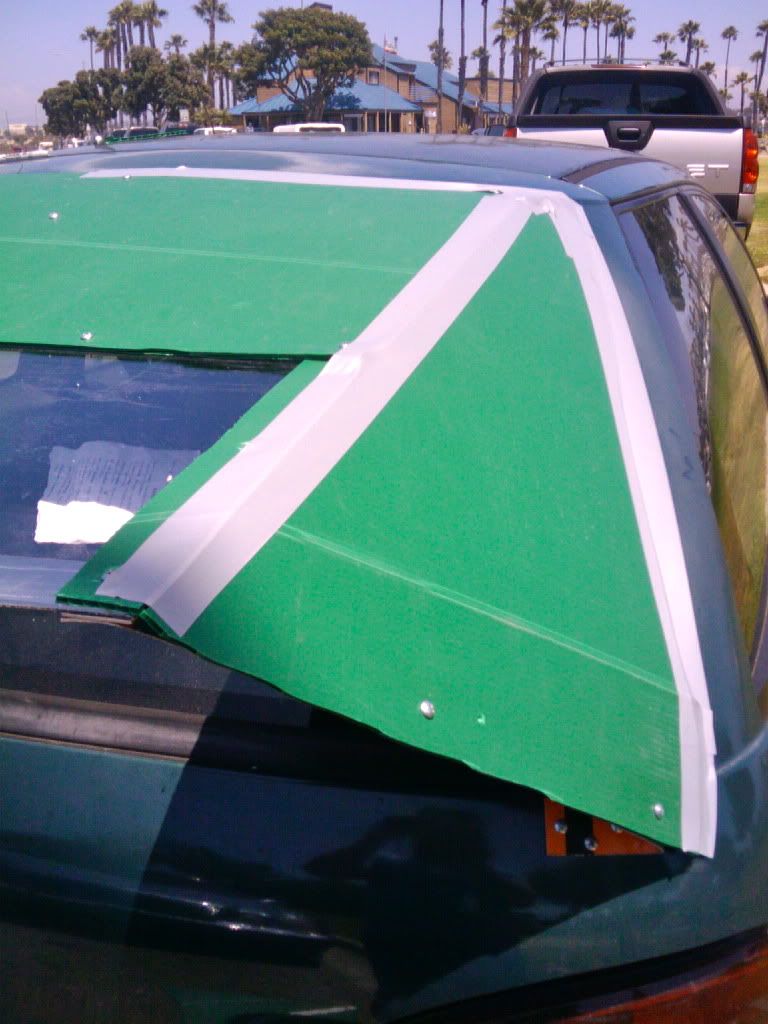
I'm not a fan of the tape color, I'll either paint the tape green or find green tape soon.
Check out how little of the window is actually blocked with the addition of the plexi-window:
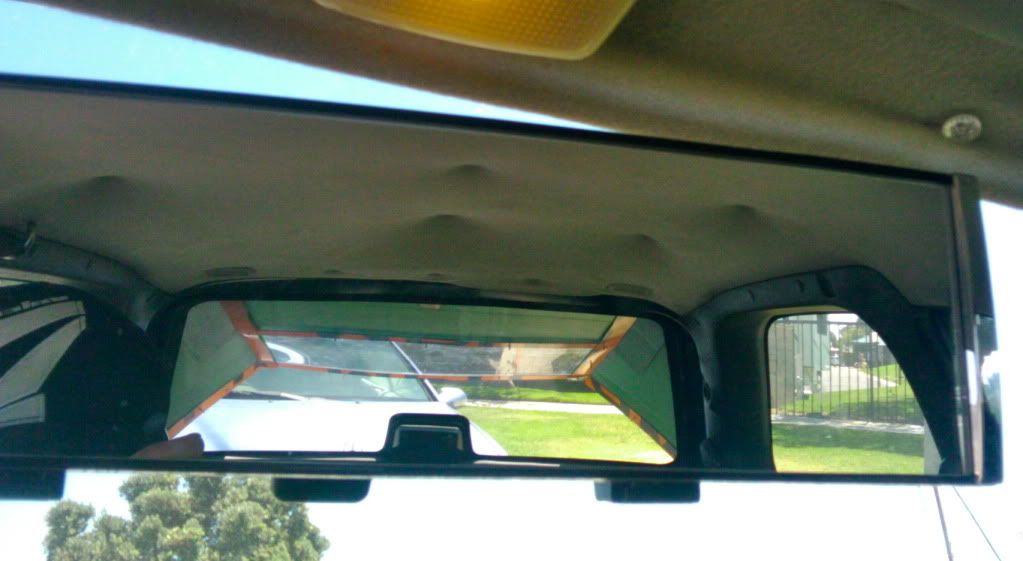
View from back:
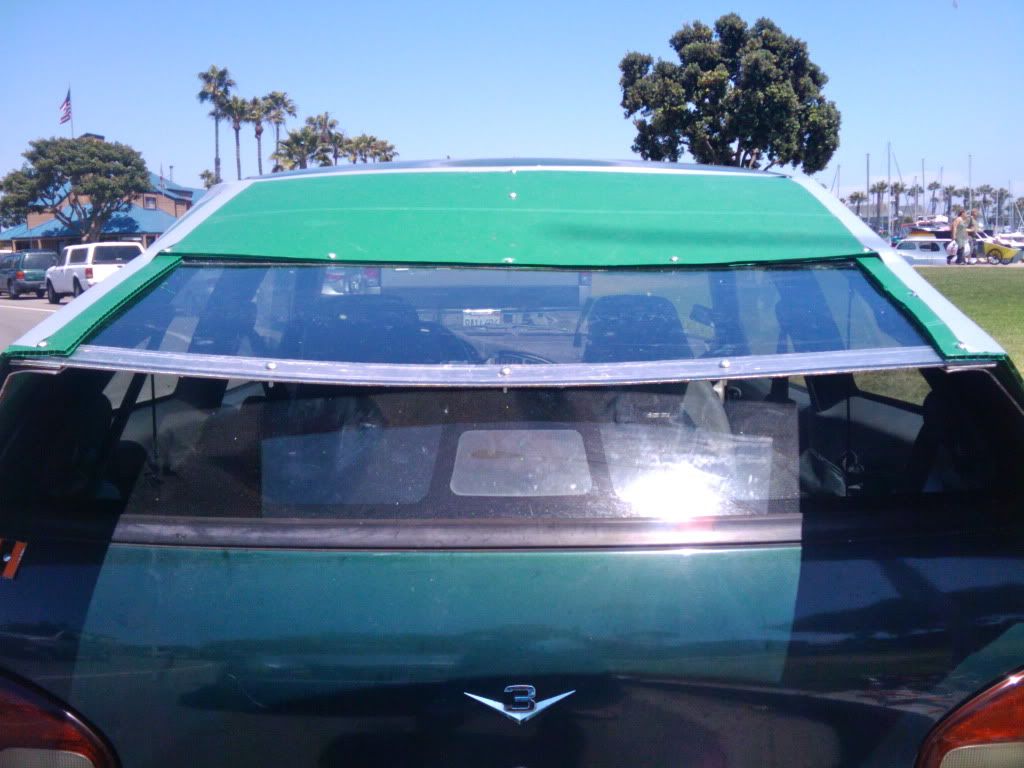
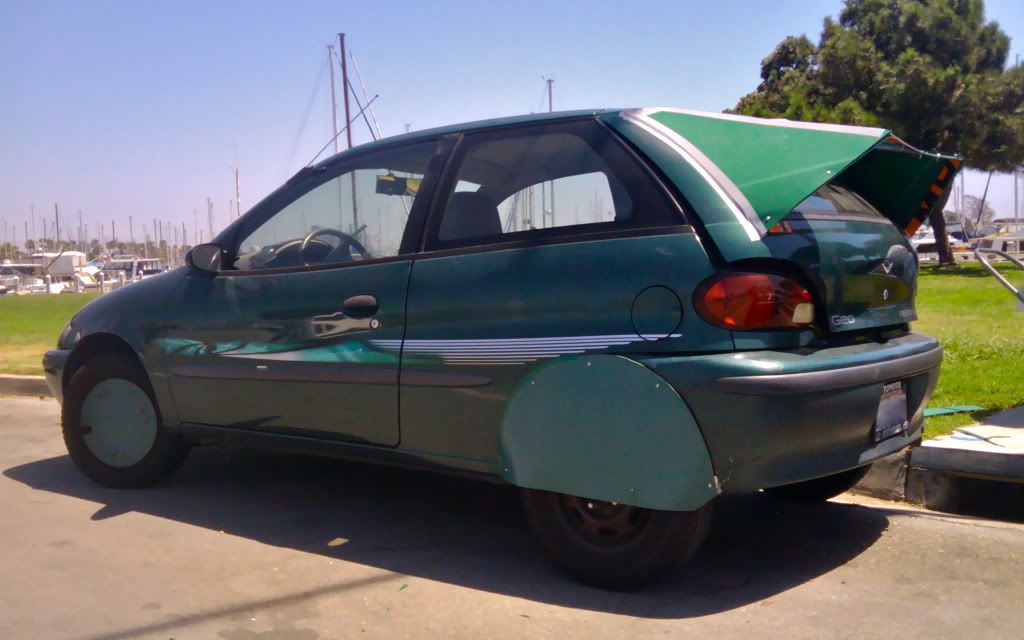
Because I screwed the plexiglass window in at the four corners then into the middle (rather than from the middle out) it caused the top of the kammback to bow or sag a bit:
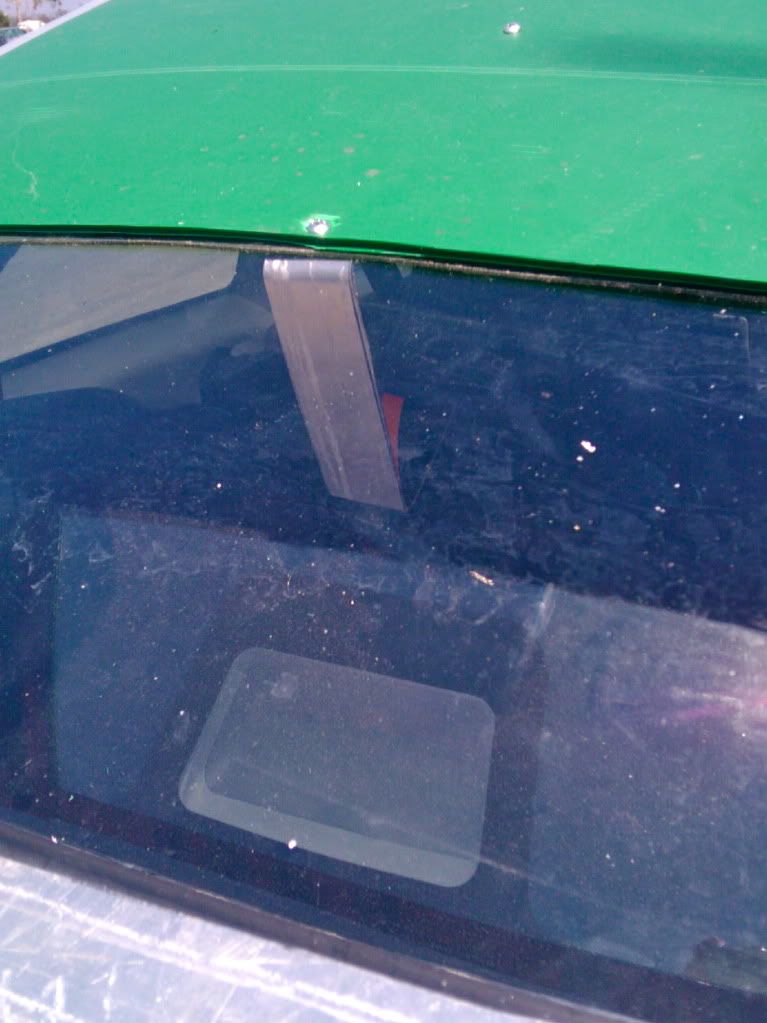
To fix this I added a brace that simply pushes out from the window:
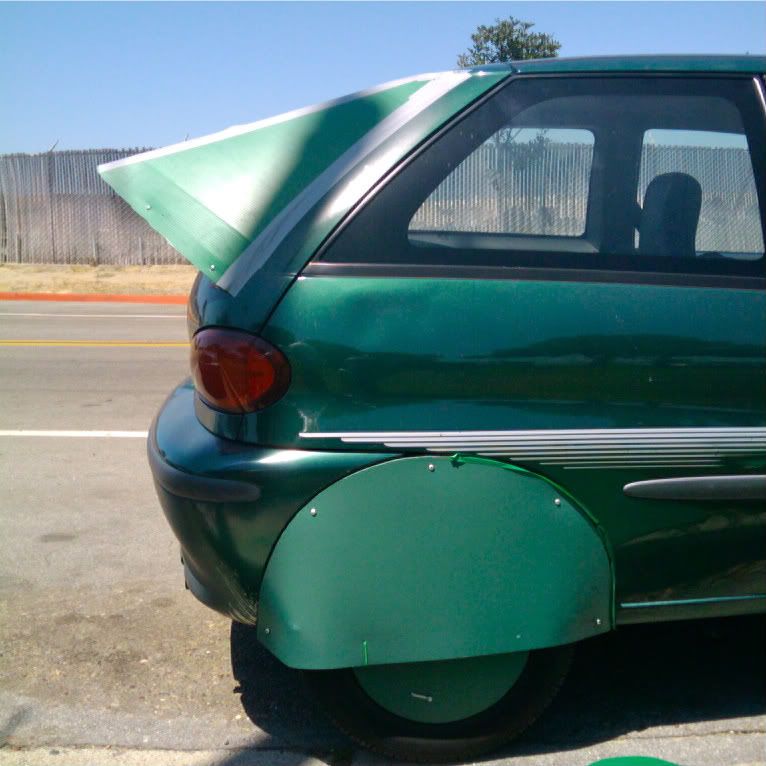
Here's the finished product:
  Reply With Quote
The Following 2 Users Say Thank You to Geo Metropolis For This Useful Post:
noxman (03-02-2013), Piwoslaw (07-13-2011)
Alt Today
Popular topics

Other popular topics in this forum...

   
Old 07-13-2011, 09:13 AM   #2 (permalink)
Administrator
 
Daox's Avatar
 
Join Date: Dec 2007
Location: Germantown, WI
Posts: 11,203

CM400E - '81 Honda CM400E
90 day: 51.49 mpg (US)

Daox's Grey Prius - '04 Toyota Prius
Team Toyota
90 day: 49.53 mpg (US)

Daox's Insight - '00 Honda Insight
90 day: 64.33 mpg (US)

Swarthy - '14 Mitsubishi Mirage DE
Mitsubishi
90 day: 56.69 mpg (US)

Daox's Volt - '13 Chevrolet Volt
Thanks: 2,501
Thanked 2,585 Times in 1,553 Posts
Nice job. Have you done any testing with it?
__________________
Current project: A better alternator delete
  Reply With Quote
Old 09-29-2011, 10:16 AM   #3 (permalink)
Batman Junior
 
MetroMPG's Avatar
 
Join Date: Nov 2007
Location: 1000 Islands, Ontario, Canada
Posts: 22,513

Blackfly - '98 Geo Metro
Team Metro
Last 3: 70.09 mpg (US)

MPGiata - '90 Mazda Miata
90 day: 52.71 mpg (US)

Even Fancier Metro - '14 Mitsubishi Mirage top spec
90 day: 70.75 mpg (US)

Appliance car - '14 Mitsubishi Mirage ES (base)
90 day: 60.16 mpg (US)
Thanks: 4,058
Thanked 6,957 Times in 3,602 Posts
I like the window idea.

My only other comment is it's probably best to try to avoid "hard" corners at the transition from the "top" surface to the "side" surfaces, if possible. But with this construction technique, that's harder to do.
__________________
Project MPGiata! Mods for getting 50+ MPG from a 1990 Miata
Honda mods: Ecomodding my $800 Honda Fit 5-speed beater
Mitsu mods: 70 MPG in my ecomodded, dirt cheap, 3-cylinder Mirage.
Ecodriving test: Manual vs. automatic transmission MPG showdown


EcoModder
has launched a forum for the efficient new Mitsubishi Mirage
www.MetroMPG.com - fuel efficiency info for Geo Metro owners
www.ForkenSwift.com - electric car conversion on a beer budget
  Reply With Quote
Old 09-29-2011, 05:03 PM   #4 (permalink)
...beats walking...
 
Join Date: Jul 2009
Location: .
Posts: 6,190
Thanks: 179
Thanked 1,525 Times in 1,126 Posts
..."soften" the corners with Duck-Tape™ (ha,ha)
  Reply With Quote
Old 09-29-2011, 09:00 PM   #5 (permalink)
OCD Master EcoModder
 
brucepick's Avatar
 
Join Date: Dec 2007
Location: Eastern CT, USA
Posts: 1,933

Outasight - '00 Honda Insight
Team Honda
Gen-1 Insights
90 day: 54.18 mpg (US)
Thanks: 429
Thanked 391 Times in 261 Posts
Just saw your gas log - nice work!
Over 50 mpg on your latest tank.
__________________
Coast long and prosper.
Driving '00 Honda Insight, acquired Feb 2016.


  Reply With Quote
Old 09-30-2011, 01:11 PM   #6 (permalink)
Enthusiastic EcoModder
 
Join Date: Dec 2010
Location: San Diego
Posts: 90

Gnatmobile - '96 Geo Metro LSI
90 day: 44.68 mpg (US)

theRAV - '01 Toyota RAV4 NV
90 day: 21.07 mpg (US)

ACCELICA - '95 Toyota Celica GT Convertible
Last 3: 23.46 mpg (US)

The Van - '05 Chevrolet Uplander LS LWB
90 day: 21.04 mpg (US)
Thanks: 4
Thanked 31 Times in 12 Posts
Quote:
Originally Posted by MetroMPG View Post
My only other comment is it's probably best to try to avoid "hard" corners at the transition from the "top" surface to the "side" surfaces, if possible. But with this construction technique, that's harder to do.
yeah, if i did it again I would try to soften those corners. I don't think that would have been hard to do, but i didn't realize that mattered until much later reading one of your posts on someone else's kammback ideas. I think I could have bent the aluminum to be curved along the back edge and made it round toward the back. I'm not sure the coreplast would have liked that bend but I could do it in ABS or something.

My main tactic has been build what others have proved to work rather than test stuff myself but lately I've really been wanting to do a tuft test just to find out what's going on and identify possible tweaks that would benefit me.
__________________
"You too can get 50 Miles per Gallon, all it will cost is your self-respect."

  Reply With Quote
Old 09-30-2011, 01:12 PM   #7 (permalink)
Enthusiastic EcoModder
 
Join Date: Dec 2010
Location: San Diego
Posts: 90

Gnatmobile - '96 Geo Metro LSI
90 day: 44.68 mpg (US)

theRAV - '01 Toyota RAV4 NV
90 day: 21.07 mpg (US)

ACCELICA - '95 Toyota Celica GT Convertible
Last 3: 23.46 mpg (US)

The Van - '05 Chevrolet Uplander LS LWB
90 day: 21.04 mpg (US)
Thanks: 4
Thanked 31 Times in 12 Posts
Quote:
Originally Posted by brucepick View Post
Just saw your gas log - nice work!
Over 50 mpg on your latest tank.
Thanks! That's been my goal for so long and it felt so great to actually achieve it!
__________________
"You too can get 50 Miles per Gallon, all it will cost is your self-respect."

  Reply With Quote
Old 10-19-2011, 10:32 PM   #8 (permalink)
EcoModding Lurker
 
Join Date: Feb 2011
Location: Roanoke, Virginia
Posts: 8
Thanks: 0
Thanked 0 Times in 0 Posts
What kind of speeds were you traveling to break 50 mpg? I thought metros could do that routinely. Or is that only the previous gen metro? Is yours the 3 cyl? Festivas hit 53 routinely but that' driving 55.
  Reply With Quote
Old 10-20-2011, 09:27 AM   #9 (permalink)
EcoModding Lurker
 
Join Date: Jun 2010
Location: house
Posts: 1
Thanks: 0
Thanked 1 Time in 1 Post
zzz9395

liked your build.
looked up an old intrest of mine,building coroplast model airplanes.
Lots of coroplast building meathodes here.

www spadtothebone com/resources htm

hope this helps "smoothing out the edges"

Cheers

wouldn't let me post a live link...

fill in the dots!!!

Cheers
  Reply With Quote
The Following User Says Thank You to zzz9395 For This Useful Post:
Cd (10-26-2011)
Old 10-21-2011, 04:29 PM   #10 (permalink)
EcoModding Lurker
 
Join Date: Nov 2008
Location: Apache Junction Arizona
Posts: 1
Thanks: 0
Thanked 0 Times in 0 Posts
does that coreplast really hold up to winds at freeway speed? i have watch tarp after tarp fall apart from the buffeting winds at freeway speeds. I know it is much thicker but has anyone had long term success with it? just curious before i try anything with it.
thanks.

  Reply With Quote
Reply  Post New Thread


Thread Tools


Powered by vBulletin® Version 3.8.11
Copyright ©2000 - 2024, vBulletin Solutions Inc.
Content Relevant URLs by vBSEO 3.5.2
All content copyright EcoModder.com