03-04-2012, 08:39 PM
|
#51 (permalink)
|
|
EcoModding Lurker
Join Date: Jan 2012
Location: eugene
Posts: 61
Thanks: 11
Thanked 7 Times in 6 Posts
|
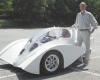
Progress so far
Its been slow going getting my bent peaces made but I'm finally done! I guess I have two peaces for the door, but that wont be to hard.
The frame is sturdier then I expected, and yet lighter at this point. Looking at around 50 pounds at the moment, with about 20 pounds yet to go. A more accurate measurement will come soon. Looking good so far to stay under 150 pounds, as the aluminium sheeting is very light, and should not amount to much more. The entire rear-trunk section will be made form sheeting like an airplane.
So I need to construct the door jam, door, mount the seat, and build the mounting points for the motorcycle at the back and the fork at the front, then I get to chop my bike in half. Fun! Progress will be slow over the next 2 weeks till the end of the term, then should intensify.
This picture is from the door side of the bike, looks kind of nosy doesn't it? My seat is actually 1 foot closer to the rear wheel then the front.

|
|
|

|
 Today Today
|
|
|
|
 Other popular topics in this forum...
|
|
|
|
|
03-04-2012, 09:17 PM
|
#52 (permalink)
|
|
A Legend in his Own Mind
Join Date: Dec 2011
Location: Atlanta
Posts: 281
Thanks: 52
Thanked 91 Times in 54 Posts
|
Quote:
Originally Posted by Electictracer

This picture is from the door side of the bike, looks kind of nosy doesn't it? My seat is actually 1 foot closer to the rear wheel then the front.
|
WAY cool. I love the photo. I assume the color is from lens flare, rather than from something you saw in real life. If so you will need to make up a story about how you had to set up for hours to get the shot just the way you wanted it. You can be the next Ansel Adams.
Really nice work. |
|
|
|
|
03-05-2012, 08:35 AM
|
#53 (permalink)
|
|
Deadly Efficient
Join Date: Jun 2008
Location: Goshen, Indiana
Posts: 1,234
Thanks: 134
Thanked 176 Times in 91 Posts
|
Very cool. Very,very cool.
Will you add any triangulation to the frame, or will the aluminum sheeting be fastened to the frame to provide stiffness? You might consider hanging some weight hung off of a torque tube clamped to one end of the frame. It would be interesting to see how much flex it has, and how it stiffens when you add elements.
Just my two cents worth. You obviously have the project well in hand.
__________________
-Terry
|
|
|
|
|
03-05-2012, 01:12 PM
|
#54 (permalink)
|
|
A Legend in his Own Mind
Join Date: Dec 2011
Location: Atlanta
Posts: 281
Thanks: 52
Thanked 91 Times in 54 Posts
|
Quote:
Originally Posted by Tango Charlie
You might consider hanging some weight hung off of a torque tube clamped to one end of the frame.
|
Good suggestion. What I did with the fuselage for mine was brace one end of the structure (mine has no frame and is fully monocoque) with whatever I had laying around (which happened to be things like wood 2x6's. Then I hung a beam off the other end with weights on it, to twist one end of the structure relative to the other. I put dial indicators at each end (at the braced end to be sure it was not moving much) and subtracted the readings to get a deflection.
I did the same kind of thing (although differently really ... bad science) with the motor scooter frame from which the engine was stolen. I had no value for what was OK for torsional rigidity, so used the scooter as a minimum standard. The monocoque was more than ten times as stiff in torsion -- no surprise because in the scooter frame case, the single tube resisting torsion was about 2" in diameter, whereas the fuselage was about 24", albeit of a much lighter, lower modulus material (wood).
If you use the aluminum skin for triangulation, you may want to bond it in addition to rivets, etc. Otherwise the stresses concentrate around the corners.
On big bumps, the structure will try to bend in a way that puts both sides in compression up at the third tube up. On one side, this is resisted by a straight tube. On the other side is is resisted by a much more flexible structure (where the door goes) If the door has a beam in it, then you'll want a pretty good latch and hinge system to transfer the compression load without play.
If the door does not handle this compression load well, then the diagonals will tend to bend the second-tube-up on the door side. If this tube is stiffened by the aluminum skin below it, the local skin loads (near where the diagonals connect) can be higher than you might want, causing oil canning, etc.
All of which I mention because, perhaps not obviously, I've built structures in the past that ended up more flexible than I would have wanted. It is interesting to play with those cheap steel shelving units that are partially triangulated with a couple braces on the back. They at least don't simply fall over to the side as they could without the bracing, but remain very flexible in torsion (twisting the top shelf relative to the bottom).
There is nothing I've seen that indicates that you are unaware of this stuff. I'm impressed. But sometimes a second pair of eyes will pick up on something that might otherwise go unnoticed until the symptom shows up. |
|
|
|
|
03-08-2012, 03:09 PM
|
#55 (permalink)
|
|
EcoModding Lurker
Join Date: Jan 2012
Location: eugene
Posts: 61
Thanks: 11
Thanked 7 Times in 6 Posts
|
Tango Charlie- Yes I do plan on the skin providing much of the strength for the frame. It would be an interesting experiment to to a before skin and after skin test, but I cant think of a way of doing it with wat limited resources I have at hand.
Quote:
Originally Posted by Ken Fry
If you use the aluminum skin for triangulation, you may want to bond it in addition to rivets, etc. Otherwise the stresses concentrate around the corners.
On big bumps, the structure will try to bend in a way that puts both sides in compression up at the third tube up. On one side, this is resisted by a straight tube. On the other side is is resisted by a much more flexible structure (where the door goes) If the door has a beam in it, then you'll want a pretty good latch and hinge system to transfer the compression load without play.
If the door does not handle this compression load well, then the diagonals will tend to bend the second-tube-up on the door side. If this tube is stiffened by the aluminum skin below it, the local skin loads (near where the diagonals connect) can be higher than you might want, causing oil canning, etc.
|
Another great point Ken, I am concerned about the door cut-out on the left side. I have considered gusseting the triagle braces in the frame there with some thin steal plate welded in, but I cant decide if it is necessary or not, I probably should just do it. It seems like everything I do just adds more weight, and that is becoming a growing concern as I tally things up.
I had not thought about adhesives in addition to rivets. Some quick research revealed some very appealing products that not only increase joint strength, but provide the corrosion barrier necessary when attaching steal to aluminum sheeting. This might be as good or better then zinc chromate paint. BMW is doing this in their cars so it cant be all bad.
Thanks again for the great comments and encouragement, I am purposefully not buying more material so I'm not working in the garage when I should be studying for finals... |
|
|
|
|
03-09-2012, 11:50 AM
|
#56 (permalink)
|
|
Deadly Efficient
Join Date: Jun 2008
Location: Goshen, Indiana
Posts: 1,234
Thanks: 134
Thanked 176 Times in 91 Posts
|
Quote:
Originally Posted by Electictracer
... I am purposefully not buying more material so I'm not working in the garage when I should be studying for finals...
|
Ha, good strategy. Keep the priorities in line. What field of study?
I don't think I would weld in the triangular gussets. If you rivet (and definitely if you end up bonding) the skin to the frame, you will be amazed at the stiffness it will have. Aircraft are riveted structures with their skin riveted to relatively thin sheet bulkheads. It's amazing how stiff this kind of construction is. I can take some pics of interior aircraft structure, if you're interested. Like Colin Chapman of Lotus Cars liked to say, "Simplify and add lightness".
__________________
-Terry
|
|
|
|
|
03-09-2012, 11:58 AM
|
#57 (permalink)
|
|
Deadly Efficient
Join Date: Jun 2008
Location: Goshen, Indiana
Posts: 1,234
Thanks: 134
Thanked 176 Times in 91 Posts
|
Ah, never mind. I just re-read your first post. Electrical engineering. Cool.
Watch out for the cost of aluminum sheet. It could be detrimental to your $2000 budget. 
In my area, I'd hit up the RV manufacturers for cut offs, but in Oregon, I dunno.
__________________
-Terry
|
|
|
|
|
03-09-2012, 12:00 PM
|
#58 (permalink)
|
|
A Legend in his Own Mind
Join Date: Dec 2011
Location: Atlanta
Posts: 281
Thanks: 52
Thanked 91 Times in 54 Posts
|
Quote:
Originally Posted by Tango Charlie
"Simplify and add lightness".
|
One of my favorite quotes.  |
|
|
|
|
03-16-2012, 02:16 AM
|
#59 (permalink)
|
|
EcoModding Lurker
Join Date: Jan 2012
Location: eugene
Posts: 61
Thanks: 11
Thanked 7 Times in 6 Posts
|
Luckily I have been fortunate enough to have seen a home built aircraft built using this technique. This is probably the reason I'm going the route I am.
Sheeting can be expensive, I have not priced it but I'm planing on using 2024-t4.
I have priced a windshield from Tod's and its outside of my budget. This means I'm making my own.... Any information anyone has on this topic would be helpful.
Over the next two weeks I have a bunch of time off. I plan on having the bike on wheels at the end of this time period.
|
|
|
|
|
03-16-2012, 02:42 PM
|
#60 (permalink)
|
|
A Legend in his Own Mind
Join Date: Dec 2011
Location: Atlanta
Posts: 281
Thanks: 52
Thanked 91 Times in 54 Posts
|
Quote:
Originally Posted by Electictracer
I have priced a windshield from Tod's and its outside of my budget. This means I'm making my own.... Any information anyone has on this topic would be helpful.
|
Simplest and quickest would be single curvatures, bent into place cold. The rear portion would be one piece, and the windscreen would be another. Aft of the rear portion, you'd fair in the canopy to the rear enclosure, to prevent separation at what would otherwise be a corner. This would require a fiberglass molding (or cool but difficult, a hand hammered aluminum) transition piece.
To blow a bubble canopy, the best do-it-yourself results seem to be free blowing, in which the surface is not restrained by a mold. I've had good luck with this for bubbles smaller than the typical canopy, using plexiglas. I have never been able to get polycarbonate to form a good heated bend, let alone a compound curvature (but others have). (But for cold single curvature bends, it works great, and 3/32 material would work well for your application.) (Blown canopies need to be a little thicker to allow for thinning out where stretched most.)
(The issue with plexiglas [acrylic] is that it can crack -- in a crash, for example -- whereas polycarbonate will not.)
Here's a thread that describes several do it yourself methods. There is a small pusher aircraft (experimental) with a single curvature canopy (I thought it was the Taylor Imp) but I can't find it. The Imp appears to have slight compound curvature.
|
|
|
|
|