 04-18-2013, 03:46 PM
|
#61 (permalink)
|
|
Master EcoModder
Join Date: Sep 2012
Location: Texas
Posts: 252
Thanks: 18
Thanked 43 Times in 23 Posts
|
i need to make one of these to fit 4 bikes. its so sick
|
|
|

|
 Today Today
|
|
|
|
 Other popular topics in this forum...
|
|
|
|
 04-19-2013, 04:57 PM
|
#62 (permalink)
|
|
Master EcoModder
Join Date: Mar 2012
Location: Salt Lake City
Posts: 292
00C - '00 Toyota Corolla 90 day: 43.54 mpg (US)
Thanks: 147
Thanked 190 Times in 73 Posts
|
Corners snipped
I made huge strides in my ability to shrink the aluminum, but it wasn't enough.
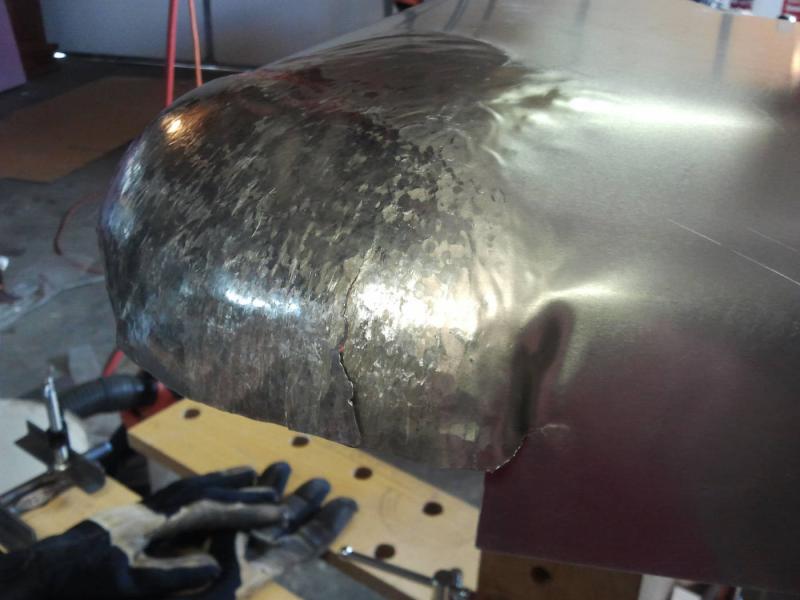
It looks like I made it to about 70-80 degrees or so, whereas the end-point should be around 110 degrees, if I recall. That may look and sound like I'm getting there, but if you think about this in terms of the reduction of length or increase in thickness around the perimeter, I couldn't be more than half-way. This piece here is about 5 hours of work, and up against the limits of what I think is doable, even with lots of patience and practice (i.e. if I could avoid big catastrophic tears like the one shown here).
It may or may not be possible to go farther with more annealing cycles, but this just isn't what I call 'favorable'. Even if I threw another 40 hours and another sheet at this problem and ultimately succeeded (but I think I would not succeed), but even if I did, there's a very real chance I'd end up with poor strength in the fatigued, work hardened corner. Fiberglass must be a better route.
So here we are, corners snipped out, two front skins riveted in place. I'm still not sure why these ended up a few inches short. I'm going to end up with a little strip to patch up that gap, but at least it will be out of sight.
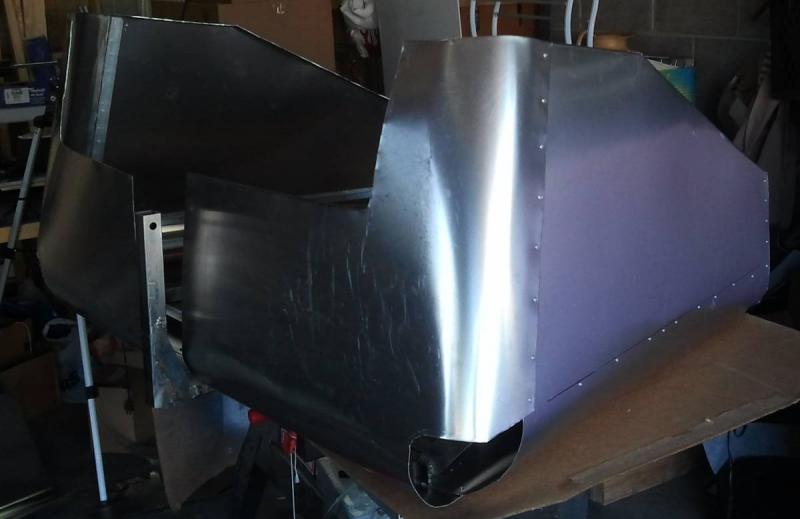
First the bottom seam, then the side. Clamp, drill, disassemble, deburr, construction adhesive, reassemble, clamp, rivet.
This rib is also the lip around the front of the box. It's made from .75x.05" aluminum right angle, like the other ribs. I used a jig-saw to define and serrate half of the right-angle, then broke out the tabs and filed, and bent the corners around some of my .5" steel rod.
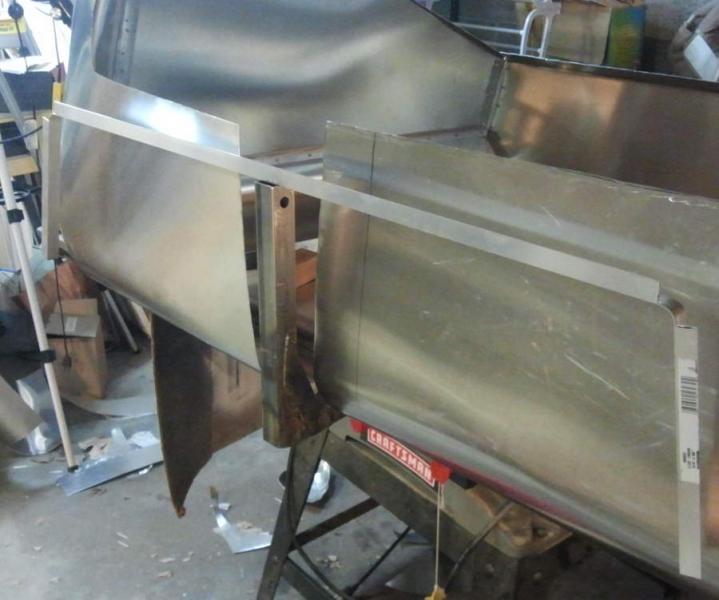
I must be behind one photo, I did finish up the glue and rivet for this rib last night. |
|
|

|
|
The Following 2 Users Say Thank You to christofoo For This Useful Post:
|
|
 04-19-2013, 05:03 PM
|
#63 (permalink)
|
|
Batman Junior
Join Date: Nov 2007
Location: 1000 Islands, Ontario, Canada
Posts: 22,541
Thanks: 4,085
Thanked 6,989 Times in 3,619 Posts
|
Quote:
Originally Posted by christofoo

So here we are, corners snipped out, two front skins riveted in place....
|
Nice to see you make the decision and forge ahead.
You know what they say: the perfect is the enemy of the good. (I'm typically on the other side of the battle from "pefect"  ) |
|
|

|
 04-19-2013, 05:20 PM
|
#64 (permalink)
|
|
Master EcoModder
Join Date: Mar 2012
Location: Salt Lake City
Posts: 292
00C - '00 Toyota Corolla 90 day: 43.54 mpg (US)
Thanks: 147
Thanked 190 Times in 73 Posts
|
Tuck shrinking; bad for aero hitch box
I think that tuck shrinking is not a good way to get the acute corners needed for an aero hitch box, but I might as well share what I learned about the technique. It was fun.
1) The tucking tool needs to have parallel rods with a spacing of about one half to one quarter of the rod diameter in between. Too much spacing, and the tucks are too oblique to result in a shrink. Too little spacing, and it's difficult to form the tucks without unduly stressing the sheet. I found this relationship experimentally with the rods under a clamp, but I couldn't clamp them tight enough so then I welded them up once I had them right.

2) A decent tuck looks like this; an acute angle between the sides of the tuck, and no sharp corners, because sharp corners will get worked into tears.
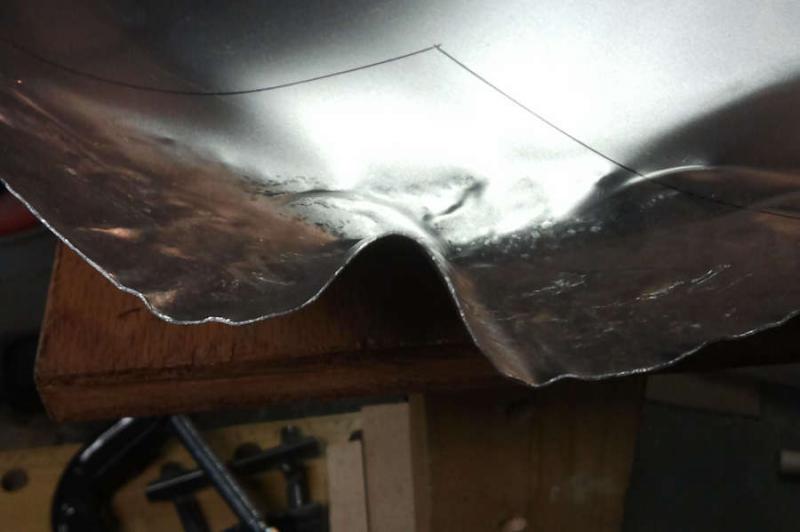
3) Unlike the stump method, start at the inside and work out. In other words, start with the longest tucks, and then work toward shorter tucks. Once you do shorter tucks, you get compound curvature that prevents you from doing long tucks, so once you move to shorter tucks you loose your opportunity to add more curvature on the inside.
4) This method with 0.032" aluminum is very time consuming. It can take 20 minutes to make one pass of 8 or so tuck/shrinks. Then you have to repeat that process 2-5 times before you can proceed to shorter tucks.
5) I succeeded in annealing with a propane (plumbing) torch, using a sharpie marker as the temperature indicator. The thing is that I'm not sure when is the best time to apply annealing and if it actually forestalls tearing long enough to be worthwhile. If I did it again, I would probably try annealing once for every two tuck shrink passes. Annealing is a 10-15 minute process for this piece. A) Preheat the propane bottle because my shop was cold, you get a lot more power with the bottle at 75°F than 50°F, just because the propane pressure is higher at that temperature. B) Preheat the area, keeping the flame moving across the whole area, for about 2-4 minutes. C) Dwell across a small area until the marker disappears. BTW, I don't believe that my little propane torch has enough power to melt aluminum of this thickness, but if I go too far it does seem to get a faint golden oxide layer of some sort.
EDIT: I'll double-check, but I think I'm using a 5000 series aluminum, which may not be ideal for this. If I did this again I would do some more research into the most 'shrinkable' and 'anneal-able' alloy.
Last edited by christofoo; 04-19-2013 at 05:43 PM..
|
|
|

|
|
The Following 2 Users Say Thank You to christofoo For This Useful Post:
|
|
 04-20-2013, 01:33 PM
|
#65 (permalink)
|
|
Master EcoModder
Join Date: Jan 2008
Location: Sanger,Texas,U.S.A.
Posts: 16,534
Thanks: 24,520
Thanked 7,438 Times in 4,818 Posts
|
corners
I used the inside surface of the top of a hemispherical barbecue grille as a mold for the corners of my first trailer.
Three coats of Maguire's 100% carnuba car wax got me a perfect release.
__________________
Photobucket album: http://s1271.photobucket.com/albums/jj622/aerohead2/
|
|
|

|
 04-21-2013, 01:36 PM
|
#66 (permalink)
|
|
Master EcoModder
Join Date: Aug 2012
Location: northwest of normal
Posts: 29,421
Thanks: 8,369
Thanked 9,128 Times in 7,537 Posts
|
Quote:
|
I succeeded in annealing with a propane (plumbing) torch, using a sharpie marker as the temperature indicator.
|
How does the Sharpie work? |
|
|

|
 04-21-2013, 06:16 PM
|
#67 (permalink)
|
|
Master EcoModder
Join Date: Mar 2012
Location: Salt Lake City
Posts: 292
00C - '00 Toyota Corolla 90 day: 43.54 mpg (US)
Thanks: 147
Thanked 190 Times in 73 Posts
|
Quote:
Originally Posted by freebeard

How does the Sharpie work?
|
It disappears at some temperature. Not sure if the ink oxidizes, or more likely just vaporizes.
The tried-and-true end-point indicator for annealing aluminum is soot, but the propane torch doesn't have a sooty setting (that I could think up), so the marker is a second-choice.
I think somewhere or other you can buy markers designed as specific temperature indicators. For all I know the sharpie could be off. It depends on the alloy, but the target should be around 600 or 650F.
Primarily I think it was right (or close enough) because the hammering steps afterwards felt noticeably softer. |
|
|

|
|
The Following User Says Thank You to christofoo For This Useful Post:
|
|
 04-22-2013, 12:38 AM
|
#68 (permalink)
|
|
Master EcoModder
Join Date: Mar 2012
Location: Salt Lake City
Posts: 292
00C - '00 Toyota Corolla 90 day: 43.54 mpg (US)
Thanks: 147
Thanked 190 Times in 73 Posts
|
Quote:
Originally Posted by Jakins

i need to make one of these to fit 4 bikes. its so sick
|
Unfortunately my box is not designed for bikes. I went out and double checked, and with the wheels off neither of my bikes fit. They both have fenders and racks though, and it's not a long shot for a single bike to fit in there if it didn't have so much hardware strapped on.
The Civic's wake isn't really a big enough envelope for 4 bikes.
I remember your thread on your cutaway trunk; and I think that is a pretty high performance solution overall.
I've put a little thought into this, since I'm trying to envision my next family car, and bikes are on my radar, and I think the solution may require starting with a car with a bigger wake in the first place, i.e. wagon or hatchback. At least, I'd end up with a lot more cargo volume that way. The Matrix (aka Vibe) is at the top of my list since it has a tow rating as well as a small engine.
Last edited by christofoo; 04-22-2013 at 10:34 AM..
|
|
|

|
 04-22-2013, 03:14 PM
|
#69 (permalink)
|
|
Master EcoModder
Join Date: Mar 2012
Location: Salt Lake City
Posts: 292
00C - '00 Toyota Corolla 90 day: 43.54 mpg (US)
Thanks: 147
Thanked 190 Times in 73 Posts
|
Rounded corner lip
In my design notes, the rounded corner lip was supposed to be plywood. Having done so much in metal, I just can't bring myself to fall back on wood. Blah. [sticks nose in air]
So I traced out the corner lip in some scrap.
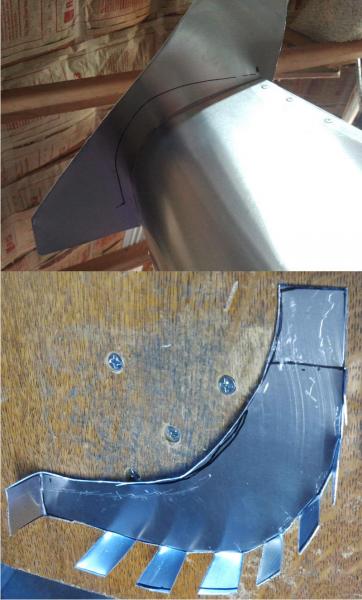
Clamp, drill, disassemble, deburr, construction adhesive, rivet.
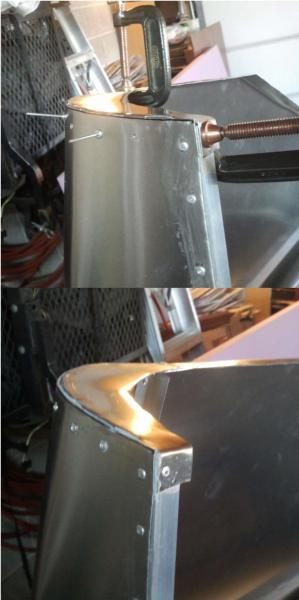
Also need a heavy bead along the inside to make sure this is sealed up.
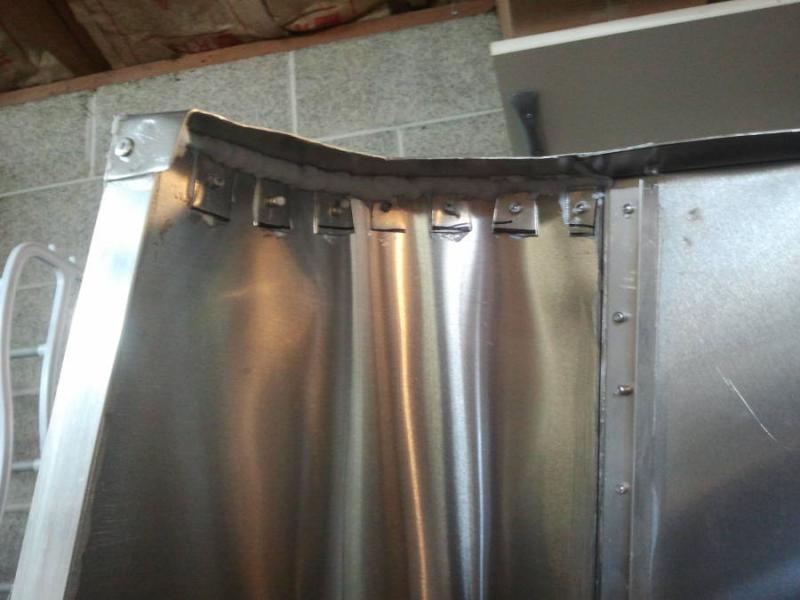 |
|
|

|
|
The Following 2 Users Say Thank You to christofoo For This Useful Post:
|
|
 04-22-2013, 03:22 PM
|
#70 (permalink)
|
|
Master EcoModder
Join Date: Mar 2012
Location: Salt Lake City
Posts: 292
00C - '00 Toyota Corolla 90 day: 43.54 mpg (US)
Thanks: 147
Thanked 190 Times in 73 Posts
|
Early pics attached to car
I've had an itch to put this on the car and snap a few pics.
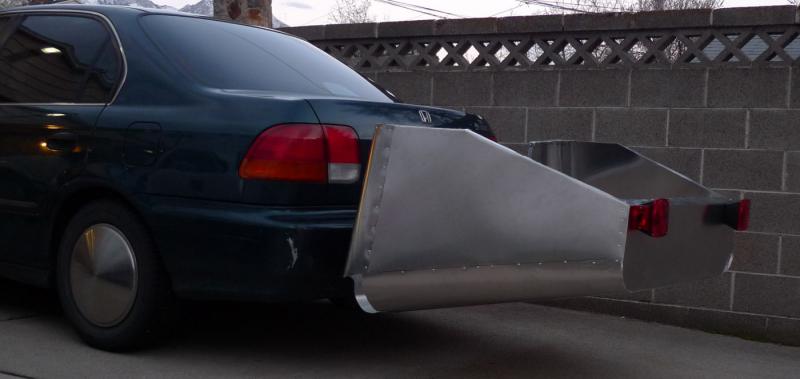
You can get a pretty good idea how this fits in the wake in this picture from the back.
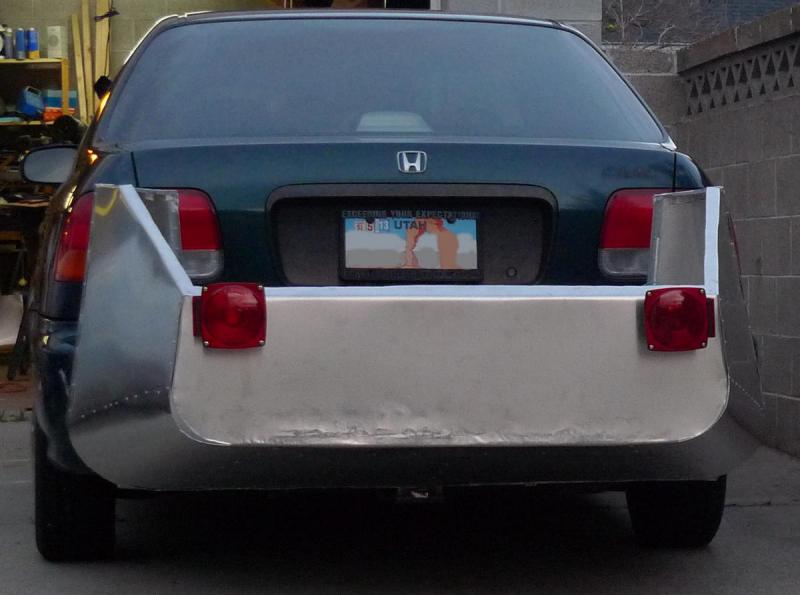
On the right side you can see just a few pixels of the bumper and tail lights poking out, so I matched the tangent coming off the car fairly well... Except that the corners (top and bottom) are going to poke out of the wake a little. Fortunately they will be rounded.
|
|
|

|
|
The Following 4 Users Say Thank You to christofoo For This Useful Post:
|
|
|