01-17-2020, 03:09 PM
|
#31 (permalink)
|
|
EcoModding Lurker
Join Date: Mar 2018
Location: Hartford, CT
Posts: 42
Thanks: 12
Thanked 40 Times in 27 Posts
|
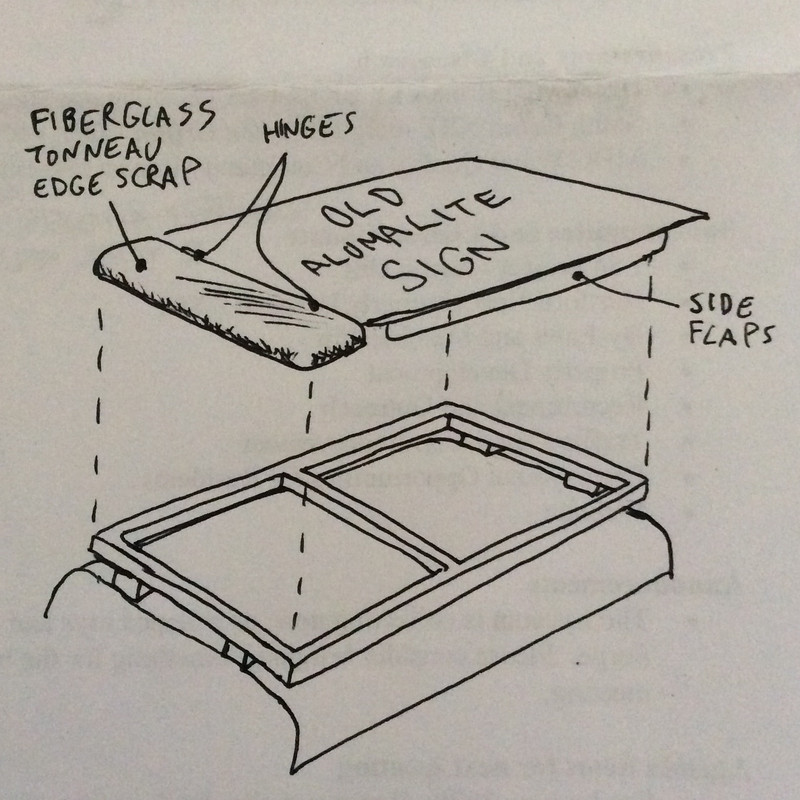
The noticeable noise reduction and slightly improved MPG I’ve observed when carrying doors and other flat items on the roof rack is making me prioritize making a deflector to cover its grid when not in use. I have an old alumalite sign panel that’s almost long enough and plenty wide. I’m going to trim it to the right width and attach a chunk of scrap tonneau edge to the front with hinges. It will hook over the front edge of the rack and the rear will be secured to two existing eyebolts with pins or spring clips. I’ll figure out what to use to fill the gaps on the sides; maybe rubber baseboard or scrap aluminum. This piece will be gone when the more radical restructuring eliminates this roof rack, so my existing preference to reuse and repurpose materials is especially strong. This piece will also be mostly out of sight, so it can be down and dirty.
Last edited by Interstatement; 01-17-2020 at 03:18 PM..
Reason: typo, clarity
|
|
|

|
|
The Following 3 Users Say Thank You to Interstatement For This Useful Post:
|
|
 Today Today
|
|
|
|
 Other popular topics in this forum...
|
|
|
|
|
02-24-2020, 01:25 AM
|
#32 (permalink)
|
|
EcoModding Lurker
Join Date: Mar 2018
Location: Hartford, CT
Posts: 42
Thanks: 12
Thanked 40 Times in 27 Posts
|
The more I have thought about it (and been too busy to make my planned roof rack deflector) the more it made sense to just remove the aluminum grid roof rack. I have ordered and will soon install a pair of Rhino Rack longitudinal 6 foot long tracks, to which I can attach some of my existing Yakima roof racks (which will stow in the truck more easily) when needs arise. $119 out of pocket, but will save me hours of work for a less ungainly setup. For this weekend, I just pulled the OEM rack.

It was held on with six rusty lag bolts installed from the top. Four of the six snapped when I tried to remove them, so I cut through the integrated spacer blocks to free the rack from the cap, aiming high enough to leave a length of lag bolt stub without damaging the main grid structure, which I plan on using for future structural mods.
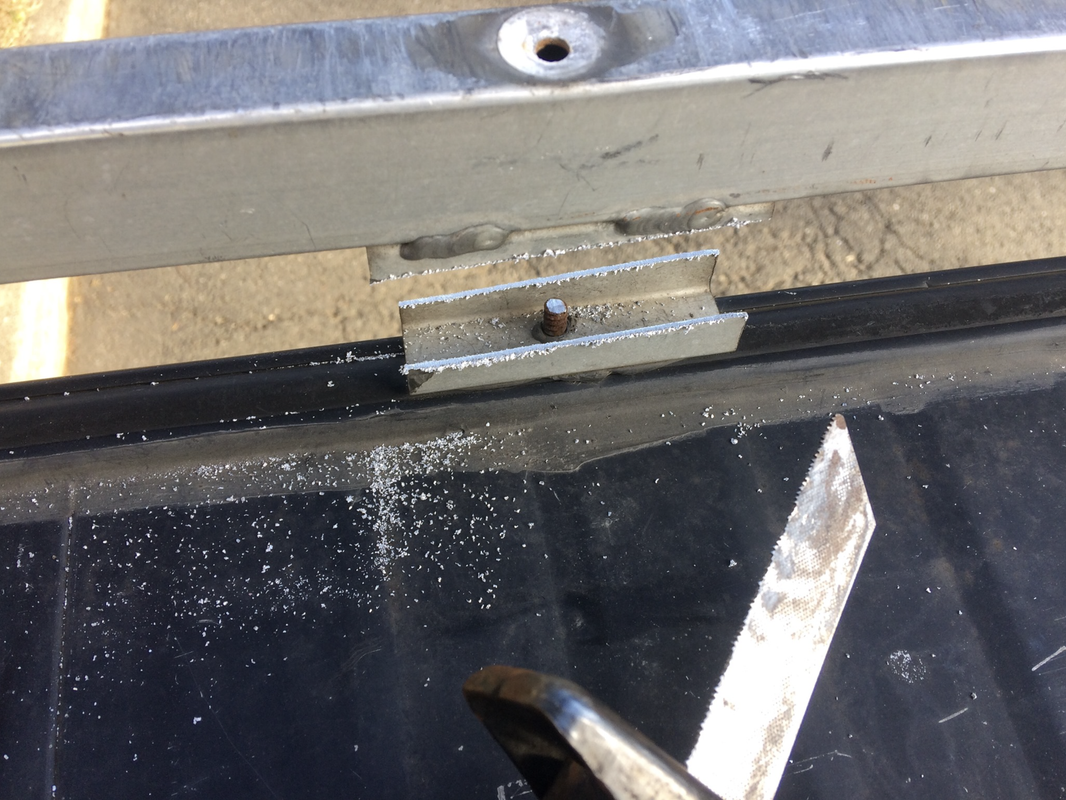
Those lags left behind were easy enough to grab with Vise-grip pliers to remove. Unseasonably warm weather was favorable for both outdoor tinkering and silicone sealant curing in six vacant lag holes.
 |
|
|
|
|
The Following 2 Users Say Thank You to Interstatement For This Useful Post:
|
|
|
03-16-2020, 05:45 PM
|
#33 (permalink)
|
|
EcoModding Lurker
Join Date: Mar 2018
Location: Hartford, CT
Posts: 42
Thanks: 12
Thanked 40 Times in 27 Posts
|
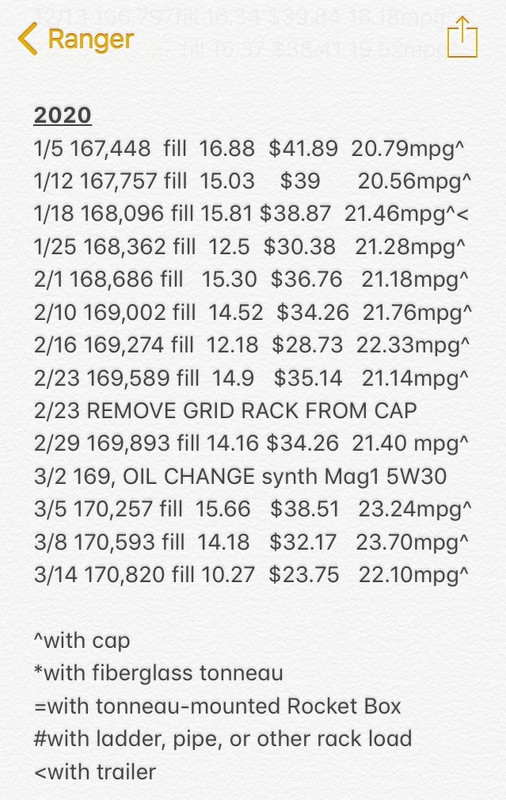
The first thousand miles sans grid rack seem to be showing a 1.x MPG improvement. The first tank included a heavy-footed three-state interstate dash, but netted equivalent MPG to my normally gentler throttle with the rack, so I'll call this a(n unsurprising) success.
Last edited by Interstatement; 03-16-2020 at 05:49 PM..
Reason: photo didn't display properly
|
|
|
|
|
The Following User Says Thank You to Interstatement For This Useful Post:
|
|
|
03-16-2020, 05:50 PM
|
#34 (permalink)
|
|
EcoModding Lurker
Join Date: Mar 2018
Location: Hartford, CT
Posts: 42
Thanks: 12
Thanked 40 Times in 27 Posts
|
The last tank included a significant load including a wheelbarrow protruding between the open tailgate and hatch that surely made for some ugly currents.
 |
|
|
|
|
The Following 2 Users Say Thank You to Interstatement For This Useful Post:
|
|
|
03-16-2020, 07:13 PM
|
#35 (permalink)
|
|
(:
Join Date: Jan 2008
Location: up north
Posts: 12,762
Thanks: 1,585
Thanked 3,556 Times in 2,218 Posts
|
It's getting warmer. Warmer > better mpgs. That could be a factor in this trend.
Cost of fill means nothing in this metric unless price/gallon was always the same. Even then, gallons and miles are the metrics, for us anyway.
Actually that stuff hanging slightly out the back probably had minimal effect on aero.
Might want to slow down. I've gotten nearly those numbers with a V8 F150.
|
|
|
|
|
The Following User Says Thank You to Frank Lee For This Useful Post:
|
|
|
03-17-2020, 10:44 PM
|
#36 (permalink)
|
|
EcoModding Lurker
Join Date: Mar 2018
Location: Hartford, CT
Posts: 42
Thanks: 12
Thanked 40 Times in 27 Posts
|
Quote:
Originally Posted by Frank Lee

It's getting warmer. Warmer > better mpgs. That could be a factor in this trend.
Cost of fill means nothing in this metric unless price/gallon was always the same. Even then, gallons and miles are the metrics, for us anyway.
Actually that stuff hanging slightly out the back probably had minimal effect on aero.
Might want to slow down. I've gotten nearly those numbers with a V8 F150.
|
About half of those miles were traveled in Vermont up to the Canadian border, where temps ranged from the teens to the mid-30s Fahrenheit, so the temps would have been equal or cooler than the previous few fill-ups spent in the NY-NJ-CT area.
130 or so miles of the first tank was the aforementioned heavy-footed run at 65-70mph, the rest was predominantly 2-lane routes at 45-55, where the truck and its owner are happiest.
The fill log is a screenshot from my phone, where I track mpg and money spent for different reasons. I havent gotten around to setting up a log on ecomodder yet. |
|
|
|
|
The Following User Says Thank You to Interstatement For This Useful Post:
|
|
|
04-02-2020, 01:41 PM
|
#37 (permalink)
|
|
EcoModding Lurker
Join Date: Mar 2018
Location: Hartford, CT
Posts: 42
Thanks: 12
Thanked 40 Times in 27 Posts
|
Quarantine downtime has me no less busy, but I've set aside some time to design and build a deflector for the vertical face of the cap. This will be an intermediate solution to keep in place until more elaborate plans are executed. Basic design goals are:
-Lightweight
-Attach to existing roof rack tracks
-Use as much recycled material as possible.
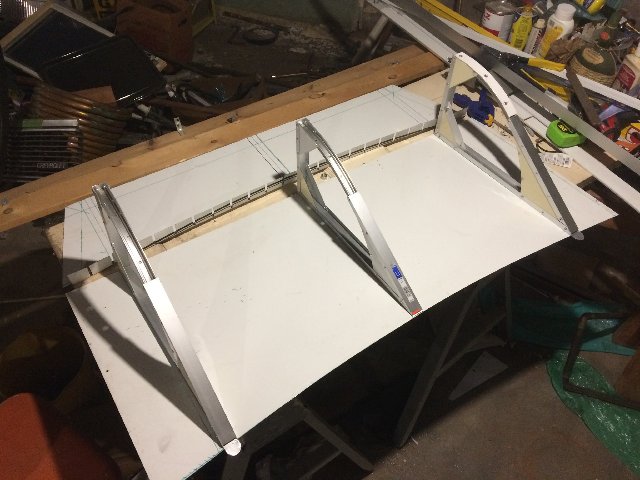
My recycled material of choice is aluminum, as I have various panels of .040 sign faces and thicker street signs left over from my years in a sign shop. Some manner of angled box-type thing would be an improvement over the flat vertical surface, but I wanted to incorporate a curve for a hopefully better transition to the horizontal roof of the cap. I found a workable solution in an old 700c bicycle rim that was too worn to justify re-lacing for wheel service.

The 622mm bead seat diameter works out to a tick over 12" radius at the outermost edge. They tuck nicely into some 1" U-channel from the hardware store, with .040 aluminum gussets making for a snug fit. 3/16" pop rivets connect the 3-layer (or otherwise thick) junctions, with 1/8" pop rivets doing the job elsewhere. I made three trusses thusly, with center truss 3/4" shorter (from the bottom) to follow the cab roof curvature. I laid them on the .040 sheet to plot out the curve.
 |
|
|
|
|
The Following 2 Users Say Thank You to Interstatement For This Useful Post:
|
|
|
04-02-2020, 01:54 PM
|
#38 (permalink)
|
|
EcoModding Lurker
Join Date: Mar 2018
Location: Hartford, CT
Posts: 42
Thanks: 12
Thanked 40 Times in 27 Posts
|
With the back piece marked and cut, I notched along the curve with an air shear and drilled out the resulting curlicues. I bent them to 90-ish degrees using a block of wood for a brake.

The back was riveted to the trusses and a "floor" made of more .040 aluminum sign face with some aluminum extrusions (the white strips off to the side beneath the green tape measure) running crosswise for added rigidity. The strips, which look like extras from storm/screen door installations, were found at a town dump's metal recycling bin. The side panels will need to open in order to fasten it to the roof, so I might as well make it work as a place to store small items when needed.
 |
|
|
|
|
The Following User Says Thank You to Interstatement For This Useful Post:
|
|
|
04-02-2020, 01:59 PM
|
#39 (permalink)
|
|
Master EcoModder
Join Date: Aug 2012
Location: northwest of normal
Posts: 28,948
Thanks: 8,219
Thanked 8,988 Times in 7,425 Posts
|
Sweet. Looks like aerospace-quality construction.
__________________
.
.Without freedom of speech we wouldn't know who all the idiots are. -- anonymous poster
________________
.
.Because much of what is in the published literature is nonsense,
and much of what isnt nonsense is not in the scientific literature.
-- Sabine Hossenfelder
|
|
|
|
|
The Following User Says Thank You to freebeard For This Useful Post:
|
|
|
04-02-2020, 02:08 PM
|
#40 (permalink)
|
|
EcoModding Lurker
Join Date: Mar 2018
Location: Hartford, CT
Posts: 42
Thanks: 12
Thanked 40 Times in 27 Posts
|
The trailing edge is 1-1/2" angle aluminum. The top edge of this is spaced about 3/16" below where the face skin will lay, allowing for a strip of rubber baseboard to lay over the deflector-cap gap. I haven't procured any yet, still hoping to find or salvage a scrap rather than buy a roll to get the needed 42" length.

First trial fit (without fastening) looks pretty good. The center truss is about 1/4" proud of the other two at the leading edge, tapering to dead even at the trailing edge. I'll wait until I attach it to the truck to correct this, as it could change. I'm not sufficiently skilled or equipped to create a compound curve, so I will get it so that a straight edge lays crosswise at all points before making the face. I need to turn my attention to less interesting projects for a couple of days, but I'm excited about this progress and will get back to it soon!
|
|
|
|
|
The Following 2 Users Say Thank You to Interstatement For This Useful Post:
|
|
|