 04-07-2020, 06:52 PM
|
#41 (permalink)
|
|
(:
Join Date: Jan 2008
Location: up north
Posts: 12,762
Thanks: 1,585
Thanked 3,556 Times in 2,218 Posts
|
I like the profile shape you've created; it intuitively looks spot-on! 
|
|
|

|
|
The Following 2 Users Say Thank You to Frank Lee For This Useful Post:
|
|
 Today Today
|
|
|
|
 Other popular topics in this forum...
|
|
|
|
 04-08-2020, 01:13 PM
|
#42 (permalink)
|
|
Master EcoModder
Join Date: Jan 2008
Location: Sanger,Texas,U.S.A.
Posts: 16,453
Thanks: 24,487
Thanked 7,421 Times in 4,808 Posts
|
trial fit
The aerodynamic gods say 'Thank you!' 
__________________
Photobucket album: http://s1271.photobucket.com/albums/jj622/aerohead2/
|
|
|

|
|
The Following User Says Thank You to aerohead For This Useful Post:
|
|
 04-08-2020, 04:54 PM
|
#43 (permalink)
|
|
Master EcoModder
Join Date: Aug 2012
Location: northwest of normal
Posts: 29,221
Thanks: 8,302
Thanked 9,058 Times in 7,487 Posts
|
Quote:
|
I'm not sufficiently skilled or equipped to create a compound curve...
|
The best potential improvement would be to project the curve of the shed's top corners to the forward ends of the outer trusses. This would be a simple curve.
Else you could start with a triangle and bend the tips or slit and overlap as necessary to make a shallow cone shape.
__________________
.
.Without freedom of speech we wouldn't know who all the idiots are. -- anonymous poster
___________________
.
.You can't be wise and in love at the same time. -- Bob Dylan
|
|
|

|
|
The Following User Says Thank You to freebeard For This Useful Post:
|
|
 04-20-2020, 10:50 AM
|
#44 (permalink)
|
|
EcoModding Lurker
Join Date: Mar 2018
Location: Hartford, CT
Posts: 42
Thanks: 12
Thanked 40 Times in 27 Posts
|
Quote:
Originally Posted by freebeard

The best potential improvement would be to project the curve of the shed's top corners to the forward ends of the outer trusses. This would be a simple curve.
Else you could start with a triangle and bend the tips or slit and overlap as necessary to make a shallow cone shape.
|
For the face sheet, it looks like the leading edge of the center truss just kicks up a bit too much, closer to 1/8" when trial-fit to the truck versus the 1/4" measure on a bench. I'm confident I can remedy this by drilling out the rivets connecting it to the rear panel and shimming it before re-riveting it.
My plan for the side panels is to make them flat 1/8" aluminum, bottom-hinged, sloping to continue the taper of the cab. Once I get those in place and working well, I'll make face panels for them (fastened from behind) that can ease the transition to the top corners, I think your projected curve idea would serve well there, and easy enough to do with a non-corrugated CAD pattern.
These side panels would be able to be removed and/or reshaped in the future when I re-taper the profile of the cap in the more radical phase, keeping the deflector well-suited to that future shape. |
|
|

|
|
The Following User Says Thank You to Interstatement For This Useful Post:
|
|
 04-20-2020, 10:56 AM
|
#45 (permalink)
|
|
EcoModding Lurker
Join Date: Mar 2018
Location: Hartford, CT
Posts: 42
Thanks: 12
Thanked 40 Times in 27 Posts
|
Unfortunately, a cracked radiator has pulled me away from the fun stuff. Need to repair the lower rad mounts to avoid a repeat, but may take the opportunity to delete the factory clutch fan in favor of a later Ranger electric fan and shroud. The donor trucks for both the radiator and the fan/shroud were air-conditioned, unlike mine, so the improved cooling capacity should make future grill-blocking a low-risk proposition.
|
|
|

|
|
The Following User Says Thank You to Interstatement For This Useful Post:
|
|
 04-21-2020, 02:19 PM
|
#46 (permalink)
|
|
Batman Junior
Join Date: Nov 2007
Location: 1000 Islands, Ontario, Canada
Posts: 22,541
Thanks: 4,085
Thanked 6,986 Times in 3,616 Posts
|
Bummer! But it sounds you're making the most of the situation and will come out ahead.
|
|
|

|
 11-10-2020, 07:33 PM
|
#47 (permalink)
|
|
EcoModding Lurker
Join Date: Mar 2018
Location: Hartford, CT
Posts: 42
Thanks: 12
Thanked 40 Times in 27 Posts
|
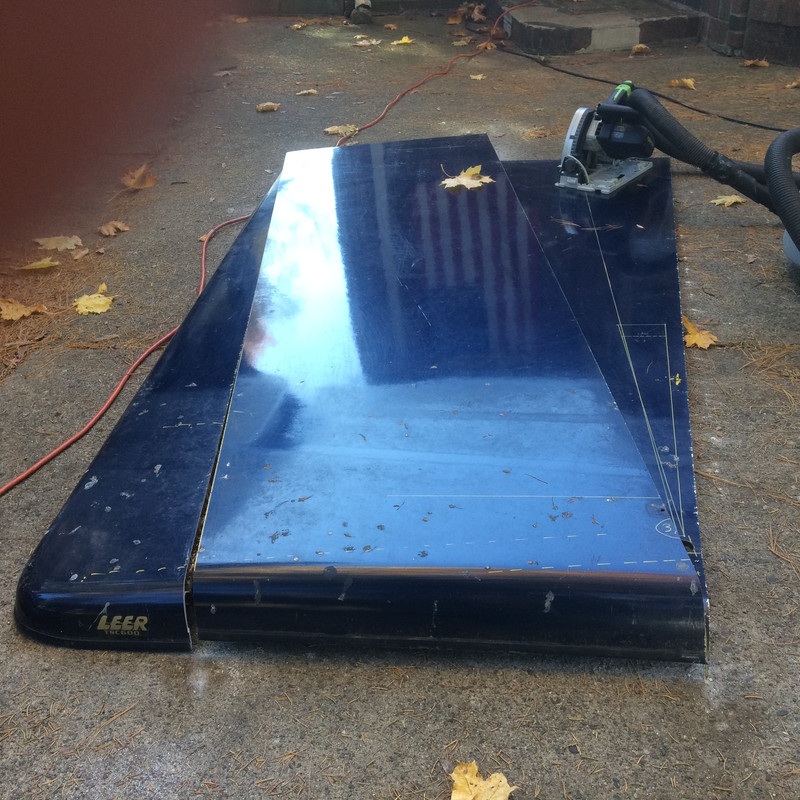
While a prolonged major move has prevented me from working on the cap, it did force me to make progress in a roundabout way: the Leer fiberglass tonneau, late of a 1990s Chevy Silverado, had yet to be cut into two new smooth side doors. The intact cap was really ungainly, so I figured it was high time I cut out the desired pieces so that it would be exponentially easier to move and store. I measured the angle of the back of the cab and marked out my cut lines. 24 inches was the maximum height I could achieve with that angle, so that’s the height.  |
|
|

|
|
The Following User Says Thank You to Interstatement For This Useful Post:
|
|
 11-10-2020, 07:46 PM
|
#48 (permalink)
|
|
EcoModding Lurker
Join Date: Mar 2018
Location: Hartford, CT
Posts: 42
Thanks: 12
Thanked 40 Times in 27 Posts
|
I borrowed a slick little Festool circular saw and guide to make the cuts and it worked beautifully but for one unpleasant surprise: an embedded steel plate was along my cut line, resulting in the rather pricy saw blade losing a tooth upon impact. I set the depth shallow for a clean cut on that short stretch on each piece and cut through the steel with a better-suited (if less precise) jigsaw. Iím pleased with how these pieces came out, and they are 1) much easier to move, and 2) a bit lighter than I expected.
 |
|
|

|
|
The Following 2 Users Say Thank You to Interstatement For This Useful Post:
|
|
 11-10-2020, 07:58 PM
|
#49 (permalink)
|
|
EcoModding Lurker
Join Date: Mar 2018
Location: Hartford, CT
Posts: 42
Thanks: 12
Thanked 40 Times in 27 Posts
|
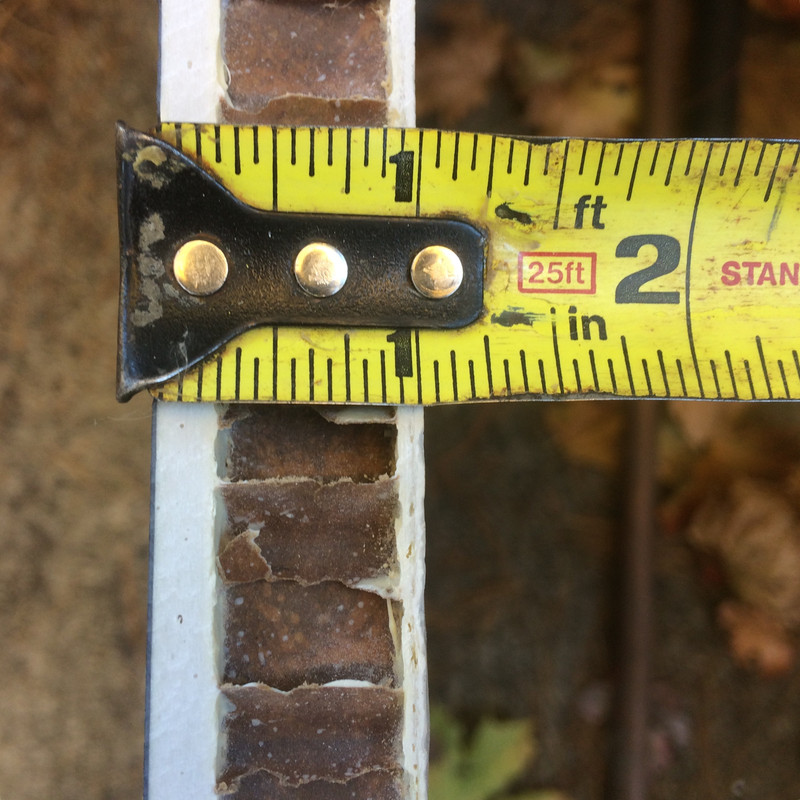
The panels are about 1” thick, comparable to the thickness of the current 1x1 square tubing-framed doors. The outer skins encase what looks like a resin-soaked version of the inside of a hollow luann door. They will need at least a basic perimeter frame of 1x1 to use the existing hinge and latch setup. I’m wondering if I could rout a channel so that the tubing can get bonded to the inside of the outer skin and sit semi-flush with the inner skin? I’m interested in hearing what others may have used to bond aluminum and fiberglass as well. I can’t really work on this for another stretch, so I’ll take some time to play with ideas and do some research.
 |
|
|

|
|
The Following User Says Thank You to Interstatement For This Useful Post:
|
|
 11-10-2020, 09:12 PM
|
#50 (permalink)
|
|
Master EcoModder
Join Date: Aug 2012
Location: northwest of normal
Posts: 29,221
Thanks: 8,302
Thanked 9,058 Times in 7,487 Posts
|
Quote:
|
Iím interested in hearing what others may have used to bond aluminum and fiberglass as well.
|
If memory serves there is a trick to that.
?? IIRC It has to do with the chemistry of the bonding agent.
__________________
.
.Without freedom of speech we wouldn't know who all the idiots are. -- anonymous poster
___________________
.
.You can't be wise and in love at the same time. -- Bob Dylan
|
|
|

|
|