 01-18-2011, 09:49 PM
|
This thread is in the EcoModder Project Library |
#1 (permalink)
|
|
MPGuino Supporter
Join Date: Oct 2010
Location: Hungary
Posts: 1,808
iNXS - '10 Opel Zafira 111 Anniversary Suzi - '02 Suzuki Swift GL
Thanks: 831
Thanked 710 Times in 458 Posts
|
 t_vago's compound curve foam board pickup aeroshell
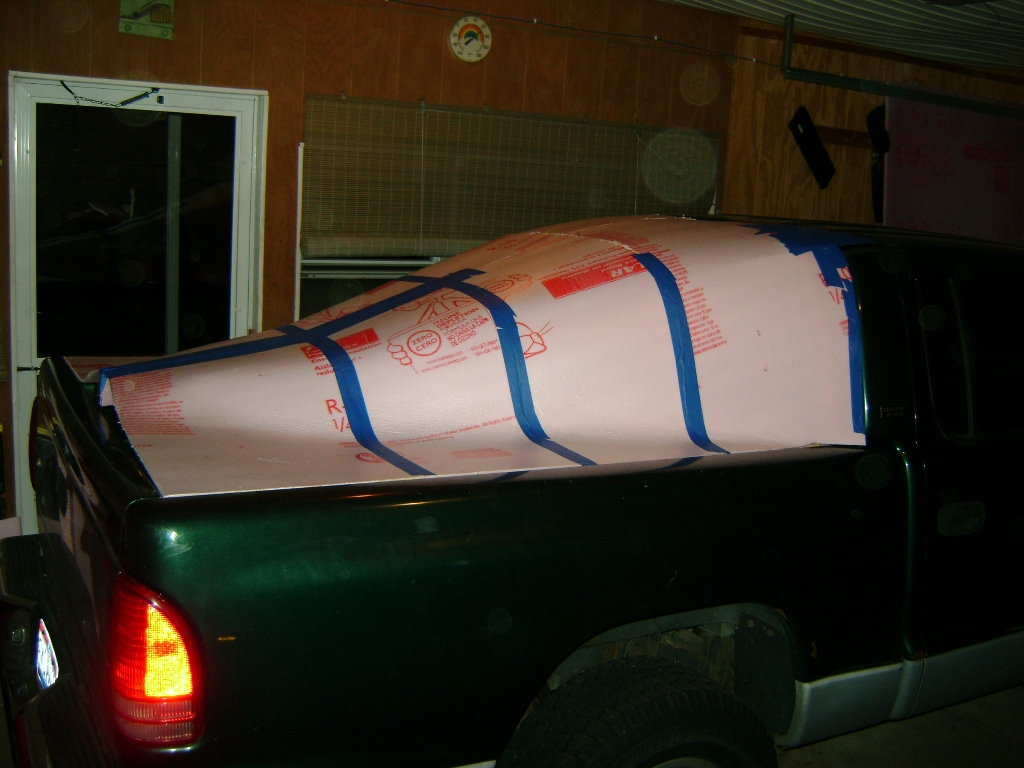
This is what I originally came up with for my truck.

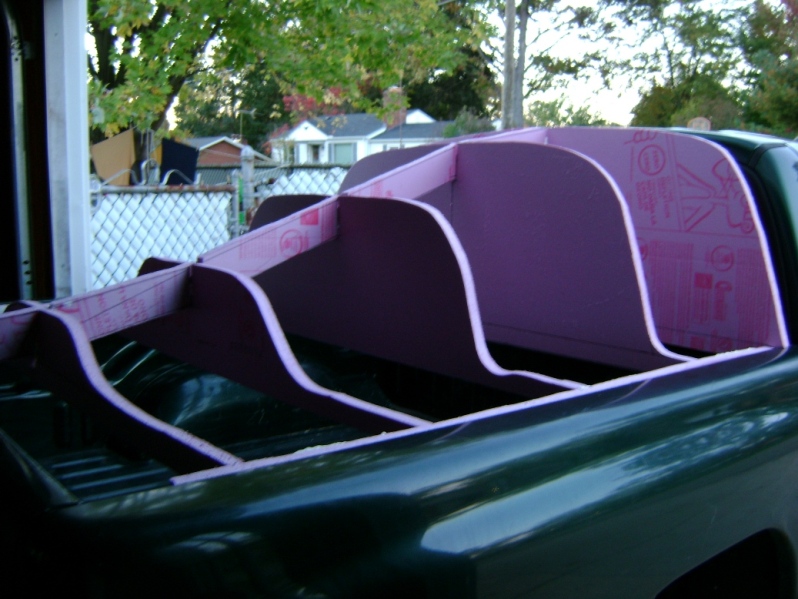
Underlying frame

Side view, right-hand side

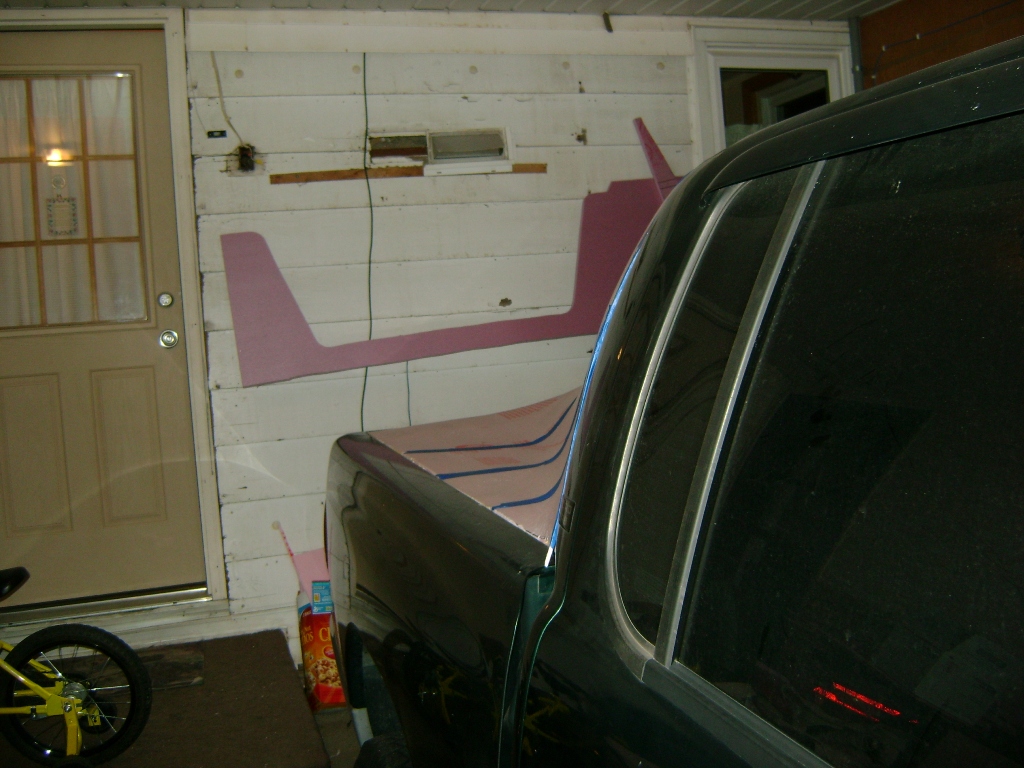
Side view, front facing rear

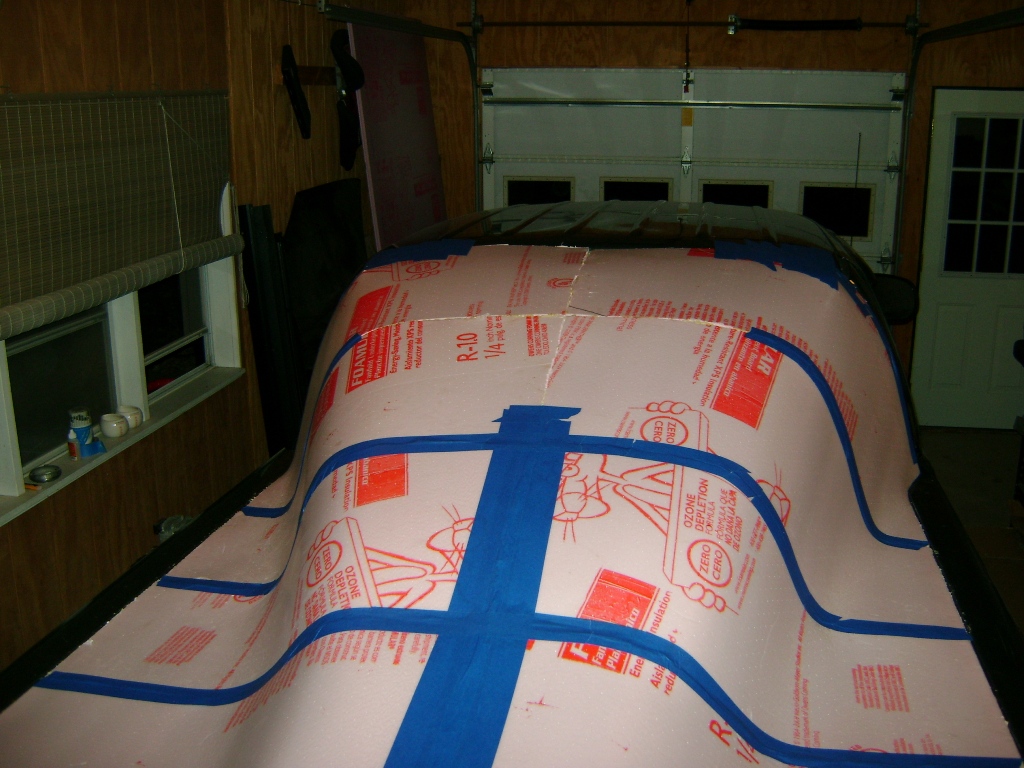
Rear view
I waited too long to coat it, and it disintegrated during one of my commutes. Version 2 will be a bit less aggressive.
Last edited by t vago; 06-27-2011 at 10:56 PM..
|
|
|

|
|
The Following 5 Users Say Thank You to t vago For This Useful Post:
|
|
 Today Today
|
|
|
|
 Other popular topics in this forum...
|
|
|
|
 01-19-2011, 12:53 AM
|
#2 (permalink)
|
|
T-100 Road Warrior
Join Date: Apr 2008
Location: The Woodlands, TX
Posts: 1,921
Thanks: 3,502
Thanked 1,395 Times in 968 Posts
|
Looks great! 
How much did that cost you? How did it disintegrate? Did you yarn tuft test it at all? How did you come up with that design?
I don't think I want to go that aggressive as I need to load/unload things from the truck bed...hence why I have a hatch on mine. I still have a few sheets of coroplast so I'm gonna stick to that material fer now...until I git the itch to use something else.  |
|
|

|
|
The Following User Says Thank You to BamZipPow For This Useful Post:
|
|
 01-19-2011, 09:48 AM
|
#3 (permalink)
|
|
Recreation Engineer
Join Date: Dec 2009
Location: Somewhere USA
Posts: 525
Thanks: 333
Thanked 138 Times in 103 Posts
|
Quote:
Originally Posted by t vago


I waited too long to coat it, and it disintegrated during one of my commutes. Version 2 will be a bit less aggressive. |
Your compound curvature is outstanding. Absolutely beautiful. What thickness foamboard did you use? Any fabrication tips you can share? I don't see any burn marks for example. 
Sorry it died. What MPG improvement did you quantify?
Keep us posted on Version 2.
|
|
|

|
|
The Following User Says Thank You to KamperBob For This Useful Post:
|
|
 01-19-2011, 09:54 AM
|
#4 (permalink)
|
|
Batman Junior
Join Date: Nov 2007
Location: 1000 Islands, Ontario, Canada
Posts: 22,541
Thanks: 4,085
Thanked 6,989 Times in 3,619 Posts
|
Would love to see tuft testing of that as well.
|
|
|

|
 01-19-2011, 10:14 PM
|
#5 (permalink)
|
|
MPGuino Supporter
Join Date: Oct 2010
Location: Hungary
Posts: 1,808
iNXS - '10 Opel Zafira 111 Anniversary Suzi - '02 Suzuki Swift GL
Thanks: 831
Thanked 710 Times in 458 Posts
|
Well, I formed the frame out of 1 inch thick FoamulaR insulation. The ribs and rails were initially cut using a jig saw, then fine-tuned using a finger-cutting knife (actually, one of those As Seen On TV knives that are supposed to cut anything from a ripe tomato to an aluminum can, but the knife I used couldn't cut cooked meat worth a darn but was excellent at cutting fingers - hence "finger-cutting knife").
The height and width of each rib were calculated using Microsoft Excel, based off of that paper written by that Naval PostGrad sailor, and my memories of how the snow formed itself on the tonneau cover of my truck last winter. I didn't want to bother with sharp edges, because they're harder to work with, with regard to being able to coat the exterior with fiberglass or something, so it was made as curvy as possible.
The ribs and rails were glued together with Gorilla Glue and a lot of water to ensure the foaming action necessary for the Gorilla Glue to work. The skin was made with 8 sections of FoamulaR 1/4 inch sheeting. Each sheet was partially cut, then partially glued onto the ribs, repeatedly until each sheet was completely glued onto the ribs. The sheeting was held in place by weights placed on the seams (things I had in the garage - spare crank pulleys, spare car radios, spare alternator, jumper cables, etc.) while the glue set.
The aerocap failed because the rear ribs and the side mounting rails were too thin to support the vibrational stresses imposed on the aerocap while the truck was travelling at speed. This was compounded by shrinkage of the rear 1/3d of the aerocap to the point where the rear was able to be wiggled by hand. The combination of the two causes caused the rear 1/3d ribs to fracture and separate from the mounting rails. The rear of the aerocap, no longer joined to the truck, caused the rest of the aerocap to break along the mounting rails, and then lift off the truck altogether. The aerocap flew upward about 10 feet, and luckily landed in the center divide of the highway, but the rear 1/3d completely disintegrated. I could recover the main part, but it was completely unrepairable.
I should have secured it more firmly at the rear, I should have used thicker ribs and rails, and I should have stiffened the skin with fiberglass. These will be applied to version 2.
I imagine that tuft testing would have revealed some turbulence around the rear of the aerocap, because I think the vertical slope was a bit too aggressive.
I was able to quantify a gain of 1 MPG from this aerocap. Incidentally, the same testing revealed absolutely no gain whatsoever from having a tonneau cover installed.
Last edited by t vago; 01-22-2011 at 01:43 PM..
Reason: Added link to Naval PostGrad paper on aerocaps
|
|
|

|
|
The Following 13 Users Say Thank You to t vago For This Useful Post:
|
aerohead (01-21-2011), autogyro (08-12-2011), BamZipPow (01-19-2011), bondo (01-21-2011), Cd (01-20-2011), ChazInMT (01-21-2011), KamperBob (01-19-2011), menaus2 (01-22-2011), moonmonkey (01-25-2011), NeilBlanchard (01-21-2011), nj trucker (02-24-2011), slowmover (01-20-2011), The_Original_Modifier (12-29-2011) |
 01-20-2011, 03:20 AM
|
#6 (permalink)
|
|
Banned
Join Date: Oct 2009
Location: Fort Worth, Texas
Posts: 2,442
Thanks: 1,422
Thanked 737 Times in 557 Posts
|
Very nice to have seen and read about. Hope to see more in version 2.
|
|
|

|
 01-20-2011, 09:37 PM
|
#7 (permalink)
|
|
n00b.... sortof..
Join Date: Oct 2010
Location: SFL
Posts: 345
Thanks: 37
Thanked 19 Times in 18 Posts
|
Quote:
Originally Posted by t vago


Rear view
|
I have to tell you, I wish you had posted those when I still had my Ranger, I would have copied it (if you didnt mind, that is)
__________________
~Mike

|
|
|

|
|
The Following User Says Thank You to d0sitmatr For This Useful Post:
|
|
 01-21-2011, 08:59 AM
|
#8 (permalink)
|
|
Aero Deshi
Join Date: Jan 2010
Location: Vero Beach, FL
Posts: 1,065
Thanks: 430
Thanked 669 Times in 358 Posts
|
T Vargo, you need to separate your project out in its own link. It is very nice. I suspect you're right about the V1 cap being too aggressive, keep the same shaping ideas, but only taper down about 6 - 8 inches front to back and make the transition from rear of cab to cap very gradual, your V1 appears to dive right in.
My 2₵
|
|
|

|
 01-21-2011, 09:18 AM
|
#9 (permalink)
|
|
Batman Junior
Join Date: Nov 2007
Location: 1000 Islands, Ontario, Canada
Posts: 22,541
Thanks: 4,085
Thanked 6,989 Times in 3,619 Posts
|
Split this into its own thread. Good idea.
|
|
|

|
|
The Following 2 Users Say Thank You to MetroMPG For This Useful Post:
|
|
 01-21-2011, 10:30 AM
|
#10 (permalink)
|
|
Master EcoModder
Join Date: May 2008
Location: Maynard, MA Eaarth
Posts: 7,908
Thanks: 3,475
Thanked 2,953 Times in 1,846 Posts
|
Awesome work! I really like seeing how well the 1/4" foam works on compound curved surfaces.
You have got me thinking very hard about going this route with my CarBEN EV design.
Are you going to skin it with fiberglass? Is Gorilla Glue and this glue compatible with fiberglass? If so, what sort?
|
|
|

|
|
The Following User Says Thank You to NeilBlanchard For This Useful Post:
|
|
|