02-27-2015, 06:33 PM
|
#11 (permalink)
|
|
Not Doug
Join Date: Jun 2012
Location: Show Low, AZ
Posts: 12,314
Thanks: 7,327
Thanked 2,246 Times in 1,733 Posts
|
Heh. The engine bay just might stay clean without an engine in there.
|
|
|

|
 Today Today
|
|
|
|
 Other popular topics in this forum...
|
|
|
|
|
02-27-2015, 07:54 PM
|
#12 (permalink)
|
|
Master EcoModder
Join Date: Aug 2010
Location: Philippines
Posts: 2,173
Thanks: 1,739
Thanked 589 Times in 401 Posts
|
There are not enough likes in the world for this thread... that's simply awesome retrofitting work!
Seems like a good way to repurpose an old car... very little wasted or thrown away (except for the engine... duh...  ). I love having the controllers in the gas tank! Is it sealed well enough to survive flooding? |
|
|
|
|
02-27-2015, 08:46 PM
|
#13 (permalink)
|
|
Master EcoModder
Join Date: Jan 2008
Location: Sacramento, CA
Posts: 406
Thanks: 35
Thanked 143 Times in 105 Posts
|
In the immortal words of Wayne and Garth, Schwwwwingggg.
JJ
|
|
|
|
|
02-27-2015, 10:05 PM
|
#14 (permalink)
|
|
EcoModding Apprentice
Join Date: Feb 2015
Location: Sacramento
Posts: 202
Thanks: 3
Thanked 225 Times in 91 Posts
|
Thanks fellas...
Since there is no more hot water coming from a gasoline engine, I have selected ceramic elements for my heater. These cheapo space heaters can be found at wal mart or home depot for around $30.
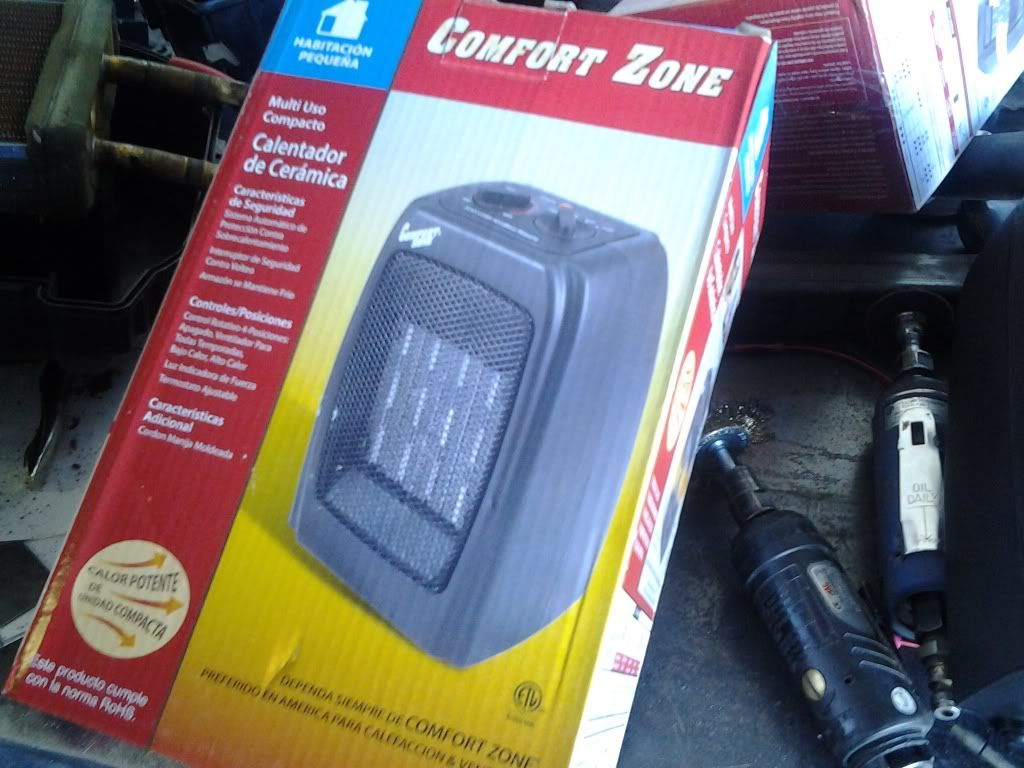
When you open up these heaters, you can see the ceramic heater element that is needed out of the space heater.
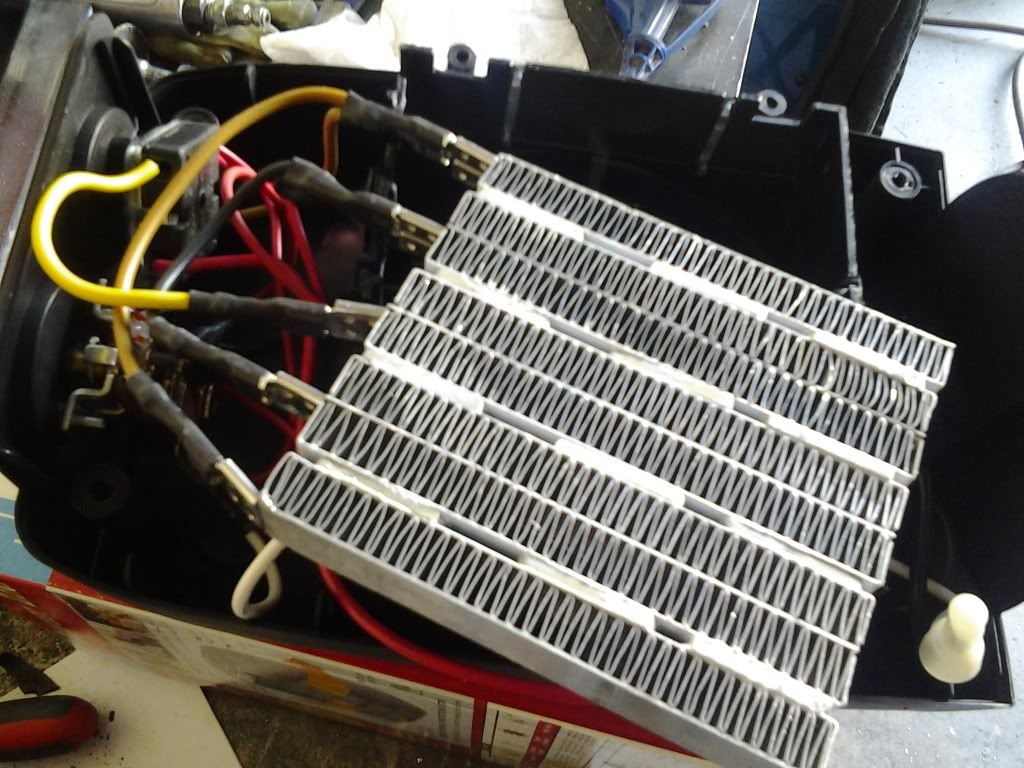
Each space heater is 1500 watts, which is enough to warm up a bedroom or bathroom. Since cars are a little more drafty, I use two of them for 3000 watts. More than enough for a Metro. I need to swap out my water heater core for an electric one, so I made this one. It is polyester body filler, and my multimeter does not detect it. After running my heat gun on it and watching it with my infra red temp gun, I was able to determine that this stuff is suitable for use up to 500 degrees F. I also do a lot of bodywork, so there are always cans of body filler around in my shop... Anyway, here is my electric heater core. It slips in and out of my heater box just like the factory heater core did. Two elements side by side, and ready to wire up.

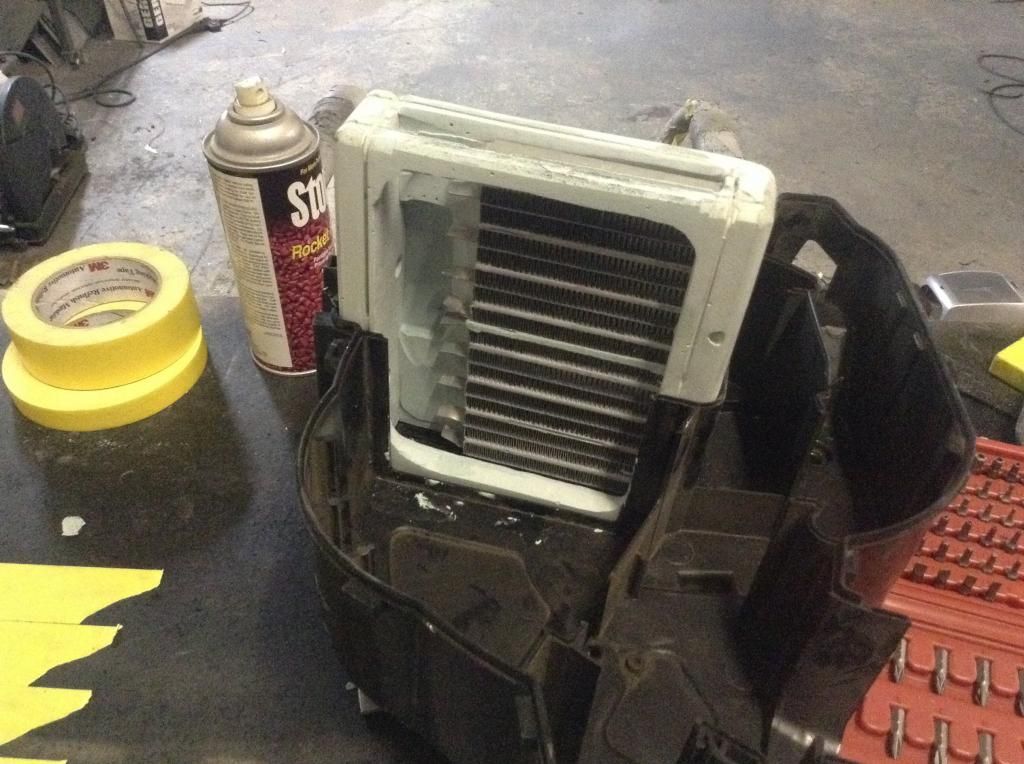
Here is how it looks in my heater box
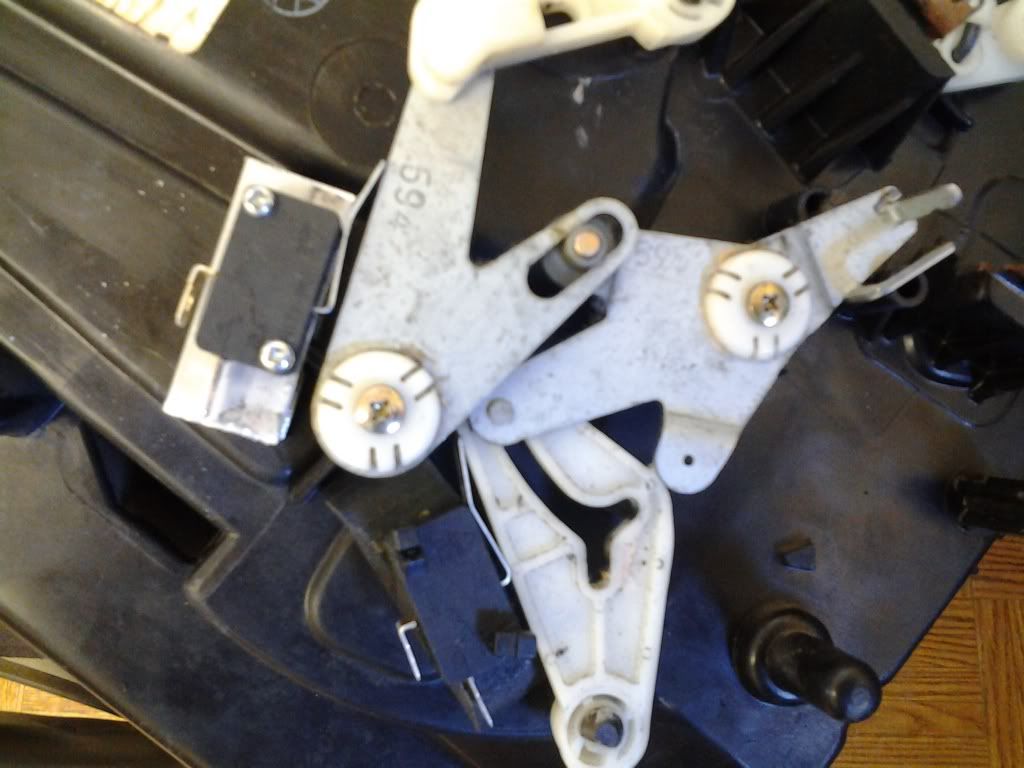
Since there are two heater elements, I set it up so that you can turn on one at a time. Kinda like high and low. When my heater control knob is in the cold position, The linkage looks like this. Note that I have added two micro switches on the lower left in this picture.
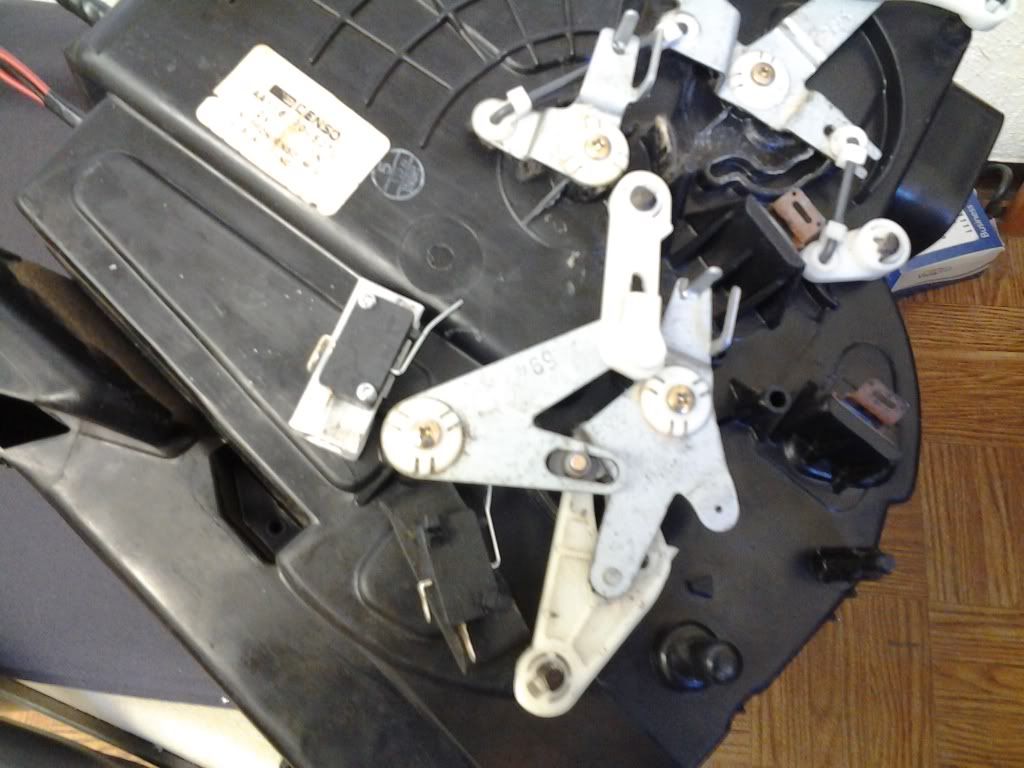
In this pic, the heater control knob is moved halfway, to the point where the blue stripe transitions to a red stripe. Notic that micro switch number 1 is pressed by the linkage, but switch 2 is not pushed yet. This turns on one element for 1500 watts
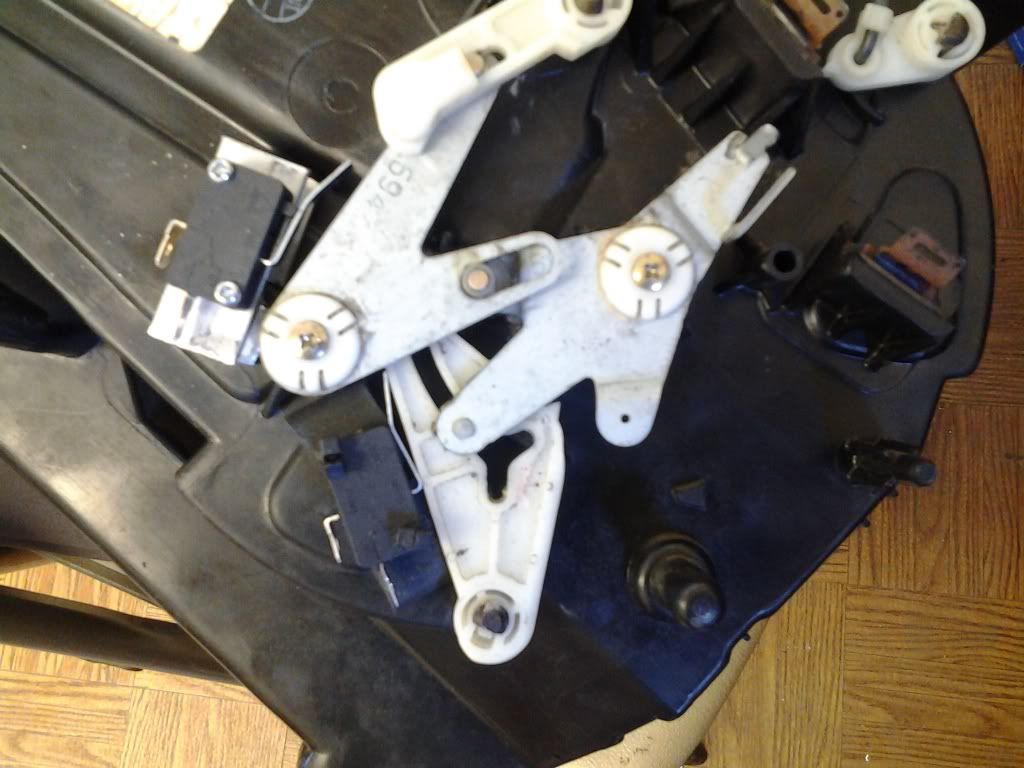
When you turn the heater control knob all the way to hot, the second micro switch gets pushed which turns on the second element as well for 3000 watts. 3000 watts is excessive, but it is nice to get into a cold car and have 165 degrees F blowing out the vents within seconds. Once the car is warm inside, 1500 watts is very nice for maintaining a nice warm car so I turn it back down. From a drivers perspective, the electric heat mod is seamless, but it has more heat output capability than factory and there is no waiting for a thermostat to open for the heat to start.
 |
|
|
|
|
The Following 4 Users Say Thank You to EVmetro For This Useful Post:
|
|
|
02-28-2015, 02:17 PM
|
#15 (permalink)
|
|
EcoModding Apprentice
Join Date: Feb 2015
Location: Sacramento
Posts: 202
Thanks: 3
Thanked 225 Times in 91 Posts
|
So here is where things get even better in the world of efficiency. I have done research, reading, road testing, and lots of learning about the use of regenerative braking. What I have learned, is that the principle of regen really does work, but the only way that it can actually improve efficiency is if it is utilized correctly. Unfortunately, manufactured new EVs, as well as all of the conversions that I have seen, do not utilize it correctly.
The most common use of regen out there is off throttle regen, where you get some regen when you let off the accelerator. It does in fact harvest energy that would have been wasted as heat coming off of the brakes, but there is a big catch to the deal. When you use regen, you also destroy the kinetic energy of your car traveling at a steady speed. It takes more energy to speed up than it takes to maintain a speed, so the most efficient way to travel is at a steady speed. Off throttle regen causes an unsteady speed, whether it be very tiny fluctuations in speed as you would see in an experienced eco driver, or big fluctuations of speed that you would see if the driver is bull****ting with a passenger or talking on his cell phone.
If you see a red light ahead and want to back off to time things so that it is green when you get there, it is often the best to "freewheel" in neutral or with the clutch pushed in, so that you never have to use the accelerator or brake, so that the car keeps as much kinetic energy as possible. There are also times when a little braking or acceleration are needed to maintain the steadiest speed, and this is where my circuits come into play. I wanted the freewheeling capabilities of a DC motor, but I also wanted the benefits of regen that come with going AC. Off throttle regen typically is set for about 10% of total capability, so if you have off throttle regen, you are missing out on the other 90% of what is available.
What I have done, is add an "on demand" variable regen button to my conversion that allows me to utilize all of the available regen capability, but only when I want it. I set my controller up to give me no off throttle, so it feels like I am driving a DC system instead of AC.
Here is my on demand variable regen button project:
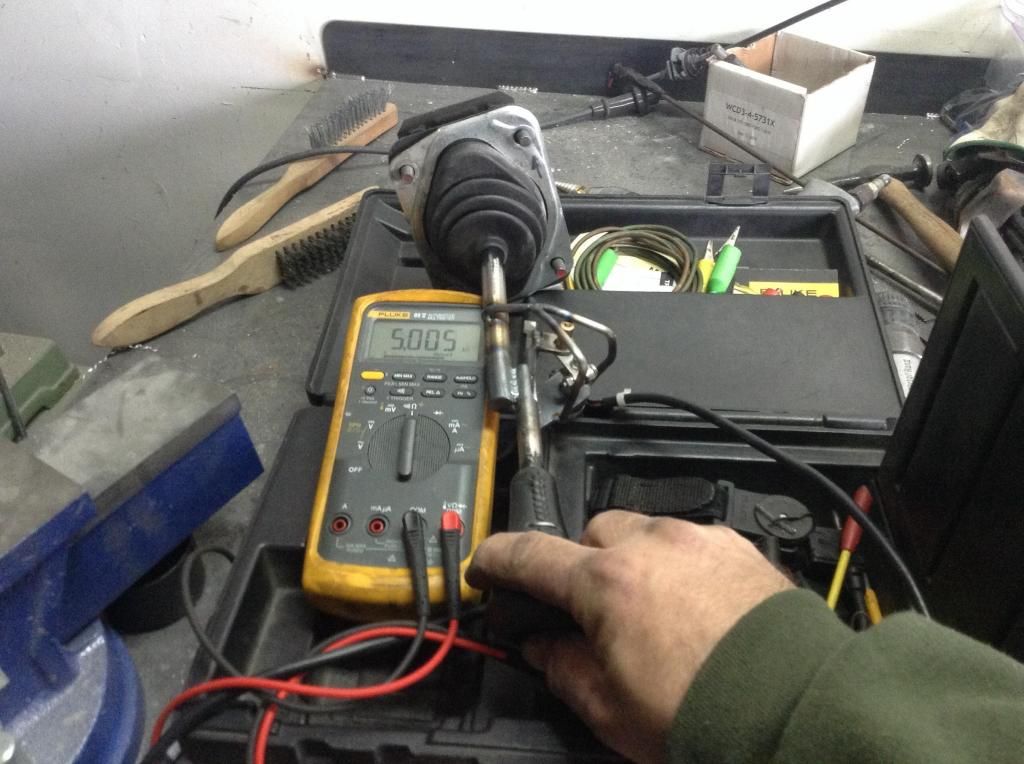
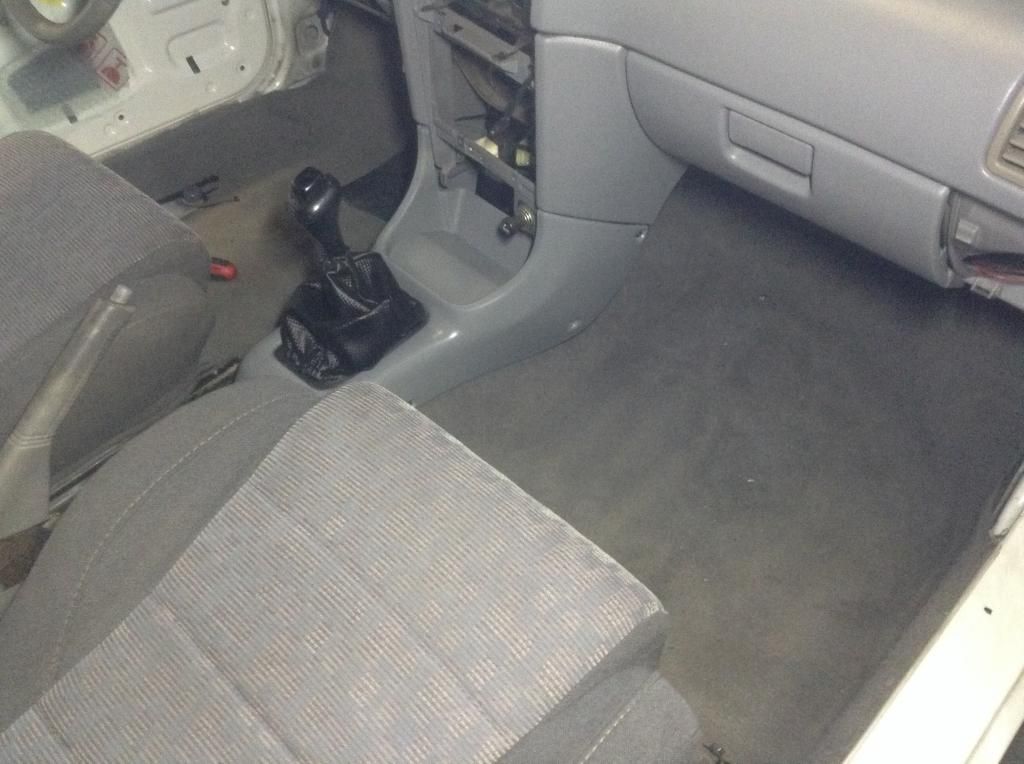
I picked up an automatic shifter over at pick n pull out of an old Buick. I was looking for something that would look as close as possible to a manual shifter, but I was after the button as well. The Buick shifter was severed in half, and same with the Metro 5 speed manual shifter. They were grafted together, and this potentiometer added.
When the button is not pushed, there is no resistance.
As I push the button down, I get variable (and very smooth) resistance all the way up to 5k. In this pick, I have the button all the way depressed for maximum regen.
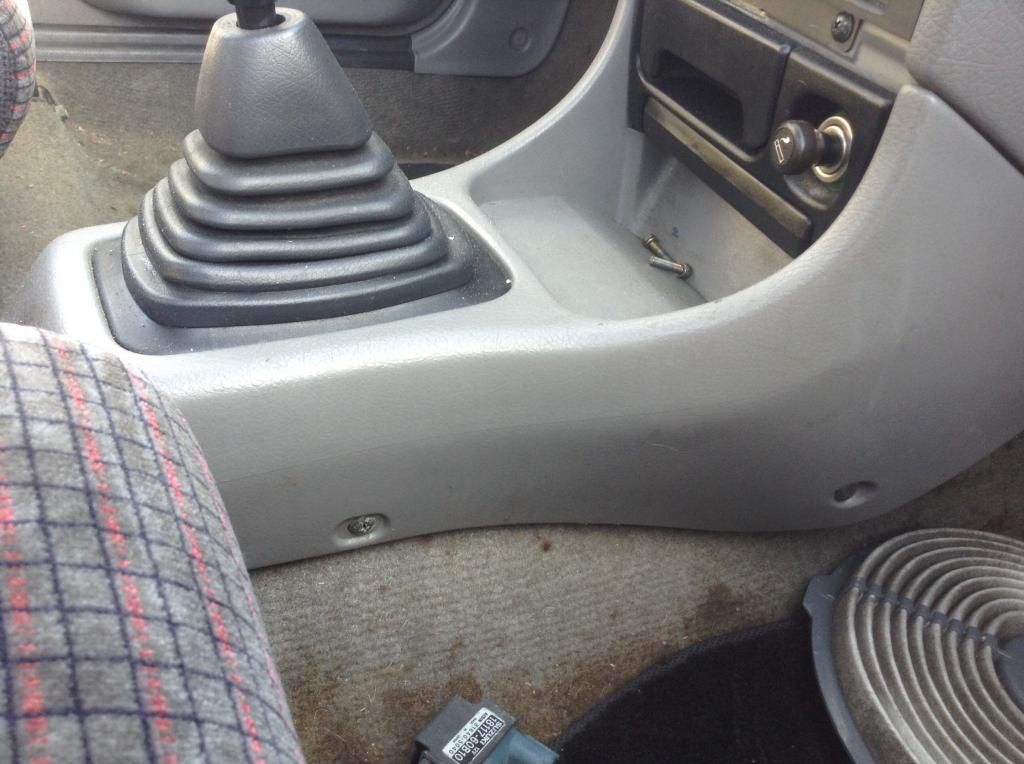
When I went to put the center console in, my big cage around the potentiometer (so the shift boot does not interfere) was right where the shifter passes through the center console, so the center console was interfering with my shift pattern. I had to modify it a little to get the shifter hole below the potentiometer.
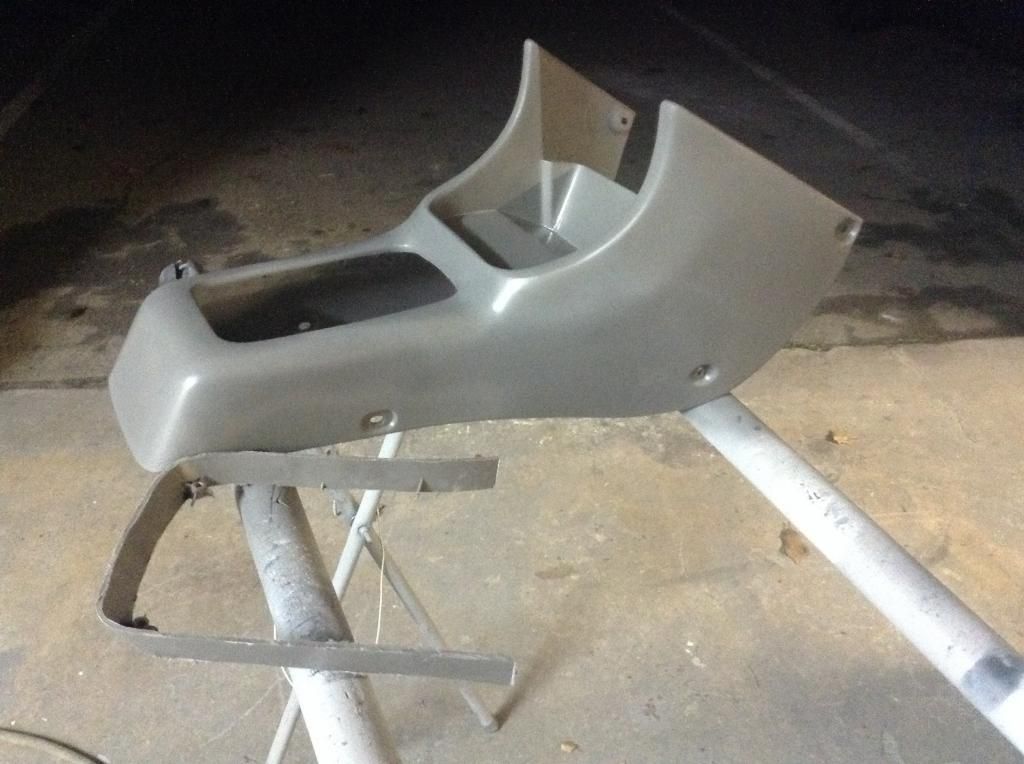
Here Is a factory unmodified center console just like the one I modified. This is in my beater gasoline powered Metro, just a reference photo.
I cut a slice out of my console (seen in the foreground) and lowered the surface. (That's a few hours of reshaping) Here it is after I modified it.
Now the opening is just below the potentiometer on my shifter. I have the boot pulled back so you can see the clearance while it is shifted into reverse.
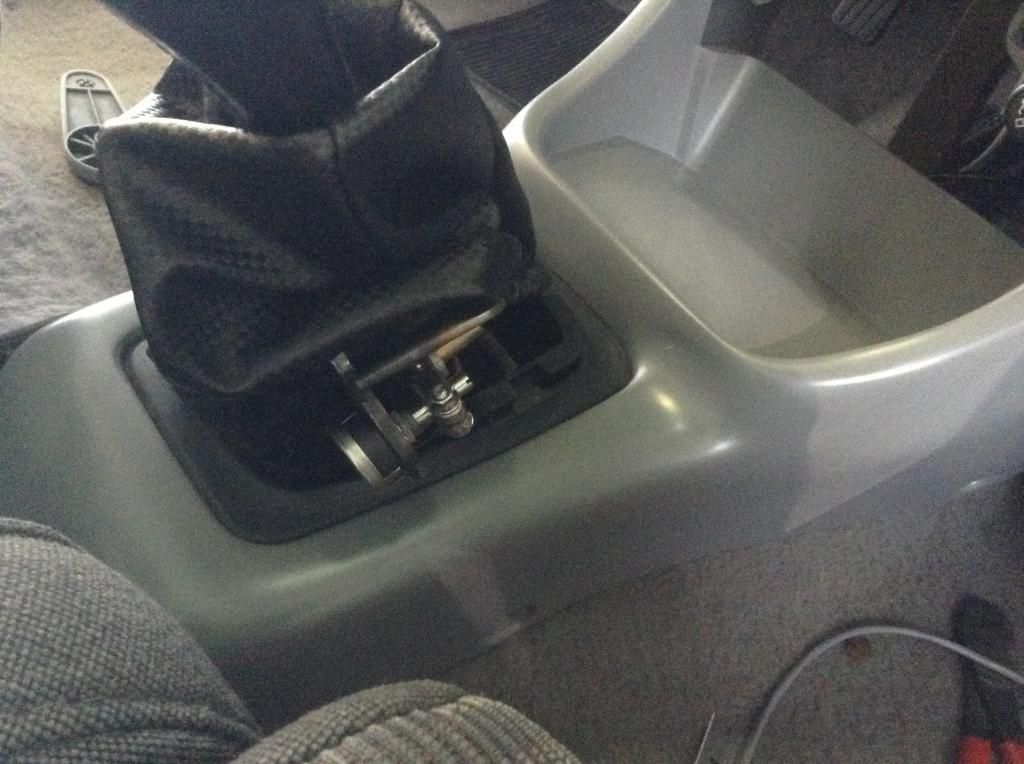
Here it is all installed with my custom shift boot installed too. It should resemble a regular 5 speed shifter.
 |
|
|
|
|
The Following 3 Users Say Thank You to EVmetro For This Useful Post:
|
|
|
02-28-2015, 02:23 PM
|
#16 (permalink)
|
|
EcoModding Apprentice
Join Date: Feb 2015
Location: Sacramento
Posts: 202
Thanks: 3
Thanked 225 Times in 91 Posts
|
I found that a setting of 70% regen allows me to make an emergency stop, all the way down to about 5 mph, all electronically. I can still use my regular brake pedal, and it works just like it always has, but this variable on demand regen button does handle about 95% of all my braking needs. I can now put way more energy back into my pack, and I only do that when the energy that I harvest is truly waste energy. This button feels a lot nicer than using the brake pedal, and has mind boggling braking power.
|
|
|
|
|
The Following 3 Users Say Thank You to EVmetro For This Useful Post:
|
|
|
02-28-2015, 07:28 PM
|
#17 (permalink)
|
|
EcoModding Apprentice
Join Date: Feb 2015
Location: Sacramento
Posts: 202
Thanks: 3
Thanked 225 Times in 91 Posts
|
I had a pretty good sized scrap of honeycomb fiberglass laying around, so I chopped it up and made this electronics enclosure with it. This will all be hidden, so I am not going to make this thing pretty. The fiberglass honeycomb is extremely light, but very strong material. When this box is empty, it feels like an empty cardboard box. Anyway, I have some contactors in this box, an Orion BMS, and an old skool DC DC converter that I had leftover from another conversion, all of my configuration switches and relays, and my wifi and Bluetooth signal transmitters in this box. The wire junction strips on the end make it easy to connect this module to the car, since I have all kinds of relay logic going on in here.
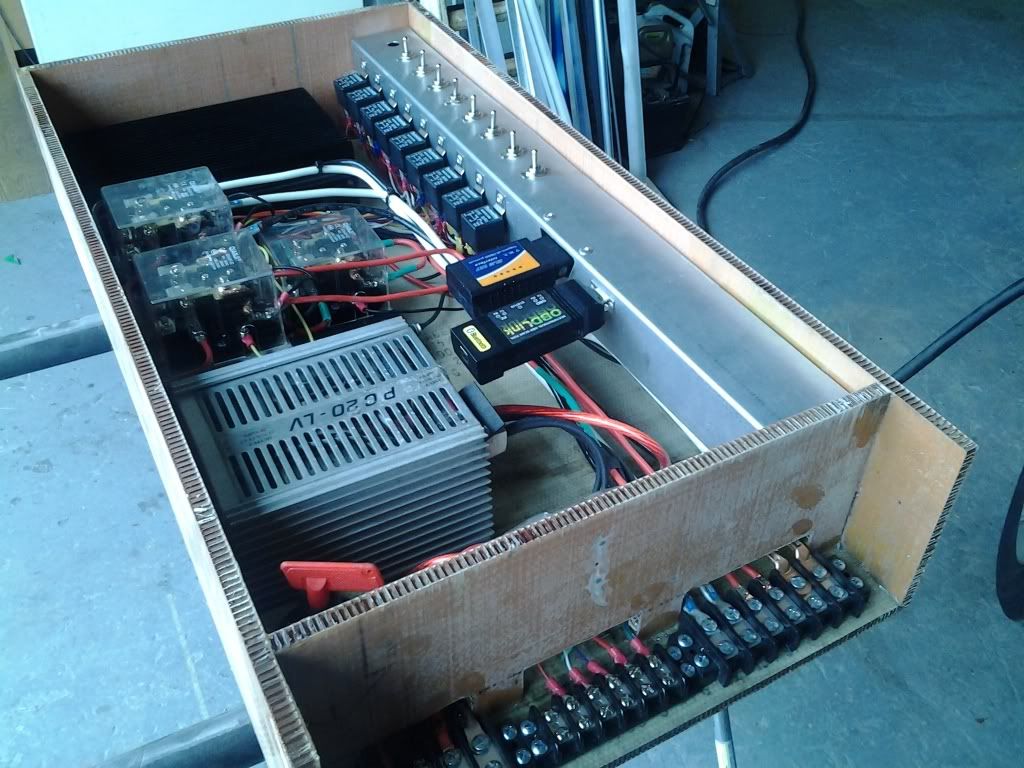
Those two contactors that are side by side in the above pic are for my charging cord inlets. Since the charger does not care if it gets 110 or 220, both of the charging inlets can be wired in parallel. The problem with this, is that the pins on the car need to be male, so if you were plugged into 220, the 110 male pins for the 110 extension cord would be live and dangerous. Those two contactors and some of those little cube relays are used to isolate the two charging inlets from each other. I also set it up so that you can plug in your regular 110 extension cord, and then forget that you already plugged it in, and then plug in the 220 cord as well. The 220 inlet will dominate, and the 110 will not go anywhere if you make this dumb mistake.
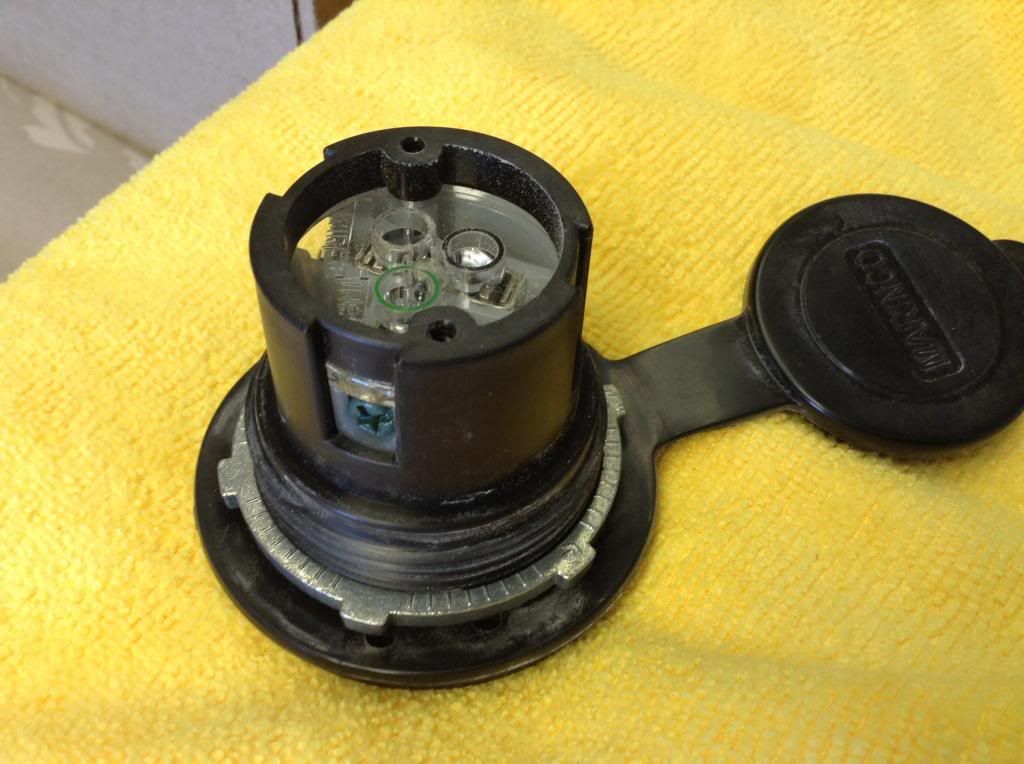
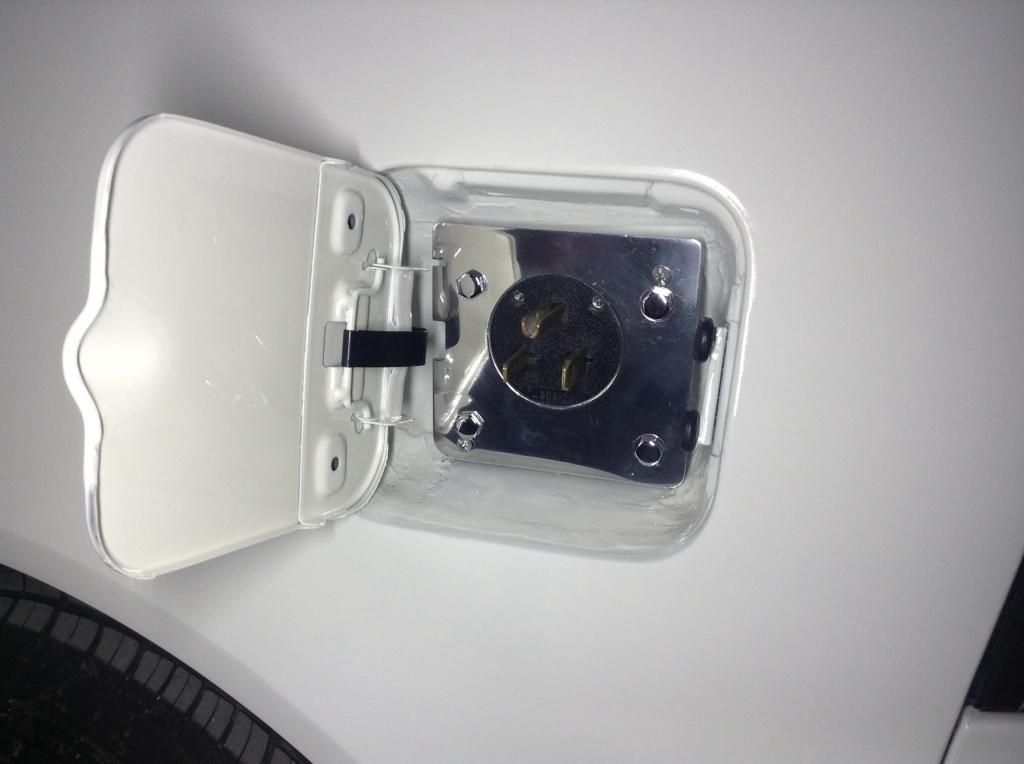
This is the 110 charging inlet that I use. Although this is the slowest way to charge an EV, 110 plugs are EVERYWHERE in North America. If you ever get yourself in trouble and need a charge, 110 is your friend. I don't use the 110 very much, but I think it is foolish to own an EV in North America and not have one of these on your car.

These can be mounted with the threaded nut that is on these threads, or with screws on the front side.
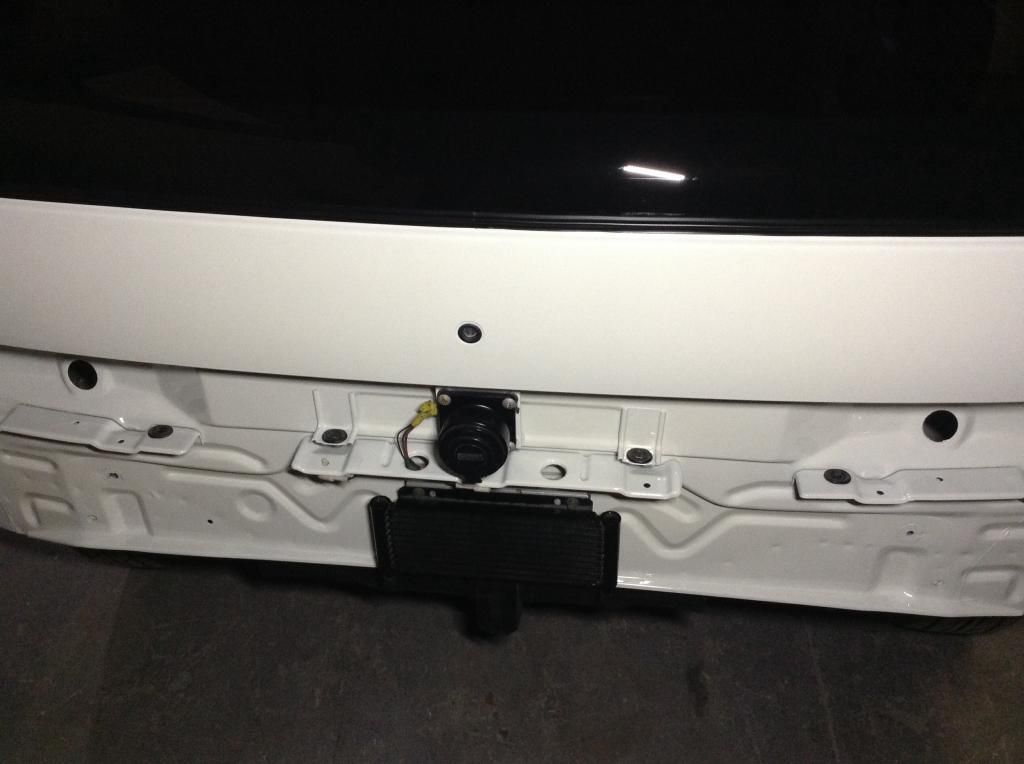
I modified a part for a home electric panel to accept my inlet, and mounted it solidly to the car.
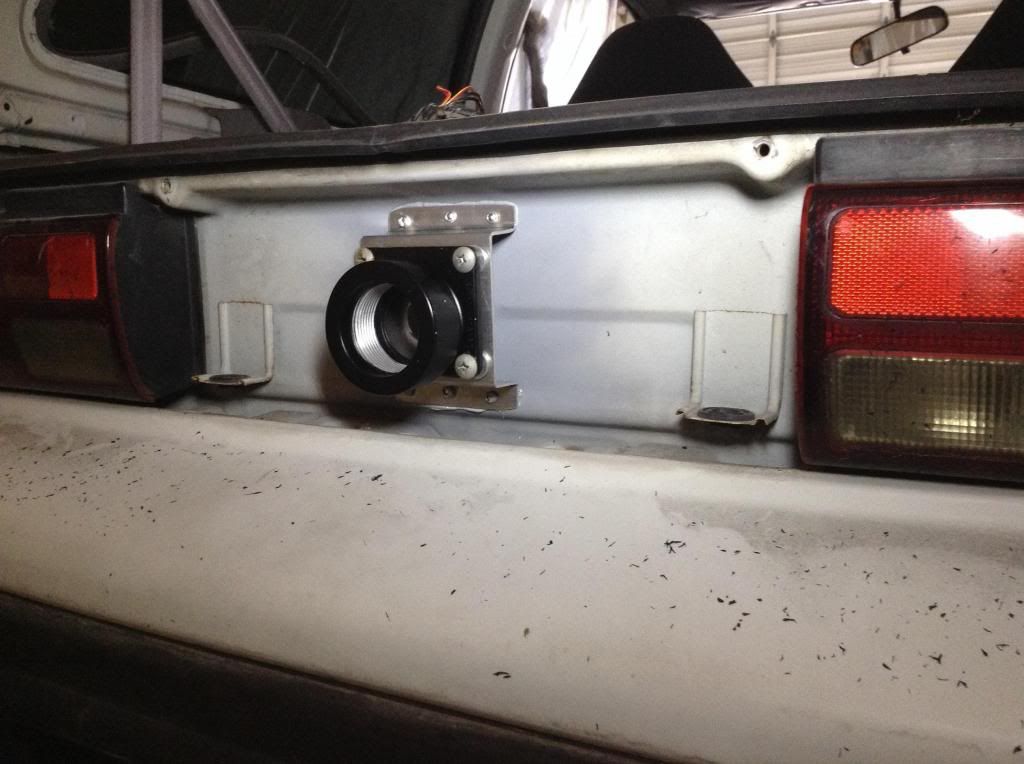
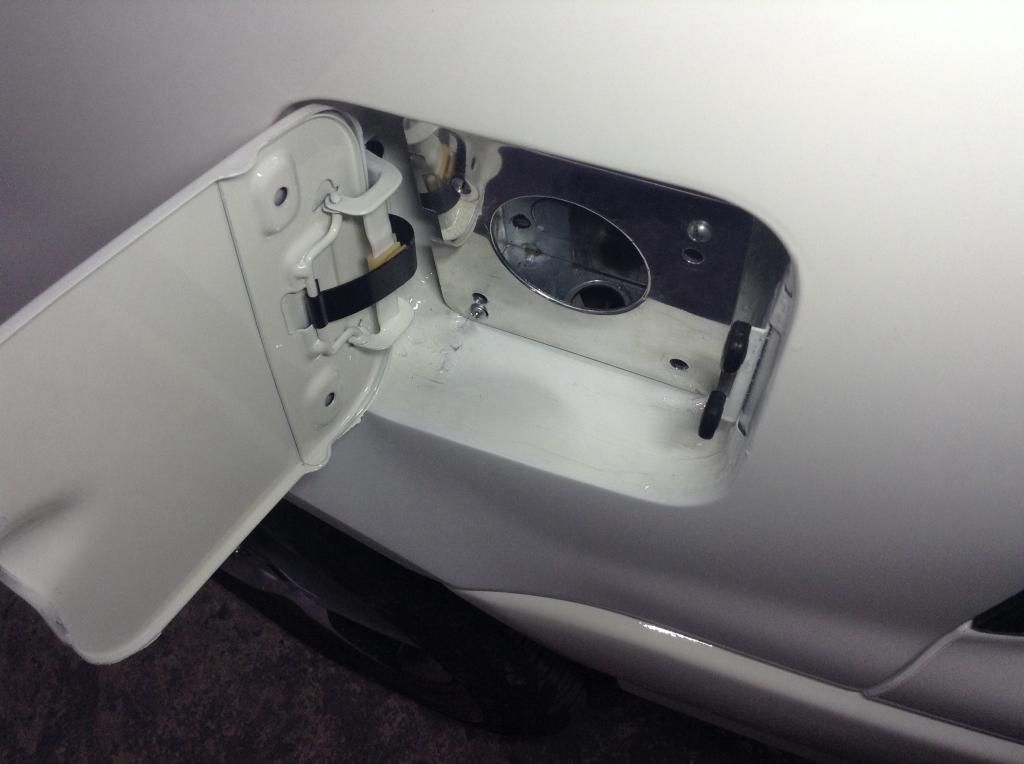
and then chopped a hole in my filler panel between my tail lights. The filler panel is not strong enough to take the abuse of repeated plugging in and unplugging, which is why the inlet is mounted solidly to the car. The filler panel is pure decoration.
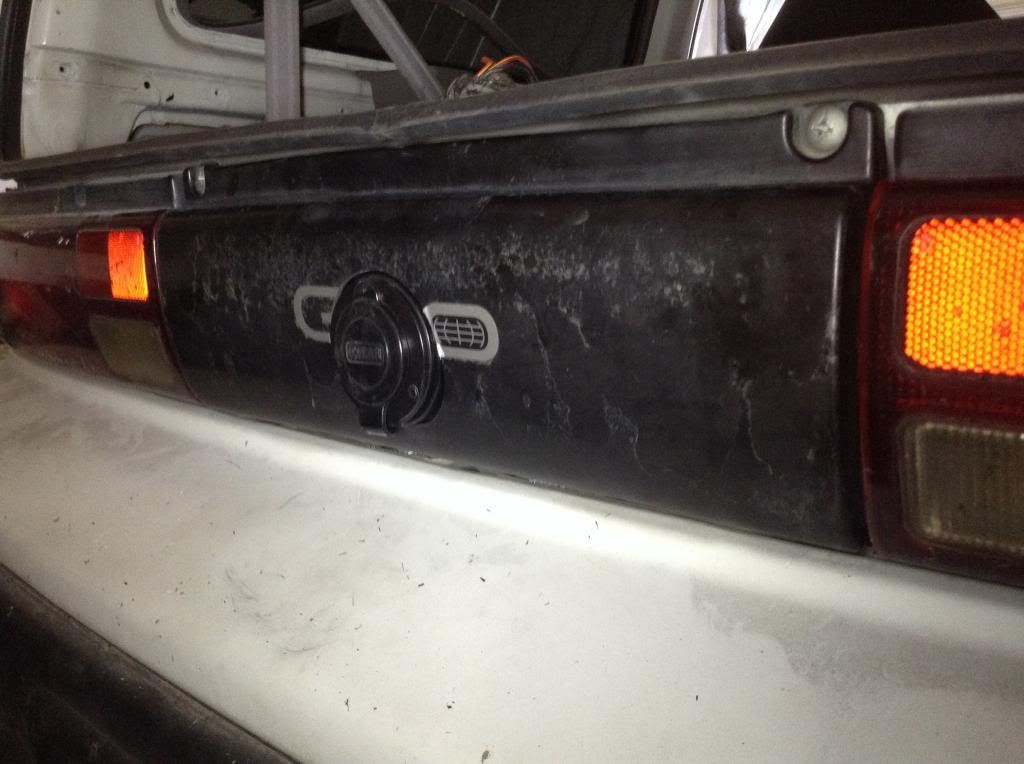
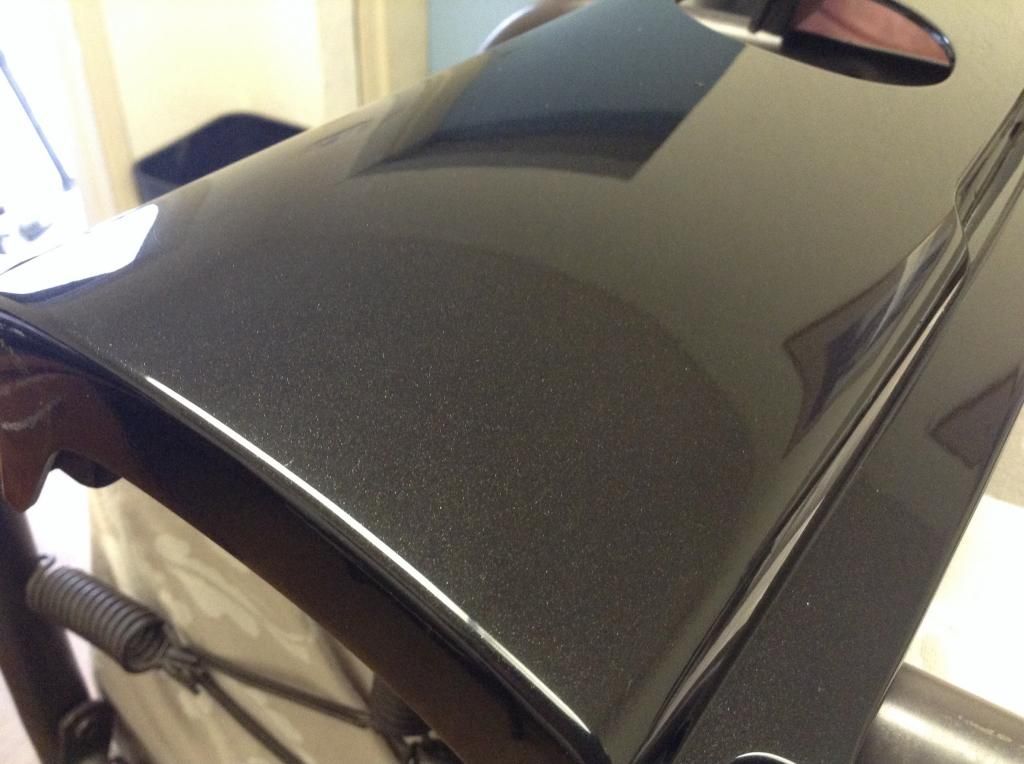
Here is that panel all repainted with metallic black from a 2012 Dodge Charger
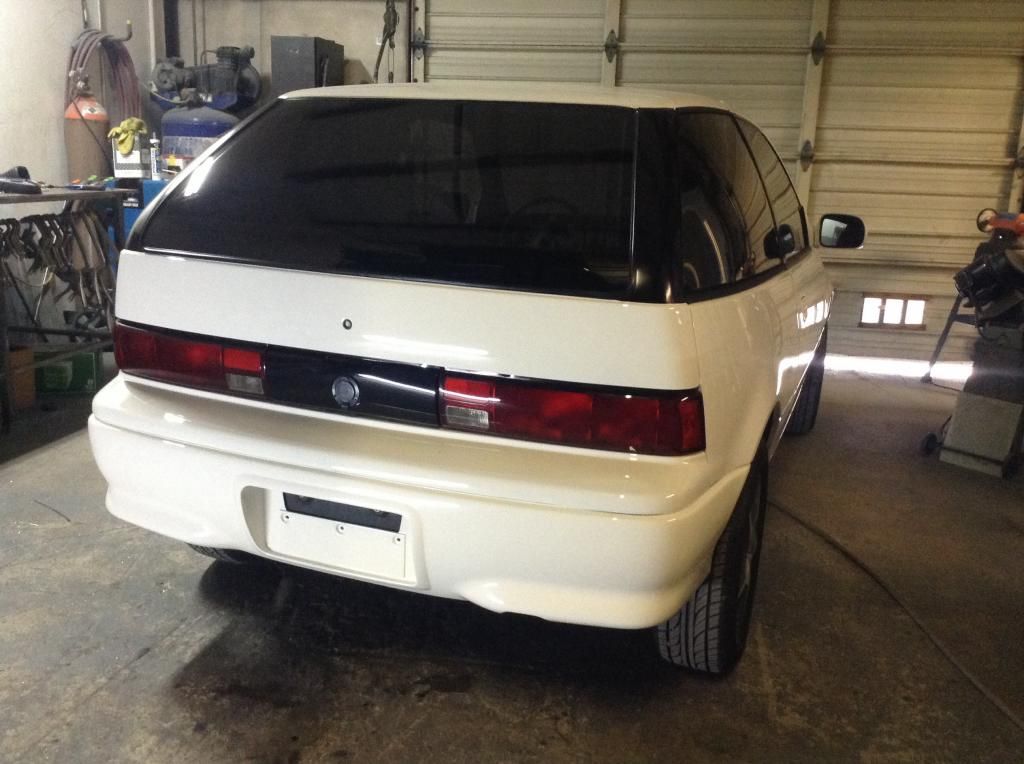
Now the car is restored, ready for tail lights and the filler panel
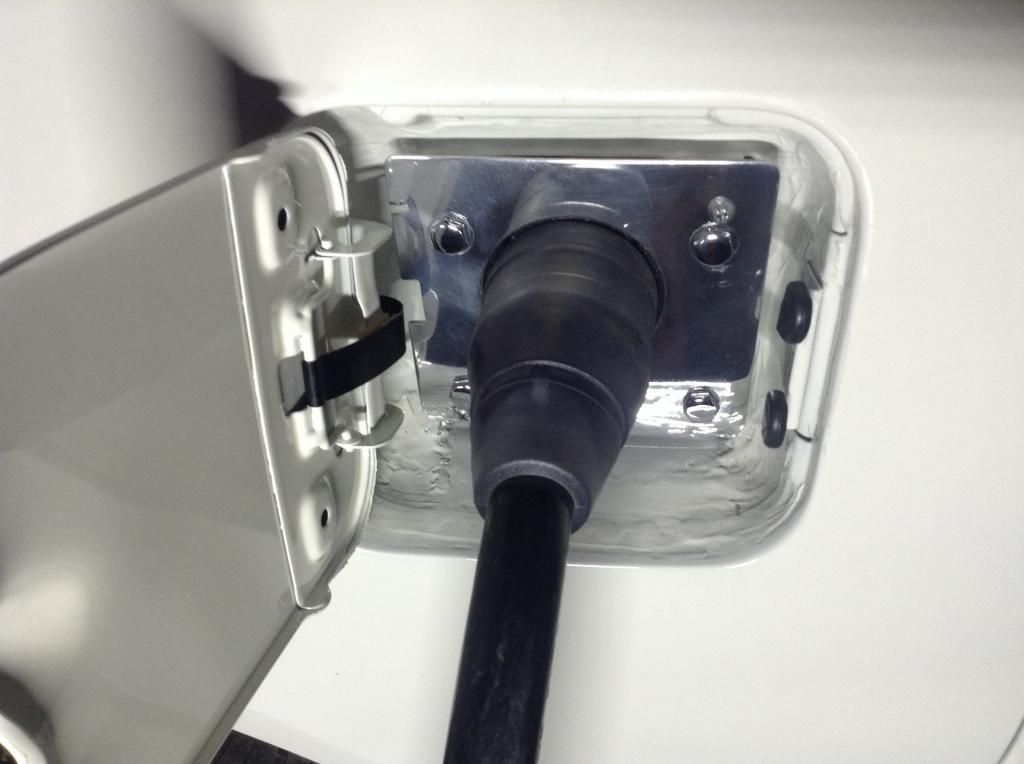
Here it is all built. Tail lights polished and loaded with LEDs, and a very functional and good looking 110 inlet. The slowest and surest way to charge an EV. The automakers are still trying to sell new EVs with a big ass cord with a funky heavy box in order to use 110v. I think it is called an EVSE?
This is what I use for 220. This is a 50 amp connection, so this is what I like to use the most. I can draw all 50 amps and then some from the wall, and I have a big circuit for my welder at the shop with a 25 foot extension cord already, so I am well set up for charging at work.

This is the box that I mount it in. The lid squeezes the cord end into the box so I can ram my charging cord in and out without having to worry about things. Very rugged.
Here it is ready to plug in
Here it is plugged in
 |
|
|
|
|
The Following 2 Users Say Thank You to EVmetro For This Useful Post:
|
|
|
02-28-2015, 07:44 PM
|
#18 (permalink)
|
|
(:
Join Date: Jan 2008
Location: up north
Posts: 12,762
Thanks: 1,585
Thanked 3,558 Times in 2,220 Posts
|
Very nice workmanship! 
Were the small wheel studs breaking? |
|
|
|
|
02-28-2015, 09:07 PM
|
#19 (permalink)
|
|
EcoModding Apprentice
Join Date: Feb 2015
Location: Sacramento
Posts: 202
Thanks: 3
Thanked 225 Times in 91 Posts
|
Quote:
Originally Posted by Frank Lee

Very nice workmanship!
Were the small wheel studs breaking? |
Thanks. I use a 14 inch wheel with 12mm wheel stud holes on all of my Metro conversions, but the earlier Metros like this on came with 12 inch wheels with 10mm holes. All the Metros after 1994 came equipped with the 12mm, so this just brings it up to date. |
|
|
|
|
The Following User Says Thank You to EVmetro For This Useful Post:
|
|
|
03-01-2015, 12:44 PM
|
#20 (permalink)
|
|
EcoModding Apprentice
Join Date: Feb 2015
Location: Sacramento
Posts: 202
Thanks: 3
Thanked 225 Times in 91 Posts
|
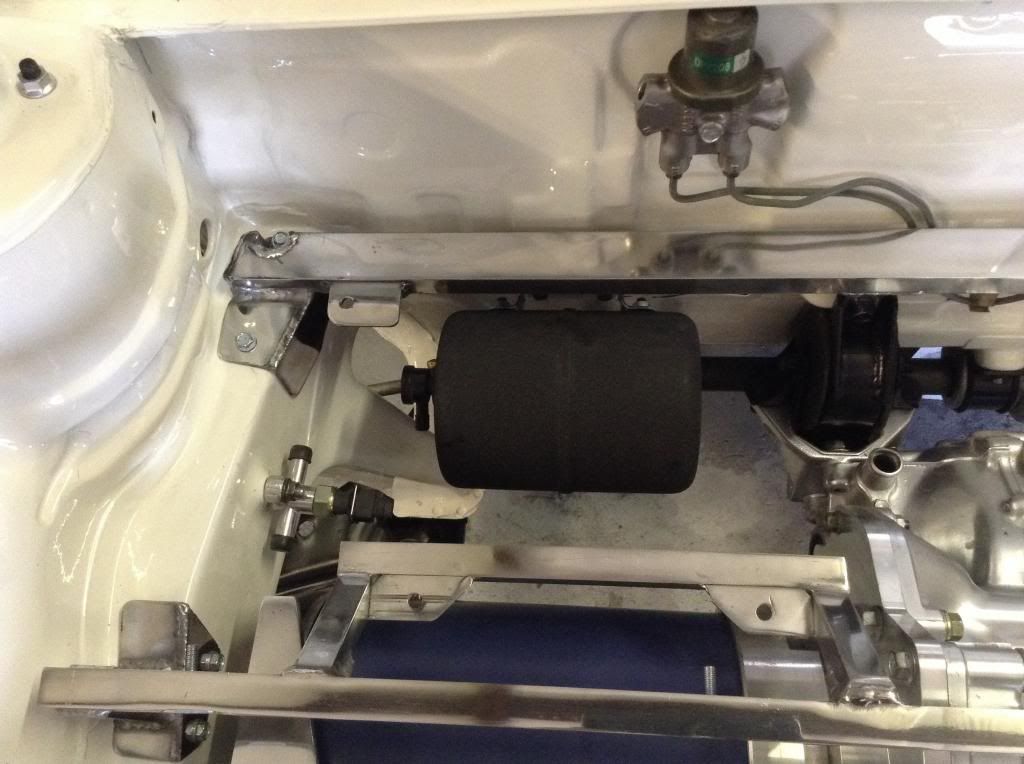
Here is a pic of my vacuum pump for my brakes. Although this EV does not need much from my on demand regen brake, I want fully functional and nice traditional brakes as well. I was tempted to not use a vacuum system on this EV since it is being constructed with weight in mind, but I really want nice brakes if I am in too much of a hurry to use my regen brake.
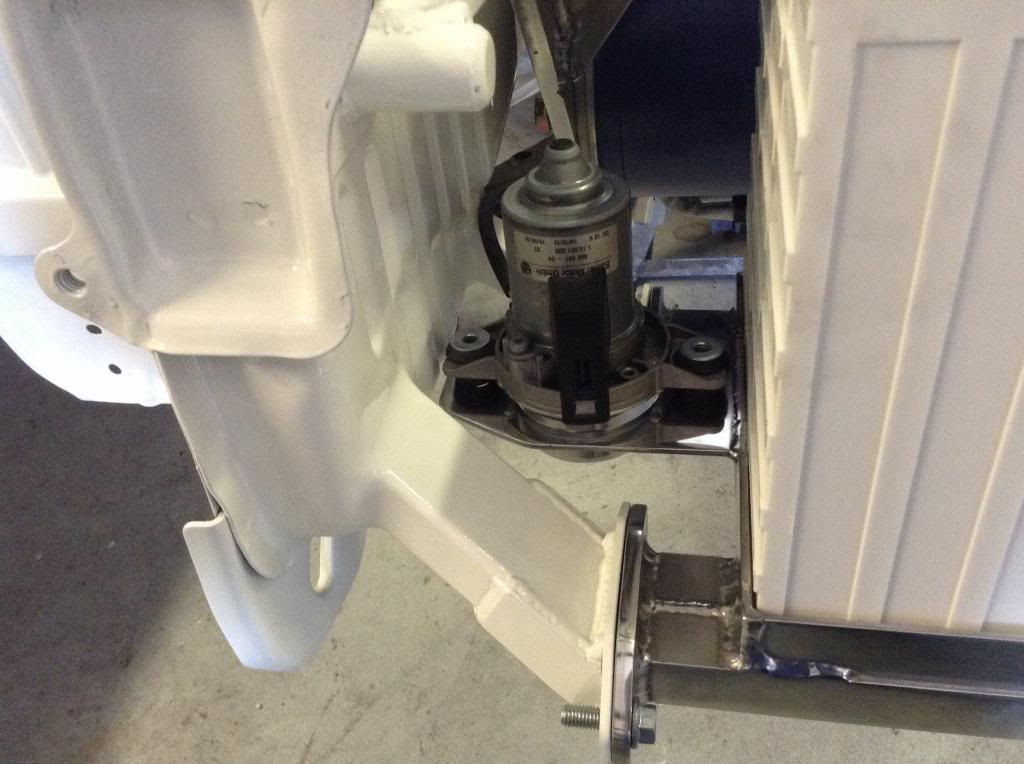
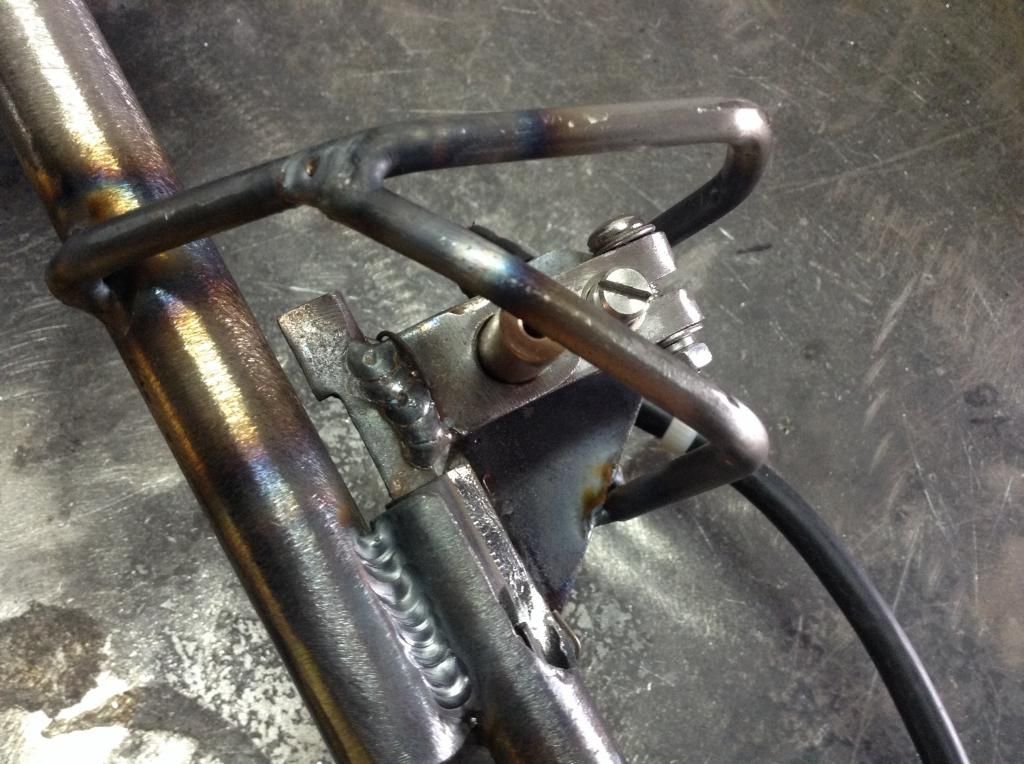
The black round thing behind the motor is my vacuum storage tank, and you can see my vacuum switch on the frame rail.
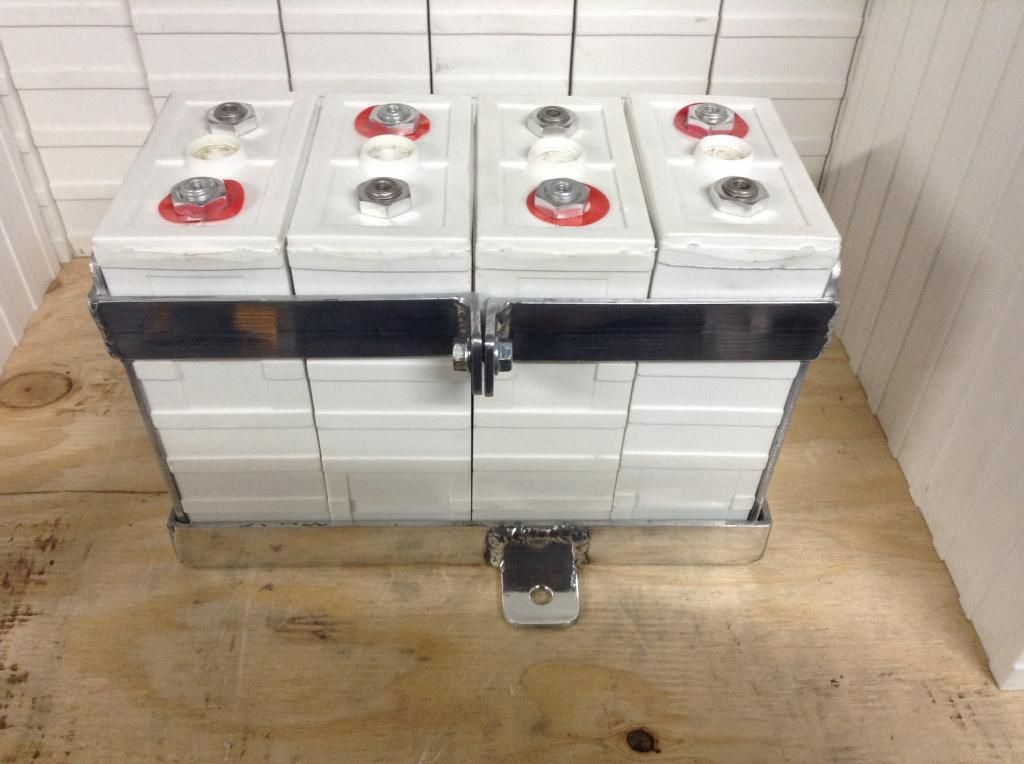
I use four 30AH lithium batteries, wired in series for my aux battery that runs the headlights, wipers, and regular 12 volt stuff. This is my "squeeze box" that holds them in place. Just stick them in, and tighten the bolts.

Here they are installed in the box
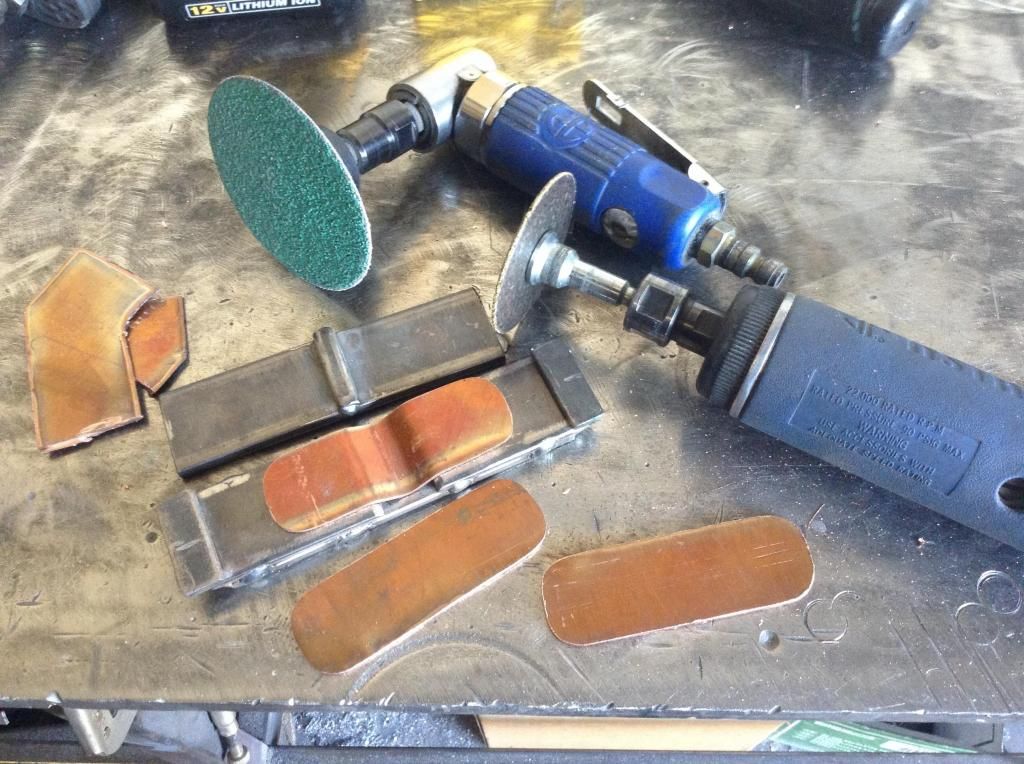
The bus bars are pretty small, so I just cut them out freestyle with my 3" cutoff wheel, and then buzzed the corners off with my little roloc grinder.
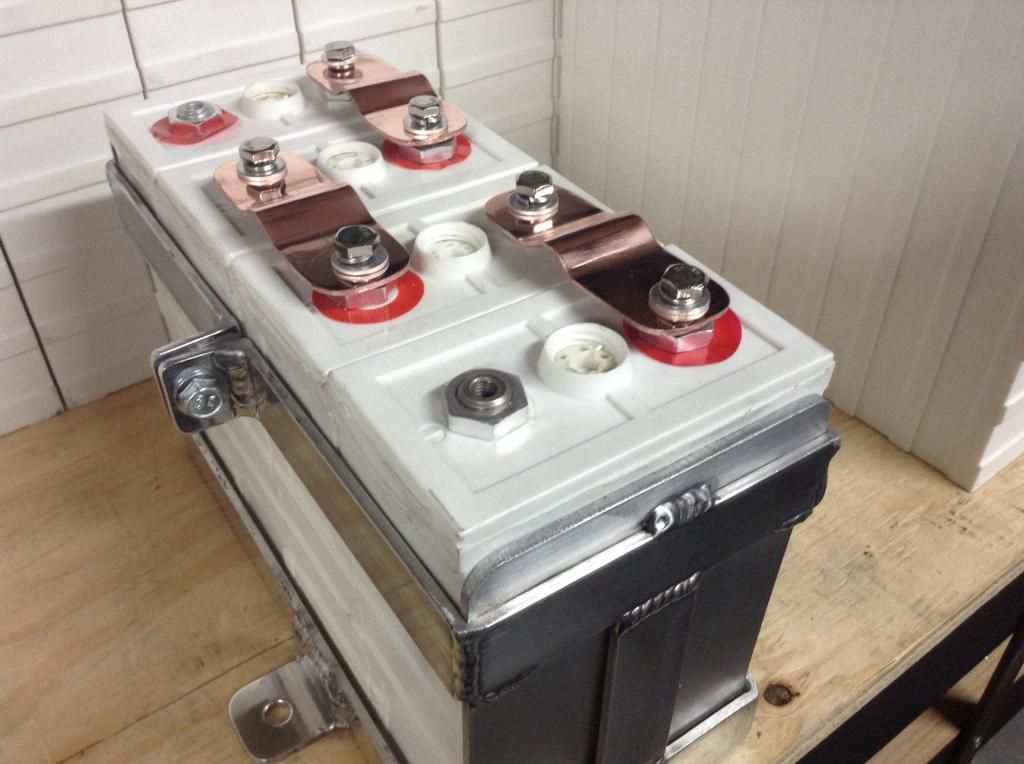
A little work with my polishing wheel, and we get to have a beautiful product that is hand crafted in the USA. Stuff like that is getting hard to come by...
|
|
|
|
|
The Following 3 Users Say Thank You to EVmetro For This Useful Post:
|
|
|