Go Back   EcoModder Forum > EcoModding > Aerodynamics
Register Now
 Register Now
 

Reply  Post New Thread
 
Submit Tools LinkBack Thread Tools
Old 12-29-2012, 06:34 PM   #11 (permalink)
Master EcoModder
 
christofoo's Avatar
 
Join Date: Mar 2012
Location: Salt Lake City
Posts: 292

00C - '00 Toyota Corolla
90 day: 43.54 mpg (US)
Thanks: 147
Thanked 190 Times in 73 Posts
Thanks for the encouragement everyone!

Quote:
Originally Posted by euromodder View Post
Sounds good to me though !
What's your wife's issue with sheet alu construction ?
It's visually the cleanest method of construction, lighter than wood and if you keep it galvanically separated from steel, more durable as well.
...
The real issue is that I've never used this method - so my skill is unproven and the wife is nervous. The clincher favoring monocoque sheet metal for me is that I can get enough strength for cargo without a bunch of layers and complexity (you know, give or take some bracing and forethought), plus I can bolt hardware in place easily, even as an afterthought. I'm also way more excited about sheet metal failure mode in comparison to other construction methods, thinking about the fender bender that I hope will never actually happen.

Quote:
Originally Posted by chrisgerman1983 View Post
Look forward to seeing your project! the cruise control sounds interesting! what is your skill set that will help with it? I find that my cruise control is a very aggressive. Do you think that you can limit the RPM or load?
I'm experienced with alanog and embedded electronics, if it requires some solenoids / pneumatics I'm sure I can manage that too. The critical piece is implementing electronic actuation for moving the tranny out of gear and back. EOC would be icing on the cake but not necessary and obviously more complex. I would probably use a simple load or throttle-position target, might be just analog, maybe even user adjustable. I'll probably make a thread for it before long, I hope it might be a big winner...

  Reply With Quote
Alt Today
Popular topics

Other popular topics in this forum...

   
Old 12-29-2012, 08:03 PM   #12 (permalink)
Master EcoModder
 
christofoo's Avatar
 
Join Date: Mar 2012
Location: Salt Lake City
Posts: 292

00C - '00 Toyota Corolla
90 day: 43.54 mpg (US)
Thanks: 147
Thanked 190 Times in 73 Posts
Quote:
Originally Posted by freebeard View Post
I'll never find the original thread, but someone who races dirt-track modifieds recommended an aluminum/plastic laminate that they use for those big wings they run. I did bookmark a source of the material, Polymetal. It comes in 1/8' and 1/4' thickness, with strength approx. equal to 5/8" plywood. A supplier local to me can provide it for $104 for a 4'x8' sheet: Sign Panels | NUDO&reg


The farther the better. Flush-headed rivets?

You could put the bottom contour at ~10ー and extend a flap all the way to the back of the gas tank/spare tire well or whatever's under there.

What do you plan to do to keep the taillights visible?
Hmm Polymetal. Never heard of it, but coropolast under aluminum had crossed my mind, primarily for vibration damping but also a little benefit in buckling stength, although in principle it makes sense as a possible weight reduction method for the flat panel sections. I kind of think that a bead roller is still the best way to go in that regard, but probably I need to play with it, anwyways I haven't decided for sure I want to invest in a bead roller. But I might sell the SGII I won for EM's BD as justification for it.

Aerodynamically I think rivet heads don't matter, but I might have to flush them just for aesthetics.

For taillights, a trailer light set is the way to go. If I do a gapfill on the sides it will be clear plastic so as not to obstruct the stock headlights when the hitch box is off.

Last edited by christofoo; 12-29-2012 at 08:23 PM..
  Reply With Quote
Old 12-30-2012, 12:09 AM   #13 (permalink)
Master EcoModder
 
freebeard's Avatar
 
Join Date: Aug 2012
Location: northwest of normal
Posts: 28,500
Thanks: 8,060
Thanked 8,862 Times in 7,315 Posts
If you look at the website, they have a wide variety of composite materials. They make 5/8" plywood with aluminum and/or plastic skins for the back doors of box vans. AlumaCorr™ is essentially pre-bonded coroplast and aluminum.

The Polymetal might survive a bead roller. But I'd settle for being able to radius an edge.

My intended material was laminated redwood benderboard, or bulkheads and stringers with shrink wrap plastic skin; but this stuff would afford a higher level of finish. My local supplier is Multicraft Plastics. I'm going to get a sample the next time I'm on that side of town.
  Reply With Quote
Old 01-20-2013, 03:51 AM   #14 (permalink)
Master EcoModder
 
christofoo's Avatar
 
Join Date: Mar 2012
Location: Salt Lake City
Posts: 292

00C - '00 Toyota Corolla
90 day: 43.54 mpg (US)
Thanks: 147
Thanked 190 Times in 73 Posts
More detailed plans

I was hoping to start fab by now, but I ended up having higher priorities this month.

Anyways, I did some CAD to help firm up my planning. Might as well share the aero eye-candy.


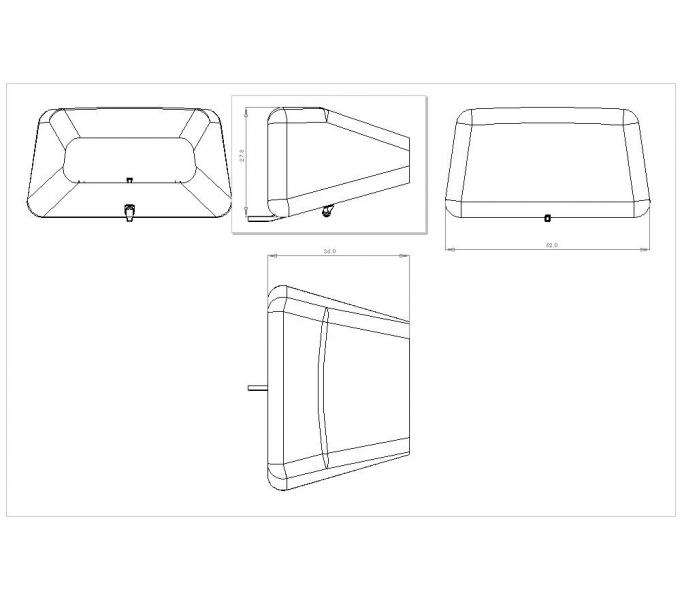
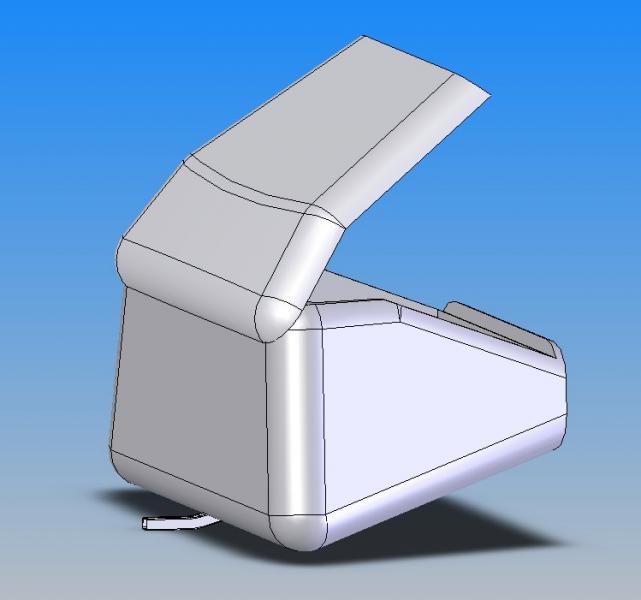


The lid ended up with so many compound curves that it would be very hard for me to learn how to make it - and make it look good - in aluminum. But the good news is the lid shouldn't need to take as much abuse as the rest of the box, so fiberglass should be great. I'm going to make a mold for the fiberglass with plywood and foam.

The rest of the box will be aluminum sheet. The the only compound curves will be contained within 6 corners. All 6 have a 4" radius, so I'm thinking that the stump method would work well. I see one or two spots, other than the floor, that probably need some framework of one sort or another. I figure I'll want a buck, at least for a few cross-sections, as well.

The 6 shrunk corners shouldn't be too ugly, even if I do them poorly, since 4 on top are covered by the lid, and the 2 on bottom might stay out of the way. This plan should pretty well cover wife certification, give or take a little bondo over the rivet heads, and it keeps my tool outlay pretty minimal as well. Not that I would really be sad if I ended up with some sweet metal shaping tools, but I'll try the stump and probably some dollies and a slapper and then go from there.

Planning on a metal square tube frame floor with pink foam in the gaps and 1/4" plywood over the top. This gets bolted to the inside of the rest of the box.


I've depicted circular tube cross members - I was hoping to find off-the-shelf lugs and do silver brazing, but I can't find generic lugs anywhere. If I drill through square tubes then the load on the joints is probably fine with just epoxy putty to keep them from rattling. But I might change my mind and get a welder and do everything in 1.25" square tubing. Man, that would be fun.

There is also the caster shown; I still haven't decided for sure, but I think this is the way to go. This design means in a ground-strike the caster and hitch receiver will have to bear the weight of some of the vehicle. The caster here is rated at 300lbs, so it may or may not break. My experience is that the car will not strike at this departure angle if it's unloaded. So if I do this right, the weight on the caster should be no more than the load in the car, not the car itself. I've also set the bottom slope at 15.5ー to keep the departure angle sane, which is faster than ideal but will still provide some aero benefit.

Another approach is to use a caster, hinge and chain so that the box can just bend out of the way instead of trying to support the vehicle. This would also enable lowering the bottom slope closer to the aerodynamic ideal. But space is tight between the trunk and the box, and it adds complexity, and I'm debating whether it's worth it, since I'd have to redesign everything. (Better now than later though.)

EDIT: I forgot to mention; this box has about 18 cubic feet for interior volume, says my CAD software. That's gonna be great! The hitch rack / bag I've got now is 11.5 cubic feet. The Civic only has 11.9 cubic feet in the trunk.

Last edited by christofoo; 01-21-2013 at 01:42 PM..
  Reply With Quote
The Following 4 Users Say Thank You to christofoo For This Useful Post:
HHOTDI (03-01-2013), mikeyjd (05-22-2013), Sven7 (01-20-2013), turbothrush (01-20-2013)
Old 01-20-2013, 03:18 PM   #15 (permalink)
Master EcoModder
 
freebeard's Avatar
 
Join Date: Aug 2012
Location: northwest of normal
Posts: 28,500
Thanks: 8,060
Thanked 8,862 Times in 7,315 Posts
Looks good. Although I don't get why the lines across the top are curved when the edge fore and aft of them are straight.

What would you think if the metal frame was a complete square with maybe 2 round crossmembers?

Look at the departure angle from the bottom of the caster to the back edge. Try the caster maybe 6" from the back edge. One is probably better than two so you don't get twisting forces on the tongue when you traverse a dip at an angle.

I've been on that side of town twice now and forgot the Polymetal both times. Maybe I should make a special trip, but my priorities have resorted themselves this month too.
  Reply With Quote
Old 01-20-2013, 09:59 PM   #16 (permalink)
Master EcoModder
 
christofoo's Avatar
 
Join Date: Mar 2012
Location: Salt Lake City
Posts: 292

00C - '00 Toyota Corolla
90 day: 43.54 mpg (US)
Thanks: 147
Thanked 190 Times in 73 Posts
Quote:
Originally Posted by freebeard View Post
Looks good. Although I don't get why the lines across the top are curved when the edge fore and aft of them are straight.

What would you think if the metal frame was a complete square with maybe 2 round crossmembers?

Look at the departure angle from the bottom of the caster to the back edge. Try the caster maybe 6" from the back edge. One is probably better than two so you don't get twisting forces on the tongue when you traverse a dip at an angle.

I've been on that side of town twice now and forgot the Polymetal both times. Maybe I should make a special trip, but my priorities have resorted themselves this month too.
I was afraid that would be confusing; you can best see this in the front and back projected views; I've got a little curvature in the level area at the top, but no curvature in the sloped section. The line at the front is curved, but it's curved towards you, roughly. This is to match the curvature of the trunk, which is about 3/4" higher in the center than on the sides. I might drop this feature though. I doubt it will affect reattachment at zero yaw, although if the front lip of the box sticks up above the trunk anywhere I suspect it would cause a little drag at higher yaw angles. Arguably it is the curve of the roof that I should be trying to match on the sloped portion to get best reattachment. On the other hand if I'm not going to worry about drag from the caster I probably shouldn't obsess over the the front lip.

I've been wishing I had a CAD model of the car, because I'd like to get a closer look at how I matched the trunk, and there is also more detail on the sides of the car that I wish I could get a more careful look at. 3dcadbrowser has a nice looking 97 Civic file, and I can get it for free, but I have to wait '3-6 weeks' for my upload credit. I think the moral of this story is that if you're a CAD user you should go and upload a file now so you can have a free credit on tap when you need it. (And of course once I have a model of the car and the aero box I'm going to really wish I had CFD.) (Next best thing to the CAD file would be having it in the driveway, presumably it should be back in town later next week.)

I'll be tinkering with the placement of the caster. Once I get the bottom rail formed I'll set the car in the gutter and eyeball where it would work best. I have to consider on one hand that the strike is less likely to occur with the caster farther from the car, and on the other hand that the strength of the bottom rail will be greatest if I can keep the caster closer to the car.

I'd call the floor frame a trapezoid rather than a square, but yeah, that's the idea. And I may need to get the welder anyways - I'll have a better idea after I call some machine shops tomorrow on bending the main bottom rail.

Last edited by christofoo; 01-20-2013 at 10:04 PM..
  Reply With Quote
Old 01-20-2013, 11:22 PM   #17 (permalink)
Master EcoModder
 
freebeard's Avatar
 
Join Date: Aug 2012
Location: northwest of normal
Posts: 28,500
Thanks: 8,060
Thanked 8,862 Times in 7,315 Posts
What file type do you need? NURBs or polygon?

ウェブプラモ|CIVIC「シビック」

It doesn't say what year but it looks about right, except it's a hatchback.
  Reply With Quote
Old 01-21-2013, 01:42 AM   #18 (permalink)
Master EcoModder
 
christofoo's Avatar
 
Join Date: Mar 2012
Location: Salt Lake City
Posts: 292

00C - '00 Toyota Corolla
90 day: 43.54 mpg (US)
Thanks: 147
Thanked 190 Times in 73 Posts
Quote:
Originally Posted by freebeard View Post
What file type do you need? NURBs or polygon?

ウェブプラモ|CIVIC「シビック」

It doesn't say what year but it looks about right, except it's a hatchback.
So close, but I'll probably just have to fall back on Cardboard Aided Design to make sure I get the right aerodynamic fit, assuming I get to that point before 3dcadbrowser comes through. This is the one I'm waiting for: Honda Civic Sedan (1997) 3D Model | 3D CAD Browser Download I haven't found a CAD sharing website that didn't have at least one format I can import.
  Reply With Quote
Old 01-21-2013, 03:14 AM   #19 (permalink)
Master EcoModder
 
freebeard's Avatar
 
Join Date: Aug 2012
Location: northwest of normal
Posts: 28,500
Thanks: 8,060
Thanked 8,862 Times in 7,315 Posts
That's an interesting business model. What's the up/down ratio? It seems like they would have to grade the submissions to keep it from filling up with cruft.
  Reply With Quote
Old 01-24-2013, 10:52 AM   #20 (permalink)
Aero Wannabe
 
COcyclist's Avatar
 
Join Date: Dec 2007
Location: NW Colo
Posts: 738

TDi - '04 VW Golf
TEAM VW AUDI Group
90 day: 52.55 mpg (US)
Thanks: 705
Thanked 219 Times in 170 Posts
Subscribed. I have been kicking this idea around for my hatchback for several years. I have the receiver hitch and the "stinger" (that plugs into the receiver) welded up but I have been stuck since. Perhaps you will inspire me to finish it up.

As to the caster, I have an unusually steep entrance to my driveway. I have to enter and exit at an angle to keep from rubbing. On my driveway the casters would have to be at the back corners to do any good. Also, the suspension should be working with you if you get a caster strike. You don't have to lift the weight of the whole back half of the car, hopefully only a small percentage of that as some of the load is taken off of the rear springs.

__________________
60 mpg hwy highest, 50+mpg lifetime
TDi=fast frugal fun
https://ecomodder.com/forum/showthre...tml#post621801


Quote:
Originally Posted by freebeard View Post
The power needed to push an object through a fluid increases as the cube of the velocity. Mechanical friction increases as the square, so increasing speed requires progressively more power.
  Reply With Quote
Reply  Post New Thread


Powered by vBulletin® Version 3.8.11
Copyright ©2000 - 2024, vBulletin Solutions Inc.
Content Relevant URLs by vBSEO 3.5.2
All content copyright EcoModder.com