04-02-2014, 04:05 PM
|
#301 (permalink)
|
|
EcoModding Lurker
Join Date: Apr 2014
Location: Spain
Posts: 12
Thanks: 4
Thanked 2 Times in 2 Posts
|
Hi I am new to the forum.
I am Spanish and I have a civic EJ8 (EX-D16Y8) 96
I'm trying to mount the MPGuino a mega arduino, all right, but the buttons do not work me with the code as is in the first post (I try to use the buttons with a single cable and different resistances, but the program is not me detects the buttons)
That can happen?
Thank you very much, greetings from Spain
|
|
|

|
 Today Today
|
|
|
|
 Other popular topics in this forum...
|
|
|
|
|
04-02-2014, 09:26 PM
|
#302 (permalink)
|
|
halos.com
Join Date: Oct 2009
Location: Oklahoma City, OK
Posts: 528
Thanks: 385
Thanked 94 Times in 80 Posts
|
Quote:
Originally Posted by t vago

Thank you. It is a nice collaborative effort, and it's good to build off the already-capable original MPGuino code.
As for your questions, my code should run on the meelis hardware, as I am given to understand that the meelis hardware is a legacy MPGuino design. However, there appears to be no programming port on the meelis unit, as there is on the JBD unit.
meelis MPGuino - no programming port

JellyBeanDriver MPGuino - ISP programming port on other side of chip socket, opposite clock crystal (silvery) can
You would have to unsocket the AtMega integrated circuit on your meelis hardware, then mail it off to me so I could reprogram it. I am considering charging $5 to ship off pre-programmed AtMega ICs, as an alternative. |
I'm guessing that soldering on the ISP port isn't an easy task on the legacy design? Might have to take you up on the preloaded AtMega...
__________________

|
|
|
|
|
04-02-2014, 09:30 PM
|
#303 (permalink)
|
|
MPGuino Supporter
Join Date: Oct 2010
Location: Hungary
Posts: 1,807
iNXS - '10 Opel Zafira 111 Anniversary Suzi - '02 Suzuki Swift GL
Thanks: 828
Thanked 708 Times in 456 Posts
|
Quote:
Originally Posted by modrcm
Hi I am new to the forum.
I am Spanish and I have a civic EJ8 (EX-D16Y8) 96
I'm trying to mount the MPGuino a mega arduino, all right, but the buttons do not work me with the code as is in the first post (I try to use the buttons with a single cable and different resistances, but the program is not me detects the buttons)
That can happen?
Thank you very much, greetings from Spain
|
Welcome aboard!
Can you tell me what resistors you used? did you change the #defines near to beginning to work with an AtMega2560? |
|
|
|
|
The Following User Says Thank You to t vago For This Useful Post:
|
|
|
04-02-2014, 09:32 PM
|
#304 (permalink)
|
|
MPGuino Supporter
Join Date: Oct 2010
Location: Hungary
Posts: 1,807
iNXS - '10 Opel Zafira 111 Anniversary Suzi - '02 Suzuki Swift GL
Thanks: 828
Thanked 708 Times in 456 Posts
|
Quote:
Originally Posted by ECONORAM
I'm guessing that soldering on the ISP port isn't an easy task on the legacy design? Might have to take you up on the preloaded AtMega...
|
I would not think it'd be easy to retrofit an ISP port. After that, you'd have to get an ISP programmer. Pololu sells a reasonably priced one - that's what I use to program my JBD board. But... yah - it'd probably be better if I mailed you off a chip, instead. PM me if interested... |
|
|
|
|
04-03-2014, 03:32 AM
|
#305 (permalink)
|
|
Scandinavian creature
Join Date: Jun 2012
Location: Finland
Posts: 146
Thanks: 4
Thanked 27 Times in 22 Posts
|
Actually it is pretty easy task to retrofit an ISP header. And even easier with a socket.
Just get another IC socket and solder the wires to appropriate pins. Or use thin solder wick as a wire whick you put on the pins.
Or i prefer soldering directly to the IC pins.
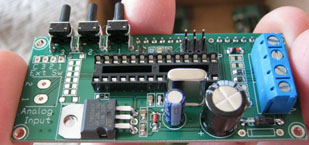
By the way, i designed another version of my MPGuino board. Now it supports t vago's code and includes the 5-position switch. And it can be programmed by USB, since i integrated USBasp into it.
I'm still waiting for the boards. So not yet in sale.
Can i use your code preprogrammed on my boards?
|
|
|
|
|
04-03-2014, 08:17 AM
|
#306 (permalink)
|
|
EcoModding Lurker
Join Date: Apr 2014
Location: Spain
Posts: 12
Thanks: 4
Thanked 2 Times in 2 Posts
|
Quote:
Originally Posted by t vago
Welcome aboard!
Can you tell me what resistors you used? did you change the #defines near to beginning to work with an AtMega2560?
|
I changed the # define, but I'm not sure it's right the way to go. |
|
|
|
|
04-03-2014, 08:59 AM
|
#307 (permalink)
|
|
MPGuino Supporter
Join Date: Oct 2010
Location: Hungary
Posts: 1,807
iNXS - '10 Opel Zafira 111 Anniversary Suzi - '02 Suzuki Swift GL
Thanks: 828
Thanked 708 Times in 456 Posts
|
Quote:
Originally Posted by Quezacotl
Can i use your code preprogrammed on my boards?
|
Sure! I noticed you had a few features that my code doesn't have. You want me to add them in? |
|
|
|
|
The Following User Says Thank You to t vago For This Useful Post:
|
|
|
04-03-2014, 10:52 AM
|
#308 (permalink)
|
|
EcoModding Lurker
Join Date: Apr 2014
Location: Spain
Posts: 12
Thanks: 4
Thanked 2 Times in 2 Posts
|
Quote:
Originally Posted by t vago
Welcome aboard!
Can you tell me what resistors you used? did you change the #defines near to beginning to work with an AtMega2560?
|
Quote:
// if the below "#define"s are commented out, code will compile for an AtMega328-series processor
#define ArduinoMega2560 true
#define TinkerkitLCDmodule true
// if the below #define is commented out, 16 MHz system clock will be assumed
//#define use20MHz true // force 20 MHz system clock values
// only one of the below LCD options may be chosen - choosing more than one will cause a compilation error to occur
// if TinkerkitLCDmodule is used, useLegacyLCD will automatically be used, and the below options will be ignored
#define useLegacyLCD true
//#define useParallaxLCD true
// only one of the below button options may be chosen - choosing more than one will cause a compilation error to occur
#define useLegacyButtons true
//#define useAnalogMuxButtons true
//#define useParallax5PositionSwitch true
// the below options only work if useLegacyLCD is selected. If useLegacyLCD is not selected, the below options will not be inserted at all
//#define useLegacyLCDinvertedBrightness true // For alternate LCD backlight connections
#define useLegacyLCDbuffered true // Speed up LCD output
// selectable options - all may be chosen independently of one another, save for serial data logging.
// the serial data logging option will conflict with the Parallax LCD output option, if both are selected at the same time
//#define blankScreenOnMessage true // Completely blank display screen upon display of message
#define trackIdleEOCdata true // Ability to track engine idling and EOC modes
#define useSerialPortDataLogging true // Ability to output 5 basic parameters to a data logger or SD card
#define useBufferedSerialPort true // Speed up serial output
//#define useCalculatedFuelFactor true // Ability to calculate that pesky us/gal (or L) factor from easily available published fuel injector data
#define useWindowFilter true // Smooths out "jumpy" instant FE figures that are caused by modern OBDII engine computers
#define useClock true // System clock, and means to set it
#define useSavedTrips true // Ability to save current or tank trips to any one of 10 different trip slots in EEPROM
#define useScreenEditor true // Ability to change any of 8 existing trip data screens, with 4 configurable figures on each screen
#define useBarFuelEconVsTime true // Show Fuel Economy over Time bar graph
#define useBarFuelEconVsSpeed true // Show Fuel Economy vs Speed, Fuel Used vs Speed bar graphs
#define useSpiffyBigChars true
//#define useChryslerMAPCorrection true // Ability to perform on-the-fly fuel injector data correction for late-model Chrysler vehicles
//#define useABresultViewer true // Ability to graphically show current (B) versus stored (A) fuel consumption rates
//#define useCoastDownCalculator true // Ability to calculate C(rr) and C(d) from coastdown
// program measurement and debugging tools
//#define useDebugReadings true
//#define forceEEPROMsettingsInit true
//#define useEEPROMviewer true // Ability to directly examine EEPROM
//#define useBenchMark true // this is probably broken - last time I used it was in August
//#define useSerialDebugOutput true
// SWEET64 configuration/debugging
//#define useSWEET64trace true // Ability to view real-time 64-bit calculations from SWEET64 kernel
//#define useSWEET64multDiv true // shift mul64 and div64 from native C++ to SWEET64 bytecode
|
Resistor:
Arduino Mega 2560
left, middle, right, extra#1, extra#2 PF3 (ADC3)
o---------------o---------------o---------------o---------------o--o GND
R2 | R3 | R4 | R5 | R6 |
o--vvv--o o--VVV--o o--vvv--o o--vvv--o o--vvv--o
| 2.2k | 4.7k | 10k | 22k | 47k
o o o o o
/ / / / /
o left o middle o right o Extra#1 o Extra#2
| | | | |
o---------------o---------------o---------------o---------------o--vvv--o--o 5V
| R1 1k
o----------o PC3 - legacy MPGuino hardware
PF3 - Arduino Mega 2560
PF7 - TinkerKit! LCD module |
|
|
|
|
The Following User Says Thank You to modrcm For This Useful Post:
|
|
|
04-03-2014, 11:00 AM
|
#309 (permalink)
|
|
MPGuino Supporter
Join Date: Oct 2010
Location: Hungary
Posts: 1,807
iNXS - '10 Opel Zafira 111 Anniversary Suzi - '02 Suzuki Swift GL
Thanks: 828
Thanked 708 Times in 456 Posts
|
Code:
// only one of the below button options may be chosen - choosing more than one will cause a compilation error to occur

//#define useLegacyButtons true

#define useAnalogMuxButtons true

//#define useParallax5PositionSwitch true
You will need to enable the bolded #include. I will need to clarify this in the code... |
|
|
|
|
The Following User Says Thank You to t vago For This Useful Post:
|
|
|
04-03-2014, 11:22 AM
|
#310 (permalink)
|
|
EcoModding Lurker
Join Date: Apr 2014
Location: Spain
Posts: 12
Thanks: 4
Thanked 2 Times in 2 Posts
|
Quote:
Originally Posted by t vago
Code:
// only one of the below button options may be chosen - choosing more than one will cause a compilation error to occur

//#define useLegacyButtons true

#define useAnalogMuxButtons true

//#define useParallax5PositionSwitch true
You will need to enable the bolded #include. I will need to clarify this in the code... |
If you change it to try, it still does not operate the buttons is a bit strange
|
|
|
|
|