 09-24-2016, 02:51 PM
|
#121 (permalink)
|
|
Master EcoModder
Join Date: Jan 2008
Location: Sanger,Texas,U.S.A.
Posts: 16,395
Thanks: 24,469
Thanked 7,410 Times in 4,800 Posts
|
a little progress
One new tire 'failed' over it's 1st night.Completely flat by morning.I didn't leave the house for 2-days,and this morning,pumped it up,and after a snack,went by the tire store.The metal valve stem had a fault.$ 15 later,I have 4-trustworthy tires.I'll run them at the full 44-psi.
I've added permanent deadwood and central support spine to the lower body chassis which will hold the upper body section to it's proper elevation when attached.I prime as I go,as if the model will be fully exposed to the elements.I can't afford ANY warping.
I spent 1-day with a go-no-go ground clearance-sized block,shimming the belly pan to a constant elevation,for the flat portion,and constant-clearance for points along the angled diffuser section.The belly will never have to be removed.This is with the stinger section attached,so the whole car has it's belly now.It's within 1/32th of an inch accuracy all-around 'flatness.'
Yesterday I spent the entire day beginning to wrap the perimeter of Baby's lower body section belly pan with cedar.3-pcs took the entire day.They required angle cuts,compound cuts,kerf cuts (for bendability),dados,rabbits (for chassis and wheel axle clearances),then countersinking before drywall screws went in from below,carefully bending as I went to fit the curvature of the belly.
I cannot flip the lower body over until this perimeter is in place and reinforced,or else the 1/8th-inch-thick belly will be destroyed.
And I cannot begin the wheel fairings until I can safely flip the lower body section.
I fashioned a stainless steel 100% grille plug from a $4 salad bowl.
I also made a pattern for a fairing to cover Poco-Loco's rear windscreen to be tested at DARKO.
Now that I have the tires,I can do really close-fitting of the belly and also size the wheel fairing package (8-fairings).
'Got some rain coming but there's plenty of 'indoors' projects I can stay busy with.
__________________
Photobucket album: http://s1271.photobucket.com/albums/jj622/aerohead2/
|
|
|

|
|
The Following 3 Users Say Thank You to aerohead For This Useful Post:
|
|
 Today Today
|
|
|
|
 Other popular topics in this forum...
|
|
|
|
 09-24-2016, 03:35 PM
|
#122 (permalink)
|
|
Master EcoModder
Join Date: Dec 2014
Location: Butte, Montana
Posts: 726
Thanks: 208
Thanked 428 Times in 279 Posts
|
Make shure you have room for tire chains as you could get caught needing them to get home if Ogden gets hit with an Arctic storm .
Winter is coming...
__________________
1st gen cummins 91.5 dodge d250 ,HX35W/12/6 QSV
ehxsost manafulld wrap, Aero Tonto
best tank: distance 649gps mi 24.04 mpg 27.011usg
Best mpg : 31.32mpg 100mi 3.193 USG 5/2/20

Former
'83 GMC S-15 Jimmy 2door 2wd O/D auto 3.73R&P
'79 Chevy K20 4X4 350ci 400hp msd custom th400 /np205. 7.5-new 14mpg modded befor modding was a thing
87' Hyundai Excel
83 ranger w/87 2.9 L FI2wd auto 18mpg on the floor
04 Mitsubishi Gallant 2.4L auto 26mpg
06 Subaru Forrester XT(WRX PACKAGE) MT AWD Turbocharged 18 plying dirty best of 26mpg@70mph
95Chevy Blazer 4x4 auto 14-18mpg
04 Chevy Blazer 4x4 auto 16-22mpg
|
|
|

|
|
The Following User Says Thank You to gumby79 For This Useful Post:
|
|
 09-24-2016, 03:50 PM
|
#123 (permalink)
|
|
Master EcoModder
Join Date: Jan 2008
Location: Sanger,Texas,U.S.A.
Posts: 16,395
Thanks: 24,469
Thanked 7,410 Times in 4,800 Posts
|
storms
Thanks! Yes,I'm seeing snow reported at 7,500' and above on the weather channel now.
I'll try and be ready for contingencies.
And I'm prepared to alter my route if it means avoiding a nasty mountain pass.I don't worry about myself so much,but other drivers scare the ---- out of me!
__________________
Photobucket album: http://s1271.photobucket.com/albums/jj622/aerohead2/
|
|
|

|
|
The Following User Says Thank You to aerohead For This Useful Post:
|
|
 10-01-2016, 03:57 PM
|
#124 (permalink)
|
|
Master EcoModder
Join Date: Jan 2008
Location: Sanger,Texas,U.S.A.
Posts: 16,395
Thanks: 24,469
Thanked 7,410 Times in 4,800 Posts
|
li'l update
The World's worst job estimator continues his dim-witted slog in fabricator land.
I managed to rough in the nose,sides,and tail of the lower body/chassis.
And I managed to invert 'baby' without breaking anything.
The superstructure components for the front wheel fairings are complete.I ran out of material late yesterday and made a run to Home Depot this AM for 3,6-foot cedar fence pickets which will give me enough material for the rear,2-pc wheel fairings.
While I was over in that part of town I hit Harbor Freight for their 10" X 84" steel loading ramps (on sale @ $34 off regular price).
'Baby' will probably end up weighing as much as I do and I already strain to move her upper and lower bodies.Those new ramps may save my bacon!
I have some photos of the build and brought the camera with me.If Al isn't super busy,he'll help me get those into Photo-Bucket so I can post them.
I do 'labs' Tuesday for my upcoming physical on the 11th.
It looks like I could spend at least an entire week on 'baby,' to finish her up.And then there's all the T-100 stuff.
After the woodwork for the fairings is done (ripping,chop-sawing,band-sawing,and sanding/shaping) I can take down one of the power tool work stations which now blocks the entry to the 'shop.'
Then I can get either the nose or the tail of 'Spirit' under some cover for composite work,juggling between 'vehicles.'
It's weird to see the 'template' finally.And it will be cool to see how she does on her 'exam' at DARKO.
__________________
Photobucket album: http://s1271.photobucket.com/albums/jj622/aerohead2/
|
|
|

|
|
The Following 3 Users Say Thank You to aerohead For This Useful Post:
|
|
 10-01-2016, 04:47 PM
|
#125 (permalink)
|
|
Master EcoModder
Join Date: Jan 2008
Location: Sanger,Texas,U.S.A.
Posts: 16,395
Thanks: 24,469
Thanked 7,410 Times in 4,800 Posts
|
photos
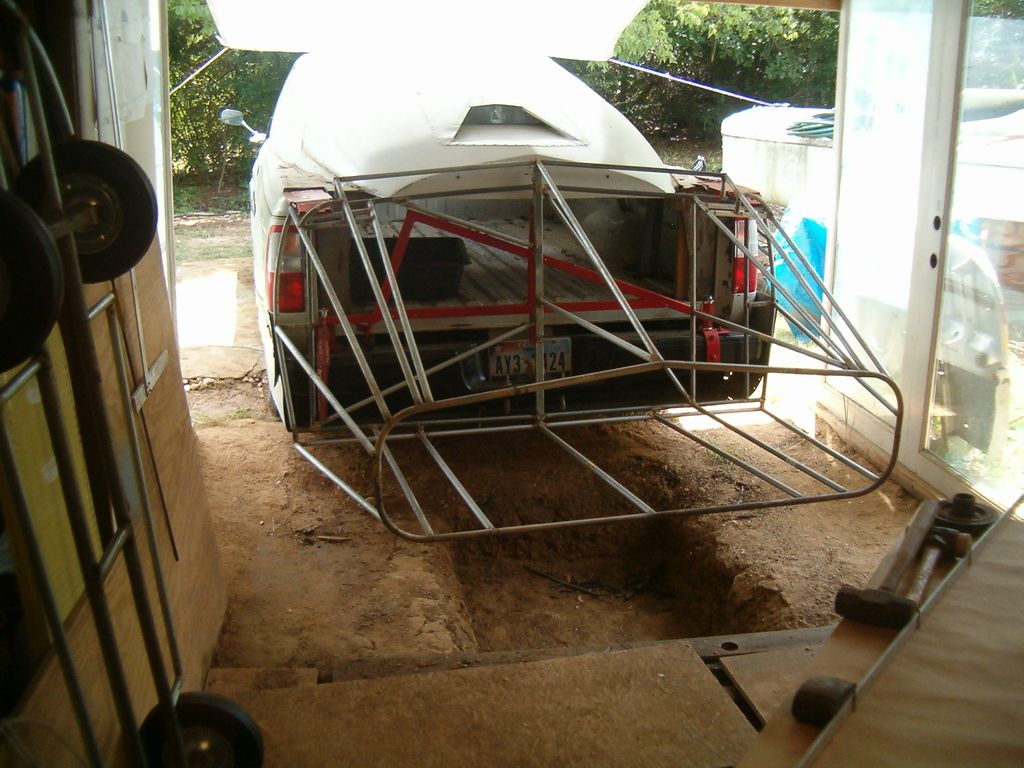
here are 2-views of the bumper-mounted swing-mount onto which the tail attaches and pivots on
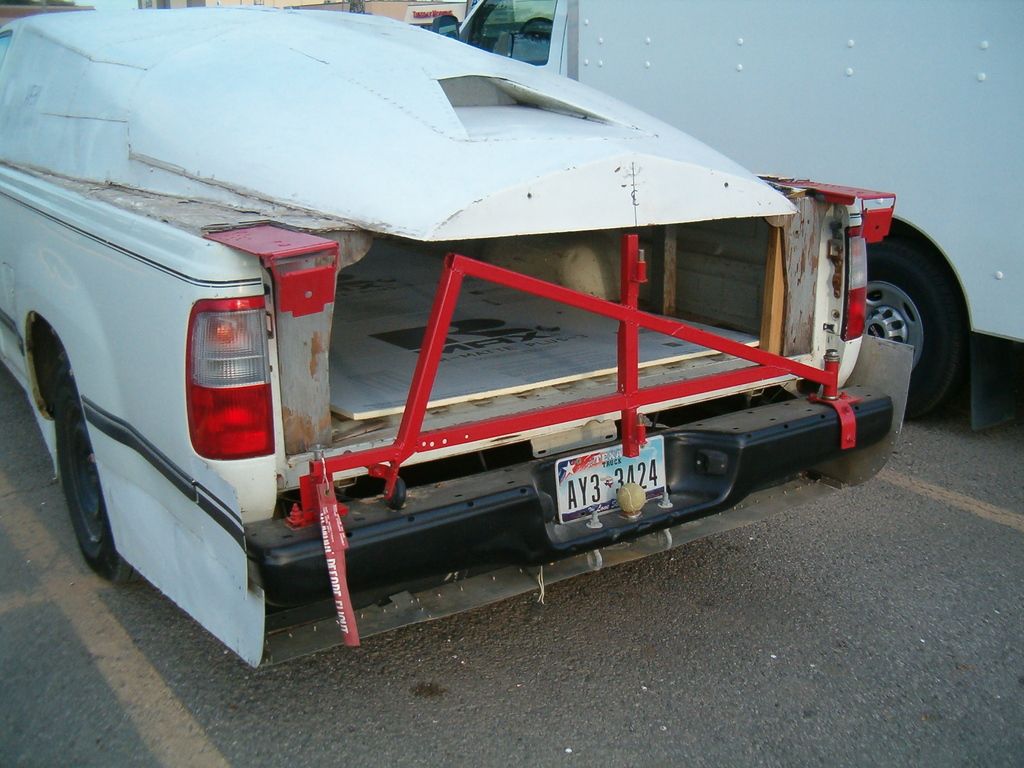 
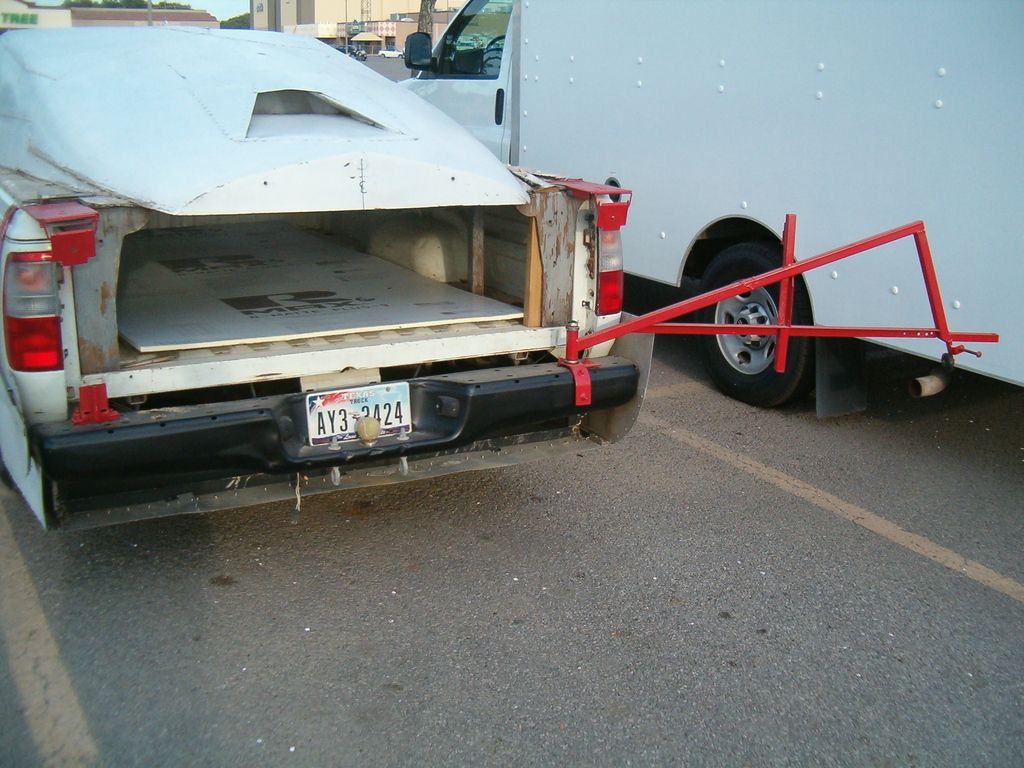
For the upper corner attachment to the truck box I re-configured 2-ammo boxes to take advantage of these robust latches
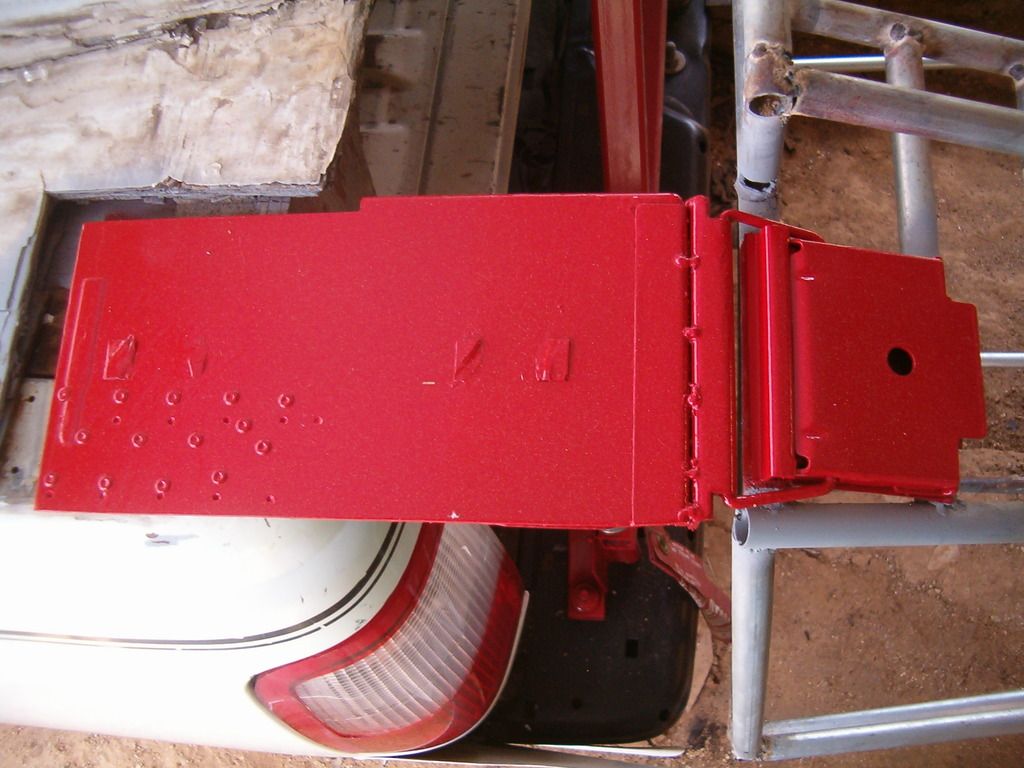
The boat tail slips down onto the half-hinge welded at the centerline of the swing-mount
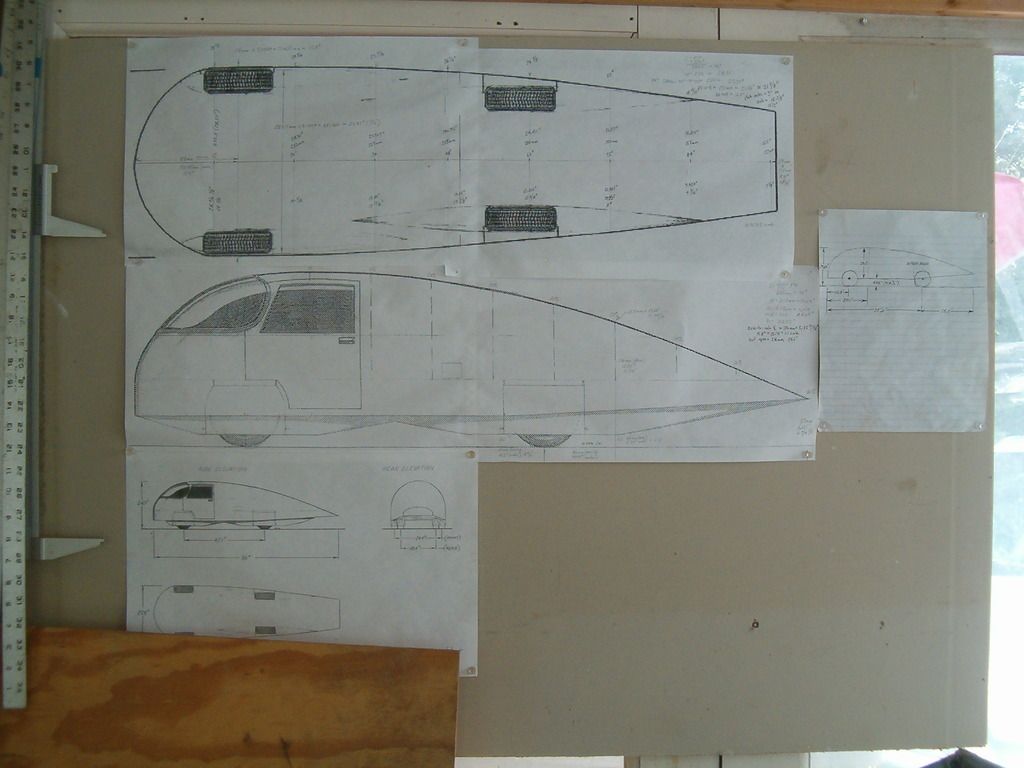
I did as large a scale set of drawings that I could,although they're at different scales so I have to triple check everything
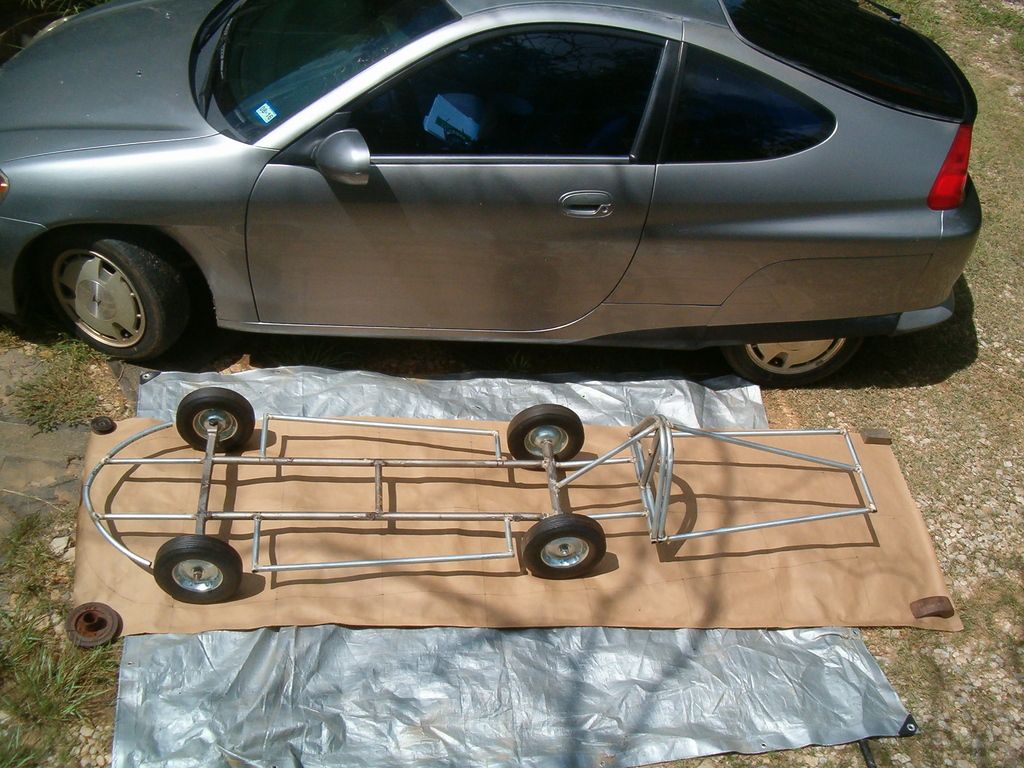
'Baby's' chassis is a re-tasked go-kart frame I bought decades ago from the metal recycling center.It's been shortened and narrowed,then a rough perimeter of 1/2" EMT welded on to define the body outline.
To reduce weight,and give me some extra room in the truck bed,the tail can be dropped (also for testing!).The cut is at Kamm's 50% frontal area location
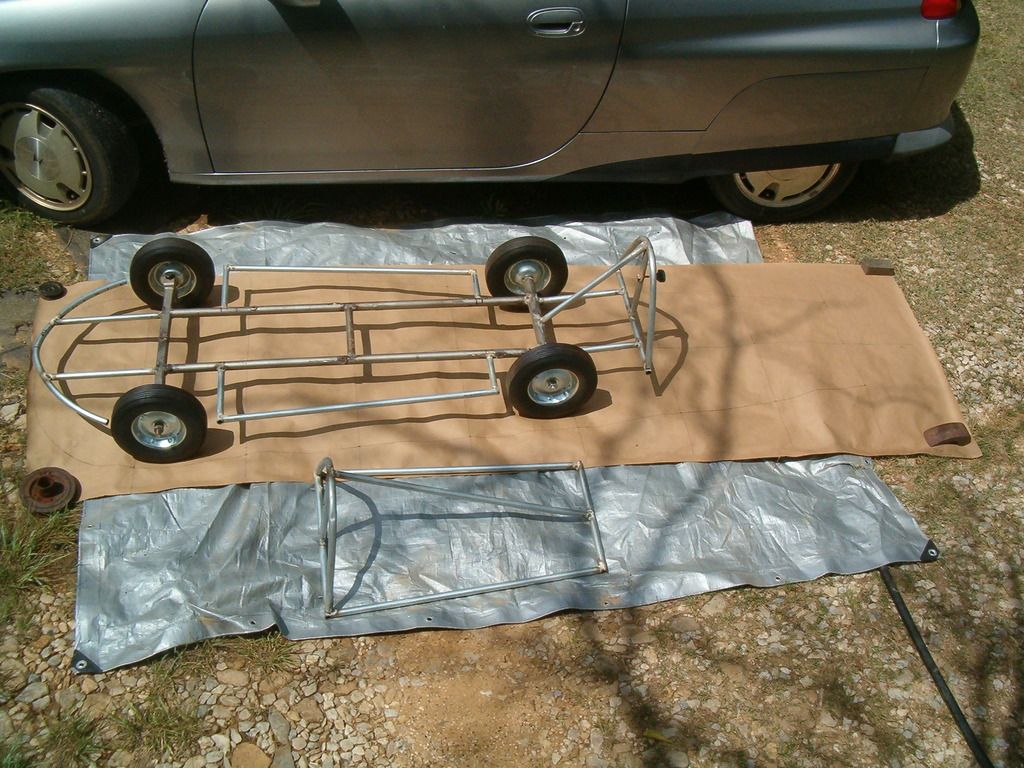
At the parting line for the tail I welded in some 1-penny nails for registration pins and then welded in a 1/4"-20 bolt,with hand nut for quick attach/detach
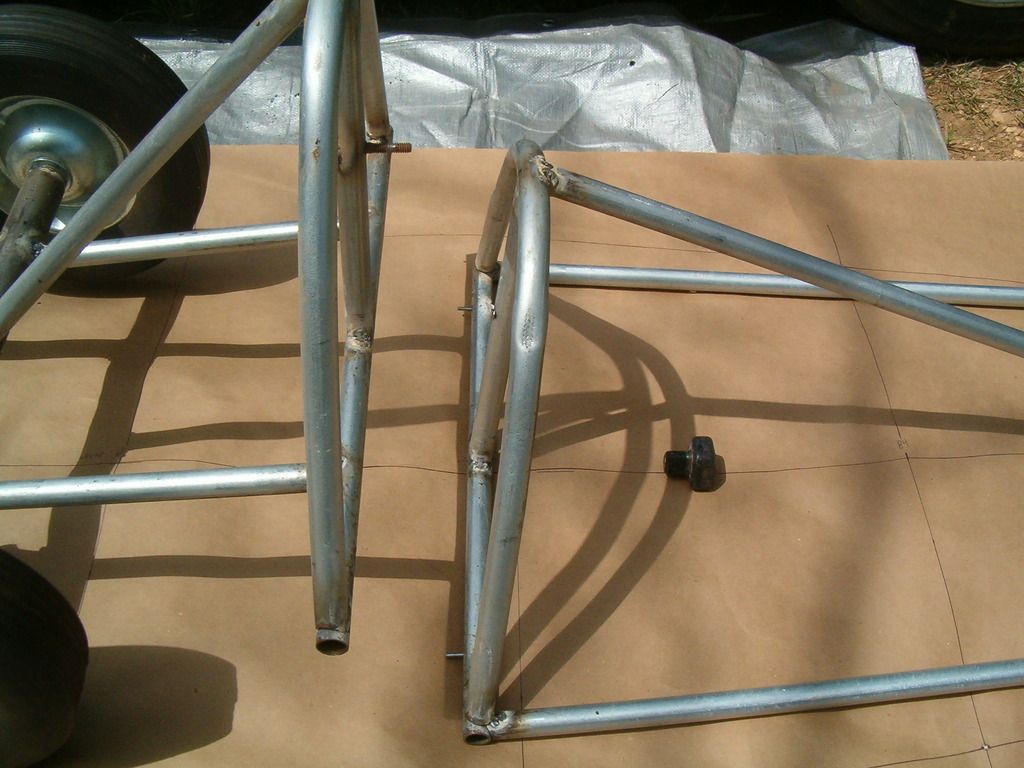
To the chassis I welded single-hole EMT clamps,which hold speed-nuts,into which trim screws pass to secure the belly pan.I made a GO-NO-GO of ground clearance dimension,then used a tubing cutter to cut portions of EMT to create shims which hold the belly to the proper ground clearance
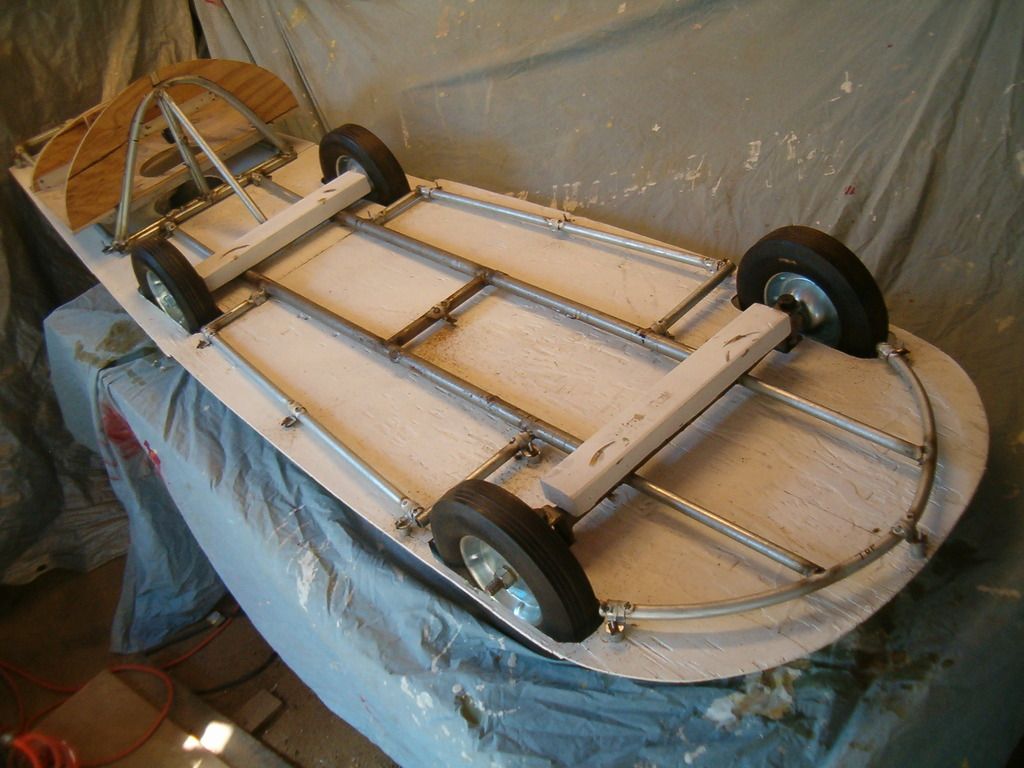
Then a bunch of deadwood was added to reinforce the perimeter of the belly as well as lock in the elevation of the upper body when placed,while providing attachment points for 'skins'.
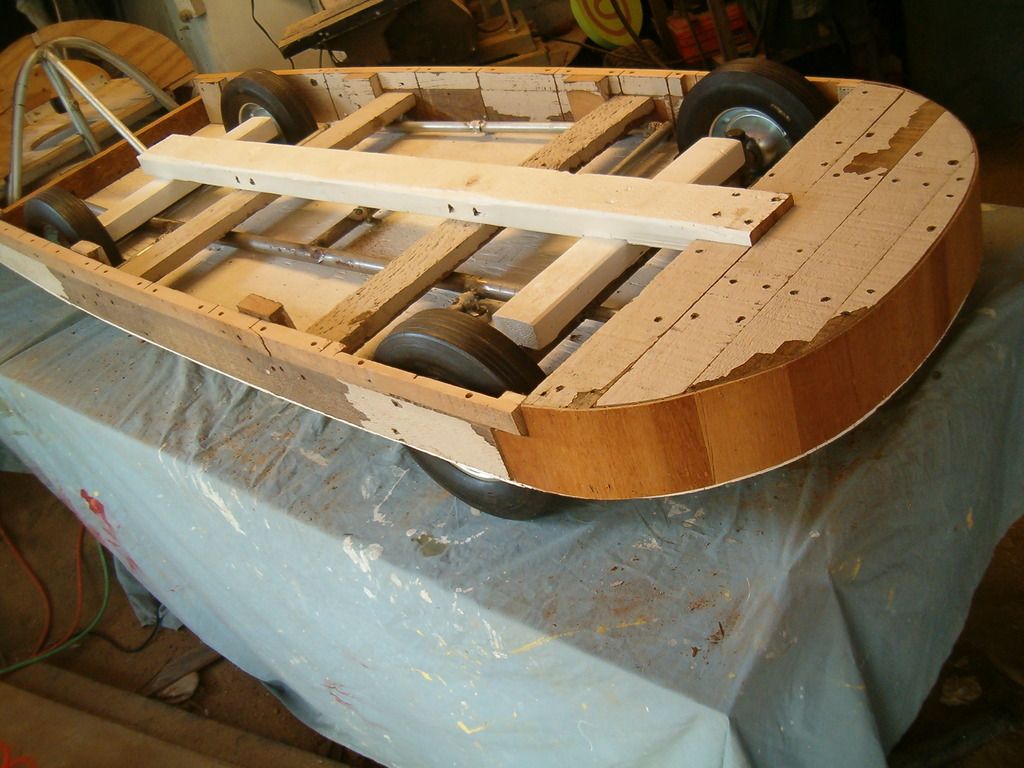
Then the nose,sides,and tailpiece could be attached.
The upper body started with the 'planview' as a base,upon which the central spine was added,then the ribs.
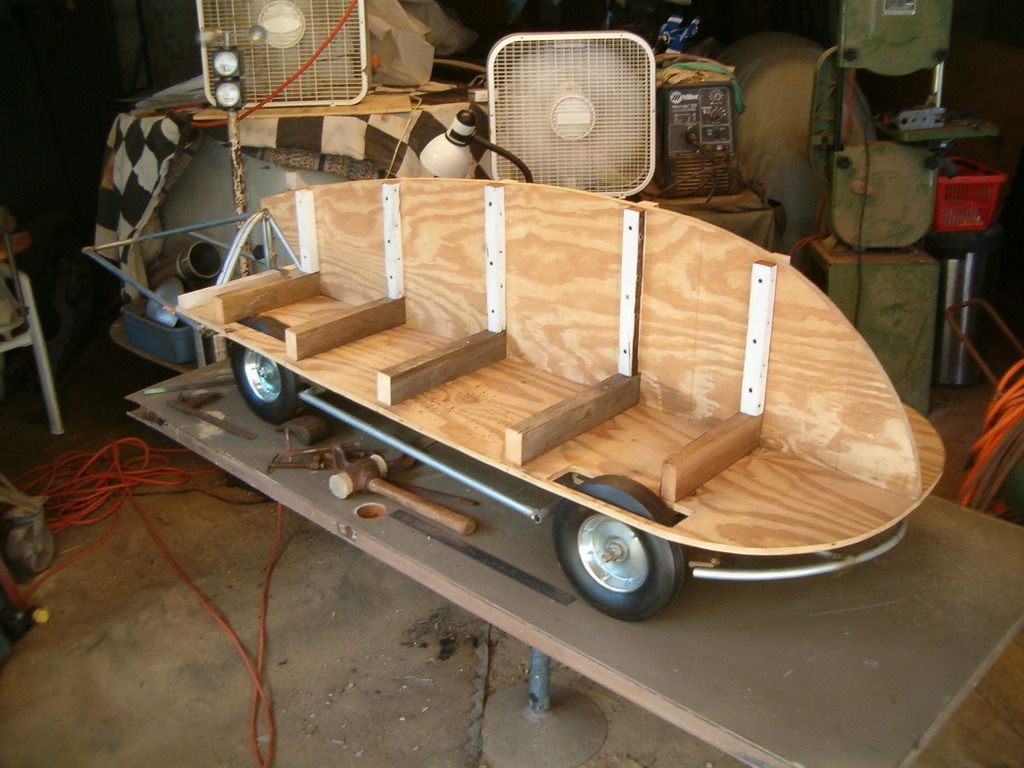
She was so heavy that I went back and cut out much of the 5/8ths plywood just to shave weight ,going from 50,to 32-pounds.
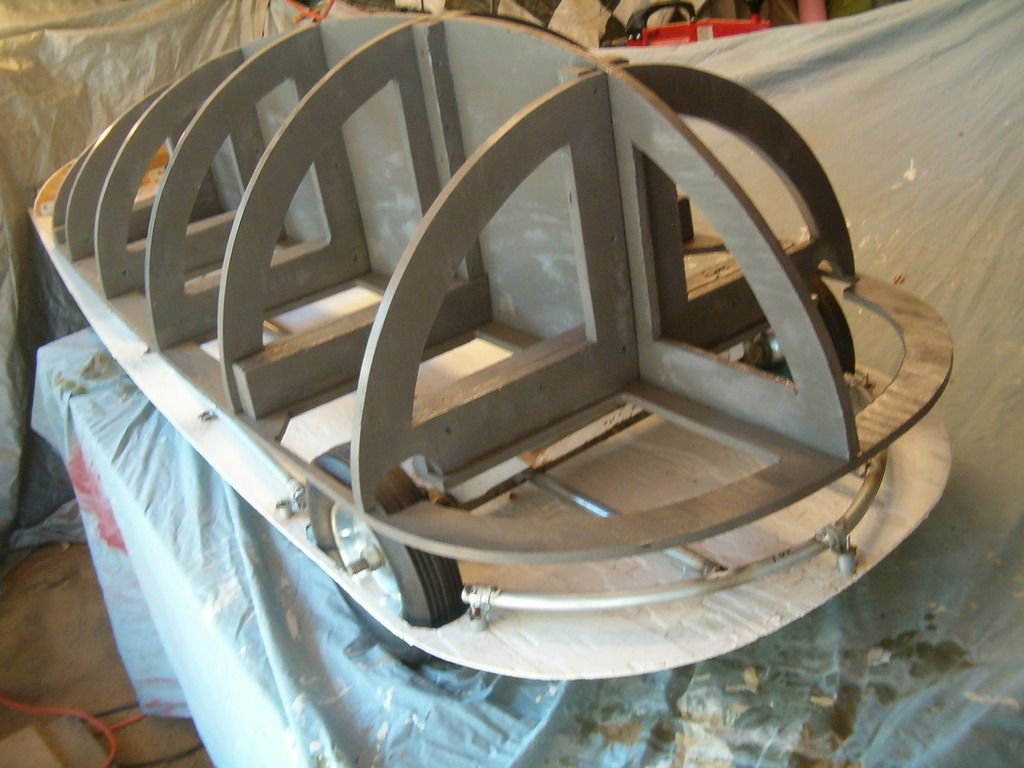
She pretty much has the ultimate profile of the car defined now
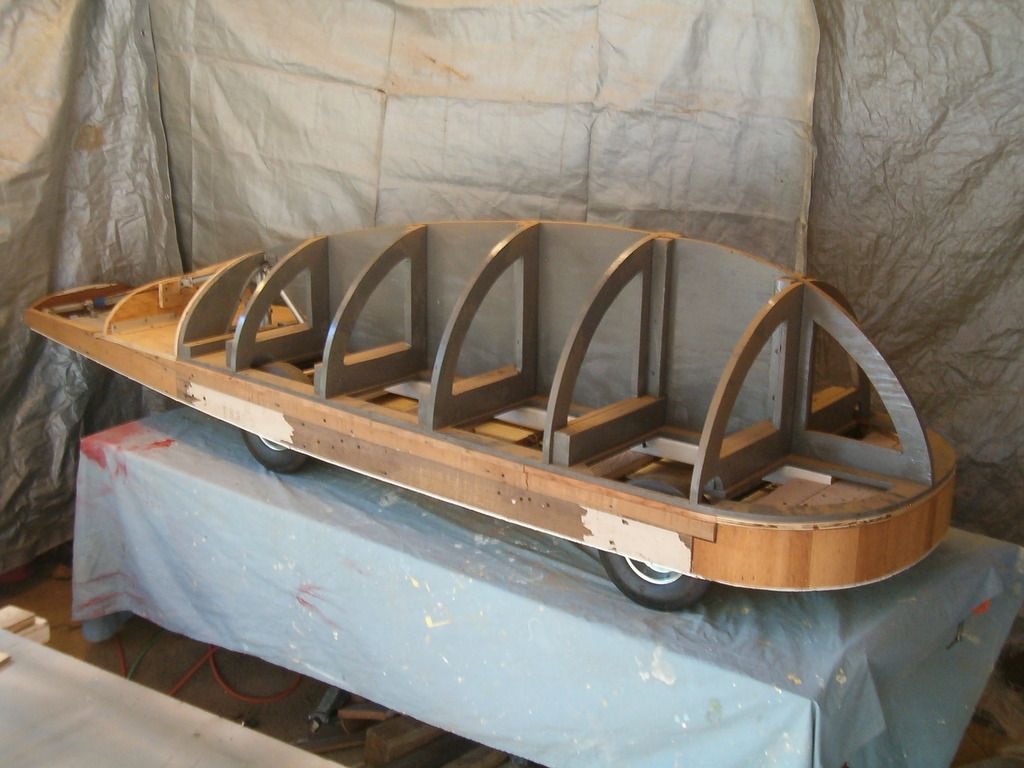
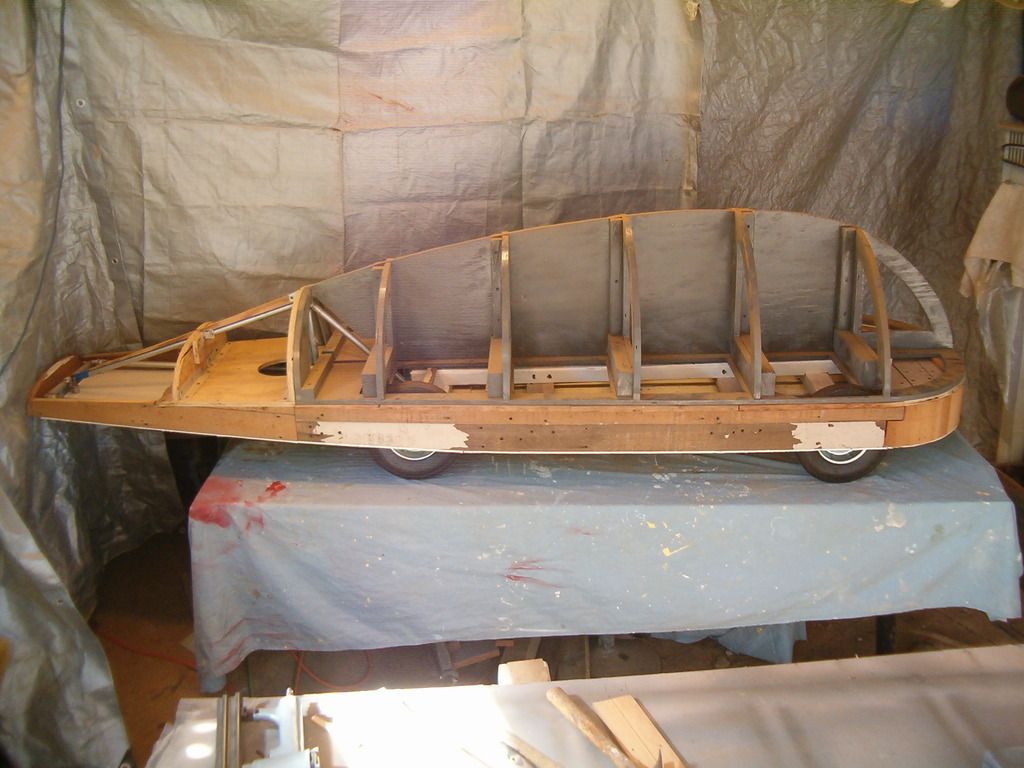
And now she's inverted on the table with her belly facing skyward so I can do the wheel fairings.
Cubic man-hours!
All my scrap foam in assembled and I'll be gluing in that real soon,then the shaping,fiberglassing,Bondo,and finishing can follow.
I'll see where I'm at after my physical on the 11th and perhaps by then I'll have a sense of when to contact DARKO.
__________________
Photobucket album: http://s1271.photobucket.com/albums/jj622/aerohead2/
|
|
|

|
|
The Following 5 Users Say Thank You to aerohead For This Useful Post:
|
|
 10-01-2016, 11:01 PM
|
#126 (permalink)
|
|
Master EcoModder
Join Date: Aug 2012
Location: northwest of normal
Posts: 28,965
Thanks: 8,222
Thanked 8,995 Times in 7,431 Posts
|
Very cool.  thanks for posting that. |
|
|

|
|
The Following User Says Thank You to freebeard For This Useful Post:
|
|
 10-02-2016, 12:17 PM
|
#127 (permalink)
|
|
Master EcoModder
Join Date: Apr 2011
Location: Tacoma WA
Posts: 1,399
Thanks: 743
Thanked 528 Times in 344 Posts
|
Wish I was closer, Phil. Just got laid off and we'd knock that out in a couple of (long) days.
__________________

2007 Dodge Ram 3500 SRW 4x4 with 6MT
2003 TDI Beetle
2002 TDI Beetle
currently parked - 1996 Dodge 2500 Cummins Turbodiesel
Custom cab, auto, 3.55 gears
|
|
|

|
|
The Following User Says Thank You to skyking For This Useful Post:
|
|
 10-05-2016, 12:40 AM
|
#128 (permalink)
|
|
Aero Wannabe
Join Date: Dec 2007
Location: NW Colo
Posts: 738
Thanks: 705
Thanked 219 Times in 170 Posts
|
Wow! This is exciting. Great work Phil. I would be willing to contribute to the cause, in the name of science, to see the test results from DARKO.
__________________
60 mpg hwy highest, 50+mpg lifetime
TDi=fast frugal fun  https://ecomodder.com/forum/showthre...tml#post621801

Quote:
Originally Posted by freebeard

The power needed to push an object through a fluid increases as the cube of the velocity. Mechanical friction increases as the square, so increasing speed requires progressively more power.
|
|
|
|

|
|
The Following User Says Thank You to COcyclist For This Useful Post:
|
|
 10-05-2016, 01:30 PM
|
#129 (permalink)
|
|
Master EcoModder
Join Date: May 2008
Location: Maynard, MA Eaarth
Posts: 7,908
Thanks: 3,475
Thanked 2,952 Times in 1,845 Posts
|
This model looks to be 1/2 scale? Looks exactly like the drawing - but it is easier to understand the shape.
|
|
|

|
|
The Following 2 Users Say Thank You to NeilBlanchard For This Useful Post:
|
|
 10-07-2016, 12:52 PM
|
#130 (permalink)
|
|
Master EcoModder
Join Date: Apr 2011
Location: Tacoma WA
Posts: 1,399
Thanks: 743
Thanked 528 Times in 344 Posts
|
Phil, you could cover the shell with rips of 1/8" wood paneling, wiring it on with safety wire and epoxying like a stitch and glue kayak. IF you leave a gap and don't butt the strips, and just glue them to the tubes, there would be no facets or edges. Then fair in the gaps with some epoxy goop, sand, and sand off the wires.
It would not be absolutely perfect without a bunch of fairing and sanding, but it would be very very close.
BTW, it is 2048 miles door to door. cheap flights are ~255, and greyhound was 250, LOL!!!
Greyhound is on some serious drugs there.
If I left my right foot out, taped on some fairing, figure 80 gallons round trip 
~70$ less than flying 
__________________

2007 Dodge Ram 3500 SRW 4x4 with 6MT
2003 TDI Beetle
2002 TDI Beetle
currently parked - 1996 Dodge 2500 Cummins Turbodiesel
Custom cab, auto, 3.55 gears
|
|
|

|
|
The Following User Says Thank You to skyking For This Useful Post:
|
|
|