 10-08-2016, 02:04 PM
|
#131 (permalink)
|
|
Master EcoModder
Join Date: Jan 2008
Location: Sanger,Texas,U.S.A.
Posts: 16,395
Thanks: 24,469
Thanked 7,410 Times in 4,800 Posts
|
scale
Quote:
Originally Posted by NeilBlanchard

This model looks to be 1/2 scale? Looks exactly like the drawing - but it is easier to understand the shape.
|
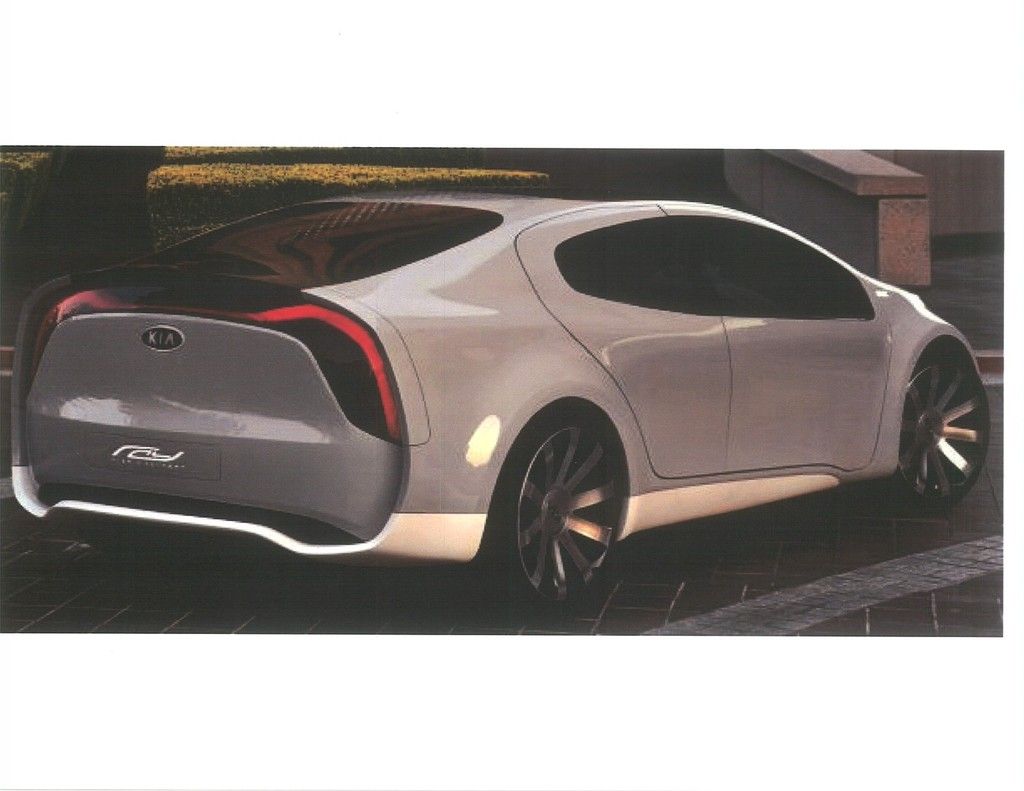
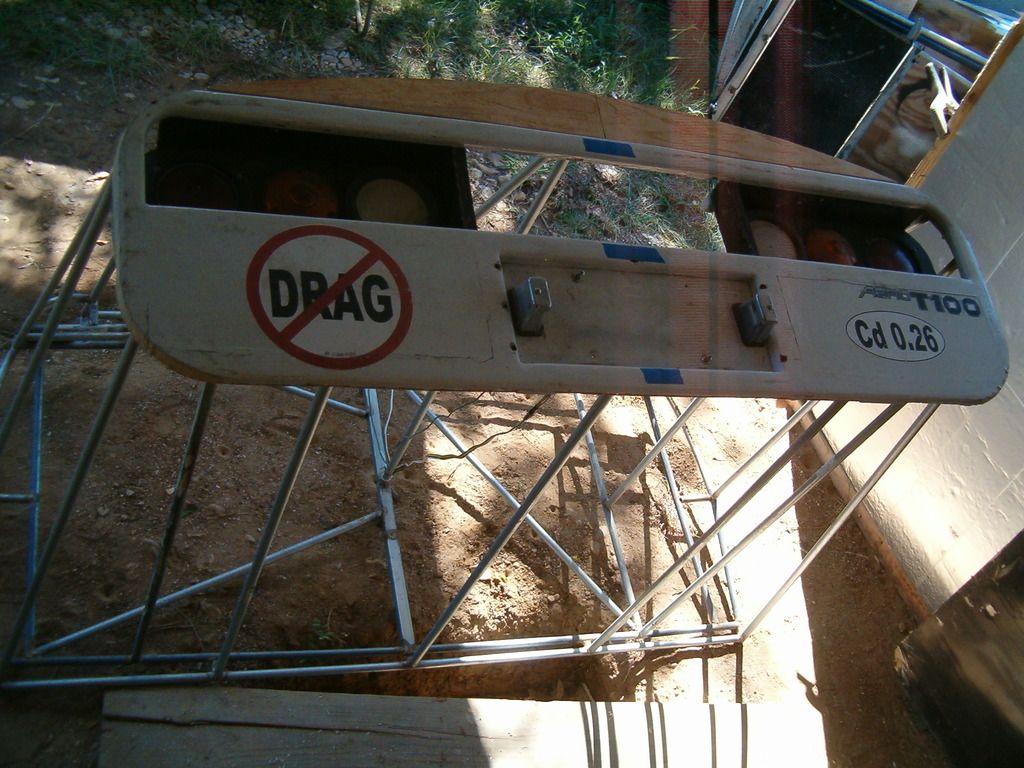
she's actually 1/3rd-scale,based upon the T-100.At this scale,she will fit inside the truck with a little room for me too,and at 76-mph tunnel velocity,just eek by with a supercritcal Reynolds number;absolutely mandatory for a constant TBL drag coefficient.
PS at this scale though,she's big enough for a soapbox derby-sized kid (if they wanted to rewrite the rule book).
__________________
Photobucket album: http://s1271.photobucket.com/albums/jj622/aerohead2/
Last edited by aerohead; 10-08-2016 at 02:06 PM..
Reason: add PS
|
|
|

|
|
The Following User Says Thank You to aerohead For This Useful Post:
|
|
 Today Today
|
|
|
|
 Other popular topics in this forum...
|
|
|
|
|
10-08-2016, 02:08 PM
|
#132 (permalink)
|
|
Master EcoModder
Join Date: Jan 2008
Location: Sanger,Texas,U.S.A.
Posts: 16,395
Thanks: 24,469
Thanked 7,410 Times in 4,800 Posts
|
ammo boxes
Quote:
Originally Posted by Old Tele man
Love the "re-cycled" AMMO-CAN lid & latch...and its red color, too!
|
I couldn't think of any ready-accessible latches that were more robust.And I don't want to consider what might happen if she got 'loose' on the road. 
PS that's Massey Ferguson 'RED',from Tractor Supply and Sutherland's.
__________________
Photobucket album: http://s1271.photobucket.com/albums/jj622/aerohead2/
Last edited by aerohead; 10-08-2016 at 02:20 PM..
Reason: add info
|
|
|
|
|
The Following User Says Thank You to aerohead For This Useful Post:
|
|
|
10-08-2016, 02:17 PM
|
#133 (permalink)
|
|
Master EcoModder
Join Date: Jan 2008
Location: Sanger,Texas,U.S.A.
Posts: 16,395
Thanks: 24,469
Thanked 7,410 Times in 4,800 Posts
|
cover
Quote:
Originally Posted by skyking
Phil, you could cover the shell with rips of 1/8" wood paneling, wiring it on with safety wire and epoxying like a stitch and glue kayak. IF you leave a gap and don't butt the strips, and just glue them to the tubes, there would be no facets or edges. Then fair in the gaps with some epoxy goop, sand, and sand off the wires.
It would not be absolutely perfect without a bunch of fairing and sanding, but it would be very very close.
BTW, it is 2048 miles door to door. cheap flights are ~255, and greyhound was 250, LOL!!!
Greyhound is on some serious drugs there.
If I left my right foot out, taped on some fairing, figure 80 gallons round trip 
~70$ less than flying  |
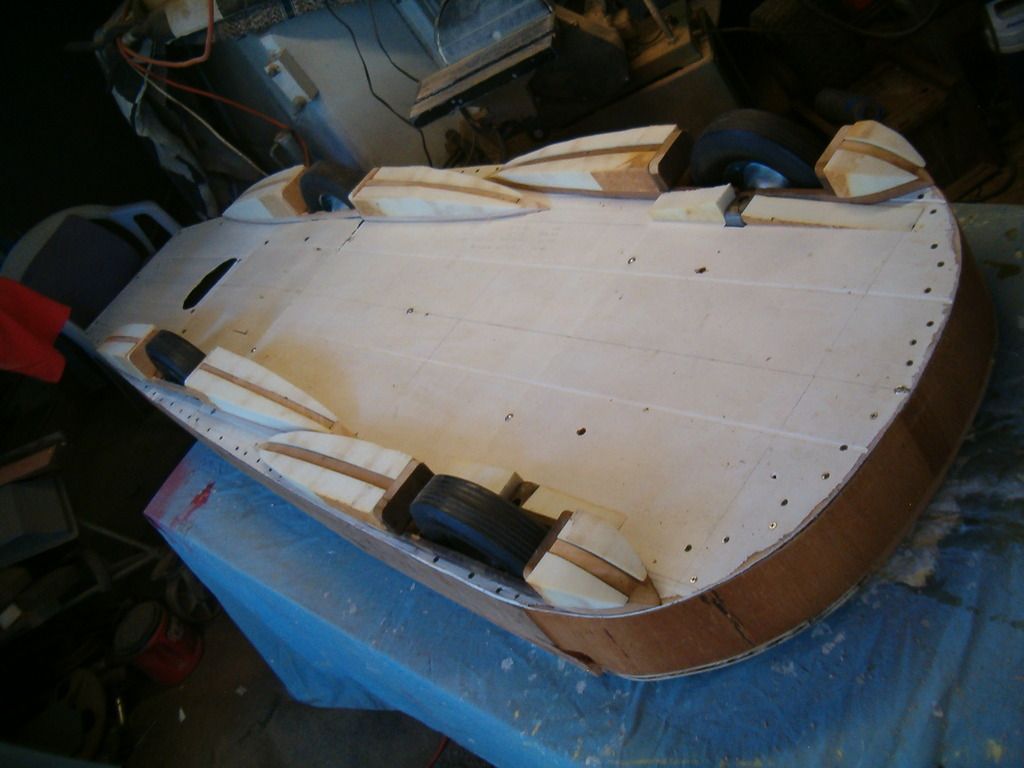
The skeleton is already at the net dimensions so I can't go 'outside' that footprint.If I had infinite time I'd do tooling plaster,make a splash,then do a thin,wet layup inside that.
For the time being,I'm filling the voids with polyisocyanurate foam,will Surform/sandpaper that down,nuke it with resin,then a single layer of glass,then sanding,Bondo,etc.
I'll essentially be taking a 'male plug' to DARKO.
__________________
Photobucket album: http://s1271.photobucket.com/albums/jj622/aerohead2/
|
|
|
|
|
The Following 2 Users Say Thank You to aerohead For This Useful Post:
|
|
|
10-08-2016, 03:38 PM
|
#134 (permalink)
|
|
Master EcoModder
Join Date: Aug 2012
Location: northwest of normal
Posts: 28,965
Thanks: 8,222
Thanked 8,995 Times in 7,431 Posts
|
|
|
|
|
|
The Following User Says Thank You to freebeard For This Useful Post:
|
|
|
10-08-2016, 09:44 PM
|
#135 (permalink)
|
|
Master EcoModder
Join Date: Apr 2011
Location: Tacoma WA
Posts: 1,399
Thanks: 743
Thanked 528 Times in 344 Posts
|
Quote:
Originally Posted by aerohead
The skeleton is already at the net dimensions so I can't go 'outside' that footprint.If I had infinite time I'd do tooling plaster,make a splash,then do a thin,wet layup inside that.
For the time being,I'm filling the voids with polyisocyanurate foam,will Surform/sandpaper that down,nuke it with resin,then a single layer of glass,then sanding,Bondo,etc.
I'll essentially be taking a 'male plug' to DARKO.
|
so there is no room for a 1/8" skin over the tubing?
__________________

2007 Dodge Ram 3500 SRW 4x4 with 6MT
2003 TDI Beetle
2002 TDI Beetle
currently parked - 1996 Dodge 2500 Cummins Turbodiesel
Custom cab, auto, 3.55 gears
|
|
|
|
|
The Following User Says Thank You to skyking For This Useful Post:
|
|
|
10-15-2016, 02:40 PM
|
#136 (permalink)
|
|
Master EcoModder
Join Date: Jan 2008
Location: Sanger,Texas,U.S.A.
Posts: 16,395
Thanks: 24,469
Thanked 7,410 Times in 4,800 Posts
|
1/8th
Quote:
Originally Posted by skyking
so there is no room for a 1/8" skin over the tubing?
|
That's probably what will happen with the Spirit's boat tail.I'm gonna fit foam board in between the tubing,dope that once with resin,then do one layer of cloth and Bondo the gross imperfections.
On 'Baby',she gets resin on the foam,then Bondo and smoothing, and that would actually be enough for the wind tunnel.The wheel fairings for the boat-tailed trailer were done this way.
__________________
Photobucket album: http://s1271.photobucket.com/albums/jj622/aerohead2/
|
|
|
|
|
The Following User Says Thank You to aerohead For This Useful Post:
|
|
|
10-15-2016, 04:41 PM
|
#137 (permalink)
|
|
Master EcoModder
Join Date: Jan 2008
Location: Sanger,Texas,U.S.A.
Posts: 16,395
Thanks: 24,469
Thanked 7,410 Times in 4,800 Posts
|
update
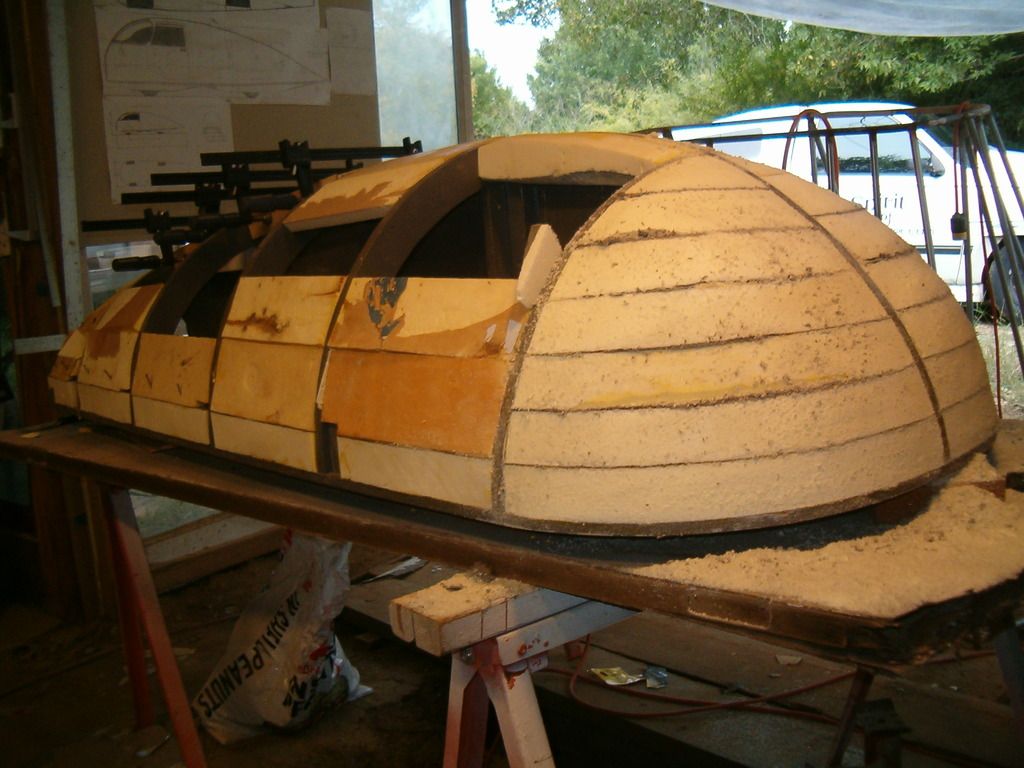
* 'completed the foam for 'baby's' main upper body and stinger.I made a pass across the big ridges with the blades of a coping saw,back saw, and carpenters saw.Then went over that with a sanding long-board of 36-grit paper,and Stanley Surform hand plane.
*These,along with the wheel fairings are ready for resin.
*Then I'll follow with body filler.
*Since she's non-structural,I don't see a need for glass,plus I'm already at the net outside dimensions; although a good bump would shatter the surface.
--------------------------------------------------------------------------
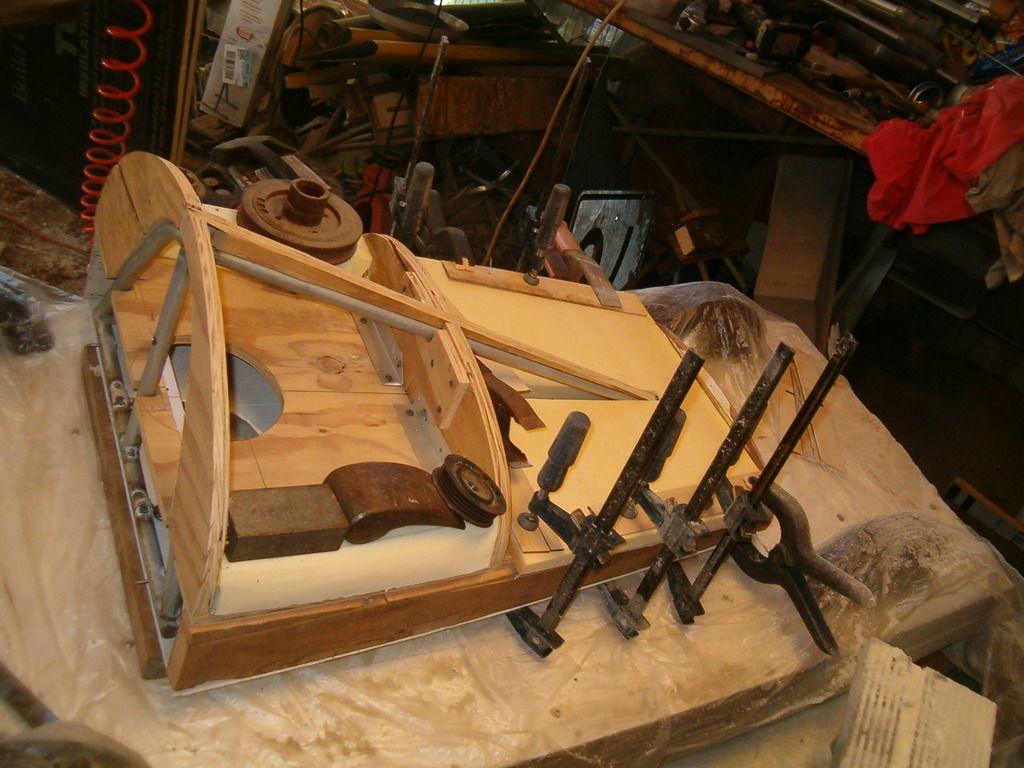
*The 2014 boat tail is now demolished,but I was able to harvest its rear transom, with the complete lighting package and integrate it into the new boat tail's steel skeleton.
*Once fastened,I can begin adding foam board to the skeleton to create it's 'surface,' plus I'll have something to attach the pogo to.
* I will do a single layer of glass on all of this,as it will be stressed during use.
* This new tail must have a trap door in it's floor (diffuser),plus a top hatch to allow me to crawl under it and then stand up inside it,in order to lift it off the swing-mount by myself.This will be handy over the long haul.
--------------------------------------------------------------------------
*This morning I found an aerodynamic plastic waste basket at the thrift store,for $3,which will help me develop the faux 5th-wheel and wheel fairing to add to Spirit's stinger for a BamZipPow-esque ,simulated 1-wheel trailer' trailer wheel.(I've been curious about these trailers and this will allow me to simulate a full-gap-sealed,fully-boat-tailed 1-wheel trailer at DARKO)
--------------------------------------------------------------------------
I made a few new photos,and have the camera with me in case Al has time to help me post them.
Yesterday was the first time I was able to view the 'template' in real life,sans wheel fairings.
NOTE: I did a Richard von Mises,'reflexed' tail on 'baby's stinger,which I didn't originally consider.I figured that an actual road-going version of this form would need some width at the rear transom,and some facility for mounting taillights and rear license plate.I've no idea what it will do to the airflow,but it should be contained within Morelli's 'fluid tail'/phantom tail region,so I don't think it will make that much difference.
__________________
Photobucket album: http://s1271.photobucket.com/albums/jj622/aerohead2/
|
|
|
|
|
The Following 2 Users Say Thank You to aerohead For This Useful Post:
|
|
|
10-15-2016, 06:52 PM
|
#138 (permalink)
|
|
Master EcoModder
Join Date: Aug 2012
Location: northwest of normal
Posts: 28,965
Thanks: 8,222
Thanked 8,995 Times in 7,431 Posts
|
Quote:
|
*Since she's non-structural,I don't see a need for glass,plus I'm already at the net outside dimensions; although a good bump would shatter the surface.
|
5-8 coats of Plastidip. It's about $50 a gallon. |
|
|
|
|
The Following User Says Thank You to freebeard For This Useful Post:
|
|
|
10-22-2016, 01:35 PM
|
#139 (permalink)
|
|
Master EcoModder
Join Date: Jan 2008
Location: Sanger,Texas,U.S.A.
Posts: 16,395
Thanks: 24,469
Thanked 7,410 Times in 4,800 Posts
|
update
*Got the entire upper body doped with resin.
*The wheel fairings are doped and ready for Bondo.
* The upper body and stinger were floated out with Bondo until I ran out (1st gallon).
* The upper body and stinger have been hand-planed with the Surform.
* The upper body and stinger have been primed for a guide coat,to help reveal areas for further Bondo buildup.
* I've created an elliptical 'top' for 'Spirit's' boat tail which will help to enable Morelli's ring-vortex and fluid tail.
* I'll do the same for each side.I'm goin' for something like this:
*I picked up the second gallon of Bondo and some black primer (for guide coat) this AM.3M has jacked up the price another $5 a gallon,Their resin is now over $40 a gallon! Yikes!!!!!!!!!!!!!!!!!!!!!
--------------------------------------------------------------------------
'Spirit' is dead in the yard.Cranks,won't fire.I've got an OBD-1 scanner,my brother is mailing me codes,and in a while I'll go to You-Tube to look at tutorials for diagnostics.
BamZipPow made a very generous offer to drive up and help save the day! Thanks again!
I'll keep fabricating while I look at the truck on the side.The Honda is a challenge to drive and always requires a strategy,but will have to do for awhile.
------------------------------------------------------------------------
I got to town this AM,immediately disconnected the battery and walked from the car to six different destinations before push-starting to get within 4-blocks of Copy-Pro,on a downhill incline which will help for pushing when I get back to the car.
--------------------------------------------------------------------------
*I have more photos to share,if Al gets the time.He was swamped with college students last Saturday.
__________________
Photobucket album: http://s1271.photobucket.com/albums/jj622/aerohead2/
|
|
|
|
|
The Following User Says Thank You to aerohead For This Useful Post:
|
|
|
10-22-2016, 04:34 PM
|
#140 (permalink)
|
|
Master EcoModder
Join Date: Jan 2008
Location: Sanger,Texas,U.S.A.
Posts: 16,395
Thanks: 24,469
Thanked 7,410 Times in 4,800 Posts
|
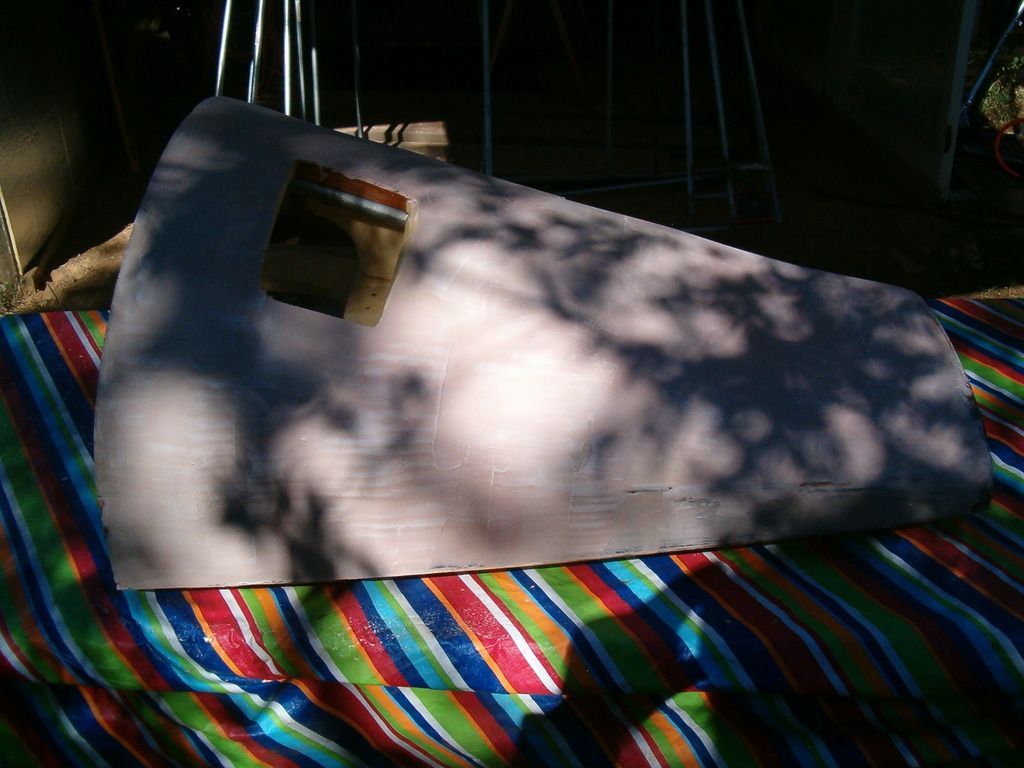
recent images
*here is the wheel fairing package roughed in
*here is foam going on.It took 103-pieces for the main body section.And the reinforced fiber cover on the 2-inch foam should all have been removed,as it is now making it very difficult to contour.
*stinger gets some foam too
*main body now filled in
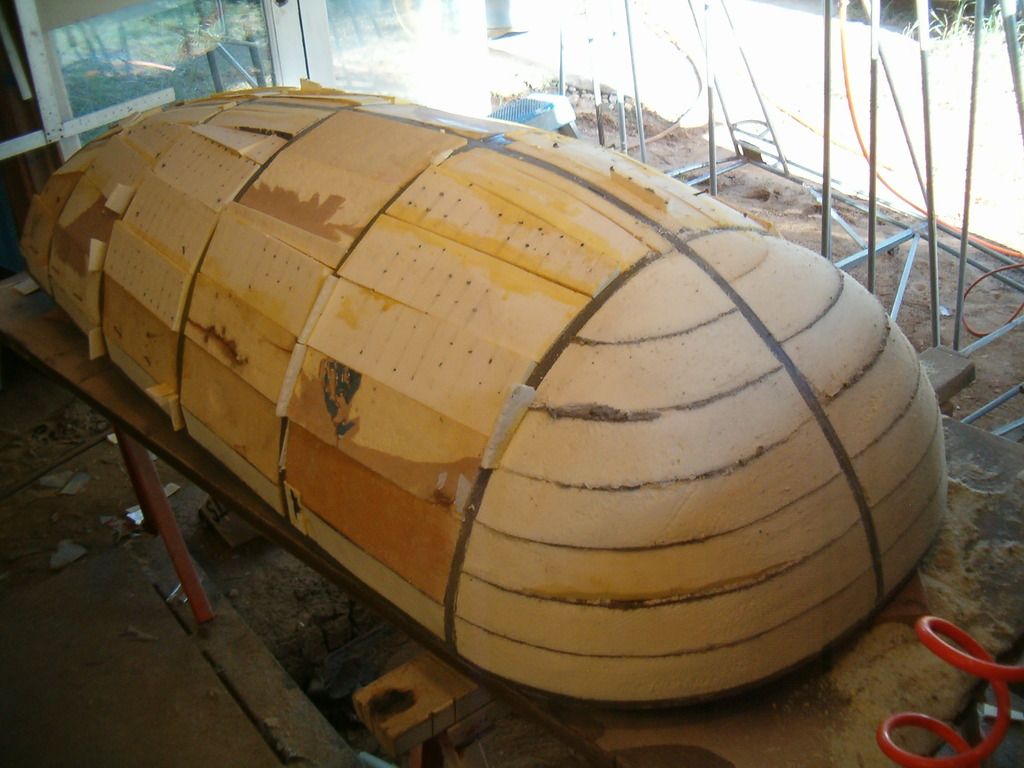
*stinger filled in.I found 8-penny nails handy for pinning the foam down until the Titebond glue went off
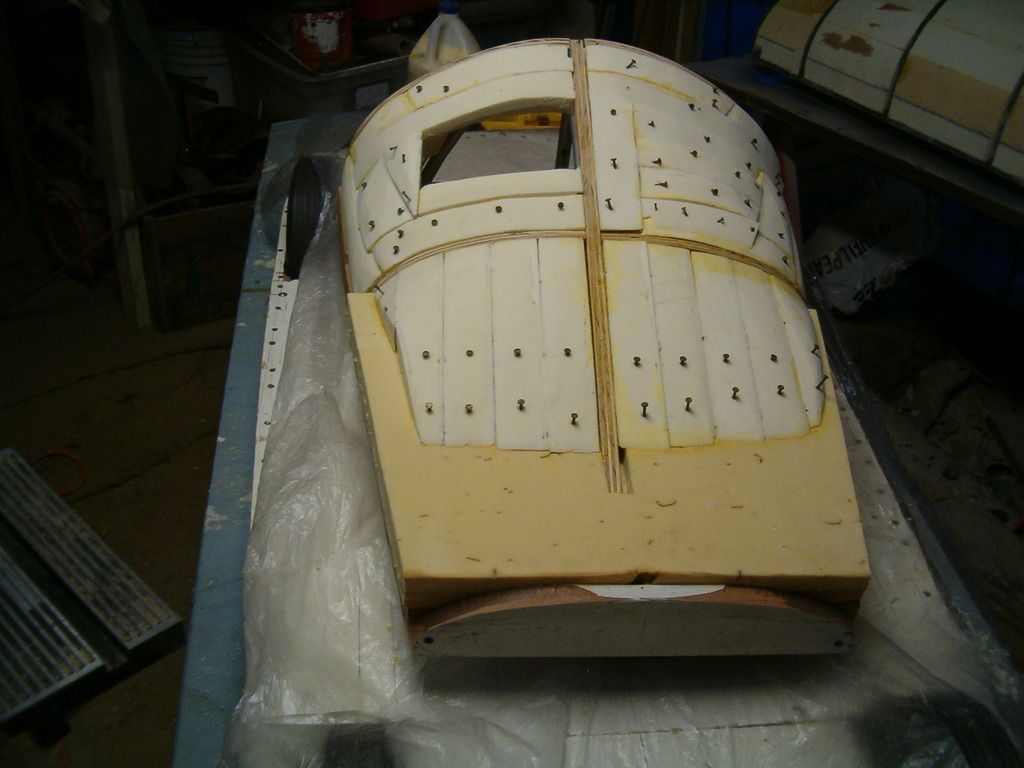
*roughed in using a Stanley Surform block plane
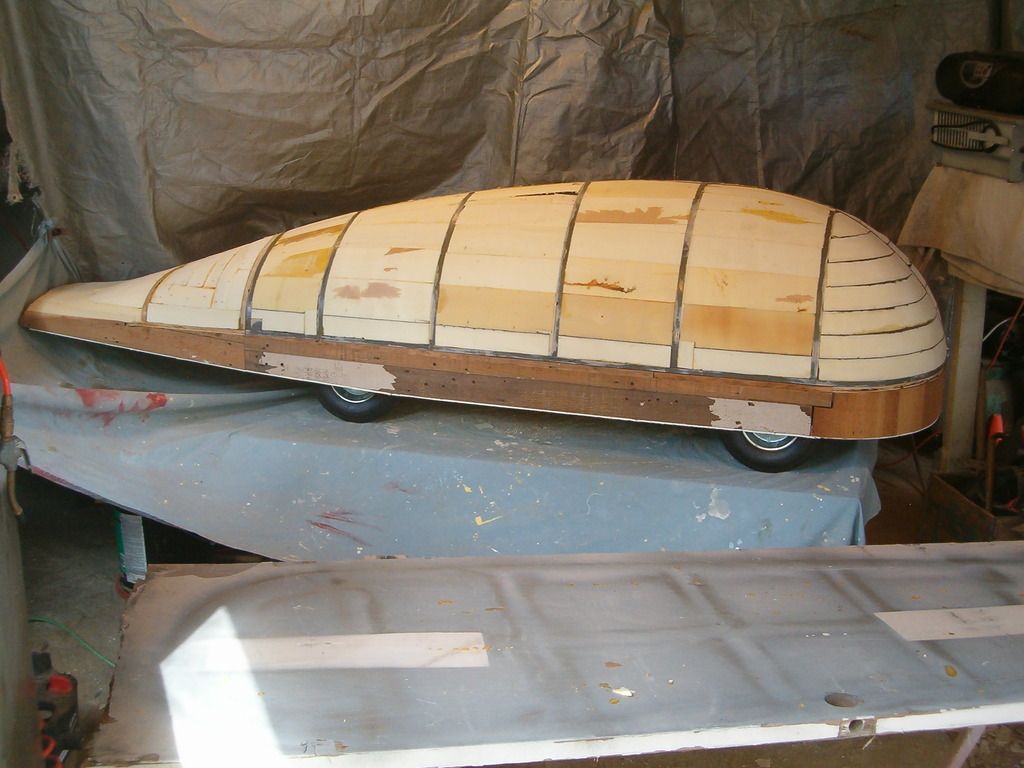
*Bare foam is doped with a liberal coat of polyester resin.
*Bondo spread on to bring the inter-rib spans up to grade.Note the access hole for attaching/removing the hand nut
* main body gets slathered
*re-assembled and with a guide coat of primer which will help reveal 'low' areas
* at some point I'll have to work at night,using a single,strong light source to read shadows for imperfections,also 'feeling' the surface for imperfections with cotton gloves.From here on out you don't want to actually 'touch' any surface with your bare hands,or you'll transfer lanolin which will ruin adhesion of primer or top coats.
*here is one of the new hood extractors (soffit vent)
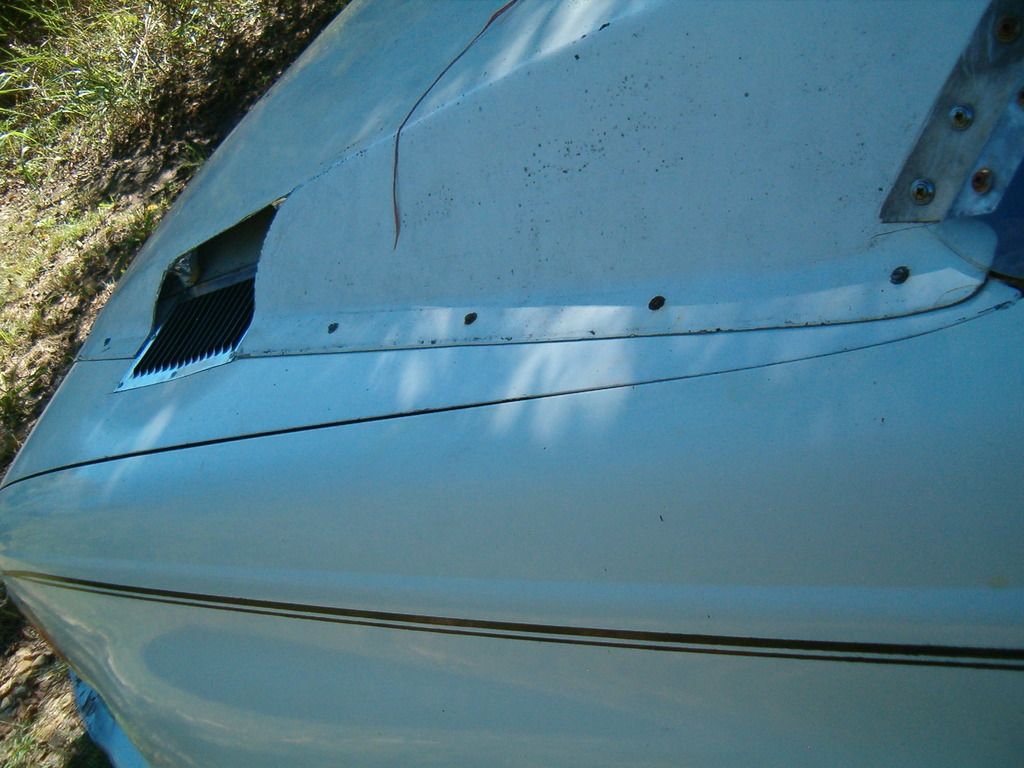
lots of detail work to finish!
*here's the old transom being re-tasked and modified for ring-vortex/fluid tail
--------------------------------------------------------------------------
PS: the 2-inch Isocyanurate foam I found on the side of the road.It is manufactured by GAF Corp.( you may be familiar with their roof shingles and roll roofing),and is for commercial roof insulation (a local church was just remodeled using it).
It was originally a 4'x 8' sheet and it has a fiberglass-reinforced laminated skin.After realizing how difficult shaping would be with the skin in place,I subsequently band-sawed off the rest before using.
It's fully compatible with polyester resin and can be glued with simple Carpenter's glue.
__________________
Photobucket album: http://s1271.photobucket.com/albums/jj622/aerohead2/
Last edited by aerohead; 10-22-2016 at 05:28 PM..
Reason: add data
|
|
|
|
|
The Following 7 Users Say Thank You to aerohead For This Useful Post:
|
|
|


