07-24-2020, 10:47 PM
|
#91 (permalink)
|
|
Master EcoModder
Join Date: Apr 2012
Location: Evensville, TN
Posts: 676
Thanks: 237
Thanked 580 Times in 322 Posts
|
California98Civic,
I will try to post progress as I go. Observe away, but don't expect any metal shaping as good as the photos you shared. 
Aerohead,
I will have to look up that book, I don't have any such books so it would be nice to have a reference.
Freebeard,
I don't yet have a nylon hammer, I will have to add that to the list to keep an eye out for.
Everyone,
Made some more slow but steady progress, I could obviously cut things apart faster but I am more concerned about how things are going to go back together and am letting that guide how things come apart. Which just takes longer.
I managed to get the roof split away from the side panels, made the cuts right where the first roof ridges start. Got the inner roof bracing removed, will shorten and reinstall it. I removed the lower quarter panels, I don't need them with my current plans for a custom wraparound bumper. I have a plan now for how to do the remaining cuts.
Once it is cut apart I will be pulling it in at a 1 in 10 slope, which is an additional 5.71 degrees, putting the sides at about 6.15 degrees after the 6 to 8 inch compound curve transition.
Edit: I was actually quite surprised during the disassembly how much adhesive/caulk was used to seal and hold the vehicle together. I plan to use welding on as many of the surfaces as I can on reassembly. I got a tube of some good 3M panel adhesive for the surfaces for which that is impractical.
|
|
|

|
|
The Following 3 Users Say Thank You to aardvarcus For This Useful Post:
|
|
 Today Today
|
|
|
|
 Other popular topics in this forum...
|
|
|
|
|
07-29-2020, 11:16 AM
|
#92 (permalink)
|
|
Master EcoModder
Join Date: Jan 2008
Location: Sanger,Texas,U.S.A.
Posts: 16,428
Thanks: 24,479
Thanked 7,410 Times in 4,800 Posts
|
adhesive
Quote:
Originally Posted by aardvarcus

California98Civic,
I will try to post progress as I go. Observe away, but don't expect any metal shaping as good as the photos you shared.
Aerohead,
I will have to look up that book, I don't have any such books so it would be nice to have a reference.
Freebeard,
I don't yet have a nylon hammer, I will have to add that to the list to keep an eye out for.
Everyone,
Made some more slow but steady progress, I could obviously cut things apart faster but I am more concerned about how things are going to go back together and am letting that guide how things come apart. Which just takes longer.
I managed to get the roof split away from the side panels, made the cuts right where the first roof ridges start. Got the inner roof bracing removed, will shorten and reinstall it. I removed the lower quarter panels, I don't need them with my current plans for a custom wraparound bumper. I have a plan now for how to do the remaining cuts.
Once it is cut apart I will be pulling it in at a 1 in 10 slope, which is an additional 5.71 degrees, putting the sides at about 6.15 degrees after the 6 to 8 inch compound curve transition.
Edit: I was actually quite surprised during the disassembly how much adhesive/caulk was used to seal and hold the vehicle together. I plan to use welding on as many of the surfaces as I can on reassembly. I got a tube of some good 3M panel adhesive for the surfaces for which that is impractical. |
3M makes an automotive adhesive specifically for your type of application. It's only available, retail, through automotive refinishing supply outlets, and is over $20 a tube. Body shops use it to bond aerodynamic kit parts. If you can stomach the price, you'll be delighted in its performance.
Also, if the chassis was electro-plated with zinc, for corrosion protection, be very careful to ventilate your welding area. The vapors won't hurt spot-welding robots on an assembly line, but they will kill you! 
__________________
Photobucket album: http://s1271.photobucket.com/albums/jj622/aerohead2/
|
|
|
|
|
The Following User Says Thank You to aerohead For This Useful Post:
|
|
|
07-31-2020, 10:41 PM
|
#93 (permalink)
|
|
Master EcoModder
Join Date: Apr 2012
Location: Evensville, TN
Posts: 676
Thanks: 237
Thanked 580 Times in 322 Posts
|
Had some time today to make some progress, I had previously gotten the side clearanced to bend in without binding, today I was able to make final adjustments, flange the roof seam, mark and clean the weld areas, and begin welding the side back to the floor and roof. I still have lots of little detailed areas to address via welding and forming, but overall good progress.
|
|
|
|
|
The Following 2 Users Say Thank You to aardvarcus For This Useful Post:
|
|
|
07-31-2020, 11:50 PM
|
#94 (permalink)
|
|
Master EcoModder
Join Date: Aug 2012
Location: northwest of normal
Posts: 29,063
Thanks: 8,251
Thanked 9,010 Times in 7,444 Posts
|
Once you've unlocked that achievement, what do you plan for the rear wheels and underbody. That could be ±25% on the improvement.
__________________
.
.Without freedom of speech we wouldn't know who all the idiots are. -- anonymous poster
____________________
.
.What the headline giveth, the last paragraph taketh away. -- Scott Ott
|
|
|
|
|
The Following User Says Thank You to freebeard For This Useful Post:
|
|
|
08-01-2020, 09:43 PM
|
#95 (permalink)
|
|
Master EcoModder
Join Date: Apr 2012
Location: Evensville, TN
Posts: 676
Thanks: 237
Thanked 580 Times in 322 Posts
|
Current plan is for the rear bumper to be positioned behind the upper part of the rear tires, also fore and after conveyor belt tire spats on all 4 wheels and tires. I have stock stainless wheel covers I plan to mount on the wheels with dzus fasteners, but wheel well covers arent out of the question. Current plans for the under body is a 100% belly pan made out of bent and welded aluminum, except under the exhaust.
|
|
|
|
|
The Following 2 Users Say Thank You to aardvarcus For This Useful Post:
|
|
|
08-02-2020, 03:34 PM
|
#96 (permalink)
|
|
Cyborg ECU
Join Date: Mar 2011
Location: Coastal Southern California
Posts: 6,299
Thanks: 2,373
Thanked 2,174 Times in 1,470 Posts
|
Quote:
Originally Posted by aardvarcus
Had some time today to make some progress, I had previously gotten the side clearanced to bend in without binding, today I was able to make final adjustments, flange the roof seam, mark and clean the weld areas, and begin welding the side back to the floor and roof. I still have lots of little detailed areas to address via welding and forming, but overall good progress.
|
Looking good, hey! It is gonna catch a few eyes on the freeway. Start a few conversations at lights and in parkinglots.
__________________
See my car's mod & maintenance thread and my electric bicycle's thread for ongoing projects. I will rebuild Black and Green over decades as parts die, until it becomes a different car of roughly the same shape and color. My minimum fuel economy goal is 55 mpg while averaging posted speed limits. I generally top 60 mpg. See also my Honda manual transmission specs thread.


|
|
|
|
|
The Following User Says Thank You to California98Civic For This Useful Post:
|
|
|
08-02-2020, 04:48 PM
|
#97 (permalink)
|
|
Master EcoModder
Join Date: Aug 2012
Location: northwest of normal
Posts: 29,063
Thanks: 8,251
Thanked 9,010 Times in 7,444 Posts
|
Quote:
|
Current plan is for the rear bumper to be positioned behind the upper part of the rear tires, also fore and after conveyor belt tire spats on all 4 wheels and tires.
|
Underlined needs a pic. Here's how I'd do conveyer belting spats:
U-shape belting and U-shape metal bracket fastened only on their long edges
Quote:
|
I have stock stainless wheel covers I plan to mount on the wheels with dzus fasteners
|
M oon disks?
__________________
.
.Without freedom of speech we wouldn't know who all the idiots are. -- anonymous poster
____________________
.
.What the headline giveth, the last paragraph taketh away. -- Scott Ott
|
|
|
|
|
The Following 2 Users Say Thank You to freebeard For This Useful Post:
|
|
|
08-05-2020, 11:37 AM
|
#98 (permalink)
|
|
Master EcoModder
Join Date: Jan 2008
Location: Sanger,Texas,U.S.A.
Posts: 16,428
Thanks: 24,479
Thanked 7,410 Times in 4,800 Posts
|
Air would find those to be plenty tasty!
__________________
Photobucket album: http://s1271.photobucket.com/albums/jj622/aerohead2/
|
|
|
|
|
The Following User Says Thank You to aerohead For This Useful Post:
|
|
|
10-24-2020, 11:08 PM
|
#99 (permalink)
|
|
Master EcoModder
Join Date: Apr 2012
Location: Evensville, TN
Posts: 676
Thanks: 237
Thanked 580 Times in 322 Posts
|
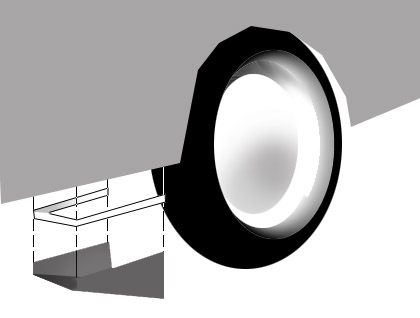
It's been a few months, a few small odds and ends have gotten done since I last posted on reinforcing and welding up the drivers side. Many other things have taken precedence over the suburban project so it has been on a bit of a back burner, but I had a basically full day to work on it. I was able to get the other side severed, binding spots clearanced, the side angled over, and tack welded in place. Attached are some photos of the progress.
Next thing on the agenda is final welding of the various parts, making patch panels, building outer fender wells, and then building a new hatch/door for the back.
|
|
|
|
|
The Following 2 Users Say Thank You to aardvarcus For This Useful Post:
|
|
|
10-24-2020, 11:11 PM
|
#100 (permalink)
|
|
Master EcoModder
Join Date: Aug 2012
Location: northwest of normal
Posts: 29,063
Thanks: 8,251
Thanked 9,010 Times in 7,444 Posts
|

Did the second side go faster than the first? Usually does.
__________________
.
.Without freedom of speech we wouldn't know who all the idiots are. -- anonymous poster
____________________
.
.What the headline giveth, the last paragraph taketh away. -- Scott Ott
|
|
|
|
|
The Following User Says Thank You to freebeard For This Useful Post:
|
|
|