 12-04-2011, 04:21 PM
|
#21 (permalink)
|
|
Master EcoModder
Join Date: Jun 2011
Location: Alabama
Posts: 625
Thanks: 40
Thanked 156 Times in 103 Posts
|
Can someone explain to me how I would get a picture of my car into the program? I'm really hoping that I don't have to draw it using the canvas feature because there is no way I'd be able to get it accurate. I tried posting the file extension for picture of my car into the program, but I have had no luck getting it to work. I imagine it has to be a special file type or something
EDIT: looked it up on the flow illustrator website. looks like it has to be a bitmap. If you have any other tips, let me know anyway
Last edited by HydroJim; 12-04-2011 at 04:28 PM..
|
|
|

|
 Today Today
|
|
|
|
 Other popular topics in this forum...
|
|
|
|
 12-04-2011, 04:39 PM
|
#22 (permalink)
|
|
Ultimate Fail
Join Date: Feb 2008
Location: Austin,Texas
Posts: 3,585
Thanks: 2,872
Thanked 1,121 Times in 679 Posts
|
Quote:
Originally Posted by HydroJim

Can someone explain to me how I would get a picture of my car into the program? I'm really hoping that I don't have to draw it using the canvas feature because there is no way I'd be able to get it accurate. I tried posting the file extension for picture of my car into the program, but I have had no luck getting it to work. I imagine it has to be a special file type or something
EDIT: looked it up on the flow illustrator website. looks like it has to be a bitmap. If you have any other tips, let me know anyway
|
Be sure to include the entire destination name.
Example --> " images/zonda.jpg "
Be sure to save the images to the same "images" folder that the program uses and it should see it.
The higher the dpi, the more accurate that the simulation will be due to bitmapping on the image at low resolutions. It will run very slow though.
I'm having no problem loading JPEG images as large as 300 dpi and 10 " wide |
|
|

|
 12-04-2011, 04:45 PM
|
#23 (permalink)
|
|
Ultimate Fail
Join Date: Feb 2008
Location: Austin,Texas
Posts: 3,585
Thanks: 2,872
Thanked 1,121 Times in 679 Posts
|
I'm having luck with a setting of 250 and 500.
At lower settings, the air just hits the windshield like a ramp and continues upward without curving with the roofline. This is what I'm seeing with the Probe image.
|
|
|

|
 12-04-2011, 04:51 PM
|
#24 (permalink)
|
|
Master EcoModder
Join Date: Jun 2011
Location: Alabama
Posts: 625
Thanks: 40
Thanked 156 Times in 103 Posts
|
Ok, I tried it as a bitmap and still need help. When I enter the program, I hit 0 as my option. then I type in
D:\My Documents\My Pictures\flowillustrator\zx3stock2.bmp
as my filename. Then I hit enter and the program exits and I'm not sure why.
|
|
|

|
 12-04-2011, 05:10 PM
|
#25 (permalink)
|
|
Master EcoModder
Join Date: Aug 2011
Location: Warren, MI
Posts: 2,456
Thanks: 782
Thanked 669 Times in 411 Posts
|
How big is your file in pixels? Is the background (everything but the car) completely white?
BTW, Business Cat is not aerodynamic.

__________________
He gave me a dollar. A blood-soaked dollar.
I cannot get the spot out but it's okay; It still works in the store
Last edited by Sven7; 12-04-2011 at 05:26 PM..
|
|
|

|
 12-04-2011, 05:30 PM
|
#26 (permalink)
|
|
Cyborg ECU
Join Date: Mar 2011
Location: Coastal Southern California
Posts: 6,302
Thanks: 2,374
Thanked 2,176 Times in 1,471 Posts
|
Quote:
Originally Posted by ChazInMT


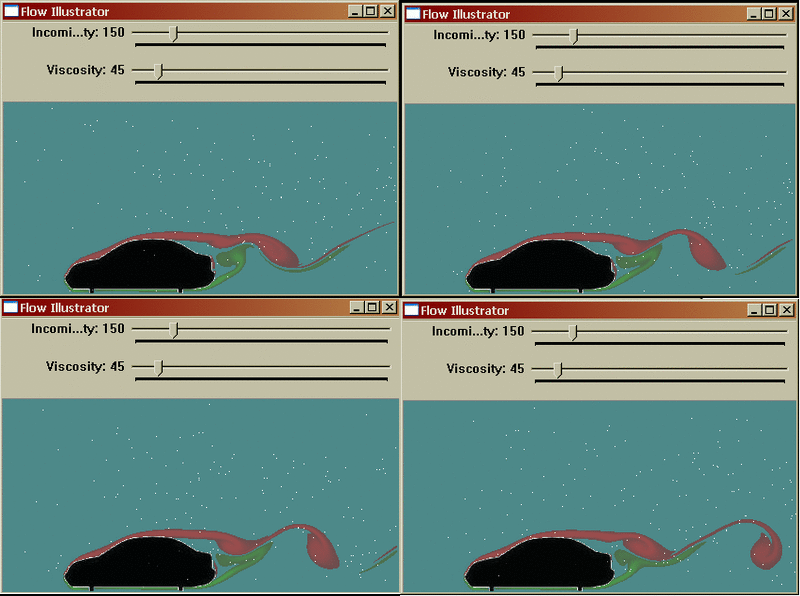
Here is a screen shot of my Civic, no mods. I used the settings 120 and 44 because it makes the flow look how I think it should for my car. Notice the flow becomes detached at the top of my rear window, and then skips off the back of my trunk lid.
This is what I am 95% sure is what is happening, so these settings approximate what air really does. I recommend you use these settings when you want to have an idea of how your vehicle will behave as well. |
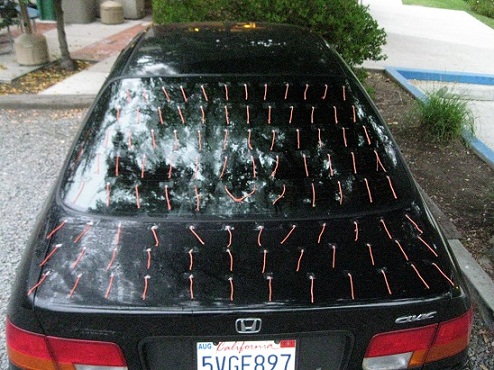
Take a look at this image, from my EM album, of tufts on the back of my Civic:

I think it roughly confirms your claims here. Notice the air seems to recirculate near the bottom of the window, seems detached, and then seems re-attached at the end of the trunk lid. I am sooo psyched about this program for my car and my students in January. Your timing is awesome.
__________________
See my car's mod & maintenance thread and my electric bicycle's thread for ongoing projects. I will rebuild Black and Green over decades as parts die, until it becomes a different car of roughly the same shape and color. My minimum fuel economy goal is 55 mpg while averaging posted speed limits. I generally top 60 mpg. See also my Honda manual transmission specs thread.


|
|
|

|
 12-04-2011, 05:40 PM
|
#27 (permalink)
|
|
Master EcoModder
Join Date: Jun 2011
Location: Alabama
Posts: 625
Thanks: 40
Thanked 156 Times in 103 Posts
|
the file is 512x256 and I made the picture black and white in paint just to confirm that everything that was white was white. the picture has 2 colors now and it doesnt seem to work. Maybe I'll try downloading the program again and reextracting the zip file
|
|
|

|
 12-04-2011, 06:30 PM
|
#28 (permalink)
|
|
Aero Deshi
Join Date: Jan 2010
Location: Vero Beach, FL
Posts: 1,065
Thanks: 430
Thanked 669 Times in 358 Posts
|
Hydro Jim, transfer/copy the .bmp picture into the "Images" file that comes with the FI program, then type images\zx3stock2.bmp (That is a "\" NOT a "/" as Cd has it) You should get the illustrator running almost immediately. If it quits, then it just means it couldn't find it.
|
|
|

|
|
The Following 2 Users Say Thank You to ChazInMT For This Useful Post:
|
Cd (12-04-2011), Sven7 (12-04-2011) |
 12-04-2011, 08:08 PM
|
#29 (permalink)
|
|
Master EcoModder
Join Date: Jul 2010
Location: Canada
Posts: 720
Thanks: 155
Thanked 274 Times in 168 Posts
|
Does this flow (.gif) look plausible ? I reduced the image size to get a more fluid animation.
 |
|
|

|
 12-04-2011, 08:31 PM
|
#30 (permalink)
|
|
Master EcoModder
Join Date: Jun 2011
Location: Alabama
Posts: 625
Thanks: 40
Thanked 156 Times in 103 Posts
|
I finally got it working. Thanks for the help guys. I don't think i extracted the zip file the first time so I think that was the problem.
Using this is going to be lots of fun!
|
|
|

|
|