Go Back   EcoModder Forum > EcoModding > EcoModding Central
Register Now
 Register Now
 

Reply  Post New Thread
 
Submit Tools LinkBack Thread Tools
Old 09-21-2011, 05:21 AM   #1 (permalink)
Enthusiastic EcoModder
 
Join Date: Dec 2010
Location: San Diego
Posts: 90

Gnatmobile - '96 Geo Metro LSI
90 day: 44.68 mpg (US)

theRAV - '01 Toyota RAV4 NV
90 day: 21.07 mpg (US)

ACCELICA - '95 Toyota Celica GT Convertible
Last 3: 23.46 mpg (US)

The Van - '05 Chevrolet Uplander LS LWB
90 day: 21.04 mpg (US)
Thanks: 4
Thanked 31 Times in 12 Posts
FULL Belly Pan How-To

A few months ago I did a Partial Front Bellypan. This post is to detail how I completed the belly pan to run the entire length of the car. I decided this was important for two reasons: 1) The metro bumper in it's current shape forces a lot of air underneath the car (I plan on later fixing this with a nosecone like aerocivic's or a full airdam like AndrewJ's - but until then all that pressurized air would probably benefit from a smoother underbelly. and 2) getting rid of the 4x8 sheet of coreplast on the roof of my boat was one of my wife's conditions for me finally getting my 67 mustang rat rod (sort of the opposite of the metro... it's a story for another time).
Without Further ado, here is the How-To:
Tools/Supplies Needed:
  • 4x8 Sheet of Coreplast
  • Self Tapping Sheet Metal screws
  • Drill
  • Zip Ties
  • Razor Knife
  • Permanent Marker
  • floor jack and jackstands
  • 1-2 hours of your life
Step 1: Jack up the back of the car as high as you can and put it on jackstands (Be sure to chock the front wheels, your e-brake has no effect on them at all)
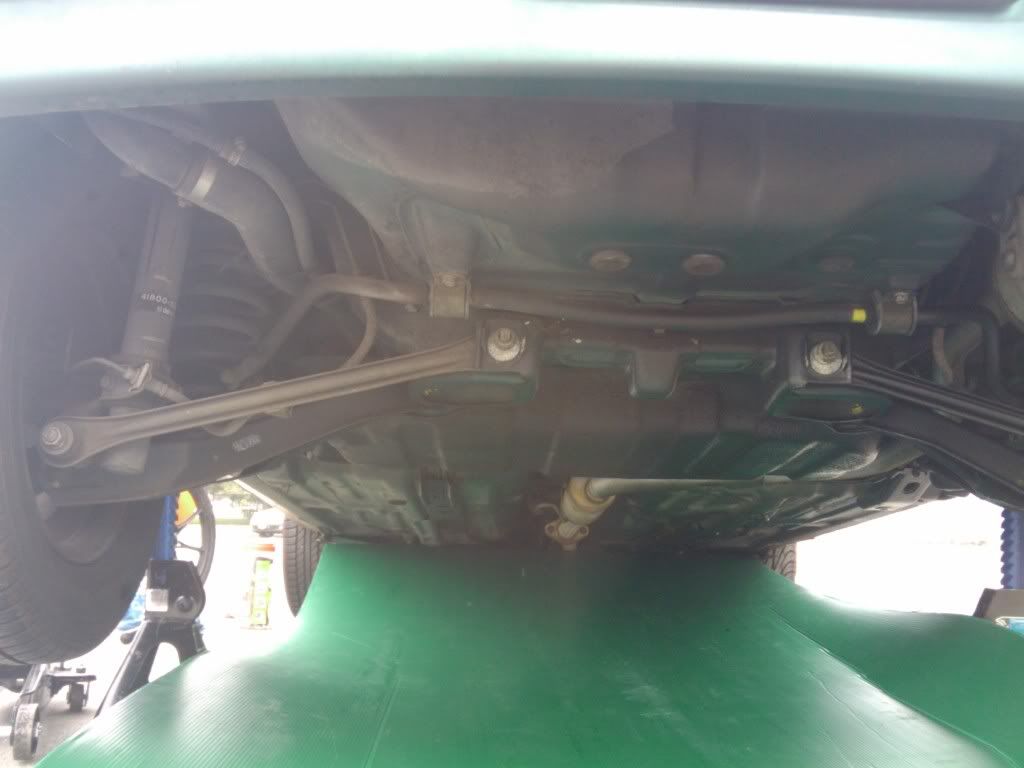
Step 2: Be sure the coreplast is nice and straight with the body of the car and tuck the front edge up over the trailing edge of the partial or front bellypan (this keeps air from getting under the front edge of your full bellypan (which would be very bad) I secured this in only two places by drilling some self tappers through the coreplast and into the belly of the car near the jack points. At this point it should look something like this:
Step 3: Pick appropriate mounting points and use the self tapping screws to secure your bellypan to the underside of the car. Do this from front to back to ensure you keep things nice and smooth and don't create any bulges or ripples. I found a low point on each side of body that was about two feet back from the first screws and two feet in from the outside edge of the car. Then another pair of screws a bit farther back but along the edges again (6 screws total at this point).
Step 4: Next you'll need to secure the back of the bellypan but you'll find the wheels are in the way. Estimate how much to trim off of the sides to accommodate the wheels and make cuts that look like:
] [
Remember the back wheels don't turn so you won't need to get fancy like we did in the front
Step 5: Lastly I placed one screw into a nice solid steely frame bit right in the rear center of the car which pinned it up nice so that it dropped on either side with the rear suspension bits. NOTE: I did not drill into the gas tank, wire harness, or any exhaust components and you should be careful not to either . At this point it should look something like this:
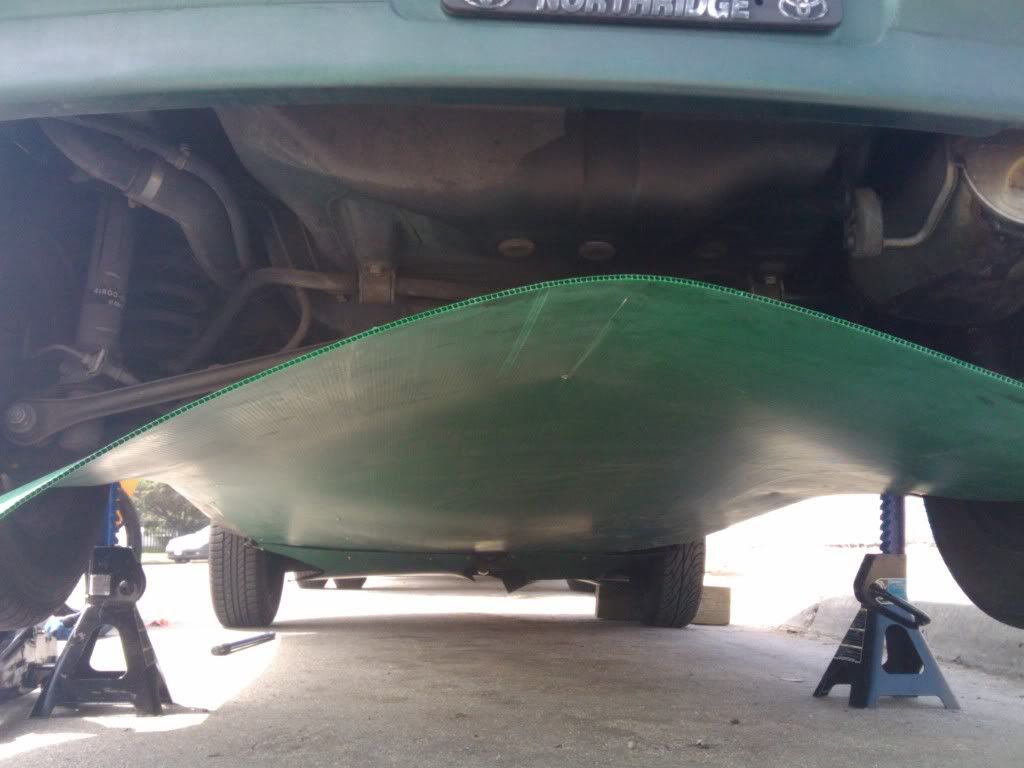
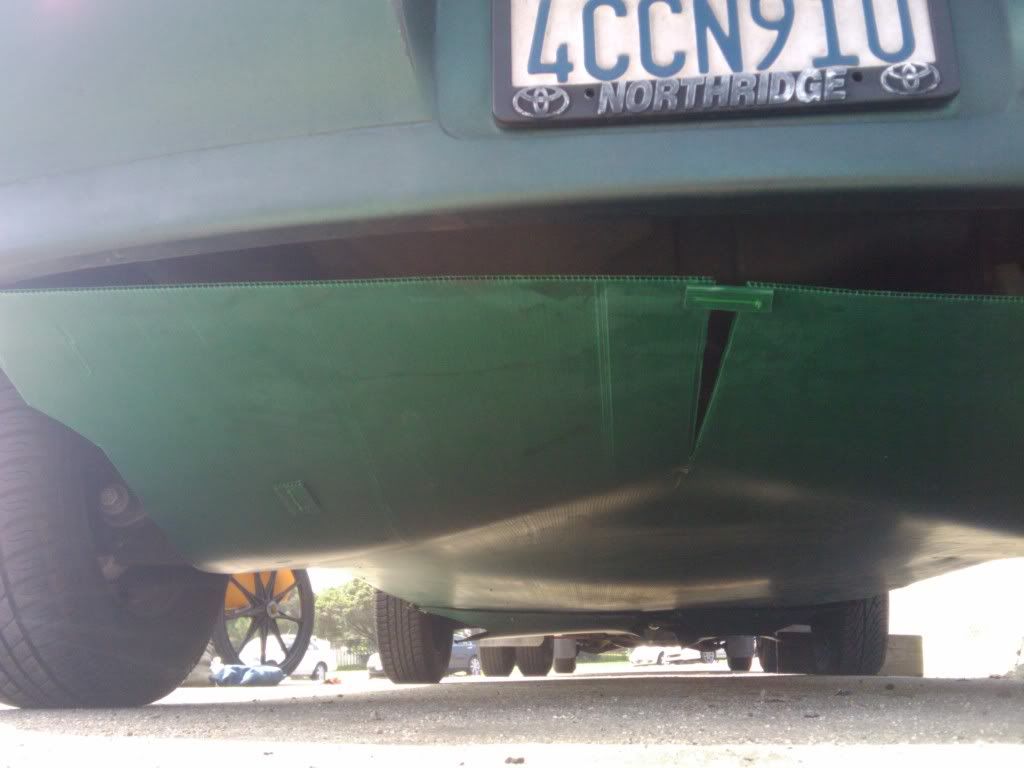
Step 6: At this point I realized the perfect piece of coreplast would have been 8'6" to give me a little extra to trim and secure perfectly to the rear bumper. As it is though, it was about 2" short of perfect but no worries. The piece would be long enough to reach the back bumper on it's two corners only, but because of the compound dips for the suspension I needed to slice the center a bit to allow it to spread and curve correctly.
Step 7: I had noticed that in the front the pan had sagged a bit from the suspension arms. I imagine this is because the suspension hangs a bit lower when the car is jacked up and the wheel is in the air so I decided to place some zip ties to secure the coreplast around the suspension arm so it could stay snug when it travelled. I cut a small piece of coreplast and drilled through it and the pan on both ends straddling the suspension arm then ran some zip ties around it.
Step 8: Next I took two self tapping screws and secured the rearmost corners of the coreplast to the bottom of the rear bumper. The exhaust caused the right side of the split bellypan to sag weirdly so I then used another fortifying scrap of coreplast and a ziptie to raise up and match together the two halves of the bellypan.
(Step 6, 7, and 8 are all kinda pictured here

In the end I'm pretty happy with the result. I wish the coreplast could have been just a hair longer, I would have liked to secure it all along the bottom edge of the rear bumper. As it stands though, the pan cuts off 1/2 inch to 2 inches ahead of the rear bumper lip but well lower so it should direct air past that parachute like edge without incident.
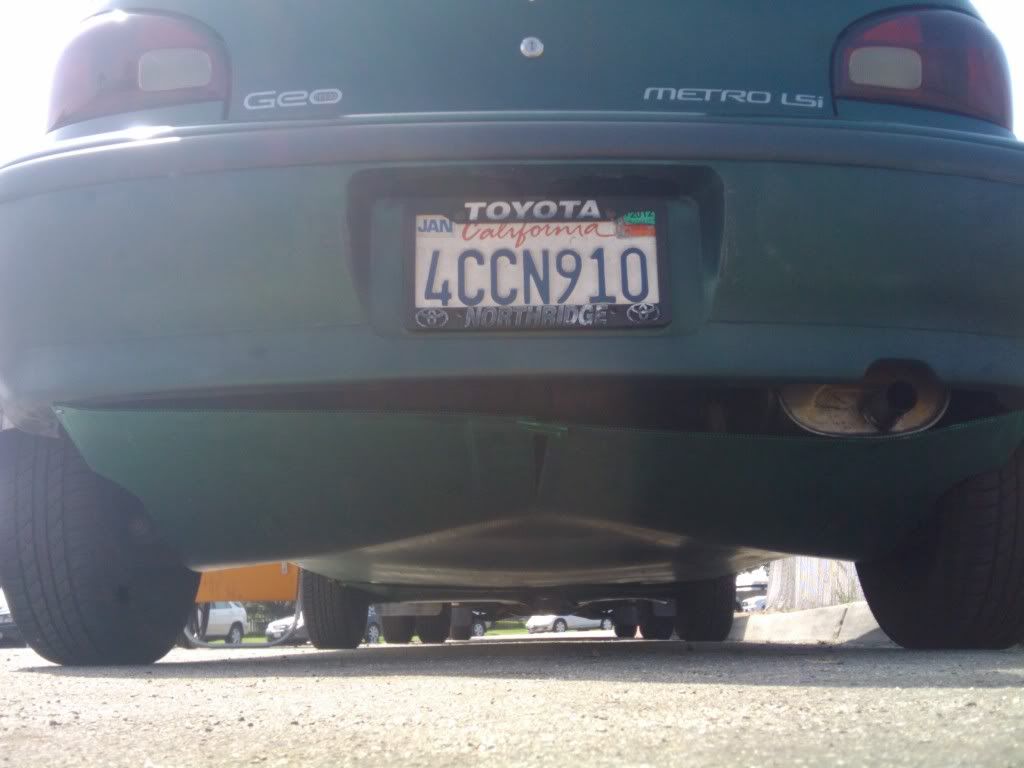
*I made no accommodations for hot exhaust components. I'm not worried about the piping much, as it's a bit tunneled in the car's underbody but the muffler is literally touching part of the pan. So far I've taken 2 10 minute drives and no melting, but I'll keep an eye on that. My first plan had been to cut out areas subject to heat and rivet in some aluminum flashing but that hasn't proved necessary so far.
OH! and while I was under the car I cleaned up the front pan a bit. Those dogbones under the front suspension were really sagging and I rigged them up with a ziptie loop just like we saw here. I also trimmed a few bits of the front bellypan just to keep things looking nice.


Last edited by Geo Metropolis; 09-21-2011 at 02:35 PM..
  Reply With Quote
The Following 2 Users Say Thank You to Geo Metropolis For This Useful Post:
lowglider (09-27-2011), Tango Charlie (09-22-2011)
Alt Today
Popular topics

Other popular topics in this forum...

   
Old 09-21-2011, 09:26 AM   #2 (permalink)
Administrator
 
Daox's Avatar
 
Join Date: Dec 2007
Location: Germantown, WI
Posts: 11,203

CM400E - '81 Honda CM400E
90 day: 51.49 mpg (US)

Daox's Grey Prius - '04 Toyota Prius
Team Toyota
90 day: 49.53 mpg (US)

Daox's Insight - '00 Honda Insight
90 day: 64.33 mpg (US)

Swarthy - '14 Mitsubishi Mirage DE
Mitsubishi
90 day: 56.69 mpg (US)

Daox's Volt - '13 Chevrolet Volt
Thanks: 2,501
Thanked 2,589 Times in 1,555 Posts
Looks like a great write up, but the pics aren't working.
__________________
Current project: A better alternator delete
  Reply With Quote
Old 09-21-2011, 02:36 PM   #3 (permalink)
Enthusiastic EcoModder
 
Join Date: Dec 2010
Location: San Diego
Posts: 90

Gnatmobile - '96 Geo Metro LSI
90 day: 44.68 mpg (US)

theRAV - '01 Toyota RAV4 NV
90 day: 21.07 mpg (US)

ACCELICA - '95 Toyota Celica GT Convertible
Last 3: 23.46 mpg (US)

The Van - '05 Chevrolet Uplander LS LWB
90 day: 21.04 mpg (US)
Thanks: 4
Thanked 31 Times in 12 Posts
I think I got them working now, sorry about that. I kind of fell asleep as I was writing this up, then woke up in front of the laptop and tried to finish and post it, I must have messed those up. are they working now?
  Reply With Quote
Old 09-21-2011, 02:49 PM   #4 (permalink)
Administrator
 
Daox's Avatar
 
Join Date: Dec 2007
Location: Germantown, WI
Posts: 11,203

CM400E - '81 Honda CM400E
90 day: 51.49 mpg (US)

Daox's Grey Prius - '04 Toyota Prius
Team Toyota
90 day: 49.53 mpg (US)

Daox's Insight - '00 Honda Insight
90 day: 64.33 mpg (US)

Swarthy - '14 Mitsubishi Mirage DE
Mitsubishi
90 day: 56.69 mpg (US)

Daox's Volt - '13 Chevrolet Volt
Thanks: 2,501
Thanked 2,589 Times in 1,555 Posts
Yup!
__________________
Current project: A better alternator delete
  Reply With Quote
Old 09-21-2011, 07:09 PM   #5 (permalink)
Human Environmentalist
 
redpoint5's Avatar
 
Join Date: Aug 2010
Location: Oregon
Posts: 12,885

Acura TSX - '06 Acura TSX
90 day: 24.19 mpg (US)

Lafawnda - CBR600 - '01 Honda CBR600 F4i
90 day: 47.32 mpg (US)

Big Yeller - Dodge/Cummins - '98 Dodge Ram 2500 base
90 day: 21.82 mpg (US)

Chevy ZR-2 - '03 Chevrolet S10 ZR2
90 day: 17.14 mpg (US)

Model Y - '24 Tesla Y LR AWD

Pacifica Hybrid - '21 Chrysler Pacifica Hybrid
90 day: 38.47 mpg (US)
Thanks: 4,341
Thanked 4,495 Times in 3,458 Posts
Let's see some ABA results!
__________________
Gas and Electric Vehicle Cost of Ownership Calculator


Give me absolute safety, or give me death!
  Reply With Quote
Old 09-21-2011, 10:09 PM   #6 (permalink)
Master EcoModder
 
Sven7's Avatar
 
Join Date: Aug 2011
Location: Warren, MI
Posts: 2,456

Boo Radley - '65 Ford F100
90 day: 13.28 mpg (US)
Thanks: 782
Thanked 669 Times in 411 Posts
First, a word of warning to fellow Northerners: This will be a dangerous exercise in the North because road salt will get in and potentially rot out your frame rails (or whatever you drilled into) from the inside out.

If anyone has ideas on how to do this without exposing structural components to road salt I'm all ears.

Second, you might want to patch that exhaust thing asap. Mine melted within days.

Last, do you have any problems with the coroplast flexing around the control arms?
__________________
He gave me a dollar. A blood-soaked dollar.
I cannot get the spot out but it's okay; It still works in the store
  Reply With Quote
Old 09-22-2011, 01:52 AM   #7 (permalink)
Enthusiastic EcoModder
 
Join Date: Dec 2010
Location: San Diego
Posts: 90

Gnatmobile - '96 Geo Metro LSI
90 day: 44.68 mpg (US)

theRAV - '01 Toyota RAV4 NV
90 day: 21.07 mpg (US)

ACCELICA - '95 Toyota Celica GT Convertible
Last 3: 23.46 mpg (US)

The Van - '05 Chevrolet Uplander LS LWB
90 day: 21.04 mpg (US)
Thanks: 4
Thanked 31 Times in 12 Posts
That's a good note. This is a San Diego car that occasionally makes it to Arizona, if you live in a snowy place, you need to give some care when drilling into your undercarriage. I would bet you could still do it you would just need to seal up all the screw points. I live on a wood boat and freshwater getting into wood rots it really fast and this can be expensive and even dangerous. The solution if you have to put a screw into the wood is to fasten the screw, then unscrew it, dip the threads in a legit waterproof sealant like 3M's 5200 then replace the screw. It takes like 24 hours to fully cure but it will be waterproof and pretty much indestructible from this point on. This would definitely work for keeping out road salt but 5200 might be a bad choice because it's so strong you might not be able to remove the screws later.

So far no melting and i've driven it up to operating temp a couple of times. Time will tell. My plan is to let it melt a little to indicate where, if anywhere I should trim and heatshield. The front portion of the belly pan didn't exactly melt anywhere but some of the plastic did get a little warped from the heat so I simply trimmed those pieces off.

Actually looping the zip-ties over the suspension components seems to have been a really good solution for keeping the bellypan snug with the suspension parts. I think installing it with the wheels fully off the ground helped accommodate for the full range of motion and it seems like it all works great.
  Reply With Quote
Old 09-22-2011, 07:24 PM   #8 (permalink)
Enthusiastic EcoModder
 
Join Date: Dec 2010
Location: San Diego
Posts: 90

Gnatmobile - '96 Geo Metro LSI
90 day: 44.68 mpg (US)

theRAV - '01 Toyota RAV4 NV
90 day: 21.07 mpg (US)

ACCELICA - '95 Toyota Celica GT Convertible
Last 3: 23.46 mpg (US)

The Van - '05 Chevrolet Uplander LS LWB
90 day: 21.04 mpg (US)
Thanks: 4
Thanked 31 Times in 12 Posts
Update, I drove the car all the way to oceanside and back in the heat of the day which is like 1 hour each way. Scanguage had the water temp at about 209 which is normal. I'd imagine that would have the exhaust as hot as it will normally get and there was no melting or warping .
I've also been over a variety of speed bumps driveways and the likes that operate the suspension and it looks like the bellypan hugs it quite nicely even when it's traveling up and down. Yay
  Reply With Quote
Old 09-25-2011, 04:00 PM   #9 (permalink)
EcoModding Apprentice
 
Join Date: Sep 2009
Location: Mars
Posts: 106

Diabla - '09 Renault Laguna Hatchback
Thanks: 10
Thanked 18 Times in 12 Posts
Has there been any improvements to the mpg with the full belly vs only the front and have you noticed any actual road noise difference with this mod?
  Reply With Quote
Old 09-25-2011, 06:03 PM   #10 (permalink)
Enthusiastic EcoModder
 
Join Date: Dec 2010
Location: San Diego
Posts: 90

Gnatmobile - '96 Geo Metro LSI
90 day: 44.68 mpg (US)

theRAV - '01 Toyota RAV4 NV
90 day: 21.07 mpg (US)

ACCELICA - '95 Toyota Celica GT Convertible
Last 3: 23.46 mpg (US)

The Van - '05 Chevrolet Uplander LS LWB
90 day: 21.04 mpg (US)
Thanks: 4
Thanked 31 Times in 12 Posts
YES a noticeable difference. In fact, I am at my office now and on the way over broke my range record for a single tank. I'll fill up on the way home but I expect this will be one of my best tanks yet. If that's any indication of MPG, I'm REALLY happy because this mod wasn't even on for the whole tank.
Yes road noise has decreased. With all the mods this car really is extremely quiet now.

  Reply With Quote
The Following 2 Users Say Thank You to Geo Metropolis For This Useful Post:
lowglider (09-27-2011), mbrac (12-20-2011)
Reply  Post New Thread


Powered by vBulletin® Version 3.8.11
Copyright ©2000 - 2025, vBulletin Solutions Inc.
Content Relevant URLs by vBSEO 3.5.2
All content copyright EcoModder.com