Go Back   EcoModder Forum > EcoModding > EcoModding Central
Register Now
 Register Now
 

Reply  Post New Thread
 
Submit Tools LinkBack Thread Tools
Old 02-02-2011, 12:48 PM   #11 (permalink)
Hi-Tech Redneck
 
Johnny Mullet's Avatar
 
Join Date: May 2008
Location: Ashtabula, Ohio
Posts: 1,436
Thanks: 6
Thanked 49 Times in 42 Posts
Send a message via AIM to Johnny Mullet Send a message via MSN to Johnny Mullet
What a cool project. Keep up the good work.

__________________

GeoMetroforum.com - got mpg?
  Reply With Quote
Alt Today
Popular topics

Other popular topics in this forum...

   
Old 02-02-2011, 06:19 PM   #12 (permalink)
Enthusiastic EcoModder
 
Join Date: Dec 2010
Location: San Diego
Posts: 90

Gnatmobile - '96 Geo Metro LSI
90 day: 44.68 mpg (US)

theRAV - '01 Toyota RAV4 NV
90 day: 21.07 mpg (US)

ACCELICA - '95 Toyota Celica GT Convertible
Last 3: 23.46 mpg (US)

The Van - '05 Chevrolet Uplander LS LWB
90 day: 21.04 mpg (US)
Thanks: 4
Thanked 31 Times in 12 Posts
Thanks JM I spent like an hour reading through your forum yesterday. Looks like your engine tuning skills contributed to significant and inspiring results. I'm not mechanically gifted in the tuning sense. I'll have to really read that carefully and see if I could figure out how to do the timing and some of the other things you did.
I also pushed out my own fenders/dents, it was surprisingly easy and there's no reason metros can't look good. I really like your tinted windows on the red, that looks really great.
  Reply With Quote
Old 02-02-2011, 06:36 PM   #13 (permalink)
Master EcoModder
 
euromodder's Avatar
 
Join Date: Jul 2010
Location: Belgium
Posts: 4,683

The SCUD - '15 Fiat Scudo L2
Thanks: 178
Thanked 652 Times in 516 Posts
Quote:
Originally Posted by Geo Metropolis View Post
It turns out the original mirors cover significantly more area than is necessary. The foam allows it to go smoothly over the metal, weatherstripping, and a good inch or so of the window. So I ended up cutting these down to simply cover the bare sheetmetal
Make sure you seal / waterproof this area quite well.

Water has been known to seep into the doors.
__________________
Strayed to the Dark Diesel Side

  Reply With Quote
Old 02-03-2011, 10:38 AM   #14 (permalink)
Enthusiastic EcoModder
 
Join Date: Dec 2010
Location: San Diego
Posts: 90

Gnatmobile - '96 Geo Metro LSI
90 day: 44.68 mpg (US)

theRAV - '01 Toyota RAV4 NV
90 day: 21.07 mpg (US)

ACCELICA - '95 Toyota Celica GT Convertible
Last 3: 23.46 mpg (US)

The Van - '05 Chevrolet Uplander LS LWB
90 day: 21.04 mpg (US)
Thanks: 4
Thanked 31 Times in 12 Posts
Thanke Euromodder, I hadn't thought of that but you're definitely right it's not water tight this way. That should be an easy fix, I'll modify the covers asap.
  Reply With Quote
Old 02-08-2011, 01:23 AM   #15 (permalink)
Enthusiastic EcoModder
 
Join Date: Dec 2010
Location: San Diego
Posts: 90

Gnatmobile - '96 Geo Metro LSI
90 day: 44.68 mpg (US)

theRAV - '01 Toyota RAV4 NV
90 day: 21.07 mpg (US)

ACCELICA - '95 Toyota Celica GT Convertible
Last 3: 23.46 mpg (US)

The Van - '05 Chevrolet Uplander LS LWB
90 day: 21.04 mpg (US)
Thanks: 4
Thanked 31 Times in 12 Posts
Talking Front Belly Pan How-To

Hooray for my days off (Mon/Tues)! I decided to start with the front portion of the belly pan. The Geo is kind of a mess underneath for aerodynamics. It has a ton of clearance so a lot of air goes under the car but there is no under engine cover of any kind, and the frame and suspension hang well into the flow. I plan on making a complete belly pan but today I did only the front portion. Here is the before shot:

Tools / supplies Needed:
  • 1/2 sheet (4'x4') of coreplast -> $7
  • Zip Ties -> already owned
  • Self Taping sheetmetal screws -> already owned
  • cordless drill
  • Boxcutter
  • Time - 3 hours
Step 1:Jack up the front of the car, lay the coreplast under the engine bay and eyeballing it from above cut it to the width of the car(generously). The boxcutter cuts through the coreplast easily. I cut two rounded m shapes to allow for wheel turnage (generously again because you can trim it all perfectly once it is in place)

Step 2:Drill a small hole in the frontmost portion of each jack point. Hold the coreplast in place and drill two small holes on either side of the jack point. Now secure the back of the belly pan with two temporary zip ties (I used big ones at the end but small ones were sufficient for getting started) Don't cinch these down all the way as you'll be moving the coreplast around for a while, you just want a hingepoint that gets it more or less in place.

These two points will act as extra hands holding the back where it should be and allowing you to hold the belly pan in place with one hand in the front

Step 3:Hold the front of the belly pan flush with the bottom edge of the bumper and scratch yourself a line around the edge (Again I was about 1" generous here, it's best to trim it perfectly once it's mounted)

The Geo bumper flattens out at the bottom higher than the front of the frame so I made a long tab running from tow-hook to tow-hook that will be tacked up to smooth the flow over the frame's hard angle. It looks like this:

Step 4: With the Back hinged like this it is easy enough to cutout some space for the exhaust and cat. I just gave it like 2" around, later I'll rivet in some aluminum flashing.

Step 5:Now that we have a generous template it's time to begin securing it. I started at the back again by drilling small holes in the coreplast and ziptie-ing it to the bar that runs from jackpoint to jackpoint (I think this is the lower strut bar? Whatever it is, I'm sure it will move some with the suspension but a few zip ties looping over it shouldn't impede this nor put a ton of stress on the ties but it will keep the bellypan nice and secure so it doesn't flap about.

Step 6:Now from the front of the car, hold the bellypan in place and pull it forward to remove any sag/slack. Using 3 self tapping screws secure it to the bottom of the frame front (Do the center first so you can ensure things are nice and straight)

Step 7:Next undo the existing screw under the bumper that secures it to the wheel-well splash shield and use it to secure the coreplast to the bumper corners

Step 8:Now that it's secured in place, use the boxcutter to carefully trim off your excess. I kept the knife at like a 45 degree angle, cutting from below so the tip of the blade was away from the bumper. This worked well and even gave the coreplast a little angle continuation from the bumper.

Step 9:Now it's time to bend that tab from the frame edge up to the lower part of the bumper and secure it with some self tapping screws into the bottom of the bumper. like so:

I ended up adding a few more screws after this pic just because I wanted to be sure no air get's between the coreplast and bumper. If I find some green tape I may tape over the coreplast edge just to smooth it out and seal it even more.
Step 10:Last thing to do is turn the wheels to the max and trim the coreplast so that it does not impede wheel turning or rub at all. If you have the key in the on position so the steering is unlocked you can easily turn the wheels themselves so there is no need to go back and forth to the steering wheel. My M became a bit more pronounced and the clearance looks like this:

and

Step 11:Last thing was trip the coreplast so there is a slot where the jackpoints can go through and replace those cheezy zip ties with sometihing beefier.
Step 12:Enjoy improved aero. MetroMpg's testing seemed to indicate this would be about a 2% gain in FE. I think it was Basjoos but someone was saying a full bellypan significantly lowers road noise as well. I'll have to drive it around and see

Last edited by Geo Metropolis; 02-08-2011 at 01:28 AM..
  Reply With Quote
Old 02-26-2011, 02:15 AM   #16 (permalink)
EcoModding Lurker
 
Join Date: Aug 2010
Location: Wisconsin
Posts: 45

Slowpoke - '00 Hyundai Sonata GLS
90 day: 32.82 mpg (US)
Thanks: 25
Thanked 0 Times in 0 Posts
Woah inspiring thread man... look like some clean, solid mods!
__________________


Slowly modding my 2000 sonata to what it should be... one project at a time.
  Reply With Quote
Old 02-26-2011, 03:17 AM   #17 (permalink)
Enthusiastic EcoModder
 
Join Date: Dec 2010
Location: San Diego
Posts: 90

Gnatmobile - '96 Geo Metro LSI
90 day: 44.68 mpg (US)

theRAV - '01 Toyota RAV4 NV
90 day: 21.07 mpg (US)

ACCELICA - '95 Toyota Celica GT Convertible
Last 3: 23.46 mpg (US)

The Van - '05 Chevrolet Uplander LS LWB
90 day: 21.04 mpg (US)
Thanks: 4
Thanked 31 Times in 12 Posts
Quote:
Originally Posted by menaus2 View Post
Woah inspiring thread man... look like some clean, solid mods!
Thanks! It's been a super fun project. It's amazing how fun putting plastic on your car can be. Since gas jumped like 30% the past two weeks I feel extra vindicated. MetroMPG was kind enough to share the measurements from his permanent kammback (which is AMAZING though the fiberglass construction turns out to be way too high a time committment for me) with me. In the coming weeks I'm hoping to do a simpler aluminum/coreplast version so stay tuned if you want to see that.

I can't believe how fun this is and I can't wait to get to the 50MPG club
  Reply With Quote
The Following User Says Thank You to Geo Metropolis For This Useful Post:
brucepick (02-26-2011)
Old 03-07-2011, 01:21 PM   #18 (permalink)
EcoModding Lurker
 
Join Date: Jan 2011
Location: oregon
Posts: 13

old blue - '98 chevy metro lsi
90 day: 39.79 mpg (US)
Thanks: 1
Thanked 0 Times in 0 Posts
great thread,can't wait for snow to melt and warm up out here so i can do the same. on the kammback, mine is abs like "5th generation civic thread" but looking to elongate further with clear lexan. either way abs is easy to work with and stiffer than colorplast.
  Reply With Quote
Old 07-13-2011, 05:04 AM   #19 (permalink)
Enthusiastic EcoModder
 
Join Date: Dec 2010
Location: San Diego
Posts: 90

Gnatmobile - '96 Geo Metro LSI
90 day: 44.68 mpg (US)

theRAV - '01 Toyota RAV4 NV
90 day: 21.07 mpg (US)

ACCELICA - '95 Toyota Celica GT Convertible
Last 3: 23.46 mpg (US)

The Van - '05 Chevrolet Uplander LS LWB
90 day: 21.04 mpg (US)
Thanks: 4
Thanked 31 Times in 12 Posts
How to - Geo Metro Kammback with window!

First I must thank metroMPG for his inspiring innovation, measurements and suggestions, they were invaluable in making this happen. My goal was simply to mimic the shape and size of his kammback but construct it more simply with aluminum and coreplast and the addition of a plexiglass window for improved rear view.
Here are the tools/supplies needed:
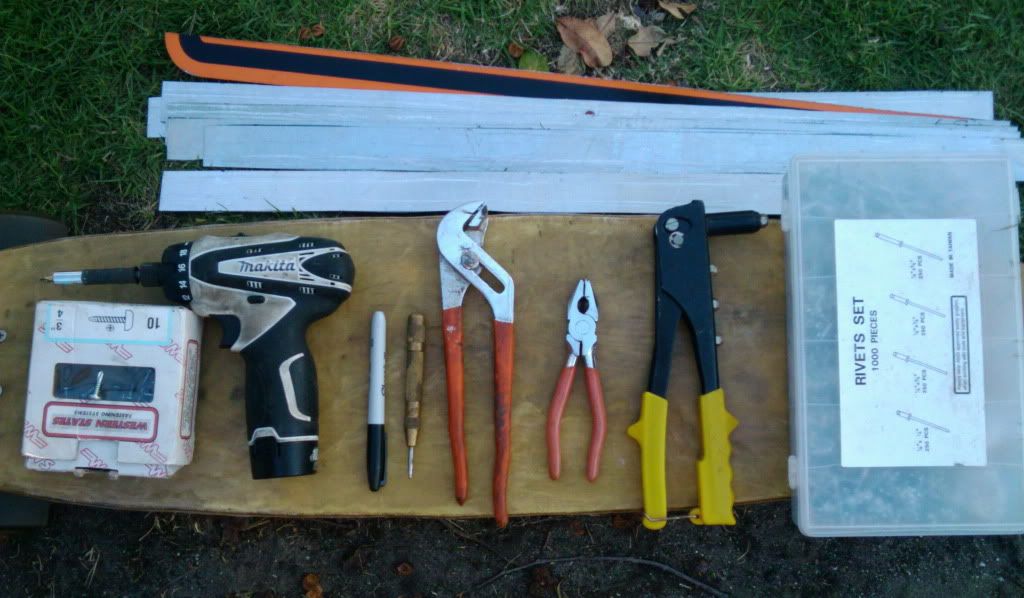
  • Aluminum bar stock or strips. (I cut up an aluminum construction sign I purchased at a scrap yard)
  • Self Tapping Screws
  • Tinsnips (these worked amazingly well for aluminum trimming/cutting)
  • Drill with drill bits and screwdriver bits
  • permanent marker
  • Metal Punch (optional but helpful)
  • two sets of pliers (for bending the aluminum)
  • Rivets/Rivet tool (optional - I ended up not using it)
  • Coreplast
  • plexiglass
  • Boxcutter or razorknife
  • Tape for sealing/smoothing edges
  • Time - about 5 hours
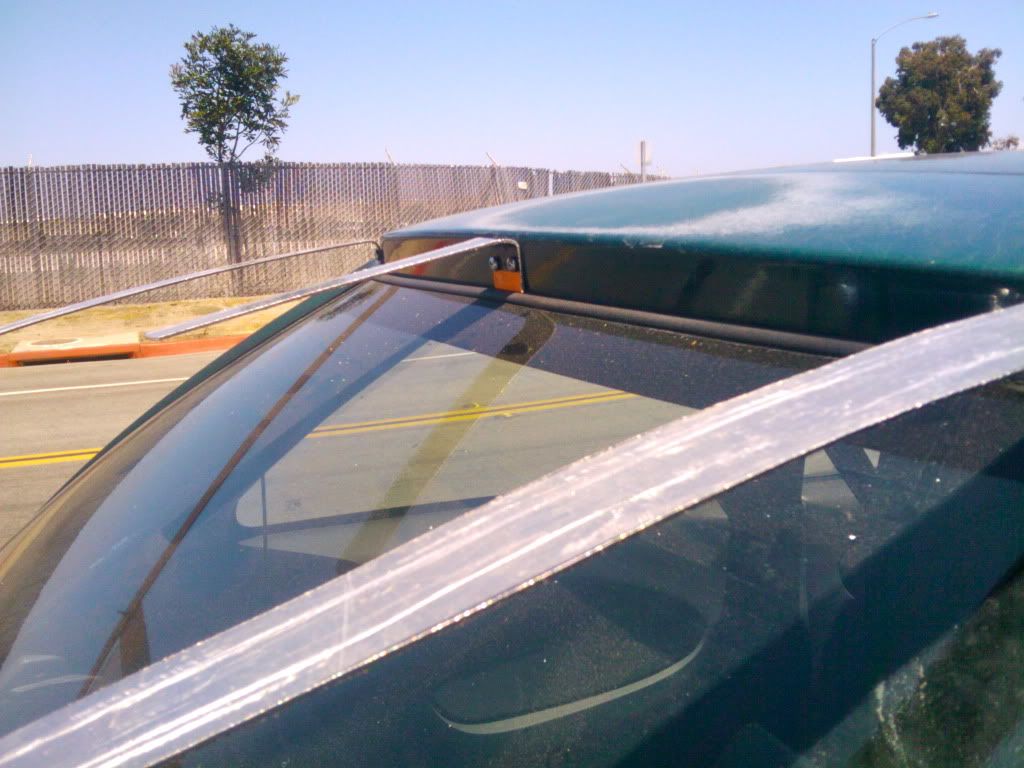
STEP 1: Using the self-tapping screws attach two equal lengths of aluminum to the hatch above the window (Yes I drilled into the car) right around the width of the drip rails. Bend them roughly to a 15% angle from the roof and be sure your bend is about 1/4 inch short of the actual roofline (so the coreplast will sit flush when attached on top. I recommend you 1) use both sets of pliers to grab and bend the aluminum precisely where you intend to, and 2) hold the aluminum in place and use the metalpunch to mark the spots you want to install the screws. Step 1 should look something like this:
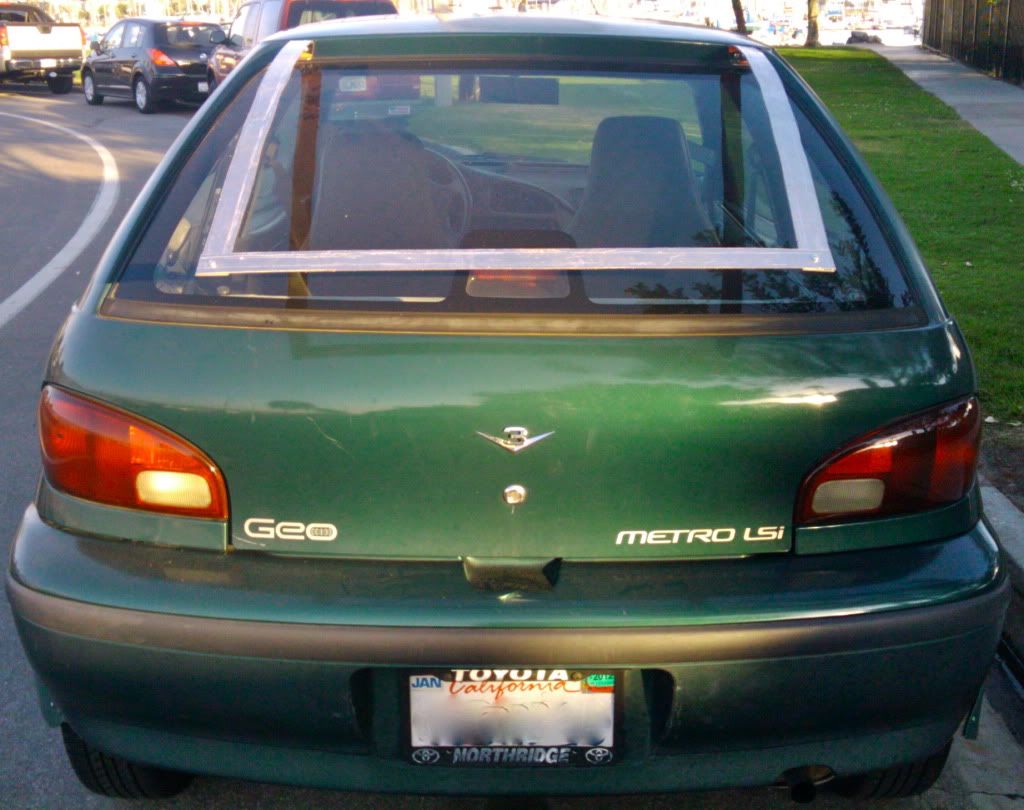
Step 2: cut a strip of aluminum to be roughly the same length as the distance between drip rails and - using the self tapping screws (even if you plan on riveting later - because you'll be adding lots more layers to these drill points) - attach the ends to the ends of your first two pieces so that you have something like this:
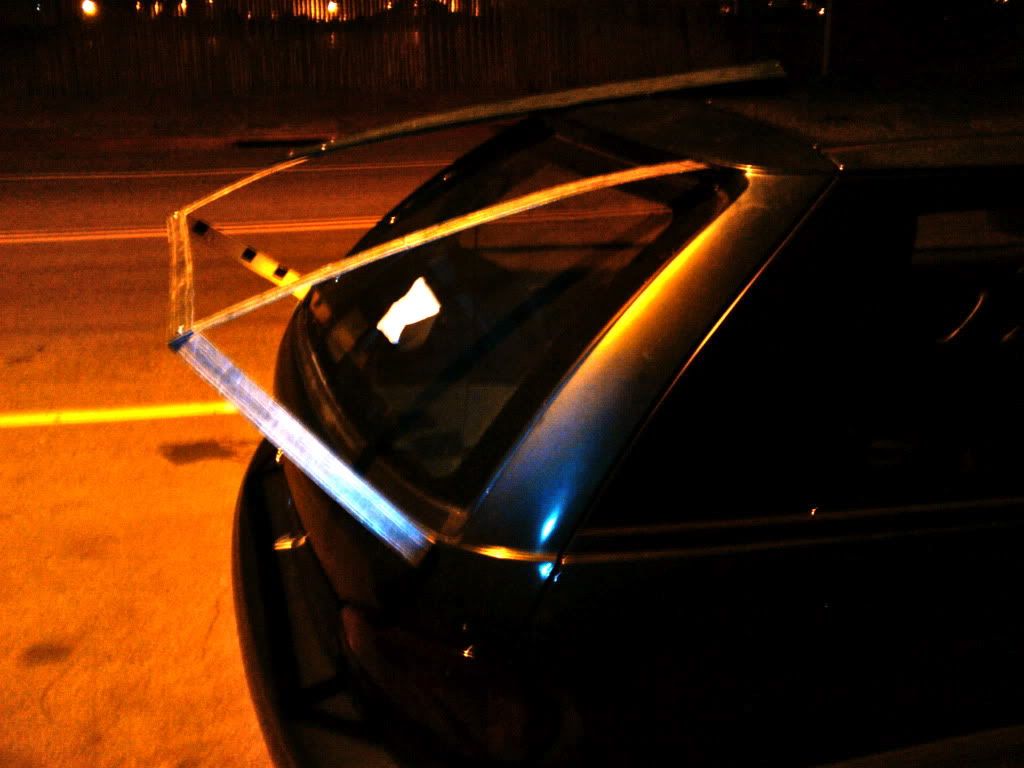
Step 3: Build the bottom outside braces. For these I chose to screw into the hatch again, this time between the taillights and the hatch window. Bend them so they will make a correct angle toward the ends of your trailing cross piece (again leave about 1/4 of an inch to accommodate the coreplast you'll be adding). Ensure you have the correct angle then using the pliers bend the end not attached to the car so that it will hold up the rear corner of the kammback. The angle will be funky and leave some extra aluminum sticking out, mark it with the marker and trim it with the tinsnips. Do this on both sides and then screw the braces in using your existing self-tappers. Should look something like this (except hopefully you're working in the day):
Step 4: I fitted a plexiglass scrap I picked up at the plastics place to ride across the top of the kammback overlapping the aluminum all the way to the trailing edge. I then tied in one more crossmember of aluminum to act as a support for the leading edge of this window. I suggest you lay it in place then screw it on then mark and trim it. I originally made it match the length of the trailing crossmember but it need up kinda closing the width of the whole thing so I undid those screws and redrilled. You can see the crossbrace here:
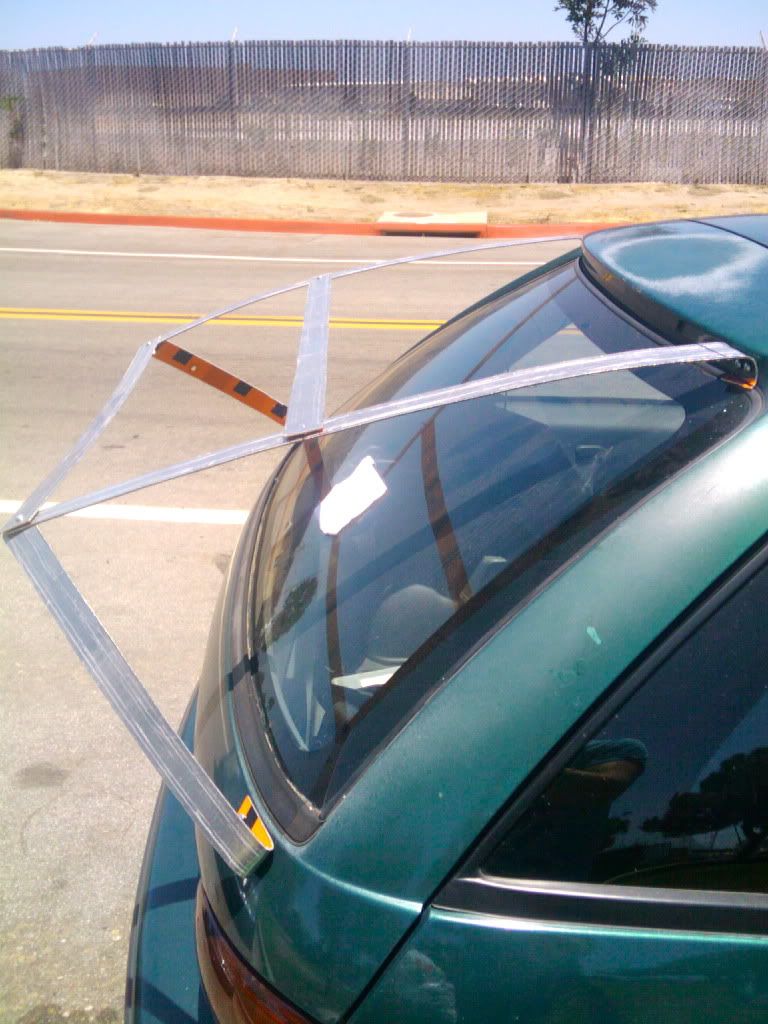
Step 5: Step back to admire your skeleton and compare it with MetroMPG's (his was tuft-tested and adjusted to near perfection). At this point I began to get excited:
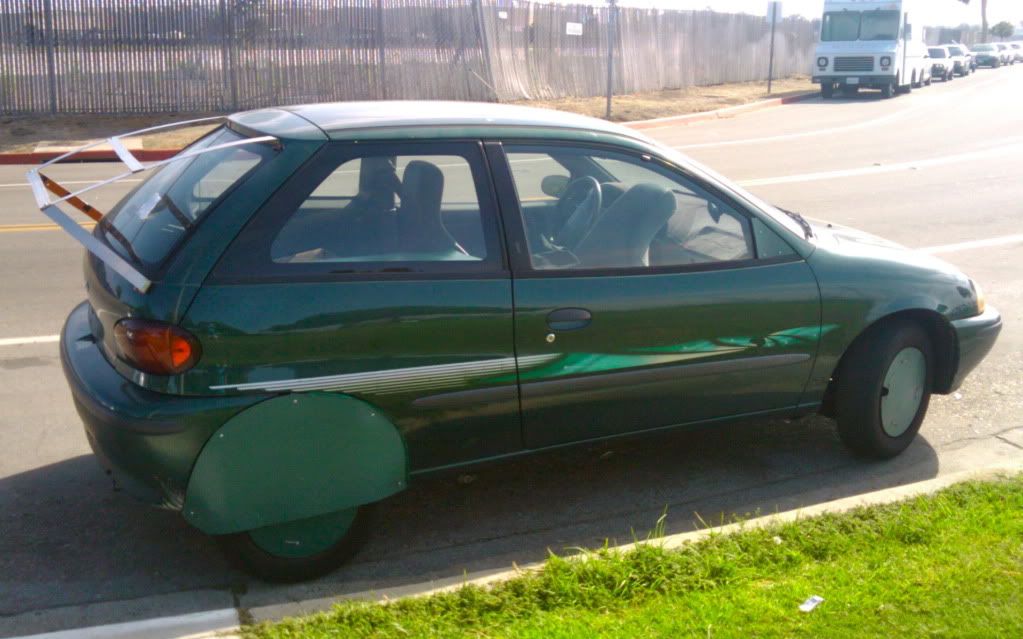
Step 6: Cut a generous piece of coreplast to the rough shape of the roofline, width of the kammback top, so that it extends down over top frame of the window. Should look something like:
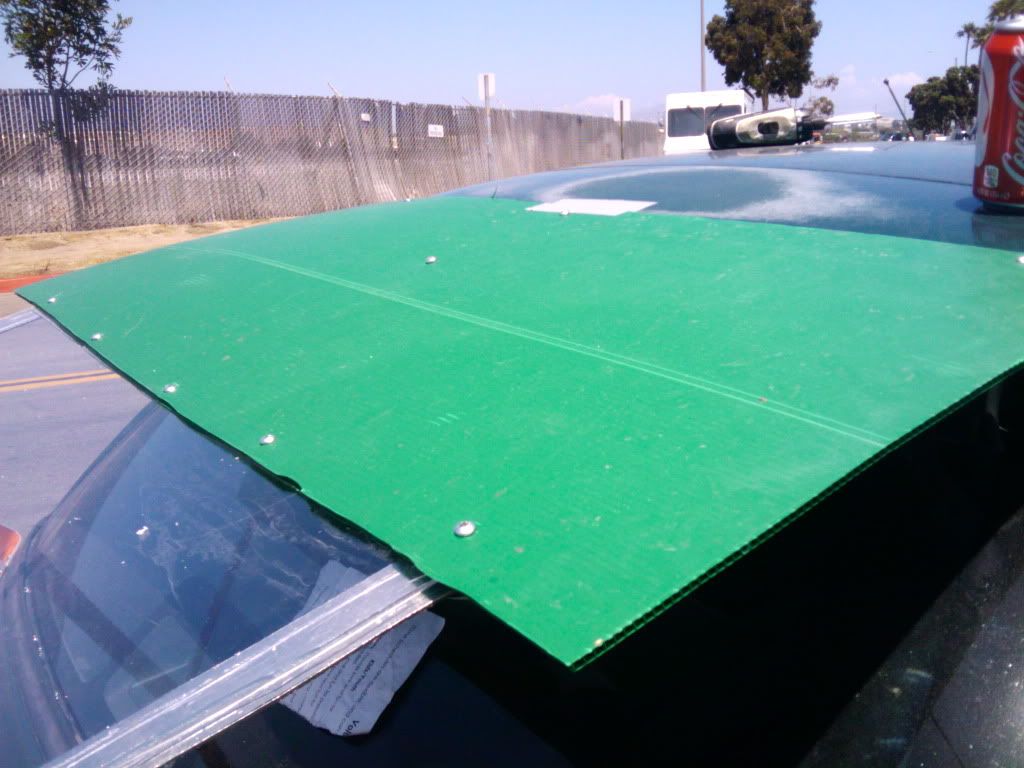
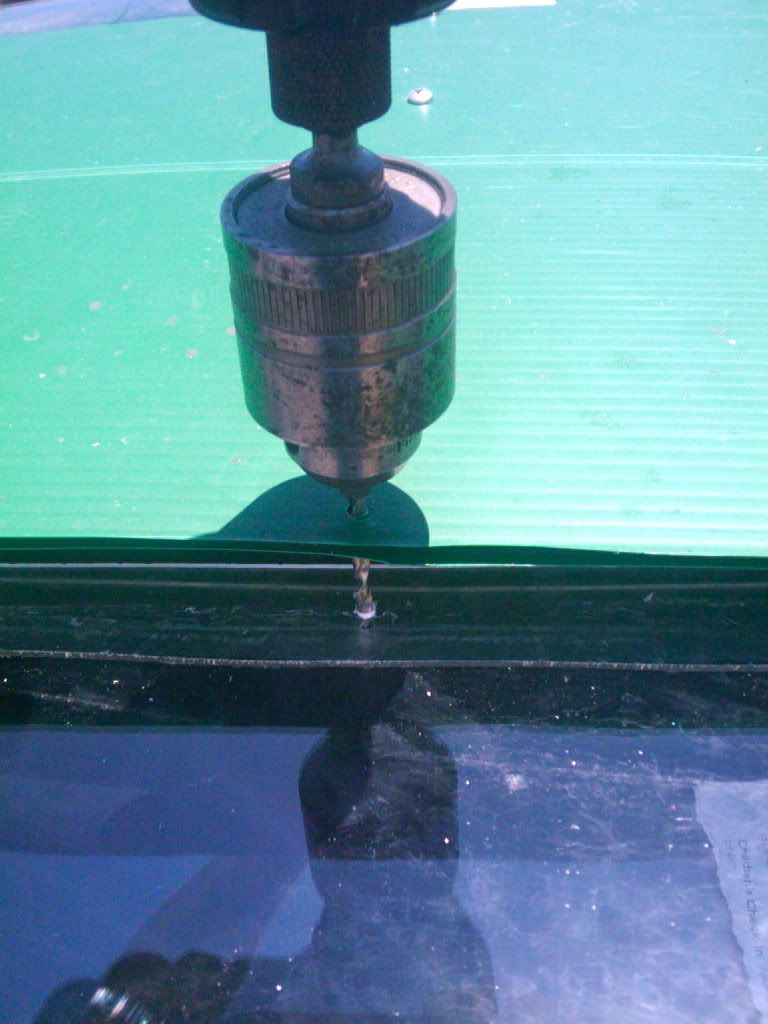
Step 7:One at a time pull the screws that make up the kamm-window frame, carefully mark and drill through the plexiglass and install it over the top of the frame. Be really careful to pre-drill, I recommend you do not use self tappers until you've predrilled and definitely don't use the metalpunch to mark your drill spot. Once this is done, begin securing the coreplast to the plexi, to the aluminum. You can see that here:
This was feeling a little flimsy in the middle so I added another brace at the top of the hatch. It looks like this:

Once everything is in place trim the coreplast top layer along the side edges of the kammback top so that it can be bent down.
Step 8: Hold a piece of coreplast along one side of the kammback and trace a marker around things to make a good template for the side. Cut it like so:
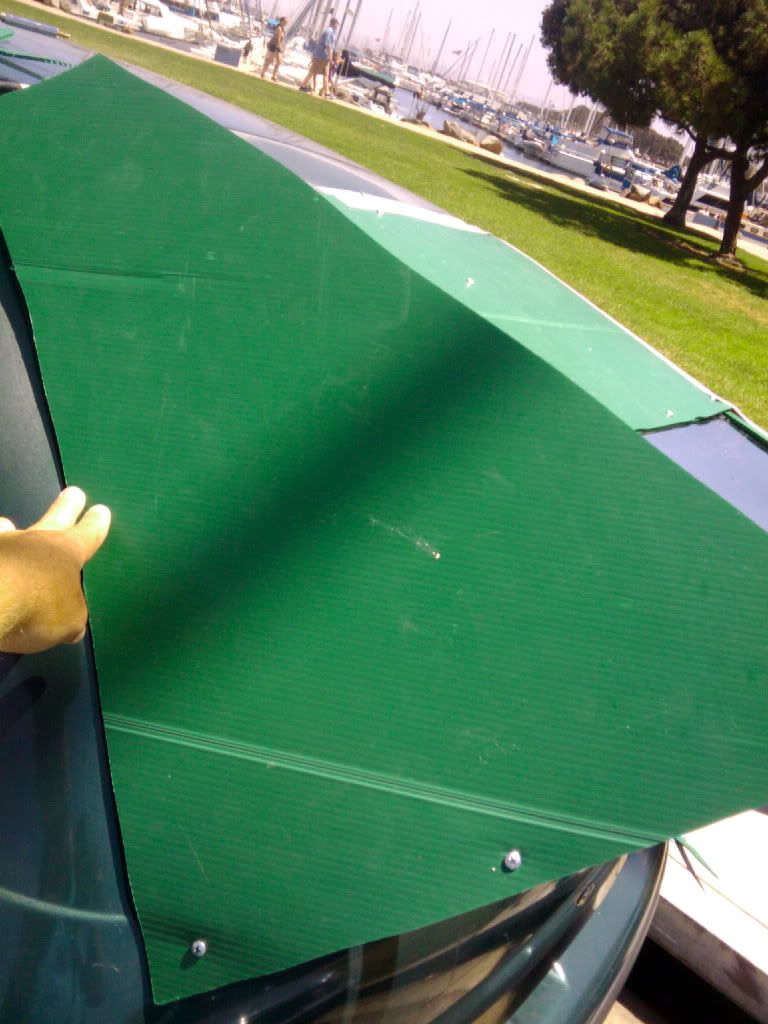
Step 9 Trim the top layer of the coreplast side pieces along the side edges of the kammback top so that it can be bent to and attached from the top. Should look something like this:
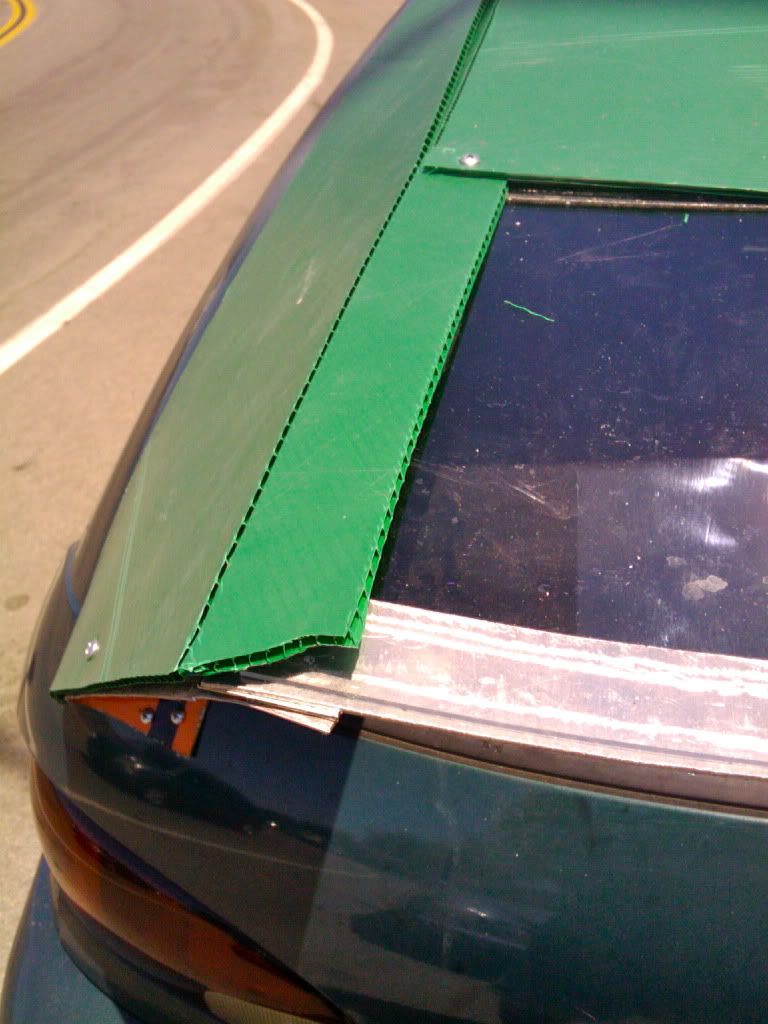
Tep10: Attach coreplast with a generous amount of screws and figure out how you'll trim/overlap the extra bits like so:
from this...
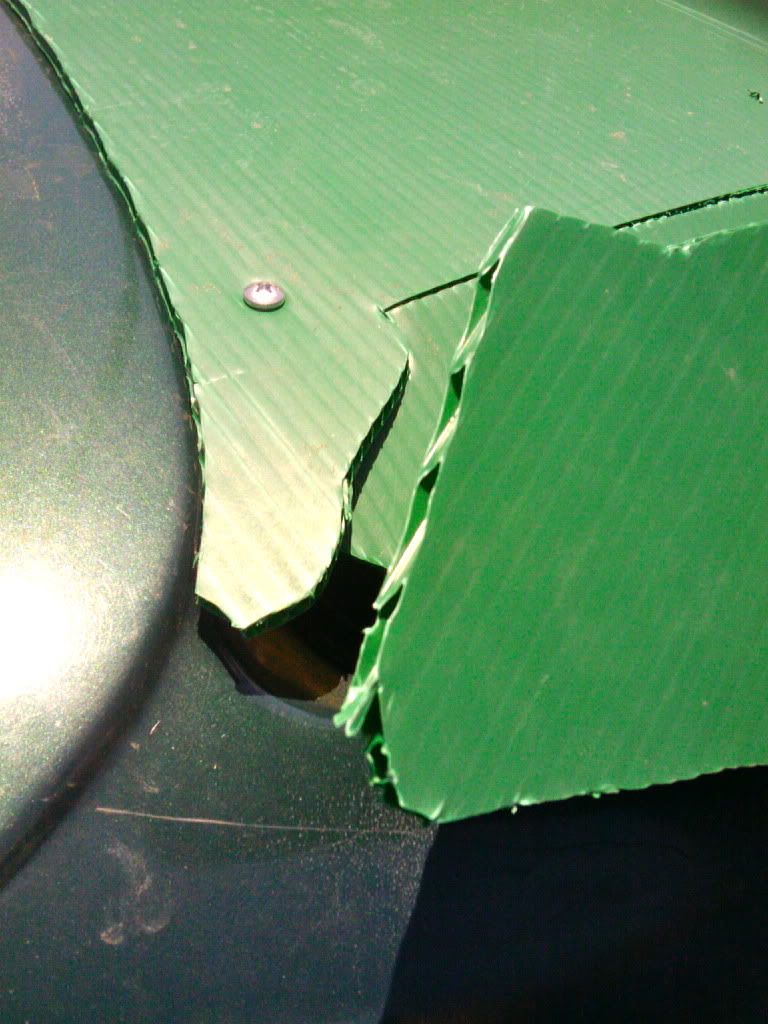
to this...
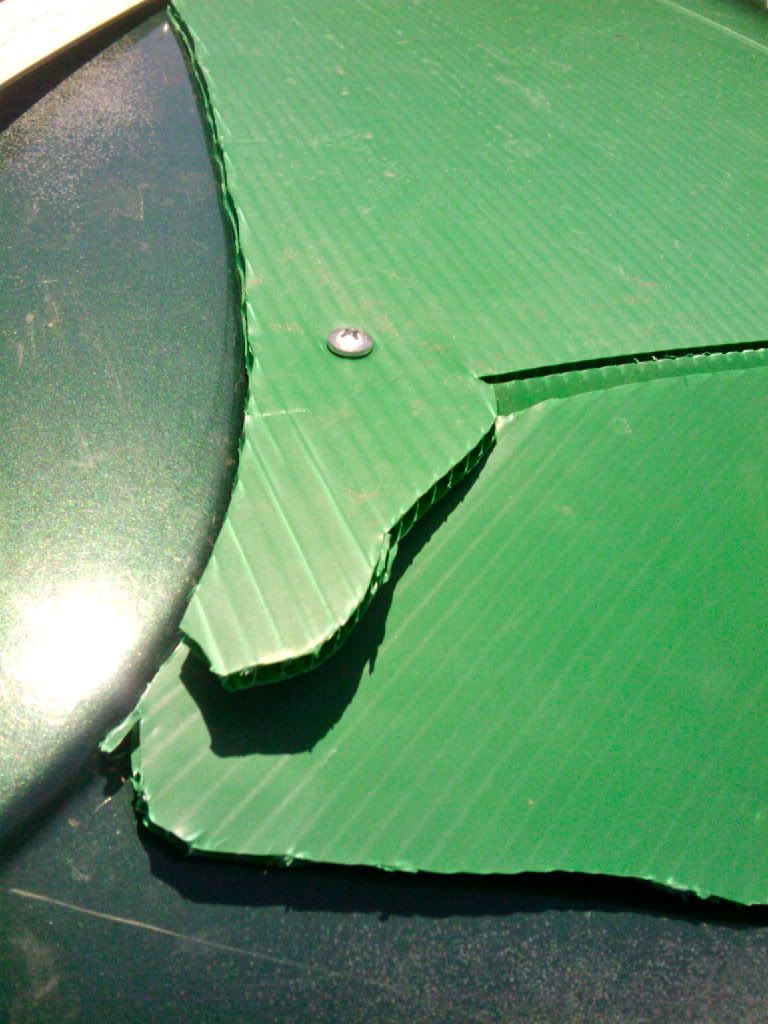
and this...
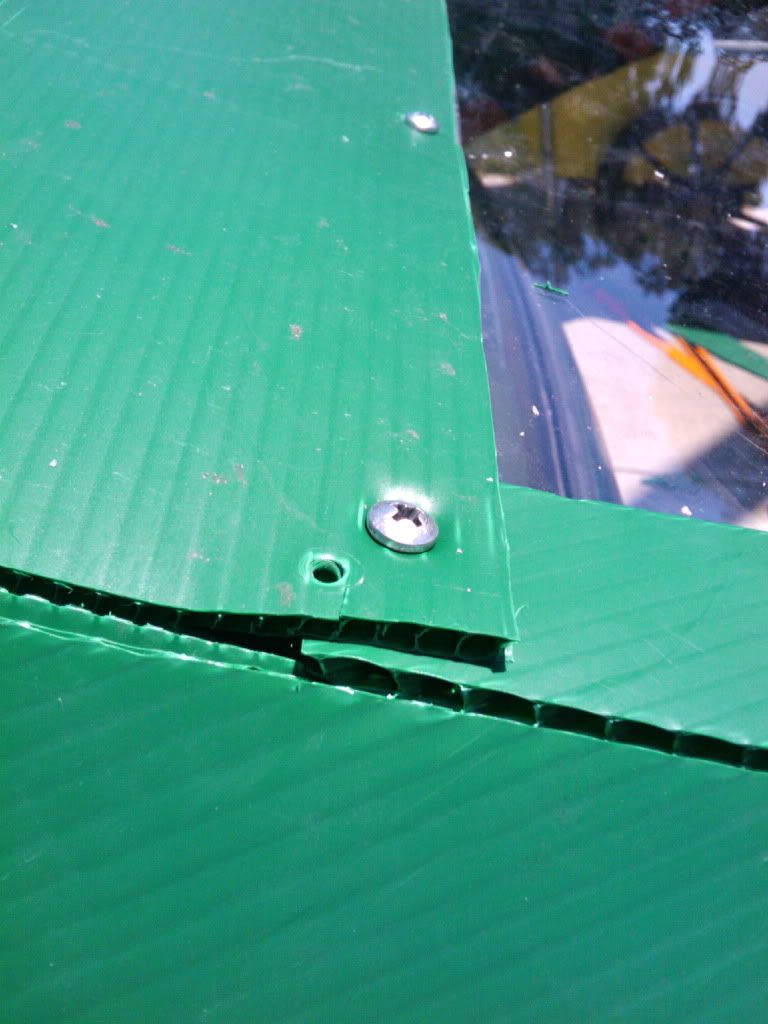
Step 11: At this point the whole thing is pretty solid but i wanted to be sure air wasn't catching on things and would flow smoothly so I added tape to the car's connection points like so:
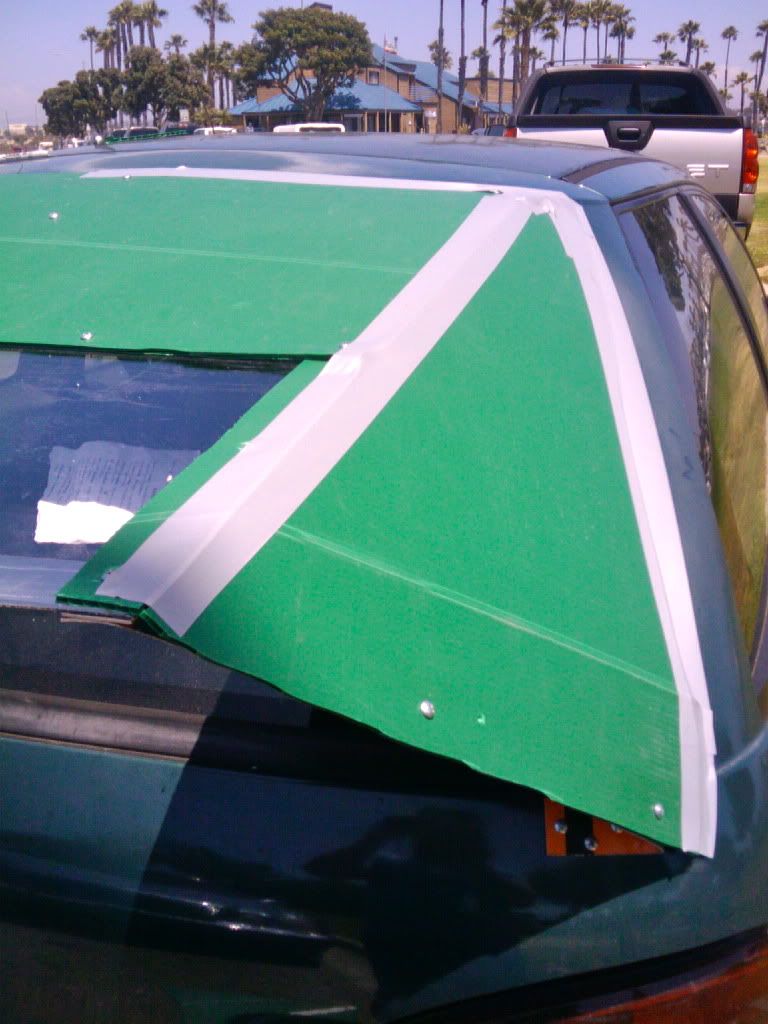
I'm not a fan of the tape color, I'll either paint the tape green or find green tape soon.
Check out how little of the window is actually blocked with the addition of the plexi-window:
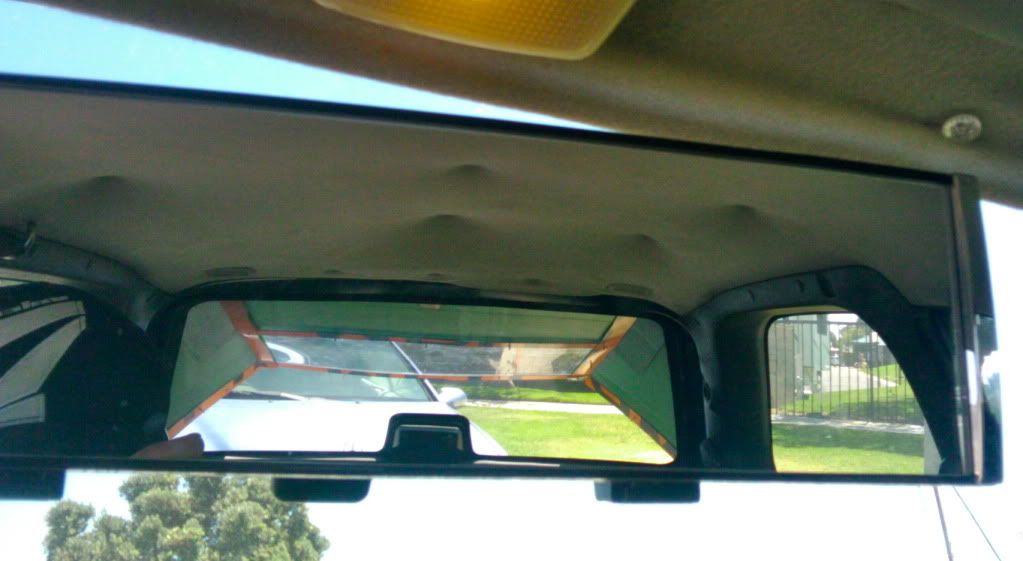
View from back:
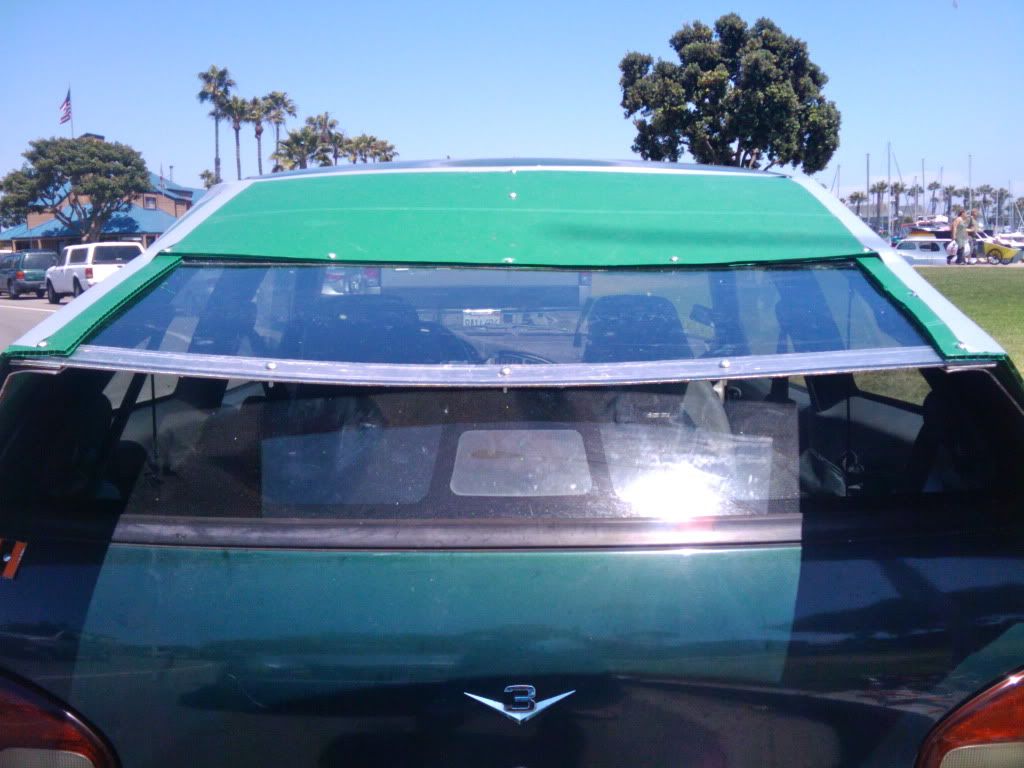
Because I screwed the plexiglass window in at the four corners then into the middle (rather than from the middle out) it caused the top of the kammback to bow or sag a bit:
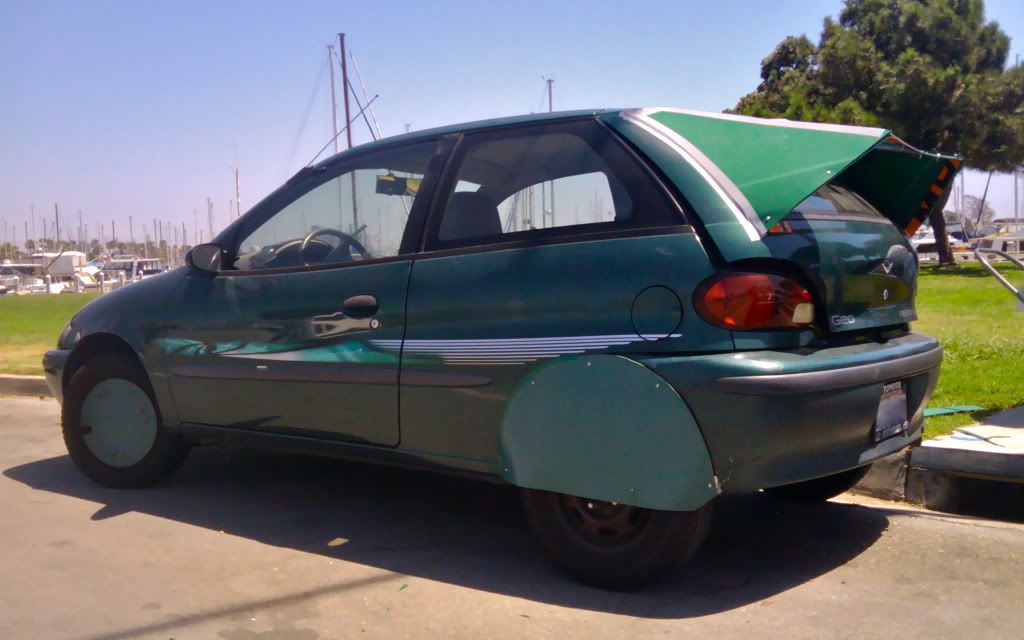
To fix this I added a brace that simply pushes out from the window:
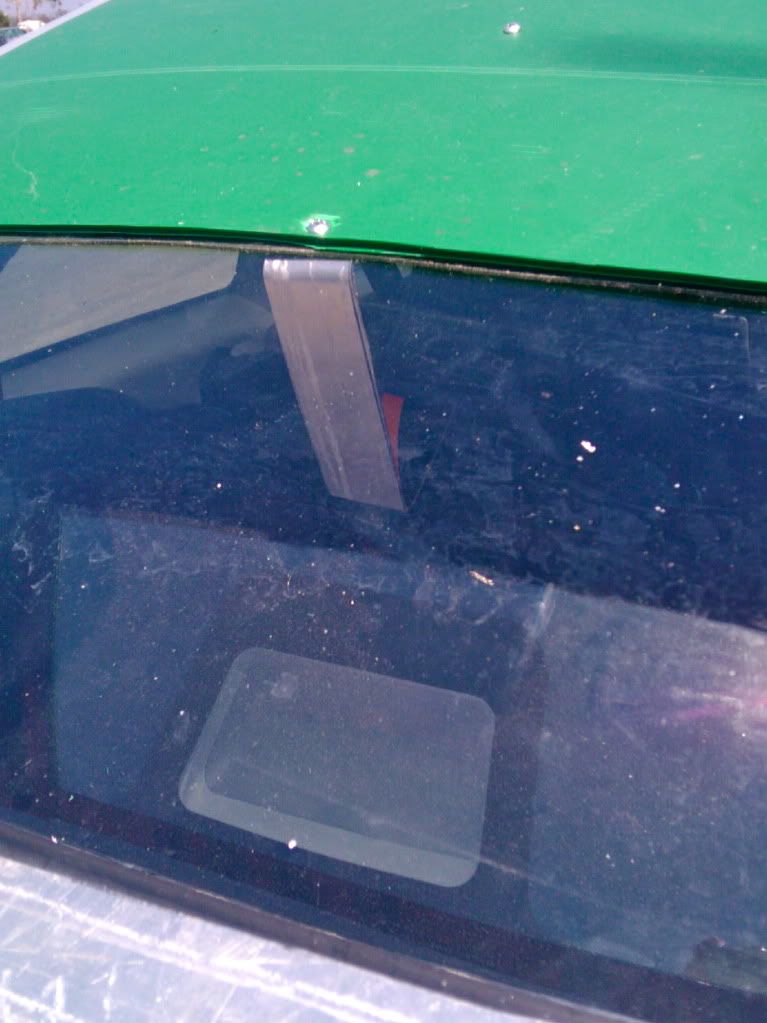
Here's the finished product:
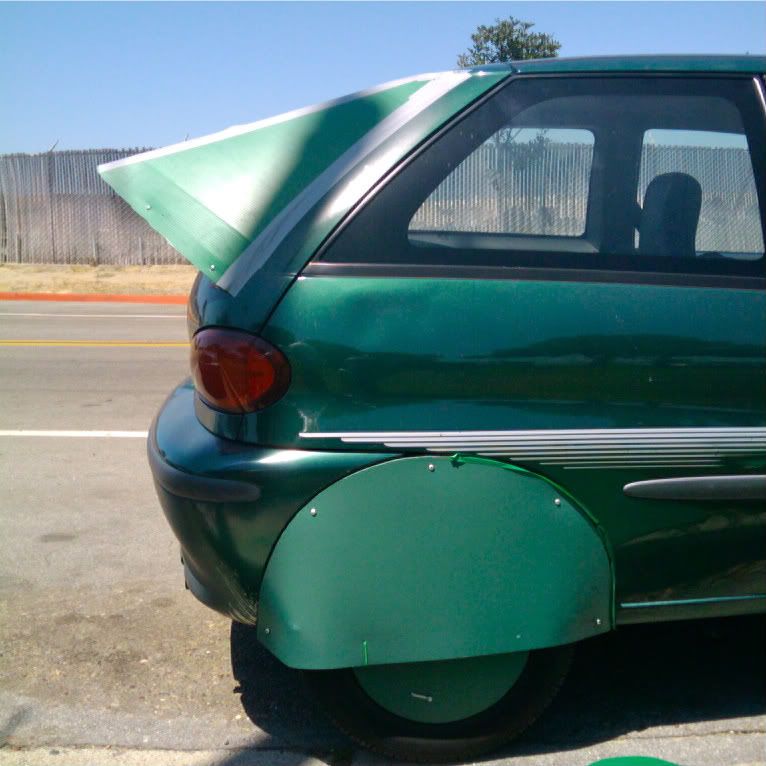
  Reply With Quote
Old 07-13-2011, 05:33 AM   #20 (permalink)
Enthusiastic EcoModder
 
Join Date: Dec 2010
Location: San Diego
Posts: 90

Gnatmobile - '96 Geo Metro LSI
90 day: 44.68 mpg (US)

theRAV - '01 Toyota RAV4 NV
90 day: 21.07 mpg (US)

ACCELICA - '95 Toyota Celica GT Convertible
Last 3: 23.46 mpg (US)

The Van - '05 Chevrolet Uplander LS LWB
90 day: 21.04 mpg (US)
Thanks: 4
Thanked 31 Times in 12 Posts
I should note that mine is not exactly the same dimensions as MetroMPGs - but I used his measurements to get the angle right. He had suggested I shorten mine to improve view. Because I figured the window would solve the problem I actually lengthened mine a bit so it extends a few inches past the bumper (as you can see in the final pic). Also in comparing it now I see I didn't go all the way down to the tail-lights with the side pieces. I had intended on it I just forgot when I cut the side-pieces out . I think I'll probably put on some extensions to go all the way to the tail-lights because it seems like it would be worth it. and not too hard

  Reply With Quote
Reply  Post New Thread


Powered by vBulletin® Version 3.8.11
Copyright ©2000 - 2024, vBulletin Solutions Inc.
Content Relevant URLs by vBSEO 3.5.2
All content copyright EcoModder.com