Go Back   EcoModder Forum > EcoModding > EcoModding Central
Register Now
 Register Now
 

Reply  Post New Thread
 
Submit Tools LinkBack Thread Tools
Old 07-13-2011, 06:25 AM   #21 (permalink)
EcoModding Apprentice
 
piers.singer's Avatar
 
Join Date: Feb 2010
Location: Sussex/Kent, UK
Posts: 108
Thanks: 4
Thanked 23 Times in 12 Posts
Fantastically thorough walk-throughs, well done! I hope that you can see some good results from these mods.

__________________
Spoken like a champion. Oh no, disaster!
  Reply With Quote
Alt Today
Popular topics

Other popular topics in this forum...

   
Old 07-18-2011, 12:21 PM   #22 (permalink)
Enthusiastic EcoModder
 
Join Date: Dec 2010
Location: San Diego
Posts: 90

Gnatmobile - '96 Geo Metro LSI
90 day: 44.68 mpg (US)

theRAV - '01 Toyota RAV4 NV
90 day: 21.07 mpg (US)

ACCELICA - '95 Toyota Celica GT Convertible
Last 3: 23.46 mpg (US)

The Van - '05 Chevrolet Uplander LS LWB
90 day: 21.04 mpg (US)
Thanks: 4
Thanked 31 Times in 12 Posts
I'm almost done with this tank. I can't wait to see the difference. I've been watching the scanguage and obliterating all my previous records for MPG from place to place (i keep a scorecard in the car). I had to change all my coastpoints on regular routes because I kept coming in hot. I can maintaing a much higher mpg at cruising speeds, this thing feels like a much bigger difference than any of my other mods.
I remember somewhere AeroCivic saying that when he drives other cars it feels like the road is covered in molasses. I drove my wife's Rav4 the other day (our only car capable of carrying surfboards) and 3 times while driving I checked to see if the eBrake was on before I realized I'm just used to cutting through the air instead of pushing it out of the way .
There is no doubt an improvement, I know the butt-o-meter isn't scientific, but I can definitely say I'm looking forward to the tank to tank results.
  Reply With Quote
Old 07-19-2011, 01:24 PM   #23 (permalink)
Master EcoModder
 
orange4boy's Avatar
 
Join Date: Aug 2008
Location: The Wet Coast, Kanuckistan.
Posts: 1,275

The Golden Egg - '93 Toyota Previa DX
90 day: 31.91 mpg (US)

Chewie - '03 Toyota Prius
90 day: 57 mpg (US)

The Spaceship - '00 Honda Insight
Thanks: 100
Thanked 306 Times in 178 Posts
Looking good so far. That's some fast ecomodding.

You might want to check your kamm angle. Looks a bit steep. biggest gains come from between 10 and 15 degrees. It's real tempting to go for the steep angle but even if the flow stays attached, it creates lift and with it drag.

Keep on modding!

Added: Could just be the camera angle that makes it look steep.
__________________
Vortex generators are old tech. My new and improved vortex alternators are unstoppable.

"It’s easy to explain how rockets work but explaining the aerodynamics of a wing takes a rocket scientist.


  Reply With Quote
Old 09-21-2011, 04:23 AM   #24 (permalink)
Enthusiastic EcoModder
 
Join Date: Dec 2010
Location: San Diego
Posts: 90

Gnatmobile - '96 Geo Metro LSI
90 day: 44.68 mpg (US)

theRAV - '01 Toyota RAV4 NV
90 day: 21.07 mpg (US)

ACCELICA - '95 Toyota Celica GT Convertible
Last 3: 23.46 mpg (US)

The Van - '05 Chevrolet Uplander LS LWB
90 day: 21.04 mpg (US)
Thanks: 4
Thanked 31 Times in 12 Posts
FULL Belly Pan How-To

A few months ago I did a Partial Front Bellypan. This post is to detail how I completed the belly pan to run the entire length of the car. I decided this was important for two reasons: 1) The metro bumper in it's current shape forces a lot of air underneath the car (I plan on later fixing this with a nosecone like aerocivic's or a full airdam like AndrewJ's - but until then all that pressurized air would probably benefit from a smoother underbelly. and 2) getting rid of the 4x8 sheet of coreplast on the roof of my boat was one of my wife's conditions for me finally getting my 67 mustang rat rod (sort of the opposite of the metro... it's a story for another time).
Without Further ado, here is the How-To:
Tools/Supplies Needed:
  • 4x8 Sheet of Coreplast
  • Self Tapping Sheet Metal screws
  • Drill
  • Zip Ties
  • Razor Knife
  • Permanent Marker
  • floor jack and jackstands
  • 1-2 hours of your life
Step 1: Jack up the back of the car as high as you can and put it on jackstands (Be sure to chock the front wheels, your e-brake has no effect on them at all)
Step 2: Be sure the coreplast is nice and straight with the body of the car and tuck the front edge up over the trailing edge of the partial or front bellypan (this keeps air from getting under the front edge of your full bellypan (which would be very bad) I secured this in only two places by drilling some self tappers through the coreplast and into the belly of the car near the jack points. At this point it should look something like this:

Step 3: Pick appropriate mounting points and use the self tapping screws to secure your bellypan to the underside of the car. Do this from front to back to ensure you keep things nice and smooth and don't create any bulges or ripples. I found a low point on each side of body that was about two feet back from the first screws and two feet in from the outside edge of the car. Then another pair of screws a bit farther back but along the edges again (6 screws total at this point).
Step 4: Next you'll need to secure the back of the bellypan but you'll find the wheels are in the way. Estimate how much to trim off of the sides to accommodate the wheels and make cuts that look like:
] [
Remember the back wheels don't turn so you won't need to get fancy like we did in the front
Step 5: Lastly I placed one screw into a nice solid steely frame bit right in the rear center of the car which pinned it up nice so that it dropped on either side with the rear suspension bits. NOTE: I did not drill into the gas tank, wire harness, or any exhaust components and you should be careful not to either . At this point it should look something like this:

Step 6: At this point I realized the perfect piece of coreplast would have been 8'6" to give me a little extra to trim and secure perfectly to the rear bumper. As it is though, it was about 2" short of perfect but no worries. The piece would be long enough to reach the back bumper on it's two corners only, but because of the compound dips for the suspension I needed to slice the center a bit to allow it to spread and curve correctly.
Step 7: I had noticed that in the front the pan had sagged a bit from the suspension arms. I imagine this is because the suspension hangs a bit lower when the car is jacked up and the wheel is in the air so I decided to place some zip ties to secure the coreplast around the suspension arm so it could stay snug when it travelled. I cut a small piece of coreplast and drilled through it and the pan on both ends straddling the suspension arm then ran some zip ties around it.
Step 8: Next I took two self tapping screws and secured the rearmost corners of the coreplast to the bottom of the rear bumper. The exhaust caused the right side of the split bellypan to sag weirdly so I then used another fortifying scrap of coreplast and a ziptie to raise up and match together the two halves of the bellypan.
(Step 6, 7, and 8 are all kinda pictured here

In the end I'm pretty happy with the result. I wish the coreplast could have been just a hair longer, I would have liked to secure it all along the bottom edge of the rear bumper. As it stands though, the pan cuts off 1/2 inch to 2 inches ahead of the rear bumper lip but well lower so it should direct air past that parachute like edge without incident. Here's a good view of the completed project:

*I made no accommodations for hot exhaust components. I'm not worried about the piping much, as it's a bit tunneled in the car's underbody but the muffler is literally touching part of the pan. So far I've taken 2 10 minute drives and no melting, but I'll keep an eye on that. My first plan had been to cut out areas subject to heat and rivet in some aluminum flashing but that hasn't proved necessary so far.
OH! and while I was under the car I cleaned up the front pan a bit. Those dogbones under the front suspension were really sagging and I rigged them up with a ziptie loop just like we saw here. I also trimmed a few bits of the front bellypan just to keep things looking nice.

Last edited by Geo Metropolis; 09-21-2011 at 04:32 AM..
  Reply With Quote
Old 10-27-2011, 01:39 AM   #25 (permalink)
Enthusiastic EcoModder
 
Join Date: Dec 2010
Location: San Diego
Posts: 90

Gnatmobile - '96 Geo Metro LSI
90 day: 44.68 mpg (US)

theRAV - '01 Toyota RAV4 NV
90 day: 21.07 mpg (US)

ACCELICA - '95 Toyota Celica GT Convertible
Last 3: 23.46 mpg (US)

The Van - '05 Chevrolet Uplander LS LWB
90 day: 21.04 mpg (US)
Thanks: 4
Thanked 31 Times in 12 Posts
Lightbulb Sign Vinyl - an EcoModder's Good Friend

I can't say best friend, It think coreplast is probably an ecomodder's best friend but i would like to introduce everyone to the wonderful world of sign vinyl.

Sign vinyl is basically the same stuff used for car pinstriping, all precut automotive window stickers, and you guessed it - sign lettering. It's also the same stuff used for vehicle wraps. It's great because it looks fantastic - just like paint, lasts 5 years in the sun, leaves no residue, is flexible enough to fit on compound curves, and it does not damage paint! It also is cheap and comes in a variety of colors.

You can pick it up on bay pretty cheap just search for "sign vinyl roll" and pick the color of your car. My geo is hunter green metallic so I purchased a roll of - you guessed it - hunter green metallic sign vinyl. In the sun they look almost identical although I found that in my case the color is not exactly the same because the sign vinyl is a bit more sparkly and so it looks lighter in most light. No worries, it's close enough and still better looking than the plastic alone. I think I paid $25 for a 30 yard roll that is 18 inches wide. For the purpose of this writeup I used it to recover my rear fenderskirt.

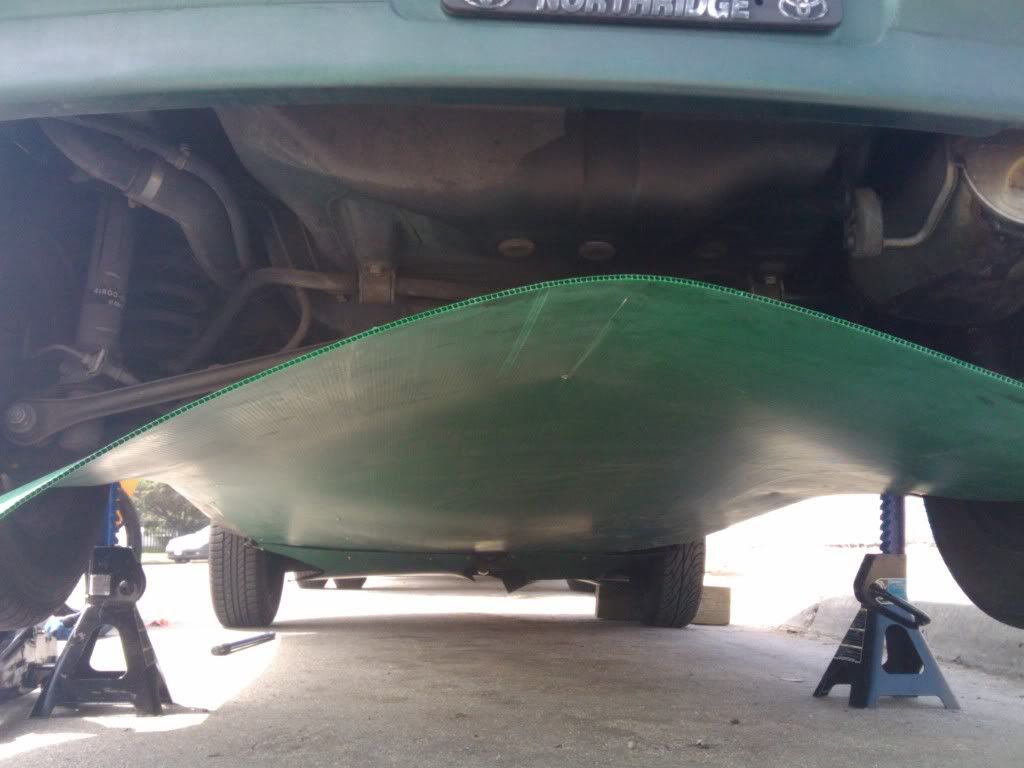
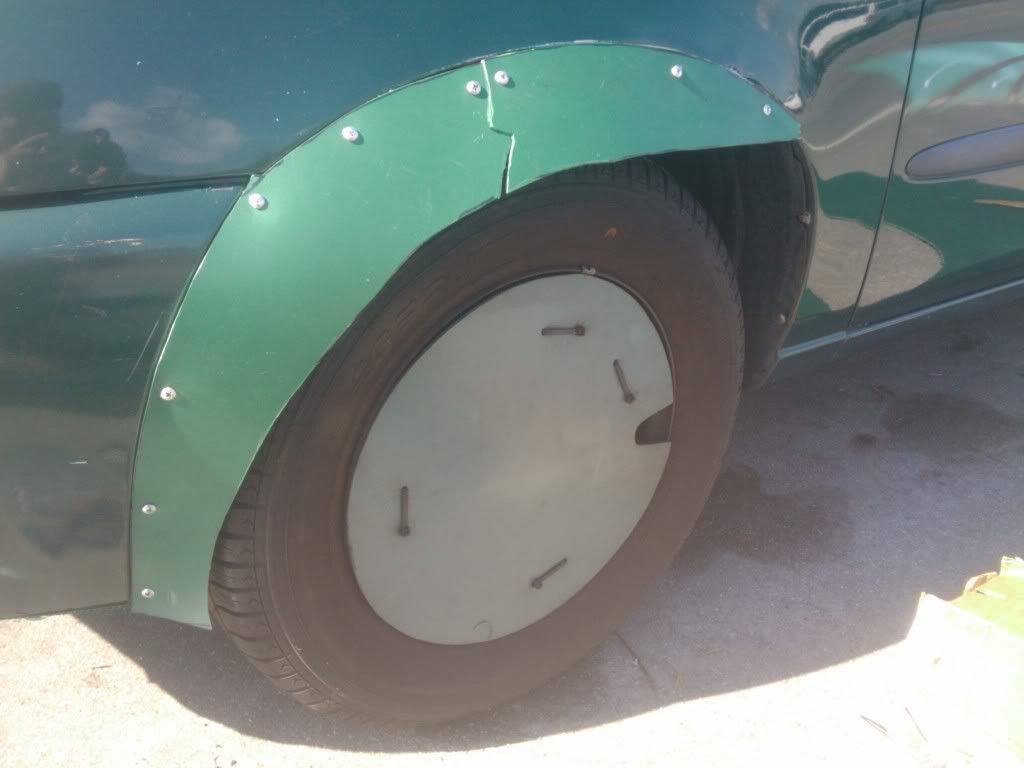
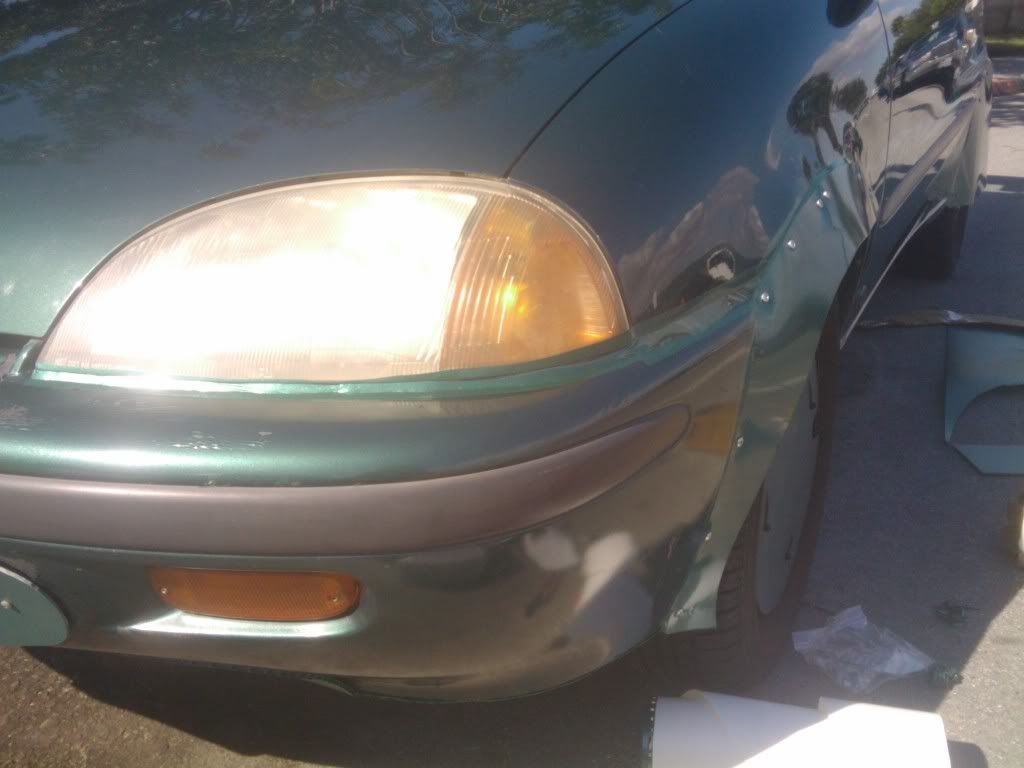
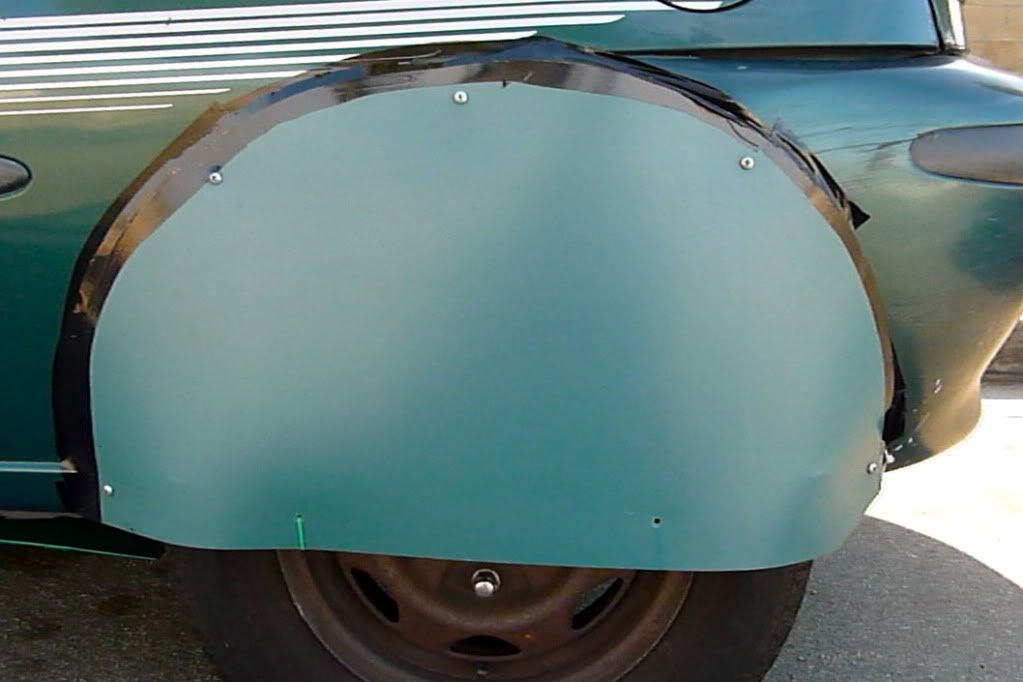
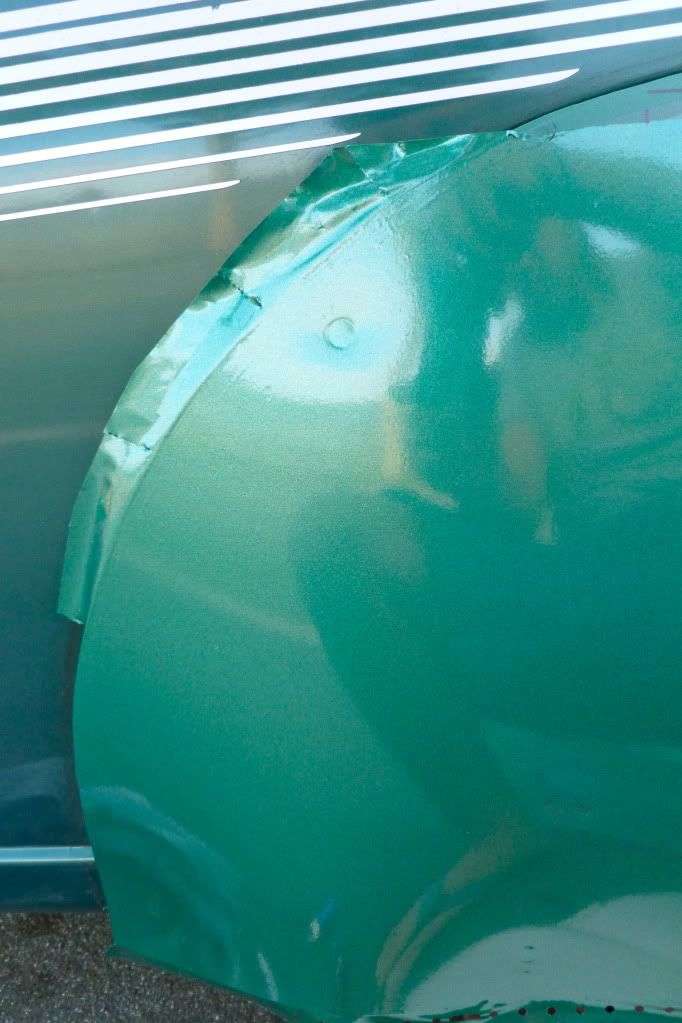
Here is a Before picture. You can see I had sloppily used some black sign vinyl to seal the edges of the skirt to the car (note I did this while at a rest stop on a road trip so quick and dirty was the goal not pretty - today the goal is pretty). Anyway before ->


I feel like it would be obvious but for this to work, it's important the surface is clean and free of dust and the like. Just make sure to wipe down whatever you're covering in vinyl before you begin.
I decided to remove the screws and then repierce the sign vinyl rather than cover the screw heads because I know from experience that removing the skirt is necessary in the case of a flat 
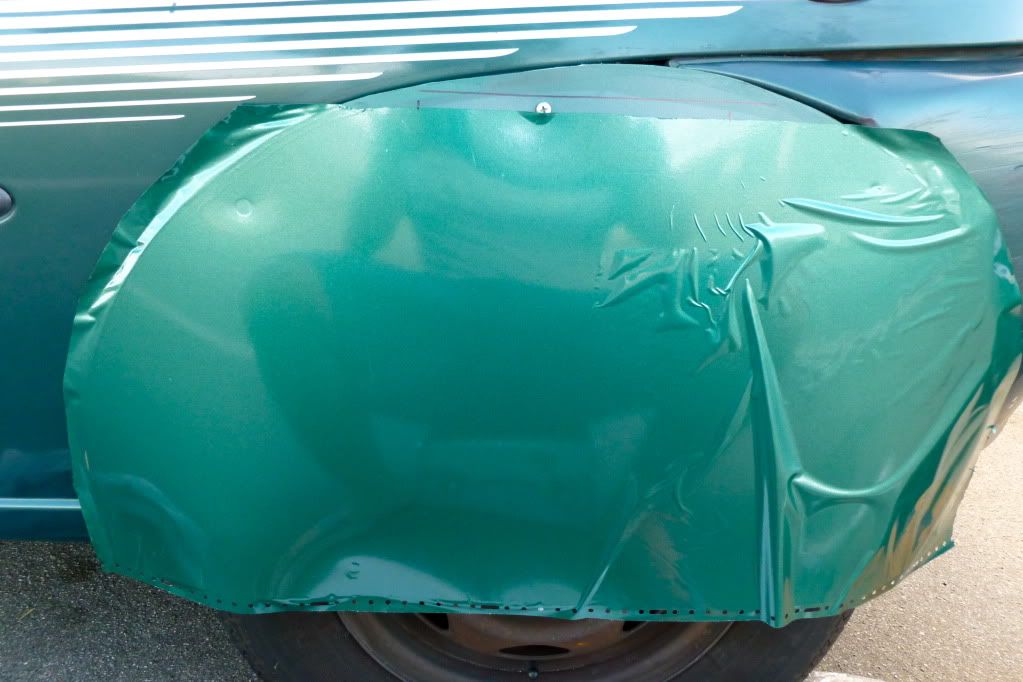
. So I cut a piece of the vinyl to be slightly bigger than the plastic skirt then, making sure it was straight I smoothed out the sticker down the center of the skirt vertically. Then holding the left side of the sticker away from the skirt I simply smoothed it down, moving left format he center. It'd flexible and forgiving so if you get a wrinkle just pull it up a bit and stretch it as you smooth it down. Here is a picture of the left side smoothed out, the right side is just lightly stuck in place ->


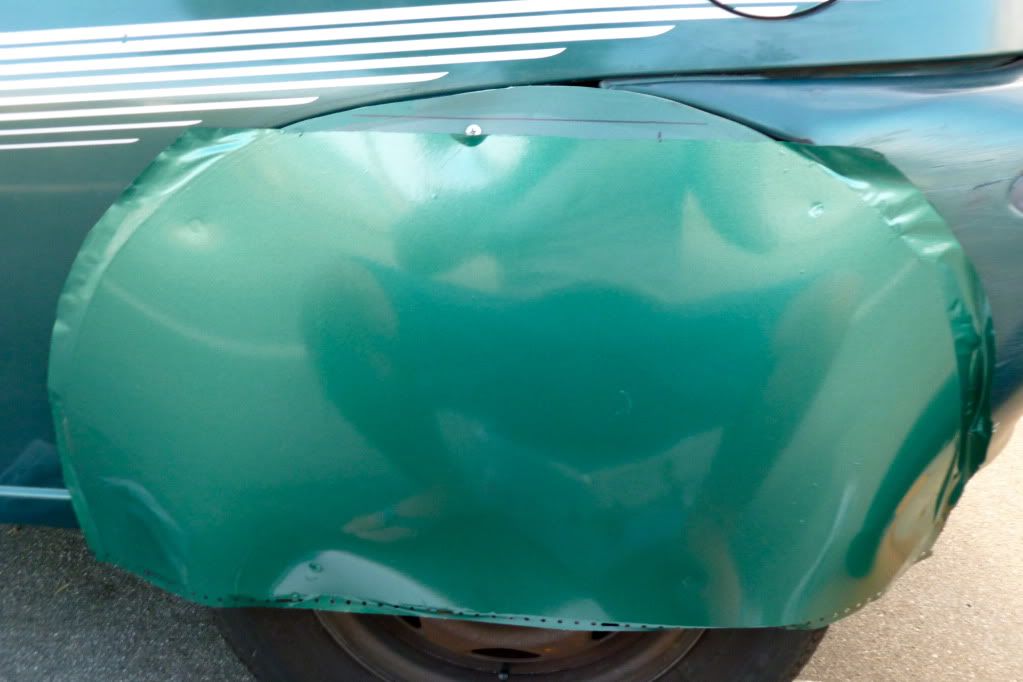
Next, I simply repeated the process working my way from the center to the right and it looked like this ->


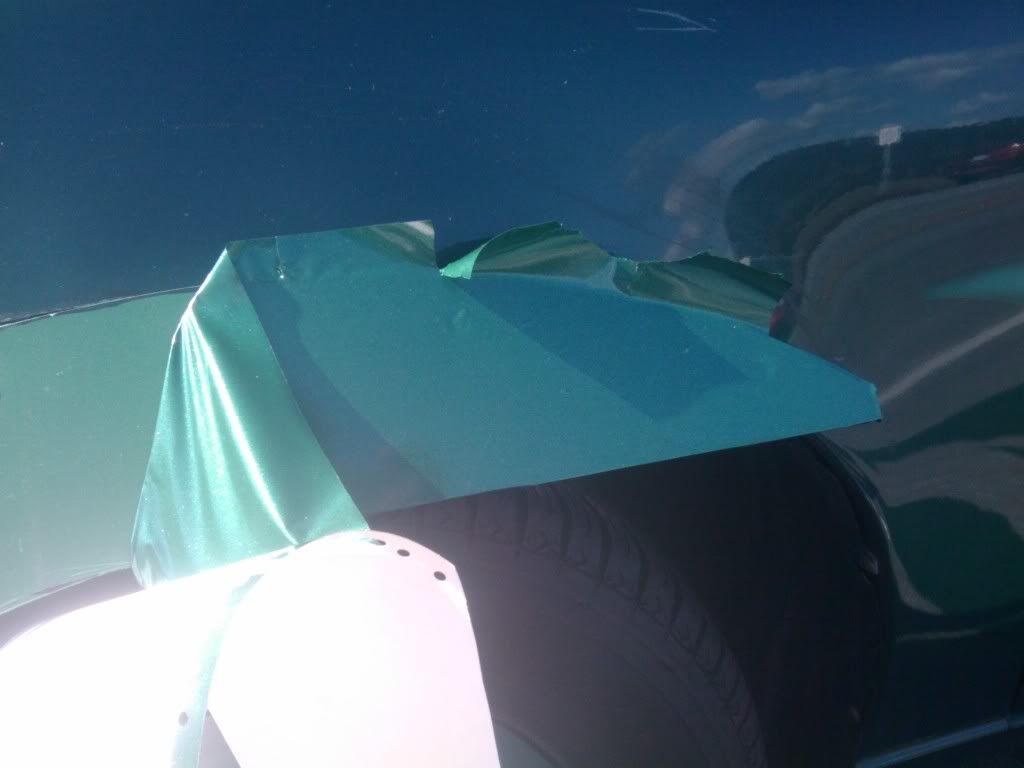
Remember I cut the sticker out to be a little big? I did this because I wanted to wrap the sticker around all the edges. To do this I simply cut the overlap every 3 or 4 inches to help it handle the circular edge and wrapped each tab over like this ->


With all the edges wrapped it now looks like this ->


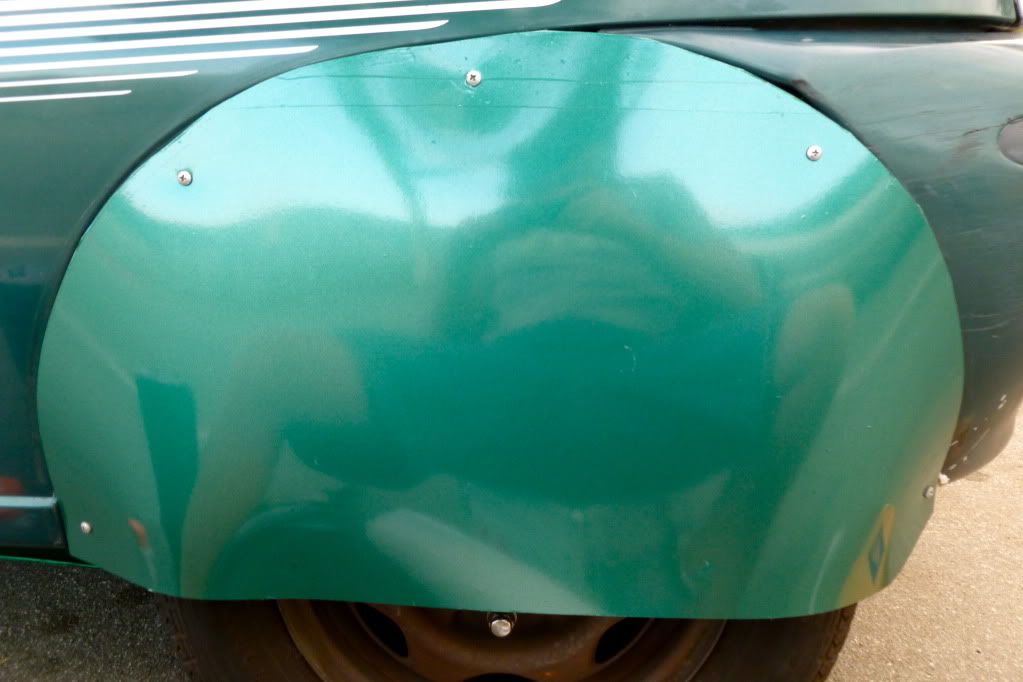
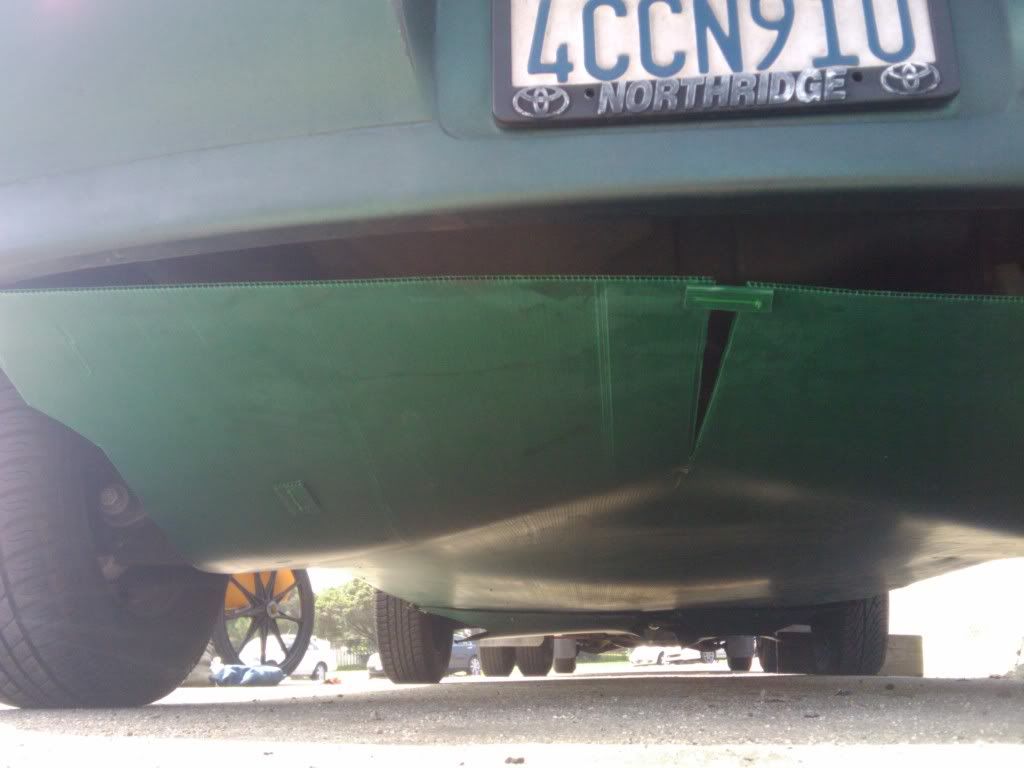
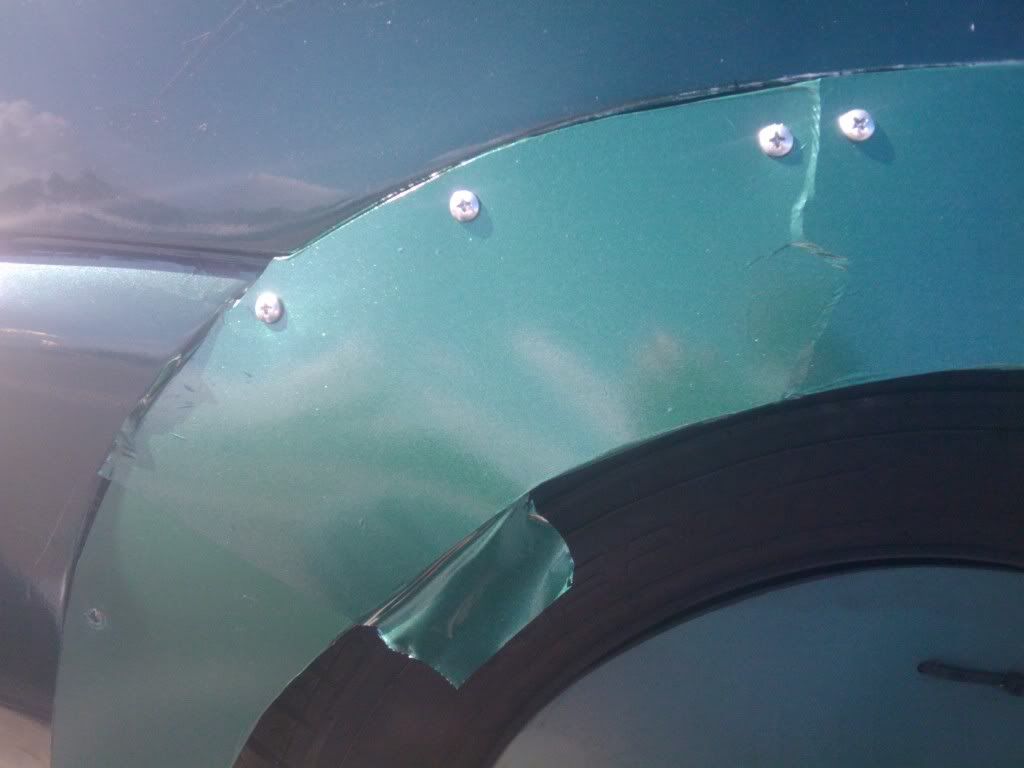
Now I always worry about air getting caught up on the leading edges of these things so sign vinyl makes a perfect smooth transition from skirt to car. I cut straight 1.5 inch strips and used them to straddle the gap between skirt and paint. Remember how I said it's flexible? Well if you have one thumb applying pressure to smooth it down while you use your other hand to stretch the free end the direction you want it to go, you get a nice smooth curve like this ->


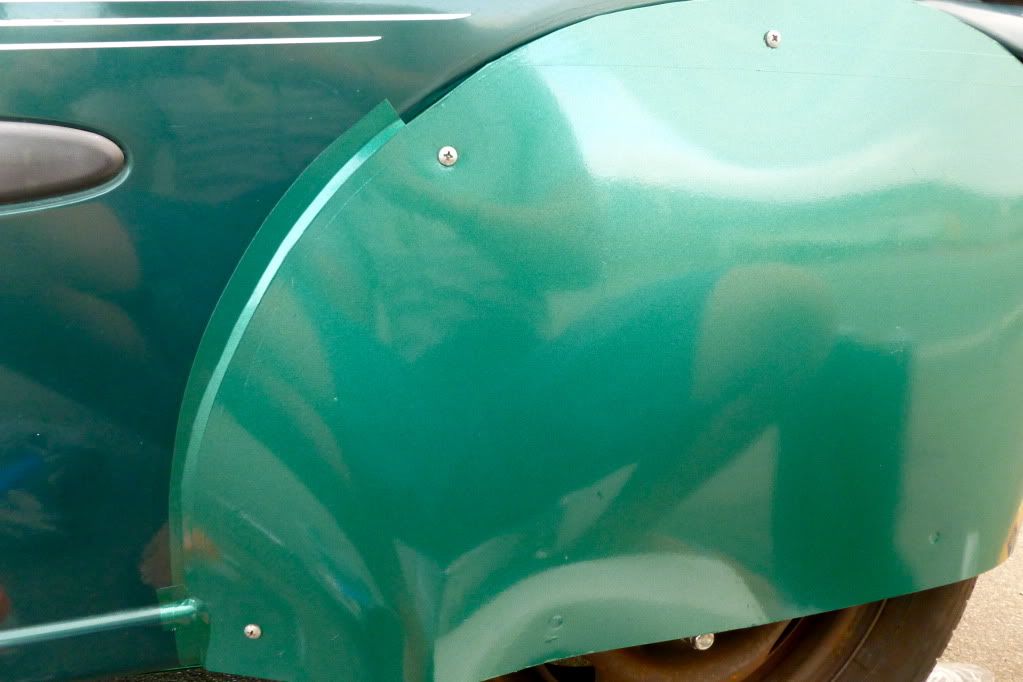
I went all the way around the skirt and even added a strip to cover the bumper/quarterfender gap just for good measure. In the case of a flat I'll simply remove this little strip (again it comes off very clean and easy) and I won't have destroyed all my work smoothing the thing on there.
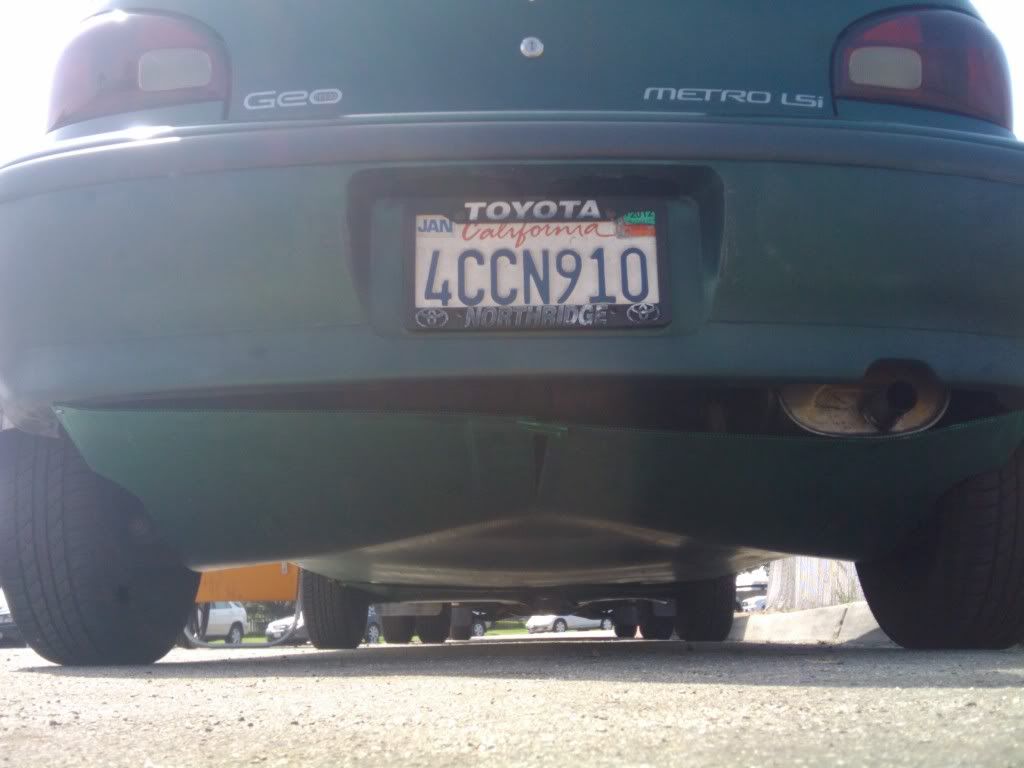
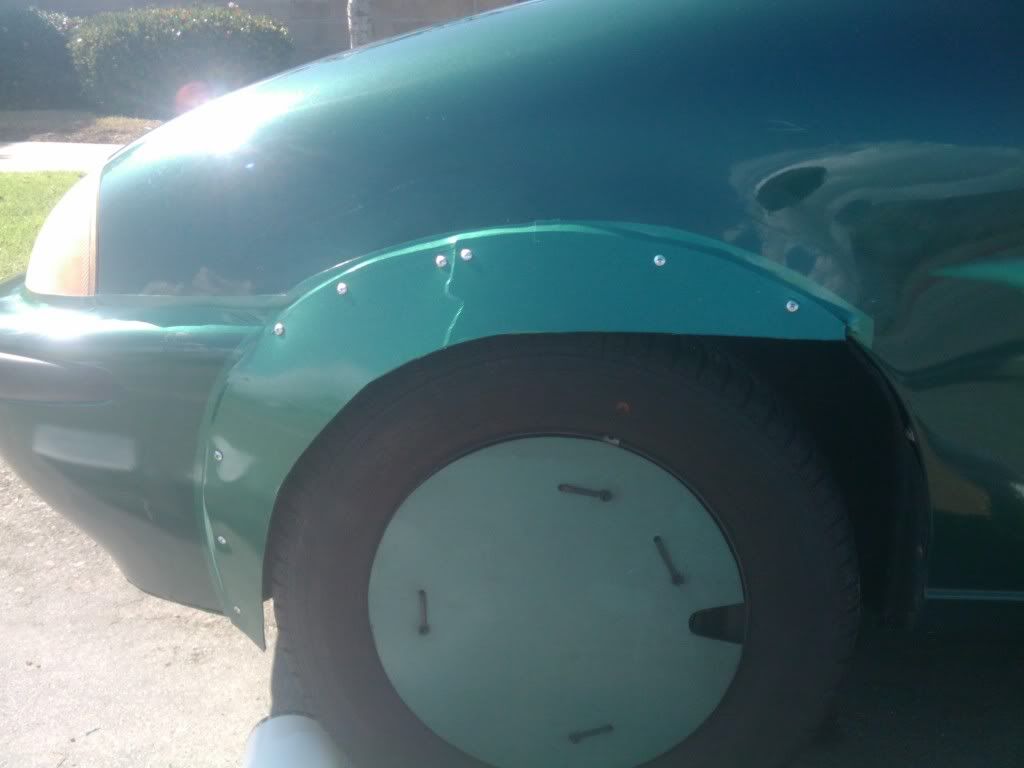
The final result looks like ->

Pretty cool right? Looks just like painted metal!

Don't judge the color match issues to harshly, it's a really specific color and I decided this was close enough. If you have a simple color like black, white, red, etc - matching the color would be much easier.

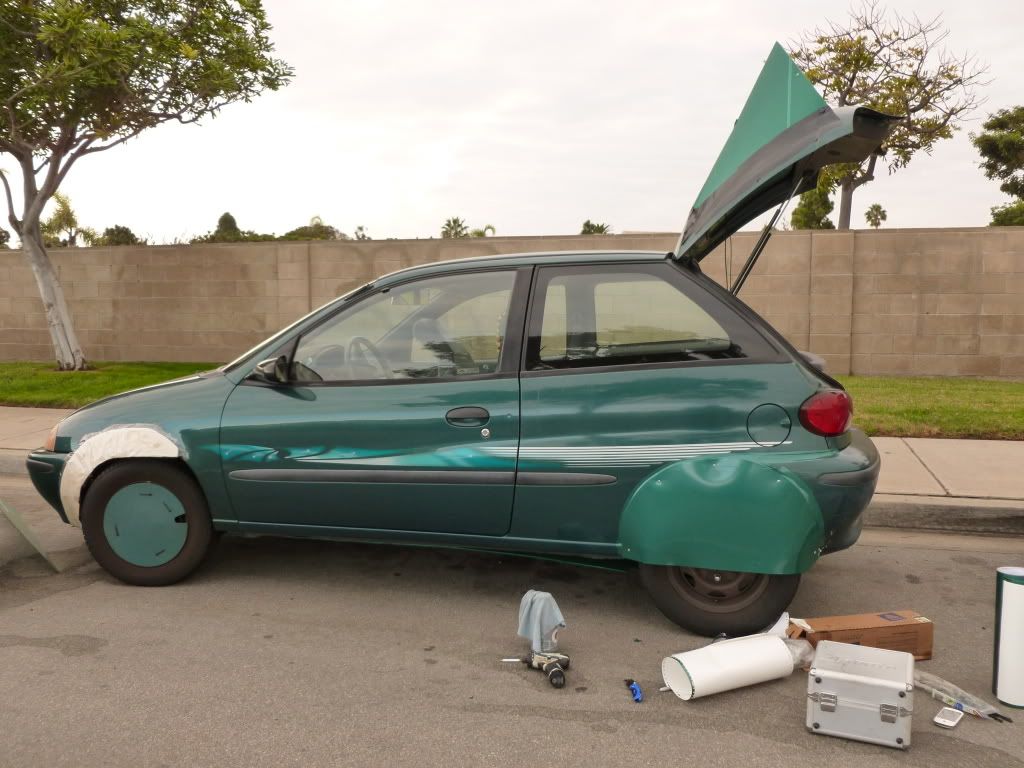
I plan on covering all my mods, including the kammback, with this stuff, and I'll have enough left over, I might even wrap some of the car where the paint isn't looking so good (like the top edge of the hatch). Think of how great it would be for gap filling.

*If you have access to a powersource (and don't have to ecomodd streetside like me) a heathen will go a long way. little heat really helps it flex for curves and also gives it a shrink-wrap like quality for compound curves and the like. I know that's how they do vehicle wraps with it.

**Also you can spray a mild soap/water mixture on the car before placing the sticker. This will allow you to move it around more easily and you simply squeegee the water out from under the sticker surface and it goes down smooth.

***If you get small bubbles you can also pierce them with a needle or pin then smooth them down.
__________________
"You too can get 50 Miles per Gallon, all it will cost is your self-respect."

  Reply With Quote
The Following 3 Users Say Thank You to Geo Metropolis For This Useful Post:
brucepick (10-27-2011), COcyclist (12-21-2011), ECONORAM (12-23-2013)
Old 10-27-2011, 07:21 AM   #26 (permalink)
OCD Master EcoModder
 
brucepick's Avatar
 
Join Date: Dec 2007
Location: Eastern CT, USA
Posts: 1,934

Outasight - '00 Honda Insight
Team Honda
Gen-1 Insights
90 day: 54.18 mpg (US)
Thanks: 429
Thanked 394 Times in 262 Posts
Quote:
Originally Posted by Geo Metropolis View Post
*If you have access to a powersource (and don't have to ecomodd streetside like me) a heathen will go a long way...
I prefer heathens myself, with our without a powersource.

I couldn't let that opportunity go by!

Thanks very much for the writeup. I've been hanging out on this forum ever since it started, and this is the first time I've seen sign vinyl mentioned. I think you've added a new and useful material to our tool box.

Thanks again!
__________________
Coast long and prosper.
Driving '00 Honda Insight, acquired Feb 2016.


  Reply With Quote
Old 10-28-2011, 12:36 AM   #27 (permalink)
Enthusiastic EcoModder
 
Join Date: Dec 2010
Location: San Diego
Posts: 90

Gnatmobile - '96 Geo Metro LSI
90 day: 44.68 mpg (US)

theRAV - '01 Toyota RAV4 NV
90 day: 21.07 mpg (US)

ACCELICA - '95 Toyota Celica GT Convertible
Last 3: 23.46 mpg (US)

The Van - '05 Chevrolet Uplander LS LWB
90 day: 21.04 mpg (US)
Thanks: 4
Thanked 31 Times in 12 Posts
lol - yea please substitute "heathen" with heat gun, oops
yes, I'm glad to bring sign vinyl to light, it's extremely useful for so many things, but in the ecommoding I could see it being a great way to:
  • seal gaps
  • smooth edges
  • beautify mods
  • accomplish shaving of door handles or moldings in a non permanent/reversible way
__________________
"You too can get 50 Miles per Gallon, all it will cost is your self-respect."

  Reply With Quote
Old 11-07-2011, 08:20 PM   #28 (permalink)
Enthusiastic EcoModder
 
Join Date: Dec 2010
Location: San Diego
Posts: 90

Gnatmobile - '96 Geo Metro LSI
90 day: 44.68 mpg (US)

theRAV - '01 Toyota RAV4 NV
90 day: 21.07 mpg (US)

ACCELICA - '95 Toyota Celica GT Convertible
Last 3: 23.46 mpg (US)

The Van - '05 Chevrolet Uplander LS LWB
90 day: 21.04 mpg (US)
Thanks: 4
Thanked 31 Times in 12 Posts
How-To: Front Fender Gap Fillers / Partial skirts

My cardboard mockups seemed to contribute to better tank to tank results (yeah, yeah, no ABA, I know...) but they weren't weathering well at all (sunbleached, waterlogged, moldy, etc). I decided I like them so I wanted to make them a little more permanent.
I started by screwing in a variety of aluminum brackets around the front and top of the wheelwell. I don't have any pics of this but I just bent some 3"x1" aluminum pieces into 90 degree brackets. I used self tapping screws to mount them to the inner edge of the fender surround.
Next I used the cardboard to make a template that fit the inner fender edge and allowed the tire to clear when turned back and forth (with enough margin to allow for some suspension movement and passenger weight). Honestly, the cardboard one helped me figure out where to add margin because it simply wore off where it needed to.
I used the template and a boxcotter to cut a piece of 1/8" abs to the right shape. Unfortunately my ABS snapped when I tried to save some time by bending it along a score mark instead of cutting all the way through. I decided to use it anyway and simply put a bracket across the crack and secure each side of it with a screw. Here it is fitted in place:

Next, I began wrapping it in sign vinyl. I decide I wanted the screws outside the vinyl so I had to remove the screws, wrap the section, then put the screws back. You can see the process here:

To wrap around the back, I just notch the vinyl every 2 or 3 inches and wrap each tab back, this helps it go around all the curves. You can see one of the tabs sticking out here:

Next I used a 3/4" strip of vinyl to seal the gap between the new piece and the fender. While I was at it, I filled the bumper/headlight gap. Here is the side view:

And the front view:

I'm really happy with the result on this one, it really looks pretty sharp wrapped in vinyl. I can't wait to get all my mods adjusted and wrapped, I think the whole car is going to look really good
__________________
"You too can get 50 Miles per Gallon, all it will cost is your self-respect."

  Reply With Quote
Old 12-23-2013, 11:17 PM   #29 (permalink)
halos.com
 
Join Date: Oct 2009
Location: Oklahoma City, OK
Posts: 528

ECONORAM - '07 Dodge RAM 1500 QC SLT flex-fuel
90 day: 18.16 mpg (US)

the Avenger - '08 Dodge Avenger SXT
90 day: 27.06 mpg (US)
Thanks: 385
Thanked 94 Times in 80 Posts
Send a message via Yahoo to ECONORAM
Thanks for sharing. I've also been working on a belly panel. I am curious if you've had water and dirt collect in the slots in your corroplast? I noticed that with nearly every corroplast panel I made, except the side skirts...

__________________
  Reply With Quote
Reply  Post New Thread


Thread Tools


Powered by vBulletin® Version 3.8.11
Copyright ©2000 - 2024, vBulletin Solutions Inc.
Content Relevant URLs by vBSEO 3.5.2
All content copyright EcoModder.com