Go Back   EcoModder Forum > EcoModding > EcoModding Central
Register Now
 Register Now
 

Reply  Post New Thread
 
Submit Tools LinkBack Thread Tools
Old 04-28-2010, 11:08 AM   #71 (permalink)
The PRC.
 
Join Date: Oct 2009
Location: Elsewhere.
Posts: 5,304
Thanks: 285
Thanked 536 Times in 384 Posts
Wouldn't know, never driven round London. Have sat in a GT6 round Oulton Park in the past though. That was lairy ;-)

__________________
[I]So long and thanks for all the fish.[/I]
  Reply With Quote
Alt Today
Popular topics

Other popular topics in this forum...

   
Old 05-06-2010, 10:05 PM   #72 (permalink)
EcoModding Apprentice
 
JackMcCornack's Avatar
 
Join Date: Mar 2008
Location: Southern Oregon
Posts: 179
Thanks: 5
Thanked 39 Times in 23 Posts
I'm making some progress on construction. First things first--figure out how to place the powerplant. The mounting system needs to be robust 'cause if the car stops suddenly (like into a bridge abutment or an oncoming Escalade) I don't want the engine joining me in the cockpit. Ditto getting rear ended. So I'm putting the powerplant in a cradle made of 2" square mild steel tubing that wraps around the engine and will butt up against another 2" square tube at the back of the cockpit.

Step one was to make a powerplant simulator out of scrap metal. I bolted sleeves and plates to the engine mount and suspension attachment points on a Metro chassis, welded them together with bits of tubing, and ta dah! A thingie I could remove and measure without breaking my back or getting all greasy.


__________________
Modding MAX, a Kubota-powered classic sports car
http://www.kineticvehicles.com
  Reply With Quote
Old 05-06-2010, 10:47 PM   #73 (permalink)
EcoModding Apprentice
 
JackMcCornack's Avatar
 
Join Date: Mar 2008
Location: Southern Oregon
Posts: 179
Thanks: 5
Thanked 39 Times in 23 Posts
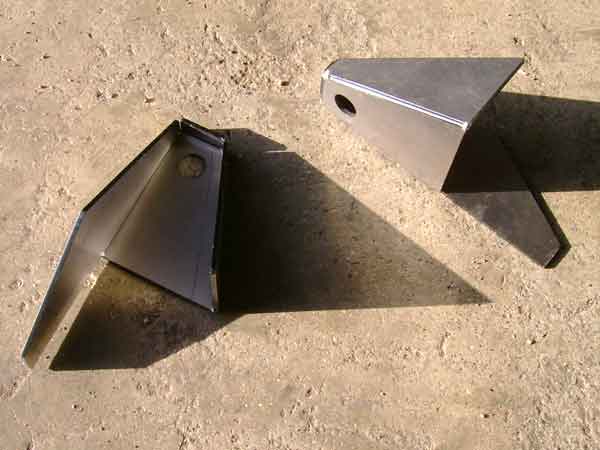
Next step (after the measuring and thinking and calculating etc, which doesn't count) was to make up the engine mounts.

I love CNC for small run manufacturing, and prototyping too--I have a deal with my local laser guys where I bring them G-code files to their specs, and they can run off prototype parts without having to do any setup or translations, which keeps it cheap. So nowadays I do all my sheet metal parts on the laptop, do a desktop test print on card stock, cut out the parts, form them over the edge of a table, weld them together with hot glue and Scotch tape, and if the paper parts fit I have a metal set made and build a prototype from them.

I generally plan on making one test-fit assembly that isn't quite right, but is close enough that the second shot will get it. It saves a bunch of calculating time if I assume I'll make a mistake or two, plus I'm such a crapola welder that I don't weld finished products...which means if I think it might work like a charm the first time, I have to bring in a professional to weld it. This way's faster.

Here's a cool technique for laser parts: to reduce fixturing and fitting sub-assemblies, I rely on origami. For a nice bend line that'll be exactly the same from part to part, I cut a line where I want the bend, leave it connected at the ends with tabs about as wide as the thickness of the metal, and then one can bend the part by hand and weld the cut back together after the part is installed.

Here's the left pickup plate (the part the left engine mount--trans mount, actually--attaches to), it has legs that fit (and weld) under the cradle tube and a center brace about mid-plate. The photo shows the cuts in the brace and how it folds, plus there are pix of the right pickup brackets (where the right motor mount attaches) already folded, plus how they fit on the 2" tube.




__________________
Modding MAX, a Kubota-powered classic sports car
http://www.kineticvehicles.com
  Reply With Quote
Old 05-06-2010, 10:58 PM   #74 (permalink)
EcoModding Apprentice
 
JackMcCornack's Avatar
 
Join Date: Mar 2008
Location: Southern Oregon
Posts: 179
Thanks: 5
Thanked 39 Times in 23 Posts
So, the right attachment points were welded to the tube to a measured position, the 2" tube cradle (a C shape at present--two sides and a back--with a scrap of 1" temporarily in the front to hold it solid 'til it's welded to the cockpit) made square and true (using a Craftsman digital level, a carpenter's square, and carpenter's clamps), the "engine simulator" placed in the cradle and the left and rear pickup points welded to the cradle. With the simulator removed, the cradle was dropped on a Metro engine/trans/mount assembly and woohoo! It fit.


__________________
Modding MAX, a Kubota-powered classic sports car
http://www.kineticvehicles.com
  Reply With Quote
Old 10-06-2010, 04:05 PM   #75 (permalink)
Batman Junior
 
MetroMPG's Avatar
 
Join Date: Nov 2007
Location: 1000 Islands, Ontario, Canada
Posts: 22,534

Blackfly - '98 Geo Metro
Team Metro
Last 3: 70.09 mpg (US)

MPGiata - '90 Mazda Miata
90 day: 54.46 mpg (US)

Appliance car Mirage - '14 Mitsubishi Mirage ES (base)
90 day: 57.73 mpg (US)
Thanks: 4,082
Thanked 6,979 Times in 3,614 Posts
Hi Jack -

I just came across another project out there using some Metro (Swift, actually) parts as the motivating bits for a light DIY sports car project. Made me think of yours.

His is a somewhat different approach: the main one being he's going with electric propulsion. He's also modifying an existing Ford race car chassis to take the Suzuki transaxle, axles & hubs (RWD configuration).


Below is the Suzuki transaxle mounted in the chassis:


And he'll top if off by sticking a Lotus(esque) fiberglass body on top:


Project web site: szott.com

Probably won't be as low drag as your project, but I thought it was worth posting as brain fodder since people here seem to get a kick out of the idea of transplanting small displacement drivetrains into custom bodies.

Darin
Attached Thumbnails
Click image for larger version

Name:	p2s.jpg
Views:	326
Size:	53.2 KB
ID:	6991   Click image for larger version

Name:	p1s.jpg
Views:	430
Size:	52.1 KB
ID:	6992   Click image for larger version

Name:	r5s.jpg
Views:	435
Size:	60.2 KB
ID:	6993  
__________________
Project MPGiata! Mods for getting 50+ MPG from a 1990 Miata
Honda mods: Ecomodding my $800 Honda Fit 5-speed beater
Mitsu mods: 70 MPG in my ecomodded, dirt cheap, 3-cylinder Mirage.
Ecodriving test: Manual vs. automatic transmission MPG showdown


EcoModder
has launched a forum for the efficient new Mitsubishi Mirage
www.MetroMPG.com - fuel efficiency info for Geo Metro owners
www.ForkenSwift.com - electric car conversion on a beer budget
  Reply With Quote
Old 10-08-2010, 04:59 AM   #76 (permalink)
EcoModding Lurker
 
Join Date: Jul 2008
Location: Oregon Eugene
Posts: 47
Thanks: 8
Thanked 10 Times in 7 Posts
I would love to see a Countach style super car look with a 1.0 engine. I suppose they were probably not very aerodynamic in their beauty!
  Reply With Quote
Old 10-08-2010, 01:28 PM   #77 (permalink)
93 Metro Streamliner
 
Join Date: Oct 2008
Location: Oregon
Posts: 180

AeroMetro - '93 Geo Metro
Thanks: 1
Thanked 14 Times in 7 Posts
Imagine a Peugeot P81 without the wing.


Attached Thumbnails
Click image for larger version

Name:	Peugeot P81 1.jpg
Views:	406
Size:	113.6 KB
ID:	7003   Click image for larger version

Name:	Peugeot P81 2.jpg
Views:	403
Size:	97.1 KB
ID:	7004  
  Reply With Quote
Old 10-08-2010, 02:26 PM   #78 (permalink)
Master EcoModder
 
Join Date: Jun 2008
Location: Earth
Posts: 5,209
Thanks: 225
Thanked 811 Times in 594 Posts
Quote:
Originally Posted by hypermiler01 View Post
Imagine a Peugeot P81 without the wing.
Nice, but I think I would keep the wing, modified as sort of the inverse of the bars on semi-trailers that keep cars from going under the trailer in a rear-end collision. There are too many jacked-up pickups & SUVs, driven by cell phone users, and I could just see myself waiting at a light while oblivious idiot rolls through on the red.
  Reply With Quote
Old 10-08-2010, 03:44 PM   #79 (permalink)
(:
 
Frank Lee's Avatar
 
Join Date: Jan 2008
Location: up north
Posts: 12,762

Blue - '93 Ford Tempo
Last 3: 27.29 mpg (US)

F150 - '94 Ford F150 XLT 4x4
90 day: 18.5 mpg (US)

Sport Coupe - '92 Ford Tempo GL
Last 3: 69.62 mpg (US)

ShWing! - '82 honda gold wing Interstate
90 day: 33.65 mpg (US)

Moon Unit - '98 Mercury Sable LX Wagon
90 day: 21.24 mpg (US)
Thanks: 1,585
Thanked 3,555 Times in 2,218 Posts
Countach had bad Cd and the wing was notorious for knocking quite a bit of top end speed off.
__________________


  Reply With Quote
Old 10-10-2010, 01:45 AM   #80 (permalink)
Master EcoModder
 
Join Date: Jun 2008
Location: Earth
Posts: 5,209
Thanks: 225
Thanked 811 Times in 594 Posts
Quote:
Originally Posted by Frank Lee View Post
...the wing was notorious for knocking quite a bit of top end speed off.
Better that than oblivious idiot knocking off quite a bit of MY top end :-)

  Reply With Quote
Reply  Post New Thread


Similar Threads
Thread Thread Starter Forum Replies Last Post
Electric car conversion: Project ForkenSwift MetroMPG Fossil Fuel Free 1056 12-14-2024 01:21 AM
Discussion on tire efficiency Ernie Rogers General Efficiency Discussion 69 12-27-2014 02:17 PM
EcoModding for Beginners: Getting great gas mileage. SVOboy EcoModding Central 55 08-21-2012 12:34 AM
Project 60/60 Xfi Metro and Singh grooves metromizer EcoModding Central 25 09-19-2008 09:25 AM
Radical Metro Aero Mods? Coyote X Aerodynamics 8 01-01-2008 05:05 PM


Powered by vBulletin® Version 3.8.11
Copyright ©2000 - 2025, vBulletin Solutions Inc.
Content Relevant URLs by vBSEO 3.5.2
All content copyright EcoModder.com