Go Back   EcoModder Forum > EcoModding > Fossil Fuel Free > Open ReVolt: open source DC motor controller
Register Now
 Register Now
 

Reply  Post New Thread
 
Submit Tools LinkBack Thread Tools
Old 08-27-2010, 09:31 AM   #3711 (permalink)
ReVolt Enthusiast
 
Join Date: Jun 2009
Location: Michigan, USA
Posts: 239
Thanks: 97
Thanked 47 Times in 40 Posts
Paul,

If you are having problems, send me the DesignSpark PCB you want gerber files for, I will create them for you and send you back a "gerber package" to have your board fabricated.

-Mark

  Reply With Quote
The Following User Says Thank You to sawickm For This Useful Post:
MPaulHolmes (08-27-2010)
Alt Today
Popular topics

Other popular topics in this forum...

   
Old 08-28-2010, 05:58 PM   #3712 (permalink)
PaulH
 
MPaulHolmes's Avatar
 
Join Date: Feb 2008
Location: Maricopa, AZ (sort of. Actually outside of town)
Posts: 3,832

Michael's Electric Beetle - '71 Volkswagen Superbeetle 500000
Thanks: 1,362
Thanked 1,202 Times in 765 Posts
For "plot type" do I choose Artwork, Outline, or Drill Ident Drawing?

And under Settings, do I choose Plot Board Outline UNPLATED, PLATED, or both?
__________________
kits and boards
  Reply With Quote
Old 08-29-2010, 12:12 AM   #3713 (permalink)
ReVolt Enthusiast
 
Join Date: Jun 2009
Location: Michigan, USA
Posts: 239
Thanks: 97
Thanked 47 Times in 40 Posts
Hi Paul,

Quote:
Originally Posted by MPaulHolmes View Post
For "plot type" do I choose Artwork, Outline, or Drill Ident Drawing?
The "plot type" should be "Artwork" for all gerber files.

Quote:
And under Settings, do I choose Plot Board Outline UNPLATED, PLATED, or both
I would add corner markers (components) to all the artwork layers. But you could add the board outline to all your artwork layers. The board house will remove they if they don't need them.

I would also select "Unplated" for the board outline.

Check out the outputed gerber files in a "WYSIWYG" gerber veiwer to make sure that they are exactly how you want them.

-Mark
  Reply With Quote
The Following 2 Users Say Thank You to sawickm For This Useful Post:
deodeo (03-27-2012), MPaulHolmes (08-29-2010)
Old 08-29-2010, 04:31 AM   #3714 (permalink)
Joe
 
Join Date: Feb 2009
Location: phx
Posts: 260
Thanks: 0
Thanked 48 Times in 38 Posts
good news and bad news

The good news is that the controller still works. The bad news is that a couple weeks ago it went 'poof'!

Here's the story:

I drive to work, everything is fine. I get in to leave for lunch and notice the voltage meter reads 0V instead of pack voltage (it's after the precharge resistor, so it really measures voltage across the caps, and they weren't charging). Unfortunately, I thought the meter was acting weird, so I closed pressed the pedal which closed the main contactor. The car instantly lurched a few feet until the contactor opened and the dreaded smoke and dead electronics smell emanated from under the hood.

So, had it towed and took the controller apart. The whole album is here: Picasa Web Albums - Joseph - controller fa...

It looked pretty bad:
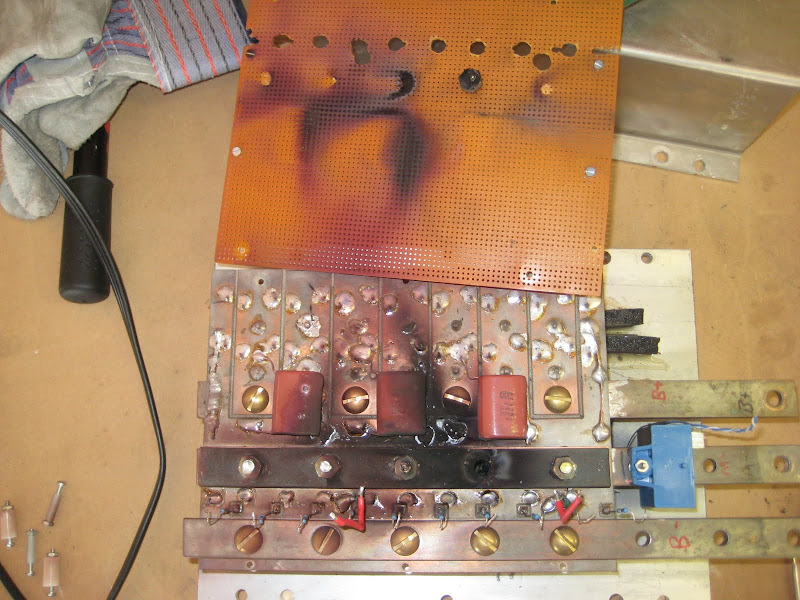


One bolt was blown apart:
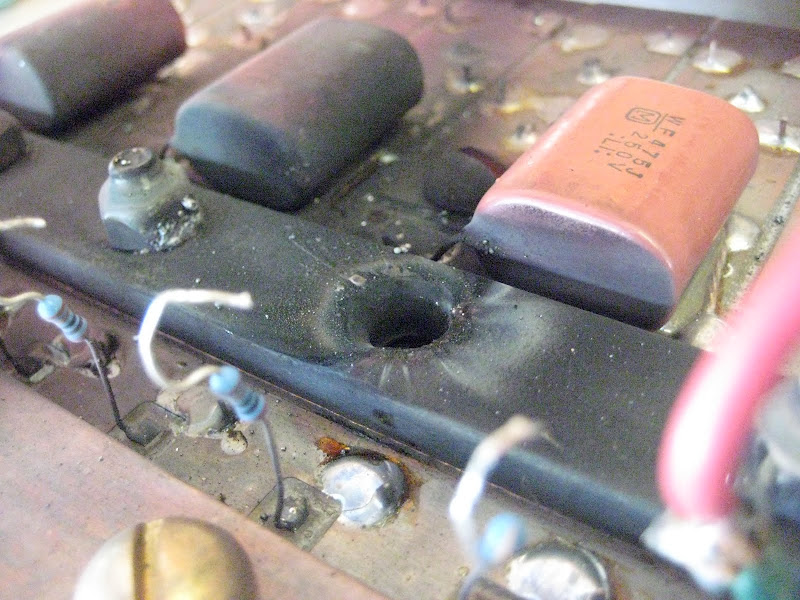


Which one of these things is not like the other?


I tried to clean the bolt as best as I could...
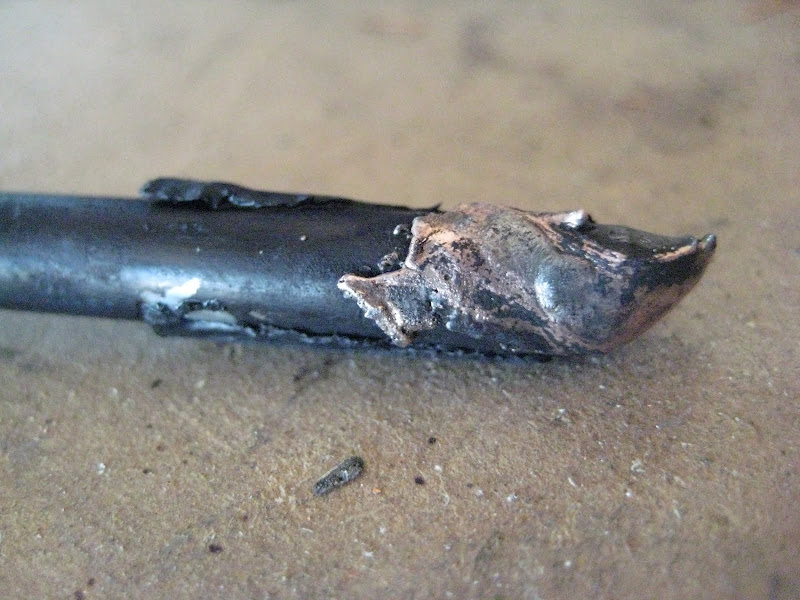

One of the legs of one diode near the bolt was blown apart.


There's copper blasted onto the nearby bus bar and a trough was blasted into the solder.


Two of the nearby caps were blasted too. They turned out to be internally shorted.


This is what the bottom of the heat spreader looked like. A small channel was cut from the bore of the bolt hole to the outer edge.
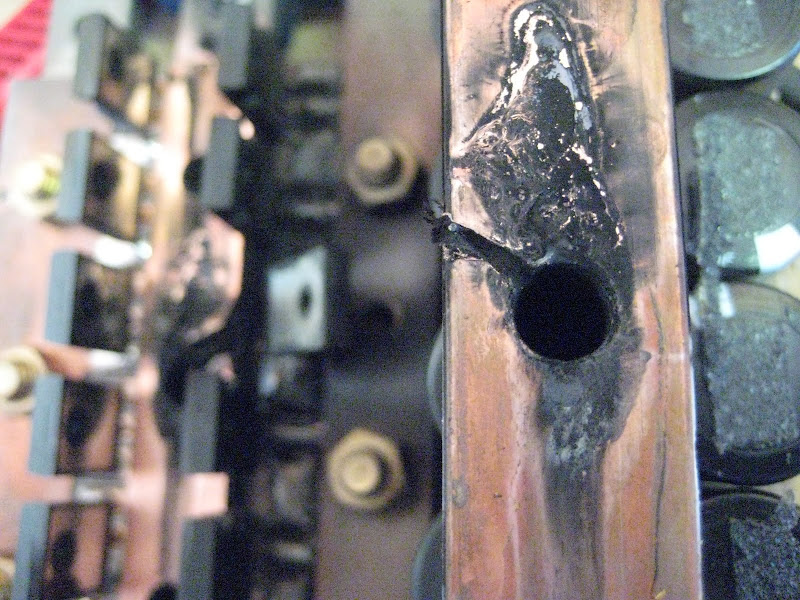


The insulating PCB strip that touches the heat spreader mirrors the damage.
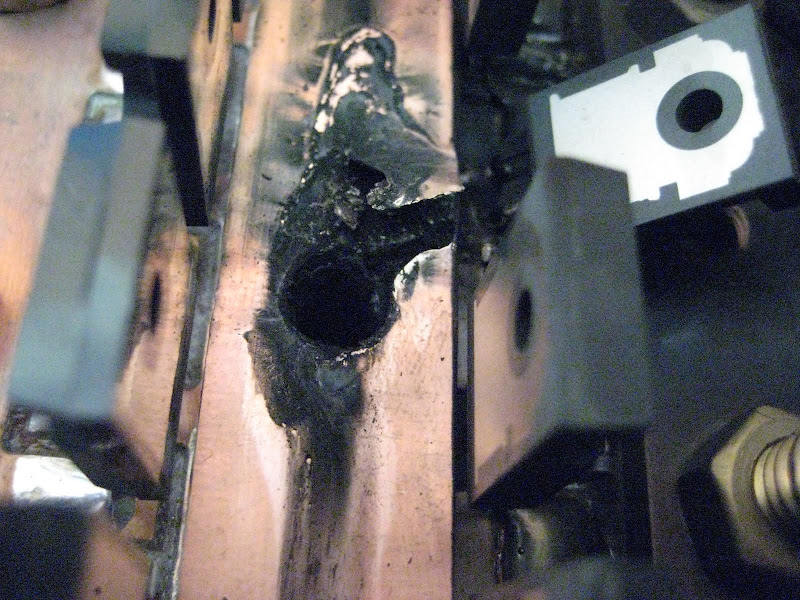

There was definitely something going on here between the B- layer and the insulation strip. The two layers were stuck together 360 degrees and pulling the insulating PCB off stretched it apart and made it baloon like that.
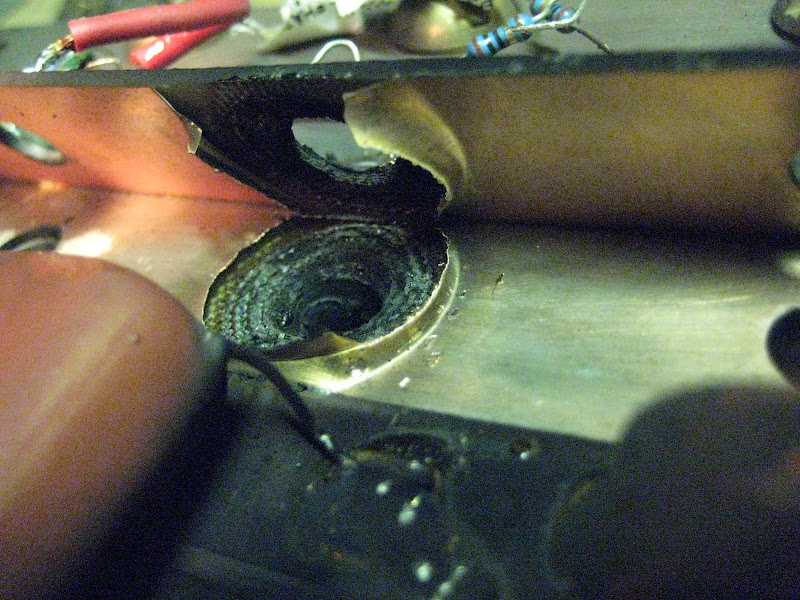


So, the theory is that the heat shrink that insulated the bolt from the B- and M- layers got compromised. Paul originally put it together and said that some of the bolts were a little tight going in. Maybe after a year and 6000 miles of vibration and thermal cycling, the threads of the bolt worked through the heatshring. Eventually, both the B- layer and the M- bus bar contacted the bolt and 144v started an arc that blew through some of the PCB copper and the bolt. The resulting plasma shot out between the cracks, bored the hole in the heat spreader and took out the diode leg and the caps.

The fix:

Fran suggested an easy check to test the mosfets. They resistance from Gate to Source should ready infinite. Turns out the one mosfet opposite of the blown diode read a few kOhms, so that was replaced along with the diode and caps.

I found some perfect nylon flanged bushings at Ace Hardware. They're 1/4" ID and 1/2" long and pretty much fit right into the holes already drilled through the heat spreader and PCBs. Some were tight. But, they should provide good insulation of the bolt and various hot things it passes through.
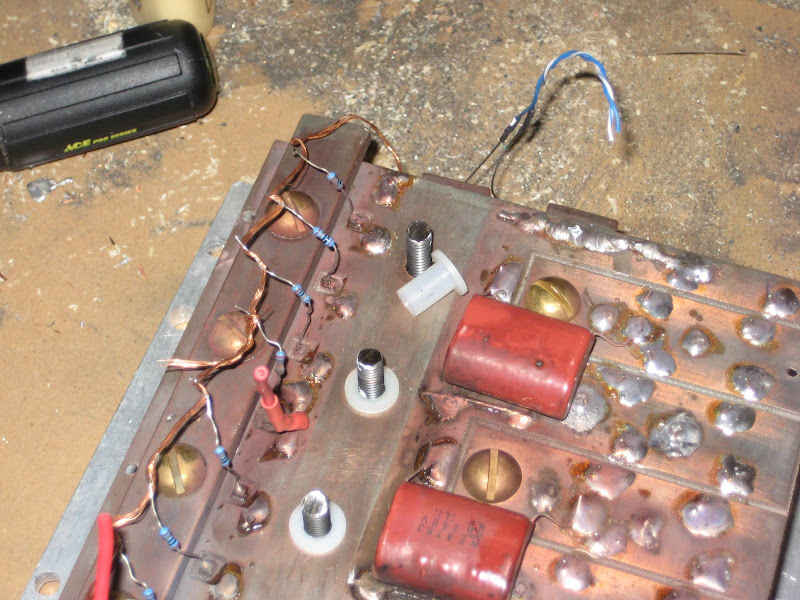


The flange diameter is 1/2", so the holes in the one insulation strip needed to be larger so the fit around the flange. Both the flange and the PCB thickness is 1/16".
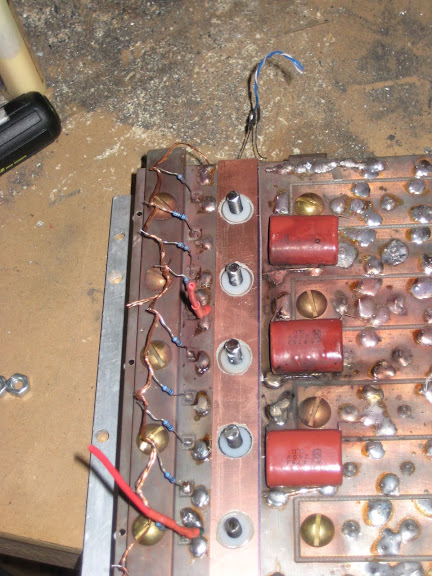


Everything back together!
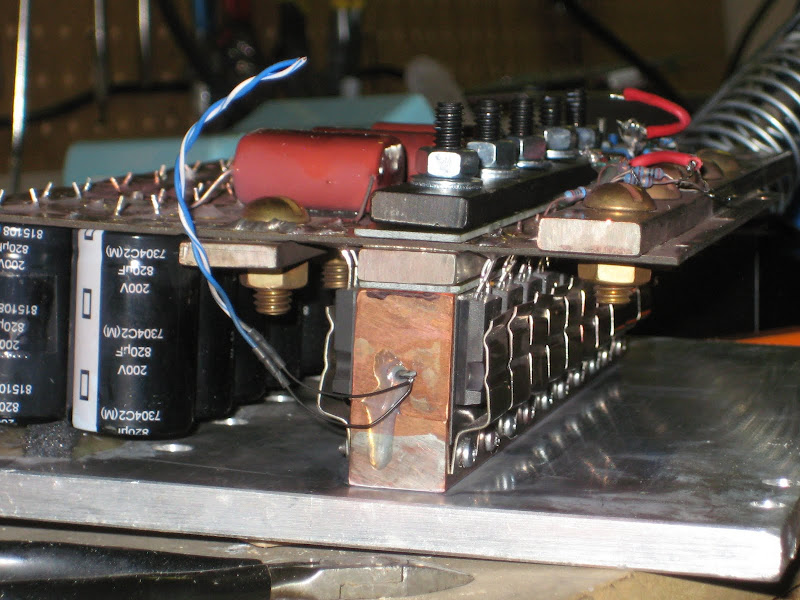


Given the amount of damage, 1 mosfet, 1 diode, 2 caps, and $3 worth of nylon bushings from Ace is not too bad! Paul was great helping with getting parts. If anyone has their controller apart, this modifcation would be pretty easy to do. It would take quite a bit of work getting the controller apart.

I've only taken a couple of trips with the fixed controller, but so far so good!
__________________
ReVolt AZ testing thread:

http://ecomodder.com/forum/showthrea...ting-9325.html
  Reply With Quote
The Following User Says Thank You to jyanof For This Useful Post:
mpgmike (01-17-2022)
Old 08-29-2010, 11:23 AM   #3715 (permalink)
EV test pilot
 
bennelson's Avatar
 
Join Date: Jan 2008
Location: Oconomowoc, WI, USA
Posts: 4,435

Electric Cycle - '81 Kawasaki KZ440
90 day: 334.6 mpg (US)

S10 - '95 Chevy S10
90 day: 30.48 mpg (US)

Electro-Metro - '96 Ben Nelson's "Electro-Metro"
90 day: 129.81 mpg (US)

The Wife's Car - Plug-in Prius - '04 Toyota Prius
90 day: 78.16 mpg (US)
Thanks: 17
Thanked 663 Times in 388 Posts
Ya know, one of the most amazing things about these projects is that you CAN fix it.

Any of the problems I have seen so far with these controllers are things that could happen on a Curtis or Alltrax. But with the Open Revolt, you can FIX it.

Not so easy when the big boys won't give you a circuit diagram and fill the inside with epoxy!
__________________


300mpg.org Learn how to BUILD YOUR OWN ELECTRIC CAR CHEAP
My YouTube Videos
  Reply With Quote
Old 08-29-2010, 02:12 PM   #3716 (permalink)
Mark Weisheimer
 
Join Date: Aug 2009
Location: Columbus Ohio
Posts: 62
Thanks: 8
Thanked 13 Times in 10 Posts
This is a great write up.
Thermal expansion/contraction and vehicle vibration can cause all kinds
of troubles and this is a good example including a fix.

Thanks Joe!

This isn't related, but I looked at your photo album and noticed a pretty nifty looking
electric AC system. Did you do a write up on that anywhere?
  Reply With Quote
Old 08-29-2010, 02:42 PM   #3717 (permalink)
Joe
 
Join Date: Feb 2009
Location: phx
Posts: 260
Thanks: 0
Thanked 48 Times in 38 Posts
Quote:
Originally Posted by Weisheimer View Post
This isn't related, but I looked at your photo album and noticed a pretty nifty looking
electric AC system. Did you do a write up on that anywhere?
I never really got around to doing a full write up. I didn't really get to test it until this summer and it's undersized so I'm not really satisfied with it. There were some guys on diyEcar that were talking about trying this, so I chimed in with my experience. (scroll about half way down).

EV air conditioning - Page 16 - DIY Electric Car Forums
__________________
ReVolt AZ testing thread:

http://ecomodder.com/forum/showthrea...ting-9325.html
  Reply With Quote
Old 08-29-2010, 02:48 PM   #3718 (permalink)
PaulH
 
MPaulHolmes's Avatar
 
Join Date: Feb 2008
Location: Maricopa, AZ (sort of. Actually outside of town)
Posts: 3,832

Michael's Electric Beetle - '71 Volkswagen Superbeetle 500000
Thanks: 1,362
Thanked 1,202 Times in 765 Posts
Oh, you were talking about Joe. Never mind what I just wrote. hahaha.
__________________
kits and boards

Last edited by MPaulHolmes; 08-29-2010 at 02:51 PM.. Reason: I'm an idiot. I got AC confused with AC
  Reply With Quote
Old 08-31-2010, 06:23 PM   #3719 (permalink)
EcoModding Lurker
 
Join Date: Dec 2009
Location: Long Beach Ca.
Posts: 50

E-car - '84 Toyota Corolla LE
Thanks: 3
Thanked 7 Times in 6 Posts
Hi guys, Paul I just crossed the 2,000 mile mark and still going great.

Looking at the pics from Joe.... ouch! Sure do like the serviceability, priceless.

In the past couple of weeks I've been making some adjustments to my controller to dial it in with my setup. I am checking to see it’s happy at the end of the day by telling it how good a job it is doing with a pat on the hood for good measure.
  Reply With Quote
Old 09-01-2010, 09:14 PM   #3720 (permalink)
Master EcoModder
 
Join Date: Nov 2008
Location: 18603, USA
Posts: 759

The Crimson Crawler - '04 Hyundai Elantra GLS
90 day: 36.71 mpg (US)
Thanks: 221
Thanked 60 Times in 45 Posts
The power board is the same no matter if you have the "regular" control board or the planned SR board, right?

  Reply With Quote
Reply  Post New Thread


Similar Threads
Thread Thread Starter Forum Replies Last Post
Paul and Sabrina's Cheap 3 Phase Inverter (AC Controller) with Field Oriented Control MPaulHolmes Fossil Fuel Free 3431 05-04-2022 06:43 PM
Paul & Sabrina's Cheap EV Conversion MPaulHolmes Fossil Fuel Free 542 11-12-2016 10:09 PM
Three Dirt Cheap DIY Electric Cars - Part 5 SVOboy EcoModder Blog Discussion 0 12-12-2008 05:10 PM


Powered by vBulletin® Version 3.8.11
Copyright ©2000 - 2024, vBulletin Solutions Inc.
Content Relevant URLs by vBSEO 3.5.2
All content copyright EcoModder.com