Go Back   EcoModder Forum > EcoModding > EcoModding Central
Register Now
 Register Now
 

Reply  Post New Thread
 
Submit Tools LinkBack Thread Tools
Old 01-23-2016, 11:59 PM   #91 (permalink)
EcoModding Apprentice
 
Join Date: Oct 2008
Location: Carson City, Nv
Posts: 113
Thanks: 5
Thanked 26 Times in 21 Posts
Moving Kubota oil filter

OK, when you remove the oil filter block off plate on the side of the engine, you will see that the casting has 2 chambers, dirty oil and clean oil. In the picture the filtered clean oil goes in the chambers outlined in yellow.

The dirty oil chamber is outlined in blue. There is also a pressure relief ball in case the filter gets so plugged up that there is no flow. The relief valve makes it stupid proof.

The cast aluminum blocking plate from the side of the engine can be transferred to directly cover the old oil filter location. It can go on without regard to placing the locating pin. Bolt it on and go. The bolt will also swap locations. That aluminum blocking plate is shown sitting above the new oil filter location for the picture. You can clearly see the chambers that need to be separated.

The large hole at the 8:30 position is connected to the hollow center bolt hole...filtered oil INTO the engine. I think the big hole at 11:00 is the connection to the other (original) oil filter and its no longer needed. I believe that's why my fancy plate does not have the hole drilled through.

And so..... the special plate has to be there to route the oil through the filter (and not bypass it). Clean filtered oil ONLY goes from the filter through the hollow center bolt. The new plate blocks off ALL of the ports under it as they are connected by a large passage about 1-1/2'' inside the front engine housing. That 8:30 hole is directly connected to the hollow oil filter bolt. That's why there are no holes in the new home made blocking plate on the clean oil side (left side)

All holes in the new blocking plate are for DIRTY oil to enter the filter. One hole is centered over the relief valve. The other 2 were conjoined.

The new blocking plate is probably 3/16'' steel and is held in by the hollow oil filter bolt. You will notice that the center has been relieved to clear the hex head. I recall chucking up the oil filter bolt and turning about half the width of the hex off. The reason....everything has to clear that hex when you tighten the oil filter.

I hope this helps!


Attached Thumbnails
Click image for larger version

Name:	20160123_181055.jpg
Views:	1040
Size:	126.2 KB
ID:	19517   Click image for larger version

Name:	20160123_184548.jpg
Views:	1034
Size:	128.6 KB
ID:	19518   Click image for larger version

Name:	20160123_184834.jpg
Views:	1063
Size:	125.6 KB
ID:	19519   Click image for larger version

Name:	PICT0780.JPG
Views:	1110
Size:	103.4 KB
ID:	19520  
  Reply With Quote
The Following 2 Users Say Thank You to kimer6 For This Useful Post:
MetroMPG (02-19-2016), planejob (01-24-2016)
Alt Today
Popular topics

Other popular topics in this forum...

   
Old 01-24-2016, 12:44 AM   #92 (permalink)
BeginnerModder
 
Join Date: Oct 2015
Location: Wylie, TX, USA
Posts: 102
Thanks: 30
Thanked 48 Times in 29 Posts
I need your address to send beer/scotch/strawberry milk... whatever you drink. That's the best damn explanation I could have ever received. Thank you very much!

(Also, it appears you went out, pulled the front plate off a kubota and snapped pics just to 'splain this to me. Wow, thanks!)

Rather than spin up a plate... I'm now considering just plugging the two "yellow" holes with a very shallow pipe plug (so as not to block the transfer passage that's back there an inch or so, as you described and I witnessed on my engine, too.)

THIS is progress.
  Reply With Quote
Old 01-24-2016, 07:02 PM   #93 (permalink)
BeginnerModder
 
Join Date: Oct 2015
Location: Wylie, TX, USA
Posts: 102
Thanks: 30
Thanked 48 Times in 29 Posts
Exciting update time:

I installed the block off plate onto the vertically oriented oil filter boss. I then took a piece of rubber hose and confirmed the (now) unused oil passage was, indeed, sealed off from the system. It's open on one end but it goes nowhere.

I then turned my attention to the horizontal boss, specifically the top port of the two "yellow" ports in Kimer's post above. That top yellow port needs to be blocked off, bottom yellow port doesn't go anywhere so no need to block it. Interestingly, the ports are different sizes. The top one that I am concerned with measures a snug 13mm (12.97mm on the perfectly calibrated highly technical Harbor Freight digital calipers). That's pretty much 1/2 inch. Hey, I just put new "freeze" casting plugs in my 1976 GMC Truck with a Chevy 350... I bought the full kit but only did the freeze/casting plugs. Typically the oil galley plugs don't rust out, see, no water. So I pulled out the ziplock bag of spare parts and shopped through the galley plugs. Perfect. I tapped a 1/2" oil galley plug into the Kubota engine with a 5lb sledge hammer and a little socket - it was truly a shadetree moment.

The threaded pipe coupling that the oil filter spins on covers the lip of the galley plug and also covers the lip of the pressure relief ball check valve. good to go! In the event it fails, it would push into the oil filter and be found at an oil change. A failure would bypass the filter, but would not starve the engine of oil. It was a solid fit. I'm confident with this choice.

I pressure washed the engine bay and got tons of "goop" out.
Before:
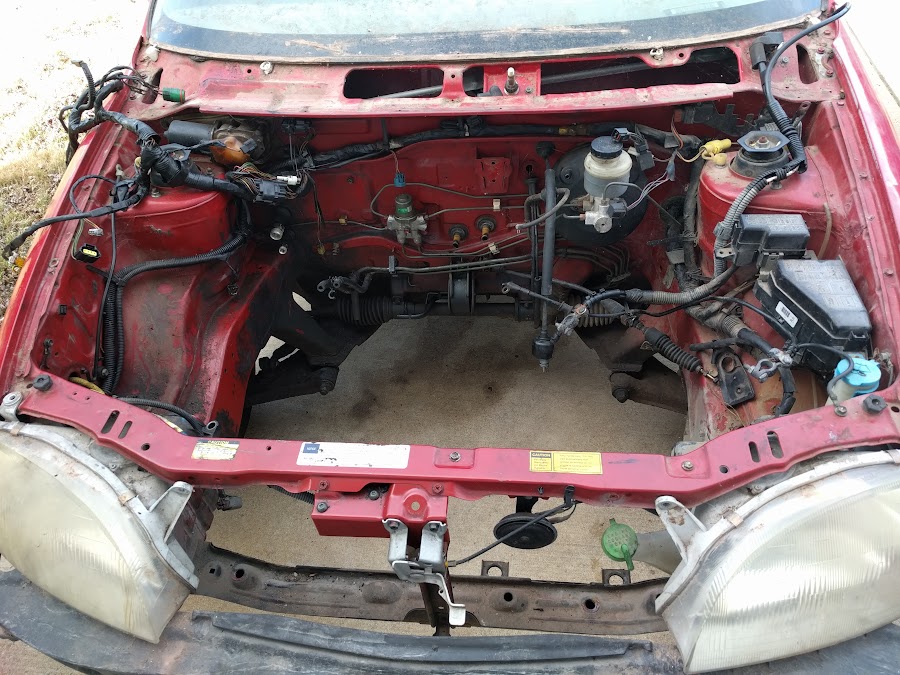
After:


I couldn't contain my excitement, even though I am not ready to install the engine I wanted to test fit it.


I didn't intentionally tease you by not including a picture of the engine hanging in the engine bay. It's just that the engine was hanging, I put it in, I took it out. I didn't snap photos. My bad, as the kids say.

Here are the custom "witness marks" of the crank shaft bolt. Unless, through a 'flash of genius' (or a suggestion from a third party), I come up with a better way I fully intend to drill a 3" hole in the uni-body at that point as relief for the crank bolt. yep, that means to change the fan belt I'll have to take the engine loose from the motor mounts.


Here's an interesting non-engine related WTF moment. I found these marks on the passenger side strut tower:


A previous owner installed these cute spring expander things in the struts on both sides and the passenger side one is getting into the strut tower - that had to make a racket! had to!
  Reply With Quote
Old 01-24-2016, 07:30 PM   #94 (permalink)
EcoModding Apprentice
 
Join Date: Oct 2008
Location: Carson City, Nv
Posts: 113
Thanks: 5
Thanked 26 Times in 21 Posts
Wow! Great progress. I like the Chevy freeze plug/oil gallery plug trick. Yes, that filter bolt holds the oil relief valve in nicely!

I need to know how you post full size pics as the attachment goodie only lets me do 135kb or smaller pics.

How can I give you my email address without letting the world (and ex WHYffe...she puts the WHY in wife) know?

I'm welding up a 40 gallon fuel tank base for a 7500 watt Onan diesel generator. It has a Yanmar 3 cylinder almost exactly like the Kubota. I was looking for more 6011 welding rod and stumbled across the front cover of a spare Kubota last night. I was jumping for joy knowing the pics would help you.

Thinking ahead...... No vacuum for power brakes. Do you know how hard it is to stop a Metro with no vacuum assist? I rigged the suction line of the Kubota fuel pump to the vacuum line to the brakes. It worked...somewhat.

I connected the fuel feed and return lines in my Metro using a tee fitting. The leg of the Tee got connected to the port on the Kubota injection pump. The tank fuel pump worked fine drinking diesel fuel.
  Reply With Quote
Old 01-24-2016, 08:28 PM   #95 (permalink)
BeginnerModder
 
Join Date: Oct 2015
Location: Wylie, TX, USA
Posts: 102
Thanks: 30
Thanked 48 Times in 29 Posts
Quote:
Originally Posted by kimer6 View Post

I need to know how you post full size pics as the attachment goodie only lets me do 135kb or smaller pics.
I'm uploading my pictures to a third party website. I'm cheap so I use free ones. Initially I was using photobucket, then Google Photos came installed on my new phone and it seems pretty easy. Once I upload them to the third party website I copy the picture's specific address (right click on the photo, copy address) and then back on the forum, I click on the mountain range button at the top and paste the copied address into the pop up box.
Quote:
Originally Posted by kimer6 View Post
Thinking ahead...... No vacuum for power brakes. Do you know how hard it is to stop a Metro with no vacuum assist? I rigged the suction line of the Kubota fuel pump to the vacuum line to the brakes. It worked...somewhat.
No idea how hard it is to stop a metro. Don't want to find out. I was studying on this little gadget: Amazon Link to Dorman vacuum pump.
  Reply With Quote
Old 01-24-2016, 11:10 PM   #96 (permalink)
BeginnerModder
 
Join Date: Oct 2015
Location: Wylie, TX, USA
Posts: 102
Thanks: 30
Thanked 48 Times in 29 Posts
Quote:
Originally Posted by kimer6 View Post
I connected the fuel feed and return lines in my Metro using a tee fitting. The leg of the Tee got connected to the port on the Kubota injection pump. The tank fuel pump worked fine drinking diesel fuel.
When I got my engine a few years ago it had a block off plate for the fuel pump. I couldn't help myself and I bought two on eBay - one with the priming lever and one without the priming lever. Right now I have the one with the priming lever installed and I was planning to use the mechanical pump in the Geo.

Block off Plate:


Spare mechanical fuel pump, no priming lever:


Installed pump, with priming lever:
  Reply With Quote
The Following User Says Thank You to planejob For This Useful Post:
Joggernot (01-25-2016)
Old 01-26-2016, 02:04 AM   #97 (permalink)
BeginnerModder
 
Join Date: Oct 2015
Location: Wylie, TX, USA
Posts: 102
Thanks: 30
Thanked 48 Times in 29 Posts
I drilled out a clearance hole in the right frame rail. There are no suspension parts mounted forward of this hole; the only heavy thing forward is the right-side engine mount.


The little Automatic transmission support bracket that is spot welded into the tunnel had to come off. It interferes with the manual transmission shift brace (two rods go from the shift to the transmission, one is a brace, one transfers motion.)

Here are the spare parts:


And...

Here it is, stuck in the hole. Everything indexes off of the rear mount because the other mounts change. When comparing a manual-transmission-car's left side mount to an auto-transmission-car's the mount is 50mm further rearward in the manual car. So I'm engineering that up. And the right side engine mount will be totally different... the only point that remains constant is the rear mount.
  Reply With Quote
The Following User Says Thank You to planejob For This Useful Post:
Joggernot (01-26-2016)
Old 01-26-2016, 02:32 AM   #98 (permalink)
EcoModding Apprentice
 
Join Date: Oct 2008
Location: Carson City, Nv
Posts: 113
Thanks: 5
Thanked 26 Times in 21 Posts
For whatever reason my Metro 5 speed was able to use both the rear trans mount plus the forward one on the driver's side. The axles were not touched. The crankshaft pulley had 1/2'' clearance to the frame, no need to cut the hole on mine.

The auto trans mount on yours may be in a different location. May be worth while to install the axles for the 5 speed and determine if the rear trans mount has to be moved.
Is the front trans mount off the 5 speed 3 cylinder?
  Reply With Quote
Old 01-26-2016, 01:36 PM   #99 (permalink)
BeginnerModder
 
Join Date: Oct 2015
Location: Wylie, TX, USA
Posts: 102
Thanks: 30
Thanked 48 Times in 29 Posts
Quote:
Originally Posted by kimer6 View Post
Is the front trans mount off the 5 speed 3 cylinder?
Yes. The front mount is from the manual. The issue is the mounting point on the frame rail is in a different location from manuals to auto. On the automatic they had to push the hole in the frame rail forward to make room for the bigger slush box.

So I either have to drill a new hole and weld in a blind nut because there is no hidden bolt there... Or I can add a spacer to use the same mount and simply expand it by the 50mm/2inches.

Some of the issues that I am working around are caused by the fact that the car was an auto AND a 4cylinder when it was born.

Was your car's front end sheet metal ever rebuilt?
  Reply With Quote
Old 01-29-2016, 11:06 PM   #100 (permalink)
BeginnerModder
 
Join Date: Oct 2015
Location: Wylie, TX, USA
Posts: 102
Thanks: 30
Thanked 48 Times in 29 Posts
Update time:

I decided on a mounting strategy for the side transmission mount. Initially I was going to get a 50mm thick piece of aluminum and use the stock bracket to mark out 3 holes and mate it this way. Instead, I found qty 3 x 50mm spacers that have a 22mm OD and a 9.8mm ID. I reamed them to fit a 10mm bolt.

The threads in the transmission are 10mmx1.25, so I ordered up some 80mm bolts to fit the new spacers that will be sandwiched between the stock mount and the transmission case.


50mm is the perfect length spacer. It puts the left side mount in the correct place, exactly. It allows the rear mount to slide in without binding.


The right engine mount is yet to be engineered.

As Kimer pointed out earlier, you have to do something with the thermostat housing because it points straight up, into the bottom of the hood. I decided to acquire a custom, sand cast, one off, bespoke thermostat housing. It's Kubota part number 1G253-73260. This piece turns the water outlet 90 degrees.


Once the mounts were in place it became apparent that my "measure with a micrometer, mark with a crayon, cut with an ax" method of locating the frame rail relief is a process that has lots of opportunity for improvement. I had to lower the relief by about 1".


  Reply With Quote
The Following User Says Thank You to planejob For This Useful Post:
Joggernot (01-30-2016)
Reply  Post New Thread


Powered by vBulletin® Version 3.8.11
Copyright ©2000 - 2024, vBulletin Solutions Inc.
Content Relevant URLs by vBSEO 3.5.2
All content copyright EcoModder.com