Go Back   EcoModder Forum > EcoModding > Aerodynamics
Register Now
 Register Now
 

Reply  Post New Thread
 
Submit Tools LinkBack Thread Tools
Old 07-05-2010, 10:43 PM   #41 (permalink)
Moderate your Moderation.
 
Join Date: Nov 2008
Location: Troy, Pa.
Posts: 8,919

Pasta - '96 Volkswagen Passat TDi
90 day: 45.22 mpg (US)
Thanks: 1,369
Thanked 430 Times in 353 Posts
Quote:
Originally Posted by cfg83 View Post
Christ -

Thanks. For my wheel cover fastneres, I think am close to what you are describing. I am going in the direction of T-Nuts on the inside of the faux plastic lug nuts :


I haven't posted it yet because I have been underwater with other @#$&@#* distractions.

CarloSW2
Exactly that picture. You can find them at hardware stores all over. I usually salvage them from old/worn/unable-to-be-saved furniture. Takes a screwdriver and a bit of patience, but they're pretty easy to remove.

__________________
"żʞɐǝɹɟ ɐ ǝɹ,noʎ uǝɥʍ 'ʇı ʇ,usı 'ʎlǝuol s,ʇı"

  Reply With Quote
Alt Today
Popular topics

Other popular topics in this forum...

   
Old 01-20-2011, 11:50 PM   #42 (permalink)
Grasshopper
 
alohaspirit's Avatar
 
Join Date: Feb 2009
Location: Hawaii
Posts: 964

Makai - '01 Toyota Echo 4D Auto
90 day: 34.45 mpg (US)

New Galaxy - '07 Toyota Prius
90 day: 42.15 mpg (US)
Thanks: 25
Thanked 30 Times in 25 Posts
Quote:
Originally Posted by cfg83 View Post
Hello -

Ok, I took my own advice and started a v2.0 wheel skirt. The problem was, the v1.0 skirts took maybe 15 minutes to take off but then it took at least an HOUR to put them on. This discouraged me because I would take them off before taking the car for service and then *leave* them off because it was too exhausting to reinstall them (mee lay-zee).

Now, I already had this idea of turning the outside of the skirt into a flush "trim piece" with holes :


I made a cover piece like this :


I used plastic pop-rivets, but I was fearful that they might hit the tire if I went over a pothole or something. Therefore I trimmed some of the rivets and used a plastic washer to reinforce them :


To demonstrate how little they stick in, I did this demo reverse-mount :
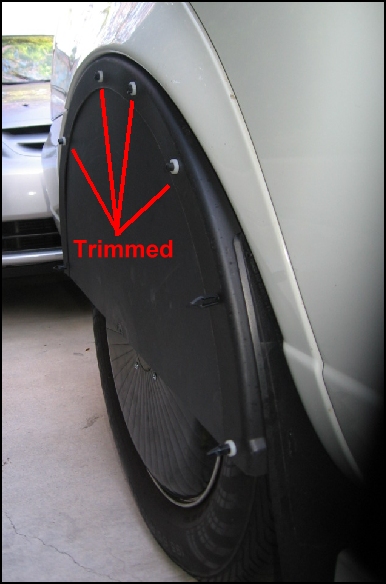


Once it is installed it looks like this :
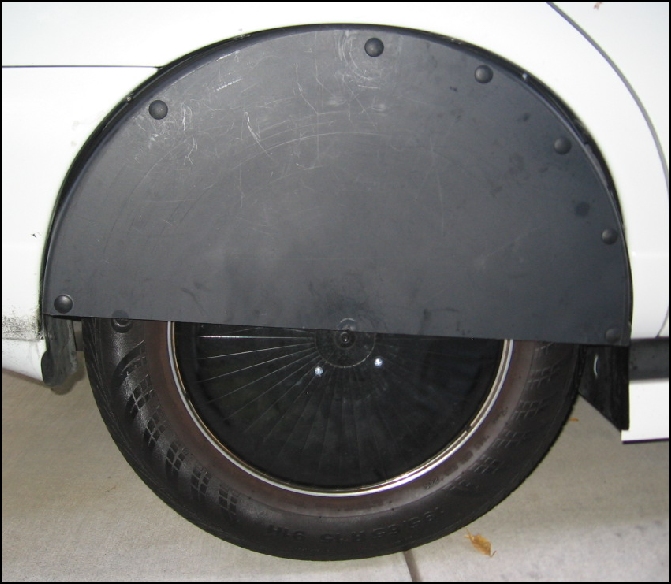


The number of rivets is not symmetric. The forward leading edge has two extra rivets to keep the wind from sneaking in and trying to open up the skirt.

Now, there was a problem that I predicted but didn't see for maybe two weeks. One morning on the freeway I heard a loud *BAM* like a rock had bounced up under my car or something. Once I was at my destination I realized that one of the wheel cover bolts had hit the skirt. Here is a view of the inside of the skirt :


The good news is that :

1 - The skirt was barely damaged, it looks normal on the outside.
2 - The wheel cover did not fail. It does have a 2" crack near one of the bolts, but it's otherwise fine. So fine, in fact, that I have left it on.

This makes me happy because the system "failed gracefully". It has also motivated me to look for a more flush wheel cover bolt system. This is the direction I am going :


And here is another comparison showing the old sticky-outy bolts and the new flush bolts + the skirt :


In addition, my cohort and I will be working on a trim piece to keep the lower edge of the skirt from *ever* doing this again.

I will publish the new wheel cover bolt installation system in another thread, but me too tired.

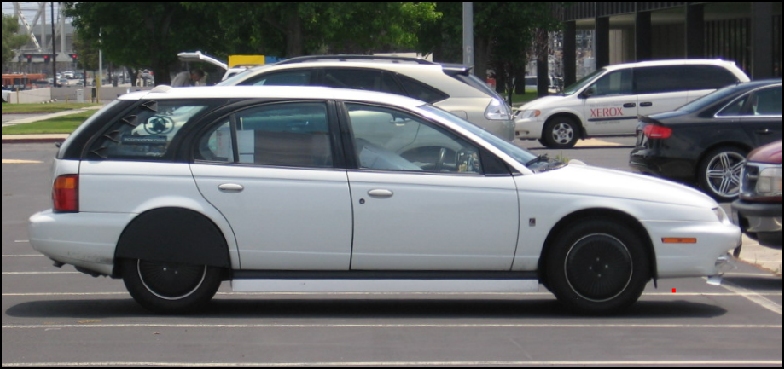
Here is the current look :


CarloSW2
Quote:
Originally Posted by cfg83 View Post
NachtRitter -


Yes, I retired v1.0 and bought two new pans. There is a 1" overlap of the pans. There is a little "belly button" of plastic at the dead center of the drain pan where I think the plastic was injected. My friend made that the center point and we nailed it down onto a board. Then we ran each pan through his band saw by turning it around that center point. That was the key to cutting it accurately. Otherwise it would have been agony to cut by hand.

I had pictures of the process, but I can't find them right now. Here is the picture of the overlapping pieces before I made the holes :

Apart :


Overlapping :


Also, I didn't have to retire v1.0. I could have just cut it and used it as the trim piece that you see. However, then the circular cut would have been more problematic (allthough still doable). Also, the covering doesn't have to be plastic, it could be metal. The trim piece is just the "base".

CarloSW2

this is great information

i hope to something similiar but i dont have a band saw
__________________
Past Present Future?
  Reply With Quote
Old 01-21-2011, 01:21 AM   #43 (permalink)
T-100 Road Warrior
 
BamZipPow's Avatar
 
Join Date: Apr 2008
Location: The Woodlands, TX
Posts: 1,921

BZP T-100 (2010) - '98 Toyota T-100 ext cab - 3.4L/auto SR5
Last 3: 24 mpg (US)

BZP T-100 (2011) - '98 Toyota T-100 ext cab - 3.4L/auto SR5
Last 3: 23.66 mpg (US)

BZP T-100 (2009) - '98 Toyota T-100 ext cab - 3.4L/auto SR5
Last 3: 19.01 mpg (US)

BZP T-100 (2012) - '98 Toyota T-100 ext cab - 3.4L/auto SR5
Last 3: 25.45 mpg (US)

BZP T-100 (2013) - '98 Toyota T-100 SR5
Last 3: 25.79 mpg (US)

BZP T-100 (2014) - '98 Toyota T-100 SR5
Last 3: 23.18 mpg (US)

BZP T-100 (2015) - '98 Toyota T-100 SR5
Last 3: 23.85 mpg (US)

BZP T-100 (2016) - '98 Toyota T-100 SR5
Last 3: 17.62 mpg (US)

BZP T-100 (2017) - '98 Toyota T-100 SR5
90 day: 20.78 mpg (US)

BZP T-100 (2018) - '98 Toyota T-100 SR5
90 day: 20.19 mpg (US)

BZP T-100 (2019) - '98 Toyota T-100 SR5

BZP T-100 (2020) - '98 Toyota T-100 SR5

2012 Scion iQ - '12 Scion iQ Base
Thanks: 3,502
Thanked 1,395 Times in 968 Posts
Send a message via ICQ to BamZipPow
Wink

Quote:
Originally Posted by alohaspirit View Post
this is great information

i hope to something similiar but i dont have a band saw
Then you need to be creative...

You could set up a center point (nail) and use a strip of wood with a hole at one end and a blade set into the other end. Set the pan onto the nail and place the wood strip over the nail withe the blade towards the pan. Make multiple passes to make a clean cut. Take yer time...yer not in a race.
  Reply With Quote
Old 01-21-2011, 01:50 AM   #44 (permalink)
NightKnight
 
NachtRitter's Avatar
 
Join Date: Dec 2008
Location: Placerville, CA
Posts: 1,595

Helga - '00 Volkswagen Jetta TDI
TEAM VW AUDI Group
Diesel
90 day: 54.39 mpg (US)

Mathilde - '99 Volkswagen Eurovan Camper
90 day: 16.87 mpg (US)
Thanks: 315
Thanked 314 Times in 187 Posts
Quote:
Originally Posted by BamZipPow View Post
Then you need to be creative...

You could set up a center point (nail) and use a strip of wood with a hole at one end and a blade set into the other end. Set the pan onto the nail and place the wood strip over the nail withe the blade towards the pan. Make multiple passes to make a clean cut. Take yer time...yer not in a race.
Pretty much what I did... Put a nail in the center, tied a string to the nail, then tied the other end of the string to a dremel tool... wasn't perfect but worked reasonably well.
  Reply With Quote
Old 02-19-2012, 10:25 PM   #45 (permalink)
EcoModding Apprentice
 
Join Date: Nov 2011
Posts: 116
Thanks: 0
Thanked 7 Times in 7 Posts
Quote:
Originally Posted by cfg83 View Post
Hello -

Ok, I took my own advice and started a v2.0 wheel skirt. The problem was, the v1.0 skirts took maybe 15 minutes to take off but then it took at least an HOUR to put them on. This discouraged me because I would take them off before taking the car for service and then *leave* them off because it was too exhausting to reinstall them (mee lay-zee).

Now, I already had this idea of turning the outside of the skirt into a flush "trim piece" with holes :


I made a cover piece like this :


I used plastic pop-rivets, but I was fearful that they might hit the tire if I went over a pothole or something. Therefore I trimmed some of the rivets and used a plastic washer to reinforce them :


To demonstrate how little they stick in, I did this demo reverse-mount :


Once it is installed it looks like this :


The number of rivets is not symmetric. The forward leading edge has two extra rivets to keep the wind from sneaking in and trying to open up the skirt.

Now, there was a problem that I predicted but didn't see for maybe two weeks. One morning on the freeway I heard a loud *BAM* like a rock had bounced up under my car or something. Once I was at my destination I realized that one of the wheel cover bolts had hit the skirt. Here is a view of the inside of the skirt :


The good news is that :

1 - The skirt was barely damaged, it looks normal on the outside.
2 - The wheel cover did not fail. It does have a 2" crack near one of the bolts, but it's otherwise fine. So fine, in fact, that I have left it on.

This makes me happy because the system "failed gracefully". It has also motivated me to look for a more flush wheel cover bolt system. This is the direction I am going :


And here is another comparison showing the old sticky-outy bolts and the new flush bolts + the skirt :


In addition, my cohort and I will be working on a trim piece to keep the lower edge of the skirt from *ever* doing this again.

I will publish the new wheel cover bolt installation system in another thread, but me too tired.

Here is the current look :


CarloSW2
Can anyone tell me what these wheel covers are made of and how they are mounted. They look absolutely wicked, not to steal someone's idea, but mimicry is the sincerest form of flattery.
  Reply With Quote
Old 02-20-2012, 03:08 AM   #46 (permalink)
Pokémoderator
 
cfg83's Avatar
 
Join Date: Dec 2007
Location: Southern California
Posts: 5,864

1999 Saturn SW2 - '99 Saturn SW2 Wagon
Team Saturn
90 day: 40.49 mpg (US)
Thanks: 439
Thanked 532 Times in 358 Posts
Sentraguy -

Quote:
Originally Posted by Sentraguy View Post
Can anyone tell me what these wheel covers are made of and how they are mounted. They look absolutely wicked, not to steal someone's idea, but mimicry is the sincerest form of flattery.
No, the goal is to copy and *improve* on each other's designs. Here is the thread :

http://ecomodder.com/forum/showthrea...isk-11838.html

The plastic was too brittle, so I moved on to pizza pans, but the mounting system was perfected and stayed the same. Zero failures in two years (knock on virtual wood).

CarloSW2

__________________

What's your EPA MPG? Go Here and find out!
American Solar Energy Society
  Reply With Quote
Reply  Post New Thread


Similar Threads
Thread Thread Starter Forum Replies Last Post
DIY: plastic rear wheel skirts (Geo Metro) MetroMPG DIY / How-to 57 06-12-2014 10:16 AM
Turning off electric hot water heater when not home? ZachUA Saving@Home 33 12-09-2009 10:51 AM
Rear wheel skirt / cover question pasadena_commut Aerodynamics 5 02-16-2009 05:50 AM
Dream Wheel Skirt. Am I Crazy? 2003protege Aerodynamics 7 05-21-2008 02:40 PM
Solar Water heater extragoode EcoModding Central 5 03-31-2008 01:54 AM


Powered by vBulletin® Version 3.8.11
Copyright ©2000 - 2025, vBulletin Solutions Inc.
Content Relevant URLs by vBSEO 3.5.2
All content copyright EcoModder.com