05-15-2009, 01:53 PM
|
#1 (permalink)
|
|
EcoModding Lurker
Join Date: Nov 2008
Location: Bristol, UK
Posts: 22
Thanks: 0
Thanked 4 Times in 2 Posts
|
Removing Hydraulic pump from forklift motor
Hi there!
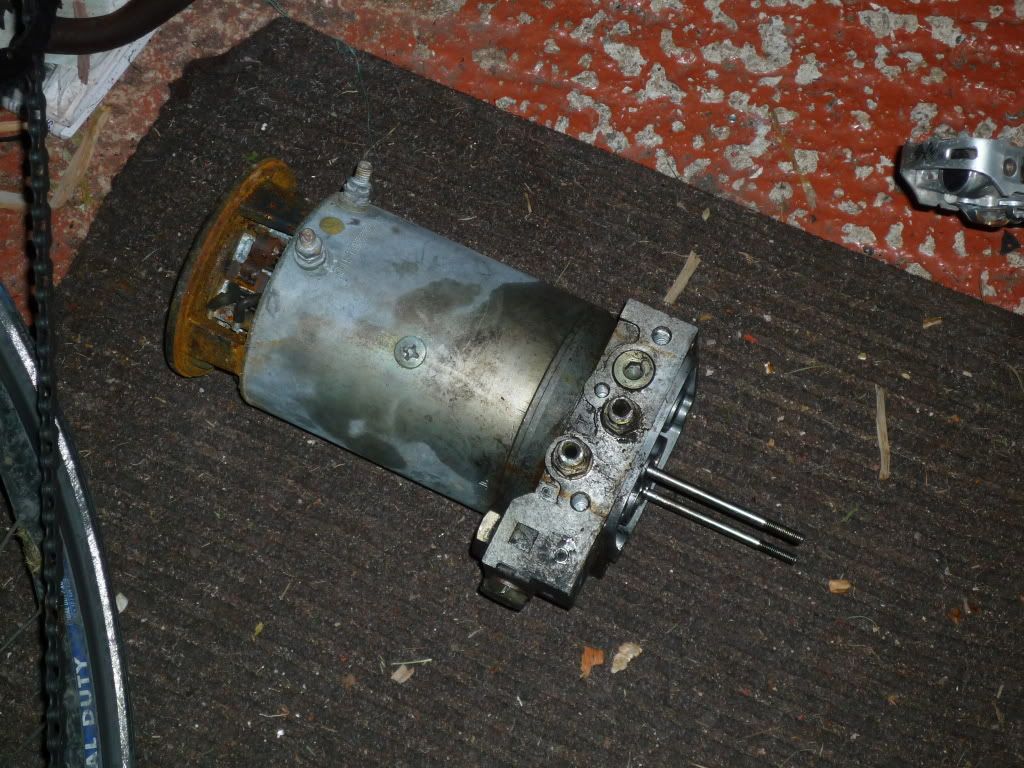
I recently came across the hydraulic pump motor from a forklift. As of 2 weeks before then, I'd had a small childrens quad bike (about 49cc aircooled. It went about 15mph and stalled at every opportunity, as well as the clutch spring going twice). Well, I pulled the motor out of the skip, stuck it in my rucksack (now stained orange with rusty water!  ) and carried all 25kg of it home (it gave me a bad back for 3 days). I plan to put it on the quad, stretch it, and add a sound system  It'll all be run off 4 car batteries, 2s2p.
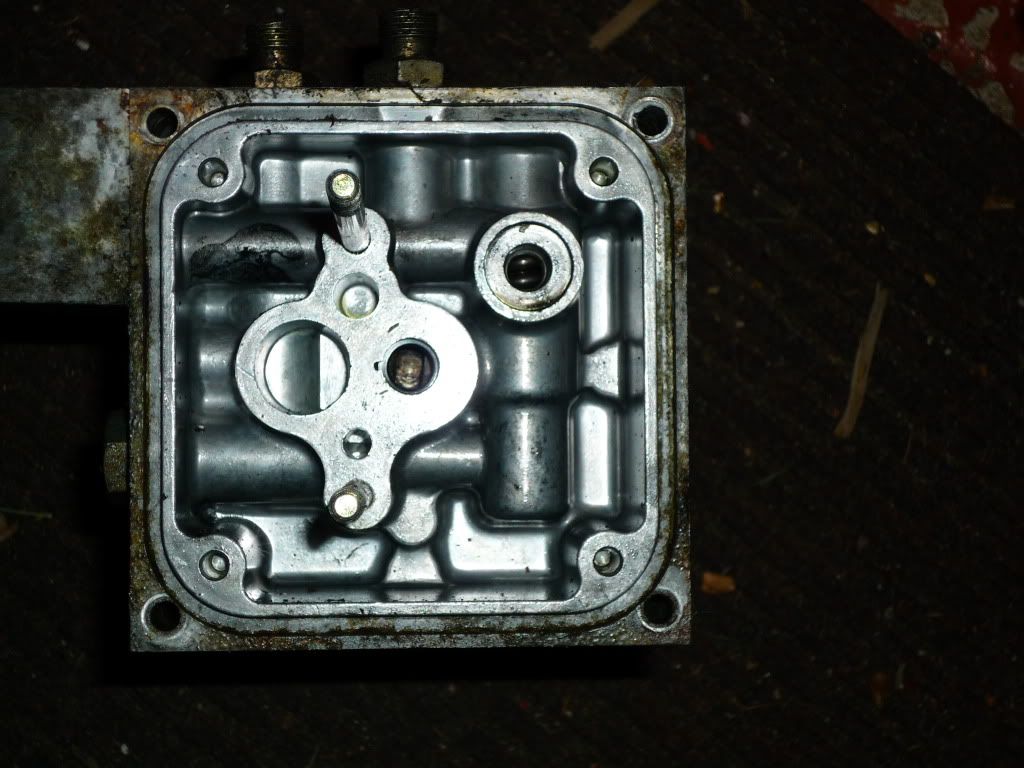
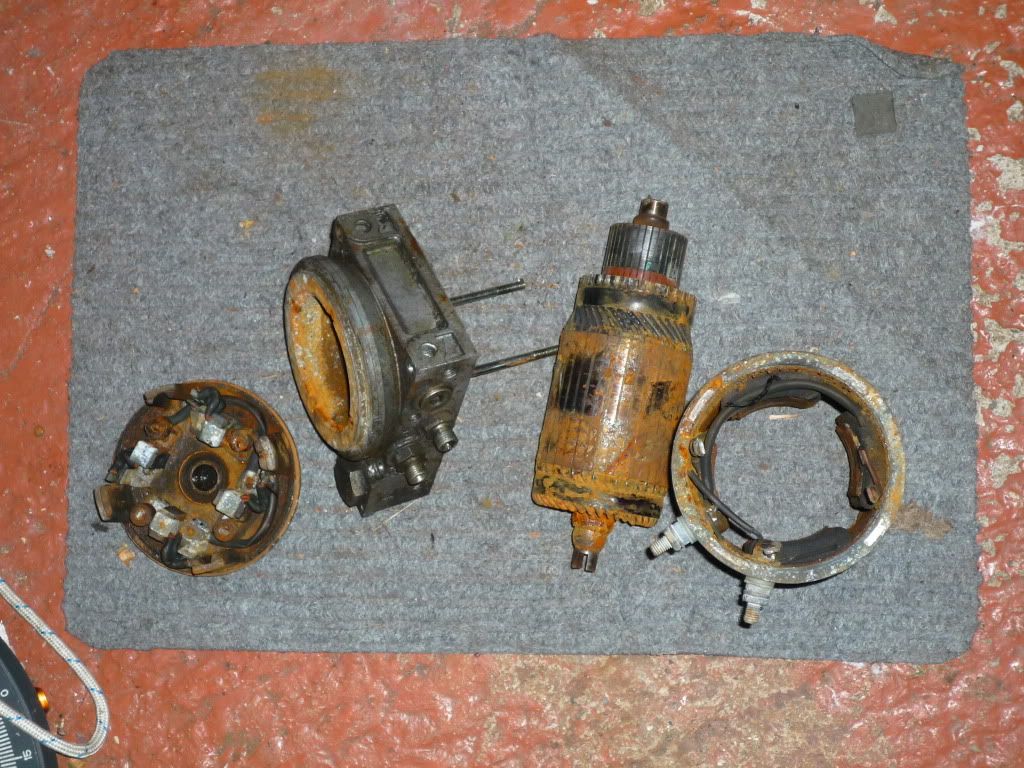
One problem. It came with a hydraulic pump on the end, and I cannot get if off for the life of me. the HUGE bolts are actually fittings for valves, and the only other 2 bolts I found that held it together didn't seem to do anything whatsoever. Does anyone recognise the motor? How do I get the pump off without resorting to the angle grinder?
Here are some pics
|
|
|

|
 Today Today
|
|
|
|
 Other popular topics in this forum...
|
|
|
|
|
05-16-2009, 01:55 PM
|
#2 (permalink)
|
|
EcoModding Lurker
Join Date: Feb 2009
Location: MO
Posts: 37
Thanks: 0
Thanked 3 Times in 2 Posts
|
It is extremely difficult to tell from these pictures, but it appears similar to a motor I disassembled several years ago. Take my suggestions with caution. I'm not 100% certain of any of my recollections.
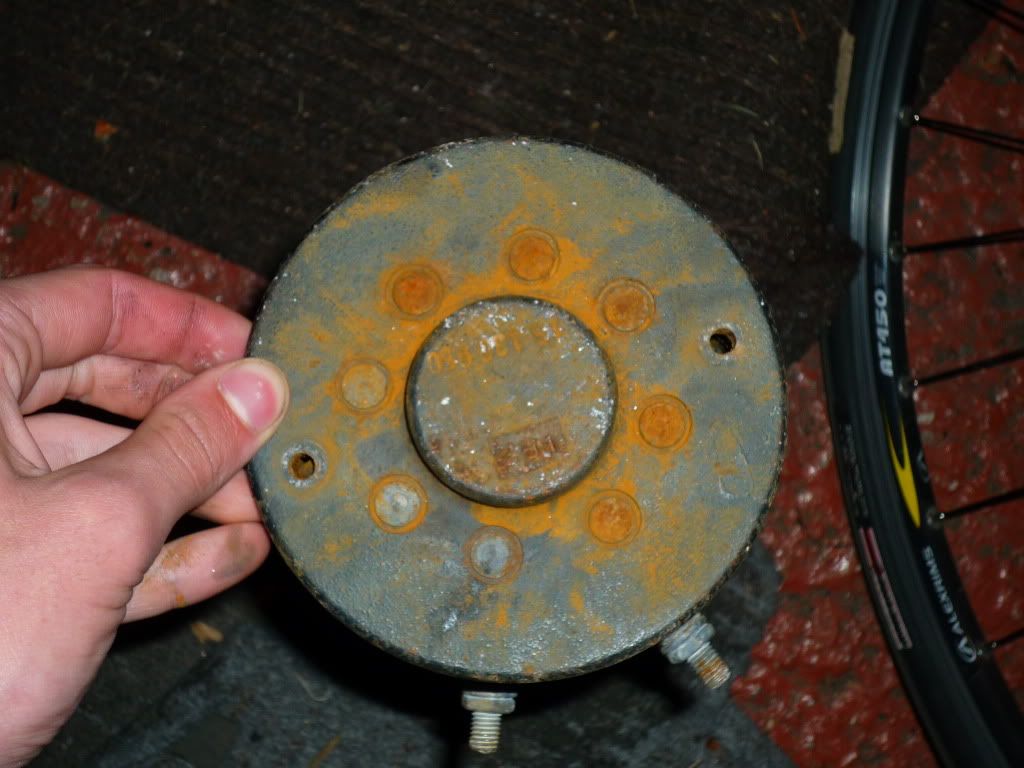
There may be some very long bolts that extend through the entire length of the cylindrical field housing. What is visible inside those two small holes in the end opposite the pump? Are there screw/bolt heads visible inside those holes?
I would also suggest checking to see if those long threaded rods extending out of the pump end can be turned. Do NOT try to grip them with pliers or vice grips. That will only damage them and make them more difficult to move. Try threading on two nuts onto one of the threaded ends and tighten them against each other. Then put a wrench on those nuts as if they are bolt heads and see if those threaded rods will come out. It's possible they are helping hold the pump on, but I'm not certain. Don't get too crazy and shear them off.
Finally, don't be afraid to use some firm, "persuasion" to verify that the pump isn't just rusted or stuck on after you are convinced you have removed all of the bolts that hold it in place. Sometimes a few sharp blows with a hammer and coal chisel will convince such items who is the boss. You can be pretty aggressive with these motors without causing serious damage, but use your own common sense to determine how much is too much force.
Best wishes on your project.
|
|
|
|
|
05-17-2009, 09:33 AM
|
#3 (permalink)
|
|
EcoModding Lurker
Join Date: Nov 2008
Location: Bristol, UK
Posts: 22
Thanks: 0
Thanked 4 Times in 2 Posts
|
Thanks for the reply!
There used to be bolts in those holes in the back. They weren't long enough to get to the pump. I'll have a go at those threaded rods though. There was originally another part of the pump on them, but I removed it.
And persuasion sounds like a good idea, I'll hit it a few times with a lump hammer. It's pretty rusted, maybe that's the problem.
|
|
|
|
|
05-17-2009, 04:04 PM
|
#4 (permalink)
|
|
EcoModding Lurker
Join Date: Nov 2008
Location: Bristol, UK
Posts: 22
Thanks: 0
Thanked 4 Times in 2 Posts
|
got it! I kicked it around the garage a bit, before hitting it with a hammer, and it just slid off! If I assume it was filled with rust AFTER it was left in the rain, it was thrown out because of ONE brush spring! I'll phone up the place I... err... nicked it from (they won't miss it, it was solid with rust. And it was in a skip.) and ask if they have any spare.
|
|
|
|
|
05-17-2009, 05:00 PM
|
#5 (permalink)
|
|
EcoModding Lurker
Join Date: Feb 2009
Location: MO
Posts: 37
Thanks: 0
Thanked 3 Times in 2 Posts
|
Congratulations.
Kicking it around the garage floor was going to be my next suggestion.
Feel free to post pics of the inside of the motor. Hopefully the pump does not also serve the function of the Drive End Motor Bearing.
Brushes, Brush Springs, and Holders are often available from local motor specialists.
|
|
|
|
|
05-17-2009, 06:29 PM
|
#6 (permalink)
|
|
Batman Junior
Join Date: Nov 2007
Location: 1000 Islands, Ontario, Canada
Posts: 22,541
Thanks: 4,085
Thanked 6,989 Times in 3,619 Posts
|
Glad you got it off. I was watching from the sidelines because I couldn't for the life of me remember how the pumps were attached to our motors.
|
|
|
|
|
05-18-2009, 05:59 AM
|
#7 (permalink)
|
|
EcoModding Lurker
Join Date: Nov 2008
Location: Bristol, UK
Posts: 22
Thanks: 0
Thanked 4 Times in 2 Posts
|
I'll get some pics when I get back from school. The end of the motor (with the bearing in) is bolted to the motor side of the pump with 3 allen bolts. I hope they're not rusted solid! AFAIK it'll go back together. I just need to find a way to attatch the sprocket now, and get hold of a relay powerful enough. I COULD weld the sprocket, but knowing me the ratio will be wrong, and it'll go 10mph and wheelie everywhere, and I'll have to get a bigger one 
The bearings are stiff, but smooth. They'll loosen up (I hope.) All I need is a brush spring. And would it make a difference if I skimmed the commutator on a lathe? I know it makes a difference on RC car motors, but I'm not so sure about larger, series wound ones.
Oh well, I haven't bought a single thing for this project so far, and a brush spring is nothing really. This is going to be mental on a tiny little quad. |
|
|
|
|
05-18-2009, 10:10 AM
|
#8 (permalink)
|
|
EcoModding Lurker
Join Date: Nov 2008
Location: Bristol, UK
Posts: 22
Thanks: 0
Thanked 4 Times in 2 Posts
|
Here are some pics:
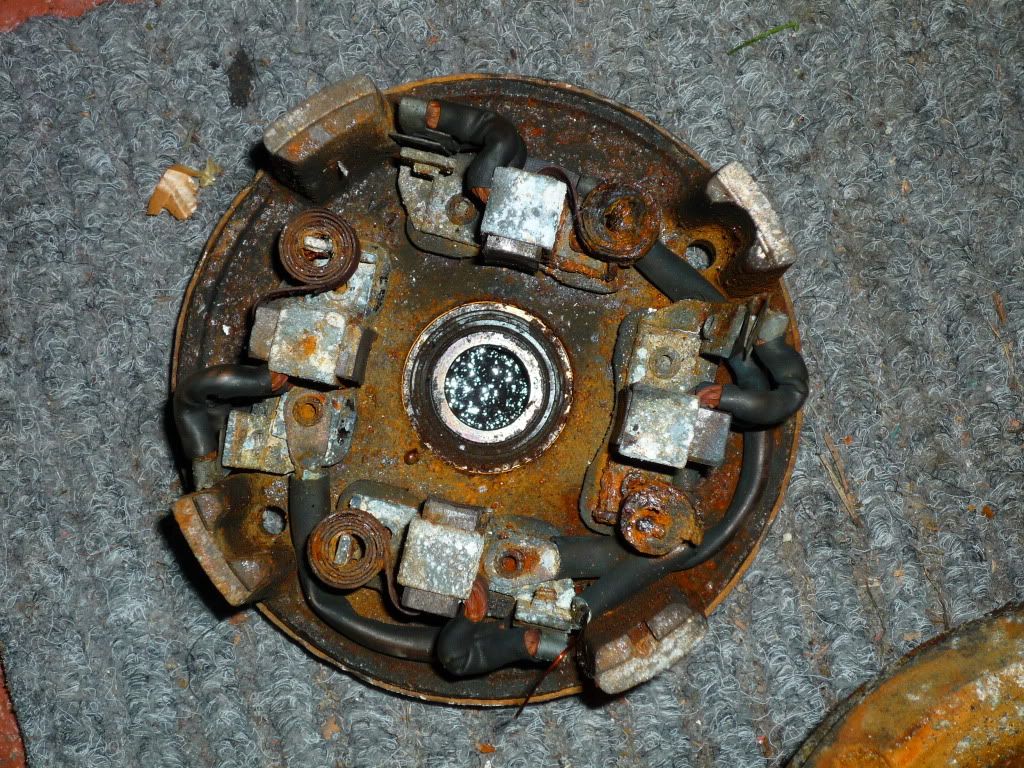
I noticed that the timing is advanced about 10 degrees from factory. How should I try get the rust off? A scouring pad and some bike cleaner? Or just attack it with a screwdriver until it falls off? |
|
|
|
|
05-18-2009, 12:02 PM
|
#9 (permalink)
|
|
EcoModding Lurker
Join Date: Feb 2009
Location: MO
Posts: 37
Thanks: 0
Thanked 3 Times in 2 Posts
|
It doesn't look as bad as many motors. Don't let the appearance scare you.
I have lots of comments. Many that you probably are not going to like, but at least I'm being honest.
You have very little drive end shaft to work with. This is probably the biggest potential problem. There is almost nothing there to attach a sprocket to. The good news is that the drive end shaft appears to be keyed, but it's difficult to tell from the picture. Extreme close up pictures of the drive end shaft might be helpful.
Are you saying that the drive end motor plate is bolted to the hydraulic pump and has the bearing in it? That's good.
If the Drive End motor plate is one piece permanently part of the hydraulic pump, that's probably a show-stopper for this motor for you. It would be a lot easier (and cheaper) to go try to find a better motor than to try to make your own drive end plate and seat a bearing in it. BE CERTAIN to solve this issue and fully understand how you are going to mate the drive end motor shaft with the rest of your drive train before investing ANOTHER PENNY in this motor.
As far as the rust goes. No problem. This motor is actually reasonably clean compared to some that get salvaged. A wire brush and sandpaper will go a long way. A good cleaning and a little paint will pretty it up. Just don't paint anything copper, and don't paint the brush holder area at all.
Inspect the armature windings very closely. Look for burned or melted windings. Anything like that is the kiss of death. Recycle the motor and find another one. You'll be glad you did. Trying to re-wind an armature is the punishment the devil gives to mass murders, rapists, and child molestors.
Inspect the field stator windings closely as well. Look for burned areas there too. Sometimes damaged field windings can be repaired if they aren't damaged too badly. Hopefully yours will only be dirty. You'll probably want to remove the bolts on the side of the field housing so that you can remove the field windings entirely. That will make it a lot easier to clean everything. That is also the best time to paint the housing your favorite glow-in-the-dark color.
I suggest 4 brand new brushes and 4 new springs, but only invest the money after you are positive that the rest of the motor is going to work for your application. You can probably clean the brushes and springs you have and get the motor to function for experimentation, but new brushes and springs are in order before you put this motor back into service.
You'll also want to confirm the direction the motor spins is correct for your application. You can drill new mounting holes for the CE plate to adjust the timing and/or change the direction that the motor spins. Again... before trying to do this, make sure you will be able to mount the DE to your drive train, and have confirmed the rest of the motor is okay first.
Spinning the commutator on a lathe wouldn't be a bad thing. It's hard to tell from this picture, but it looks to be in pretty good shape. Look at it closely. Look for burns or pits. Look for insulating mica trying to come out from between commutator contacts. (That would be the kiss of death for this motor too. Better to find another motor than to try to repair a commutator that's falling apart.)
You should also test the commutator electrically. Use an ohm meter to be certain that no adjacent commutator contacts are shorted together, but also make sure that the appropriate opposing contact has continutity. Shorts where they shouldn't be in the commutator/armature are the kiss of death. Send the motor to the recycler.
I hope this helps.
Have fun. If everything checks out, especially the armature/commutator, the DE plate/bearing, and you're positive you can mate the shaft to your drive train, this may be an excellent motor for you.
A little Love and Elbow Grease can change the appearance to make it look like new again.
|
|
|
|
|
05-18-2009, 01:03 PM
|
#10 (permalink)
|
|
EcoModding Lurker
Join Date: Nov 2008
Location: Bristol, UK
Posts: 22
Thanks: 0
Thanked 4 Times in 2 Posts
|
Quote:
Originally Posted by slurryguy

It doesn't look as bad as many motors. Don't let the appearance scare you.
I have lots of comments. Many that you probably are not going to like, but at least I'm being honest.
1.You have very little drive end shaft to work with. This is probably the biggest potential problem. There is almost nothing there to attach a sprocket to. The good news is that the drive end shaft appears to be keyed, but it's difficult to tell from the picture. Extreme close up pictures of the drive end shaft might be helpful.
2.Are you saying that the drive end motor plate is bolted to the hydraulic pump and has the bearing in it? That's good.
3.If the Drive End motor plate is one piece permanently part of the hydraulic pump, that's probably a show-stopper for this motor for you. It would be a lot easier (and cheaper) to go try to find a better motor than to try to make your own drive end plate and seat a bearing in it. BE CERTAIN to solve this issue and fully understand how you are going to mate the drive end motor shaft with the rest of your drive train before investing ANOTHER PENNY in this motor.
4.As far as the rust goes. No problem. This motor is actually reasonably clean compared to some that get salvaged. A wire brush and sandpaper will go a long way. A good cleaning and a little paint will pretty it up. Just don't paint anything copper, and don't paint the brush holder area at all.
5.Inspect the armature windings very closely. Look for burned or melted windings. Anything like that is the kiss of death. Recycle the motor and find another one. You'll be glad you did. Trying to re-wind an armature is the punishment the devil gives to mass murders, rapists, and child molestors.
6.Inspect the field stator windings closely as well. Look for burned areas there too. Sometimes damaged field windings can be repaired if they aren't damaged too badly. Hopefully yours will only be dirty. You'll probably want to remove the bolts on the side of the field housing so that you can remove the field windings entirely. That will make it a lot easier to clean everything. That is also the best time to paint the housing your favorite glow-in-the-dark color.
7.I suggest 4 brand new brushes and 4 new springs, but only invest the money after you are positive that the rest of the motor is going to work for your application. You can probably clean the brushes and springs you have and get the motor to function for experimentation, but new brushes and springs are in order before you put this motor back into service.
8.You'll also want to confirm the direction the motor spins is correct for your application. You can drill new mounting holes for the CE plate to adjust the timing and/or change the direction that the motor spins. Again... before trying to do this, make sure you will be able to mount the DE to your drive train, and have confirmed the rest of the motor is okay first.
9.Spinning the commutator on a lathe wouldn't be a bad thing. It's hard to tell from this picture, but it looks to be in pretty good shape. Look at it closely. Look for burns or pits. Look for insulating mica trying to come out from between commutator contacts. (That would be the kiss of death for this motor too. Better to find another motor than to try to repair a commutator that's falling apart.)
10.You should also test the commutator electrically. Use an ohm meter to be certain that no adjacent commutator contacts are shorted together, but also make sure that the appropriate opposing contact has continutity. Shorts where they shouldn't be in the commutator/armature are the kiss of death. Send the motor to the recycler.
I hope this helps.
Have fun. If everything checks out, especially the armature/commutator, the DE plate/bearing, and you're positive you can mate the shaft to your drive train, this may be an excellent motor for you.
A little Love and Elbow Grease can change the appearance to make it look like new again.
|
Wow, lots of input here I numbered your comments in the quote so I can reply easier.
1. Yeah, it's pretty short, but keyed. I can machine up a mount to go in there, whether it ends up true is another matter...
2. The endplate is separate to the pump. I'll try get it apart later, but it might need some persuasion.
4. I Probably won't paint it, but I'll dig out my wire brush. It should end up OK.
5. The armature looks fine so far, but I can see what looks like either an oil sheen, or heat discolouration on some of the metal parts of the armature. As it looks ok, I think I'm ok.
6. I can't get the bolts on the housing (that hold whatever bits replace the magnet on series wound motors) off. They're phillips headed, and no amount of persuasion got them off before, so I doubt they're going to loosen off now.
7. OK, the brushes and springs probably come in sets of 4 anyway, and in the RC world (albeit with tiny little motors) it's good practice to replace them once you skim the commutator. Would I have to press the brush with the broken spring to get it to run? Or will it limp round with 3 brushes working?
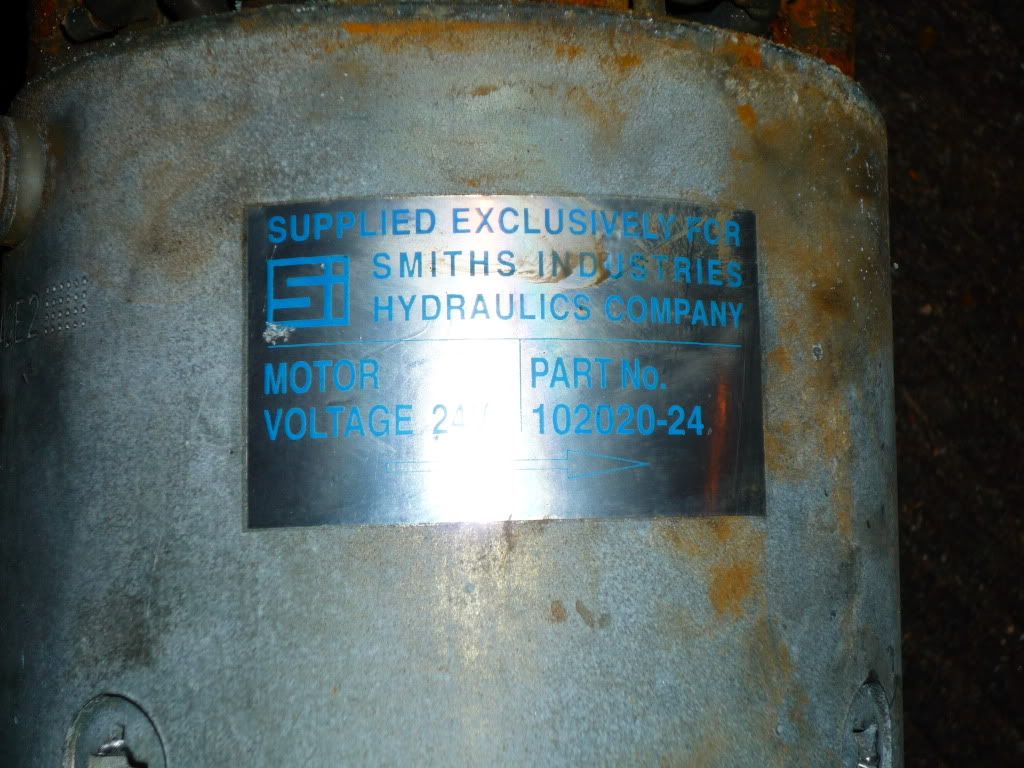
8. The direction is noted on the serial number plate, and my friend and I switched the quad axle round to compensate. Strangely this is a clockwise motor, I've never seen one before.
9+10. I'll find the volt meter and have a look at the commutator. AFAIK it's intact, and actually barely worn compared to the untouched copper ends of it. I think it was a chance failure that got this motor chucked in the skip.
Sorry I'm doing the 'bulletproof monk' answering your questions with more questions, but I don't know much about series wound motors.
Thanks
Joe
P.S when people refer to motors as '8 inch' or '9 inch', is this referring to the length or diameter of the motor?
|
|
|
|
|