 01-15-2010, 10:30 PM
|
#11 (permalink)
|
|
Pokémoderator
Join Date: Dec 2007
Location: Southern California
Posts: 5,864
Thanks: 439
Thanked 532 Times in 358 Posts
|
Hello -
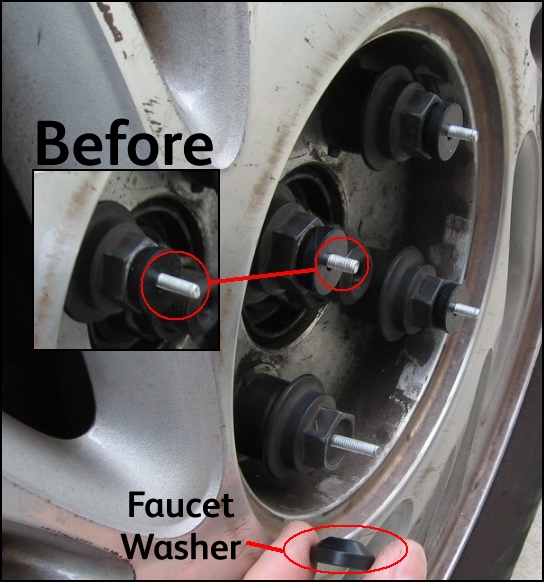
I swapped out the furniture rubber feet for faucet washers. The washers are about 1/8" shorter, but that made the bolt stick out more (as seen in the Before insert) :

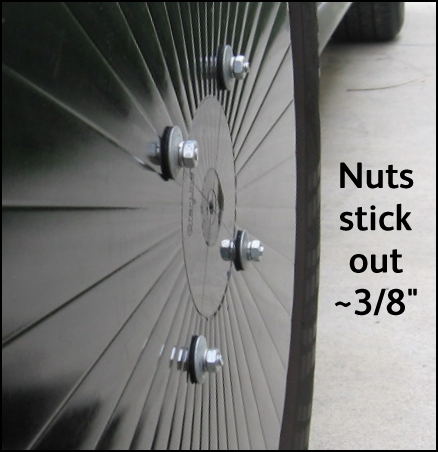
Sooooo, I just added a nut to the original bolt on the *inside* of the plastic lug nuts. This shortened the bolt. This got me back to my original situation, where the bolts stick out about 3/8" from the cover :

(You are seeing a washer with rubber backing, a lock washer, and the nut. The number of lines you see on this plate are 40 total. That is divisible by 4 and 5, so the lines can be used as guides for 4 and 5 lug wheels)
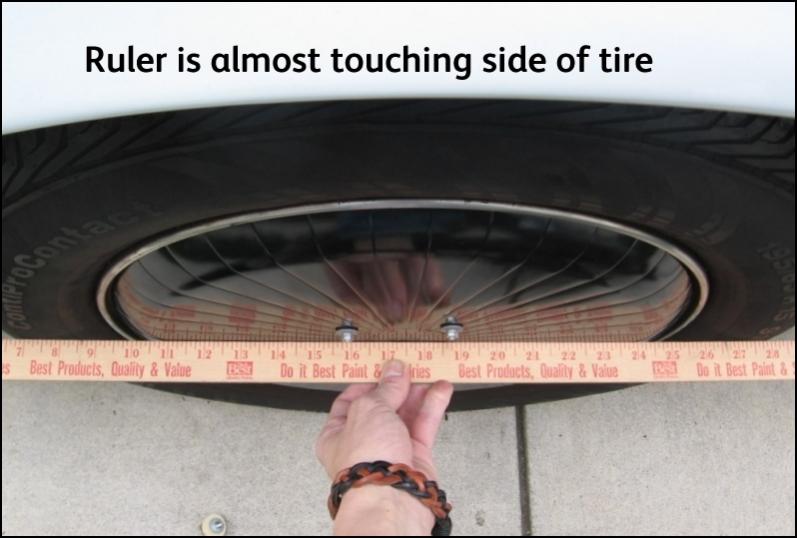
I am ok with the 3/8" protrusion because I reduced my total protrusion by 1/8". Now my wheel covers are pretty much flush to the tire :

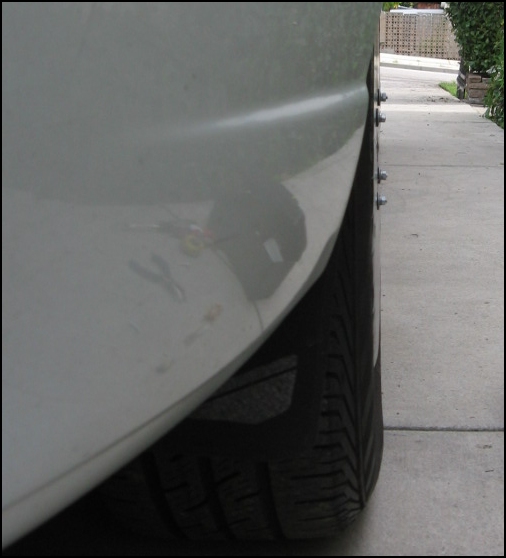
Here is a front view of same :

I think I can get the mounting bolts a little more flush, maybe 1/8" more. For the next wheel I think I will try a "reverse bolt" version where I put the nut *inside* the plastic lug nut. I just need to find the parts to keep the nut centered. I also need to make sure it doesn't spin around when I am attaching the bolt. Maybe all I need to do is blob some sillycone onto it. We'll see.
I did just realize that the plastic tray can't be UV resistant. That implies I should paint it with a UV protective spray paint. In that case I would probably paint it white so that it doesn't suffer the sun's harmful rays.
CarloSW2
|
|
|

|
|
The Following User Says Thank You to cfg83 For This Useful Post:
|
|
 Today Today
|
|
|
|
 Other popular topics in this forum...
|
|
|
|
 01-15-2010, 10:49 PM
|
#12 (permalink)
|
|
epic stock master
Join Date: Oct 2009
Location: US
Posts: 377
Thanks: 19
Thanked 17 Times in 15 Posts
|
hey there, cfg. i has a great idea. with no mention of caulk!
get rid of the lock washers.
now you can make the regular nuts lock nuts by placing them on end and pounding them with a hammer to make them slightly oblong.
i think that would look clean!
|
|
|

|
 01-15-2010, 10:59 PM
|
#13 (permalink)
|
|
Master EcoModder
Join Date: Oct 2009
Location: Red Deer, AB
Posts: 421
Thanks: 39
Thanked 96 Times in 69 Posts
|
That is a really nice look and a nice install. As for the nuts on the inside of the plastic lug nuts, if you have room, I think riv-nuts would be the way to go. You will have a threaded insert that will stay centered and can't spin. you can likely get the tool for under $20 and you'll find lots of other places to use it I'm sure.
|
|
|

|
 01-15-2010, 11:17 PM
|
#14 (permalink)
|
|
Pokémoderator
Join Date: Dec 2007
Location: Southern California
Posts: 5,864
Thanks: 439
Thanked 532 Times in 358 Posts
|
luvit -
Quote:
Originally Posted by luvit

hey there, cfg. i has a great idea. with no mention of caulk!
get rid of the lock washers.
now you can make the regular nuts lock nuts by placing them on end and pounding them with a hammer to make them slightly oblong.
i think that would look clean!
|
Yes, I have yet to exploit the infinite powers of caulk, except when it comes to fighting ant holes and sealing shower stalls.
When it comes to washers and nuts and bolts, I have a tendency to go manic crazy. There is actually a *second* lock washer inside the plastic lug nut, sandwiched between two other washers. When I see a bolt, it's like a metal shish-kabob to me. At least it's a cheap thrill.
CarloSW2
Last edited by cfg83; 01-16-2010 at 03:04 AM..
|
|
|

|
 01-15-2010, 11:28 PM
|
#15 (permalink)
|
|
Pokémoderator
Join Date: Dec 2007
Location: Southern California
Posts: 5,864
Thanks: 439
Thanked 532 Times in 358 Posts
|
puddleglum -
Quote:
Originally Posted by puddleglum

That is a really nice look and a nice install. As for the nuts on the inside of the plastic lug nuts, if you have room, I think riv-nuts would be the way to go. You will have a threaded insert that will stay centered and can't spin. you can likely get the tool for under $20 and you'll find lots of other places to use it I'm sure.
|
Ok, I see what you mean. Yes, riv-nuts are the way to go if I have the space. I am depending on the end of the plastic lug nut to be strong enough, so I deliberately made the holes snug and small. However, the riv-nut seems to create its own "washer" on the front and back of the mounting material, so maybe a larger starter hole wouldn't matter.
A riv-nut *appears* to be mounted on predominately flat panels. I would be attempting to install the riv-nut inside a small plastic cylinder.
I am wandering through here right now to see if I can find what I need :
Rivnut Fasteners & Bollhoff Installation Tools, Puller EZ & Custom Rivnuts - Blind Fasteners & Inserts - Bollhoff
Gotta do more homework ...
CarloSW2 |
|
|

|
 01-16-2010, 12:44 AM
|
#16 (permalink)
|
|
Getting BETTER Mileage
Join Date: Dec 2009
Location: Los Alamos, NM
Posts: 108
Thanks: 6
Thanked 18 Times in 8 Posts
|
This is by far the best install I've seen (sans people who can just get the snap on disks)
I've debated getting 3 more spares 15x6 and getting the snap on disks. However, I like my lightweight factory alloys.
I am rather confident that I can find those double threaded lug nuts. I'll have to do some checking around. I like the idea of having the nut set into the 2nd lug nut and then using maybe a panhead phillips machine thread bolt to make it as smooth as possible.
I was also thinking of drilling and tapping my stock wheel. Alot of racers do this to mount slicks (out at the edge, intentionally going into the bead of the tire). So I might be able to do it where the spoke meets the outer ring area. Drill / Tap use above mentioned bolts...
5 No 8 machine threads should be more than enough to hold on a flat plastic disc right?
__________________
- Greg
|
|
|

|
 01-16-2010, 01:15 AM
|
#17 (permalink)
|
|
Master EcoModder
Join Date: Oct 2009
Location: Red Deer, AB
Posts: 421
Thanks: 39
Thanked 96 Times in 69 Posts
|
cfg83,
the tool I have looks more like a pop riveter and may be easier to use. It isn't the actual riv-nut brand and I'm sure an auto parts store would have something similar. I think that if the flange of the insert fits in the plastic nut then it should clamp in just fine. Then you could use some pan head screws on the outside.
 |
|
|

|
 01-16-2010, 11:36 PM
|
#18 (permalink)
|
|
Driving the TurboWeasel
Join Date: Mar 2009
Location: Steuben County, NY
Posts: 459
Thanks: 14
Thanked 18 Times in 17 Posts
|
If you have steelies you can always go to China-Mart, get yourself some $15 wheel covers and tape the holes over with high-strength gray tape. Alternatively, you can cover the wheel covers with thin vinyl sheeting. The latter approach has worked on my car for the past 10 months. It's an improvement over bare steelies. Maybe not as good as taping up the holes so it's all flush...
Here's a shot of them back when they were installed:

__________________
2012 Chevrolet Cruze Eco 6MT
|
|
|

|
 01-17-2010, 01:50 AM
|
#19 (permalink)
|
|
Moderate your Moderation.
Join Date: Nov 2008
Location: Troy, Pa.
Posts: 8,919
Pasta - '96 Volkswagen Passat TDi 90 day: 45.22 mpg (US)
Thanks: 1,369
Thanked 430 Times in 353 Posts
|
Carlos -
Ironically, I haven't done any of those things with my van, and I'm getting around to taking it off the road now, due to damage from it being backed into. We'll see how everything works out w/ the insurance company as to whether or not I get to do any work on it, but I guess the plan is RWD, manual trans, diesel, aero mods, and 1/2 ton suspension for now.
I like the wheel covers, though. They're great, and the blackout is awesome, especially if you pay close attention to the little bit of silver that shows around the edges... it's a silver ring floating down the road!
I can't think of the name of the plastic stuff that my plates were made of, but it was crap... my Father knows what it is... you couldn't even stick it in the nuker-wave, or it would literally explode into a few pieces, but I think those trays are made of a similar material, by the look.
How about just using some plastic epoxy and filling the plastic nut's hex head, then drilling and threading the hardened plastic?
That would allow you to use normal pan-head or machine screws, which could be put in and removed with a simple screwdriver (or dime) and would sit mostly flush.
BTW - your wheel pattern is 100mm, it's metric.
Looking forward to seeing how they turn out, and where it leads!
__________________
"żʞɐǝɹɟ ɐ ǝɹ,noʎ uǝɥʍ 'ʇı ʇ,usı 'ʎlǝuol s,ʇı"

|
|
|

|
 01-17-2010, 03:23 AM
|
#20 (permalink)
|
|
Pokémoderator
Join Date: Dec 2007
Location: Southern California
Posts: 5,864
Thanks: 439
Thanked 532 Times in 358 Posts
|
Christ -
I was thinking of epoxying a long nut into the inside of the plastic lug nut in order to try to keep the threads "in place" :

Here are other bolts with edges that may just "lock themselves" into position :
 Square Weld Nut
 Spring Nut
 Cage Nut
Found these pictures here :
Nuts Detail - Advance Bolts & Fasteners Sdn Bhd
If you keep staring, the world is a giant Lego bin,  !
CarloSW2
|
|
|

|
|