Go Back   EcoModder Forum > EcoModding > Aerodynamics
Register Now
 Register Now
 

Reply  Post New Thread
 
Submit Tools LinkBack Thread Tools
Old 07-26-2012, 02:52 PM   #61 (permalink)
EcoModding Lurker
 
Prophecy99's Avatar
 
Join Date: Apr 2012
Location: PA
Posts: 91

Maxima - '02 Nissan Maxima GLE
Thanks: 2
Thanked 20 Times in 14 Posts
thanks for the amazing thread and pictures Mcrews.

I have a 2002 Nissan Maxima, so I will be able to approach my underbody paneling very similar. Much appreciated! I actually just picked up 2 sheets of black coroplast and am ready to get to it.

I had a few questions.

-What were the zip ties in the front used for? to attach the angle to a factory bar of some sort?

-The black "duct" tape you used? what exactly was it?

-How were the fairings held up? Did you just mount a piece of coroplast perpendicular to the main panel and taped away? If so do you trust that tape lasting over time? I definitely like the taping it makes it look a lot cleaner. to clear over any rough edges etc.

- When you overlap the coroplast onto the edges of the factory bumper (outside edges) I noticed you don't have a lot of screws, Do you let the majority of the overlap just rest there and get a screw on either end? I saw more screws on the alum angles and maybe just one or two on the ends of the factory bumper where it over laps. I like that because I don't want to have to drill many holes into the factor bumper even if it is underneath.

- When you drill into the existing underbody to mount the new angles (specificially the spare tire trunk area) did you take any precautions? I am concerned about creating a leak in the trunk etc. Are there nicer areas than others that you found to attach to?

-Last but not least, when you revised the rear panel and folded the coroplast around the axle, did you mount the top of folded edge to anything? In otherwords whats holding it in its bent form at the top. I have the same solid rear axle beam that I have to go around.

Thanks for any info! Very nice work, and posting all the pics and information is so appreciated.

  Reply With Quote
Alt Today
Popular topics

Other popular topics in this forum...

   
Old 07-26-2012, 05:09 PM   #62 (permalink)
Master EcoModder
 
mcrews's Avatar
 
Join Date: Oct 2009
Location: Texas
Posts: 3,523

The Q Sold - '02 Infiniti Q45 Sport
90 day: 23.08 mpg (US)

blackie - '14 nissan altima sv
Thanks: 2,203
Thanked 663 Times in 478 Posts
Quote:
Originally Posted by Prophecy99 View Post
thanks for the amazing thread and pictures Mcrews.

I have a 2002 Nissan Maxima, so I will be able to approach my underbody paneling very similar. Much appreciated! I actually just picked up 2 sheets of black coroplast and am ready to get to it.

I had a few questions.

-What were the zip ties in the front used for? to attach the angle to a factory bar of some sort?.
THe is a solid round bar that runs across the front. It's not the sway bar. It is welded at each end to part of the suspenion frame. It was at a great spot to end the front bellypan.

Quote:
Originally Posted by Prophecy99 View Post
-The black "duct" tape you used? what exactly was it? .
I was using gorilla tape. Plan on retapping every 12k? I avg 40 k a yr so it's hard to judge how often I retape.....maybe twice a yr.

Quote:
Originally Posted by Prophecy99 View Post
-How were the fairings held up? Did you just mount a piece of coroplast perpendicular to the main panel and taped away? If so do you trust that tape lasting over time? I definitely like the taping it makes it look a lot cleaner. to clear over any rough edges etc.
The first fairings(in front of the tires right?) were the factory ones fronm the original factory bellypan. then made a set by folding coroplast into right angle triangles. I glued and taped those on. the factory ones where bolted on


Quote:
Originally Posted by Prophecy99 View Post
- When you overlap the coroplast onto the edges of the factory bumper (outside edges) I noticed you don't have a lot of screws, Do you let the majority of the overlap just rest there and get a screw on either end?.
yes exactly! I made sure that the coroplast went far enough forward so it sat there.
Quote:
Originally Posted by Prophecy99 View Post
les and maybe just one or two on the ends of the factory bumper where it over laps. I like that because I don't want to have to drill many holes into the factor bumper even if it is underneath..
Quote:
Originally Posted by Prophecy99 View Post
- When you drill into the existing underbody to mount the new angles (specificially the spare tire trunk area) did you take any precautions? .
YEAH!!!! TKE OUT THE SPARE!!!!!!!!! lol put the drill bit right thru the sidewall

Quote:
Originally Posted by Prophecy99 View Post
I am concerned about creating a leak in the trunk etc. Are there nicer areas than others that you found to attach to?

-Last but not least, when you revised the rear panel and folded the coroplast around the axle, did you mount the top of folded edge to anything? In otherwords whats holding it in its bent form at the top. I have the same solid rear axle beam that I have to go around.
I was able to 'wedge' it up there and it has held. there is 'stuff' up there. cant remember exactly but it has held


Quote:
Originally Posted by Prophecy99 View Post
Thanks for any info! Very nice work, and posting all the pics and information is so appreciated.
__________________
MetroMPG: "Get the MPG gauge - it turns driving into a fuel & money saving game."

ECO MODS PERFORMED:
First: ScangaugeII
http://ecomodder.com/forum/showthrea...eii-23306.html

Second: Grille Block
http://ecomodder.com/forum/showthrea...e-10912-2.html

Third: Full underbelly pan
http://ecomodder.com/forum/showthrea...q45-11402.html

Fourth: rear skirts and 30.4mpg on trip!
http://ecomodder.com/forum/showthrea...tml#post247938
  Reply With Quote
The Following User Says Thank You to mcrews For This Useful Post:
aerohead (08-06-2012)
Old 07-26-2012, 05:21 PM   #63 (permalink)
Master EcoModder
 
mcrews's Avatar
 
Join Date: Oct 2009
Location: Texas
Posts: 3,523

The Q Sold - '02 Infiniti Q45 Sport
90 day: 23.08 mpg (US)

blackie - '14 nissan altima sv
Thanks: 2,203
Thanked 663 Times in 478 Posts
Prophecy asked some great questions.
And I wanted to add some additional general thoughts since I have been at this for about 100k miles.
1. You cant imagine the effect that air has on a surface at 50+ miles per hour.
2. It can peal back gorrilla tape if you dont make SURE the edges are pressed down
3. It can blow a belly pan completely out and off without some bracing.
4. I try to done the minimal amount and then test run. Take tape and knife and zip ties. You'll need um to salvage enough to get back home.
__________________
MetroMPG: "Get the MPG gauge - it turns driving into a fuel & money saving game."

ECO MODS PERFORMED:
First: ScangaugeII
http://ecomodder.com/forum/showthrea...eii-23306.html

Second: Grille Block
http://ecomodder.com/forum/showthrea...e-10912-2.html

Third: Full underbelly pan
http://ecomodder.com/forum/showthrea...q45-11402.html

Fourth: rear skirts and 30.4mpg on trip!
http://ecomodder.com/forum/showthrea...tml#post247938
  Reply With Quote
The Following 2 Users Say Thank You to mcrews For This Useful Post:
aerohead (07-26-2012), jime57 (07-28-2012)
Old 07-28-2012, 09:48 AM   #64 (permalink)
Master EcoModder
 
Join Date: Oct 2008
Location: Mid-Atlantic
Posts: 491

OurInsight - '06 Honda Insight
Thanks: 170
Thanked 69 Times in 44 Posts
Read through your entire thread. I had many of the same issues with the Insight. Missing support points, exhaust pipes and mufflers, attachment devices - we all face a lot of common problems. Nice job.
  Reply With Quote
The Following User Says Thank You to jime57 For This Useful Post:
mcrews (07-28-2012)
Old 08-05-2012, 07:06 PM   #65 (permalink)
Master EcoModder
 
mcrews's Avatar
 
Join Date: Oct 2009
Location: Texas
Posts: 3,523

The Q Sold - '02 Infiniti Q45 Sport
90 day: 23.08 mpg (US)

blackie - '14 nissan altima sv
Thanks: 2,203
Thanked 663 Times in 478 Posts
Front Belly Pan 4.0
May 2012 - UPDATE

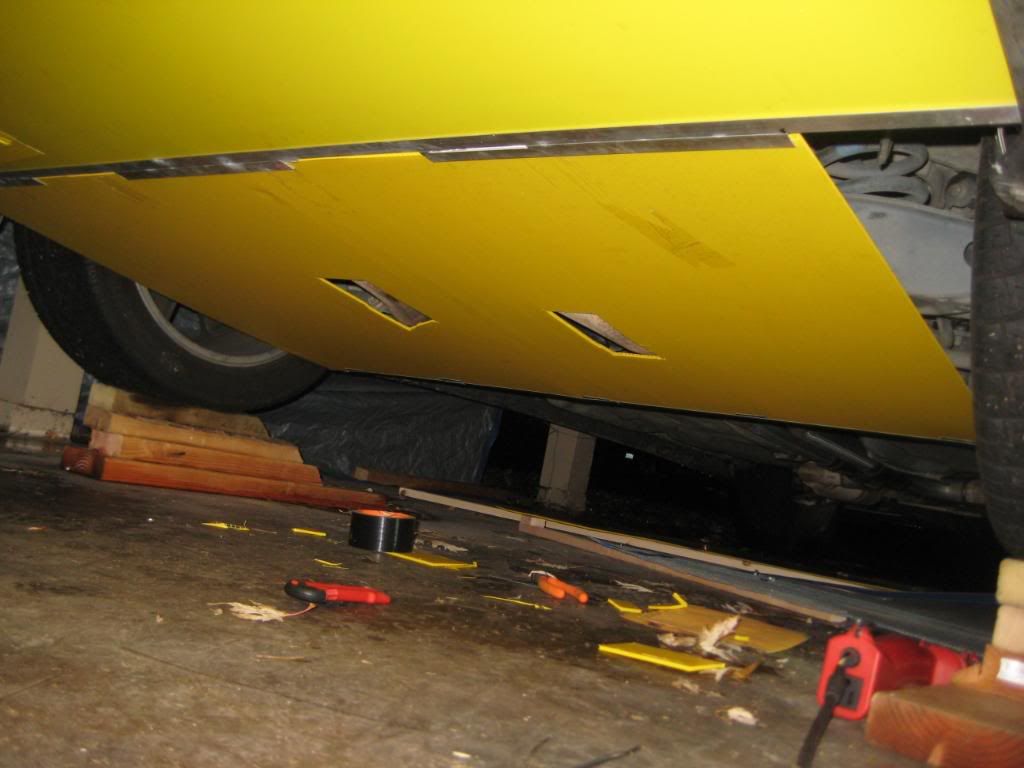
I now have 265,000 on THE BEAST. I had a small front end accident which smashed up the IMPUL front lower grill. it also tweaked the underbelly pan.

so....

Here is my model 4.0!
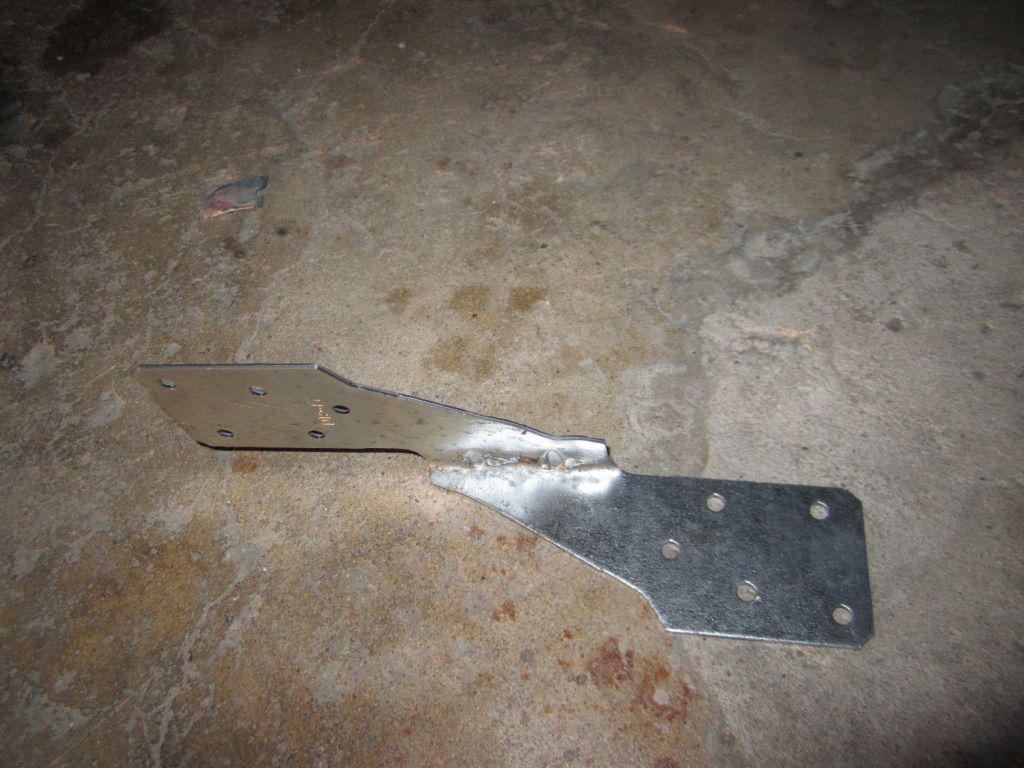
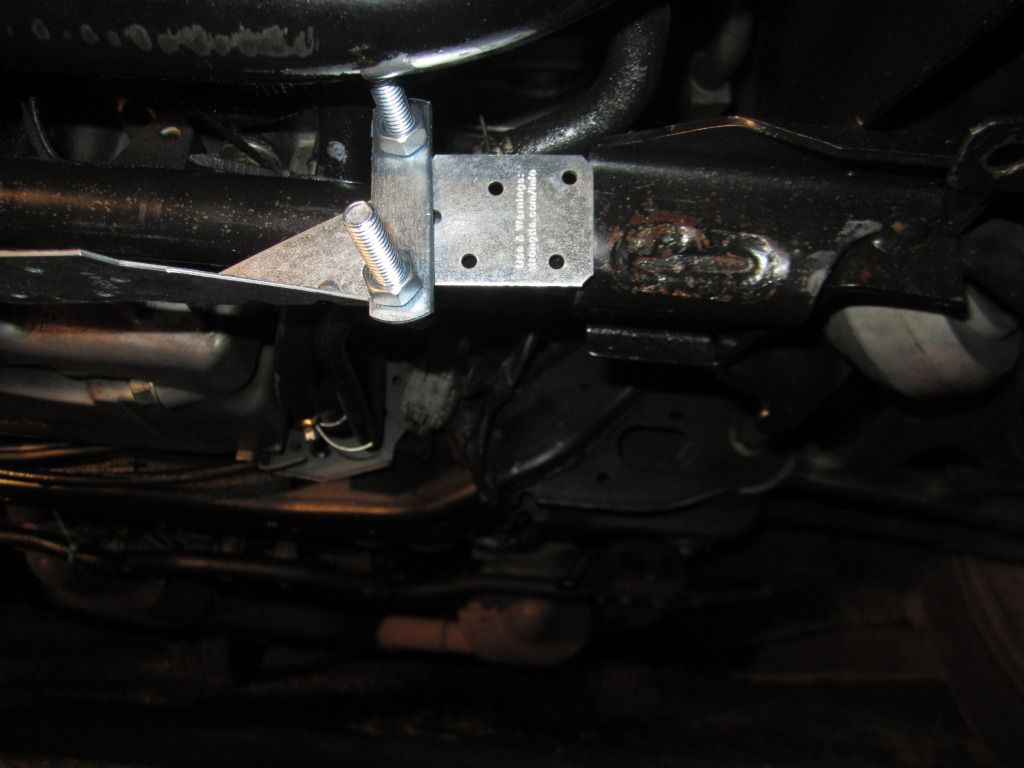
1. I found a very cool metal brace over in lumber hardware at Loew's:


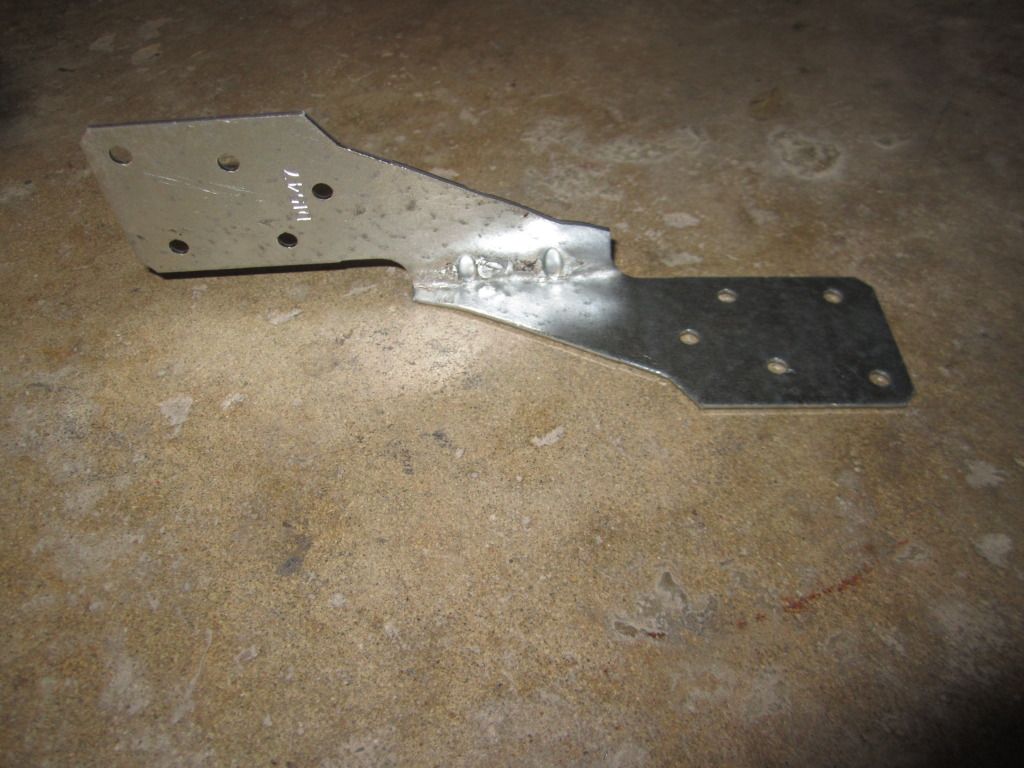
I think that it could help alot of us as we are looking for mounting points. It's very rigid and has a decent size mounting point


as you know, I have a straight round bar that is attached to the front suspension that I use to mount the rear of the coroplast.
I took the 2 braces and mounted tem w/ u-bolt.


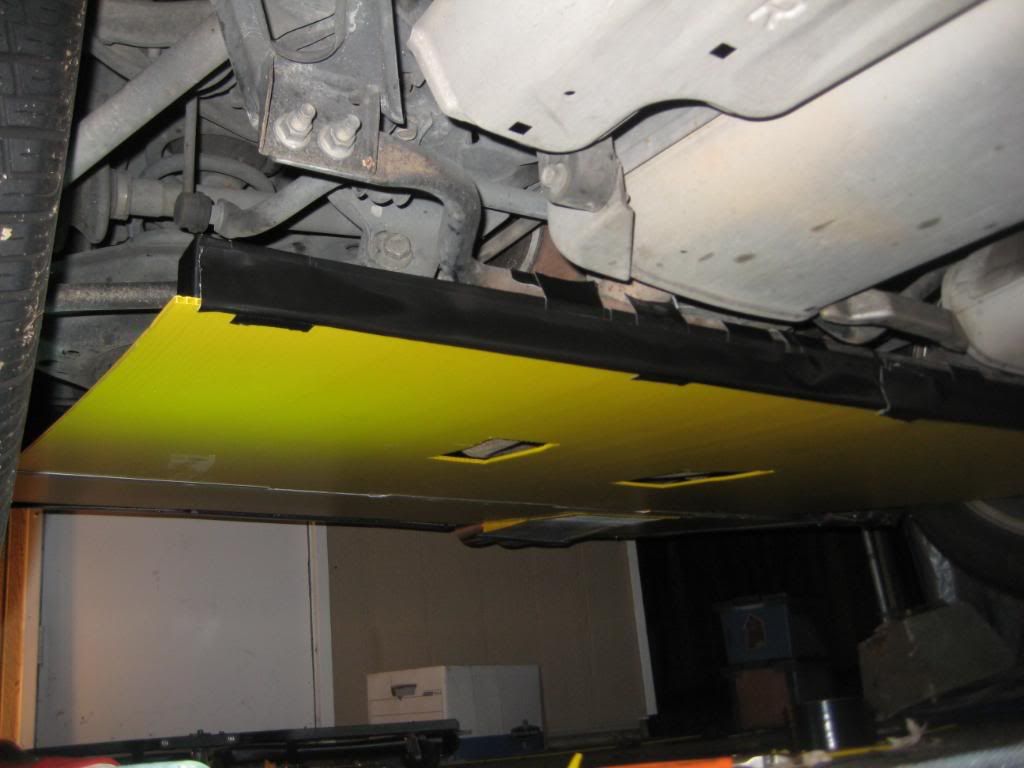
Now I used an alluminuum angle bar last time. This time I found an alluminuum channel the the coroplast fits into snuggly when folded over.


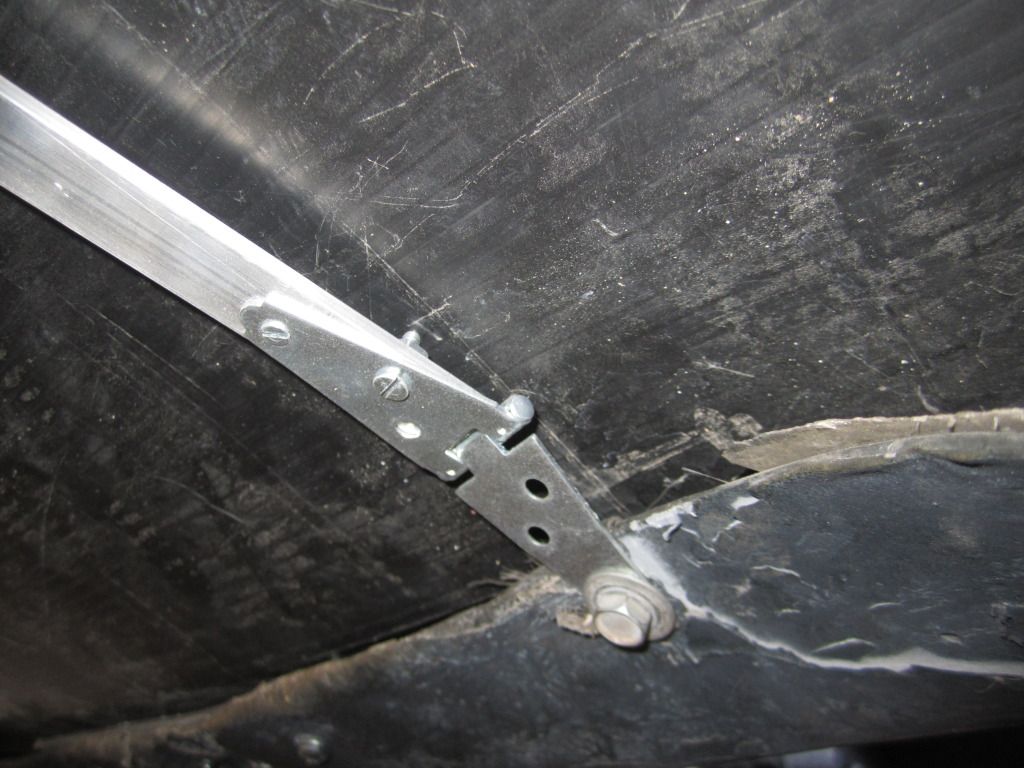
Instead of using one long brace up the middle, I used two. I used the flat part of the brace as a seat for the brace from the bumper.


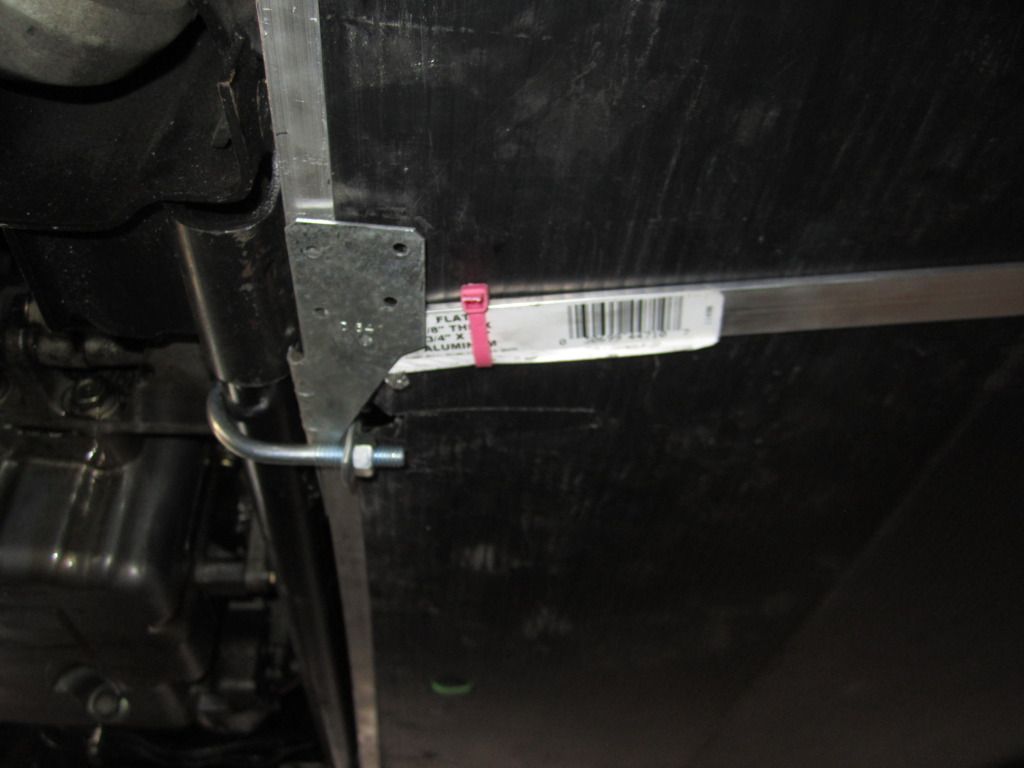
here is the next cool part.......used a small hinge to mount the brace to the bumper!!!!!


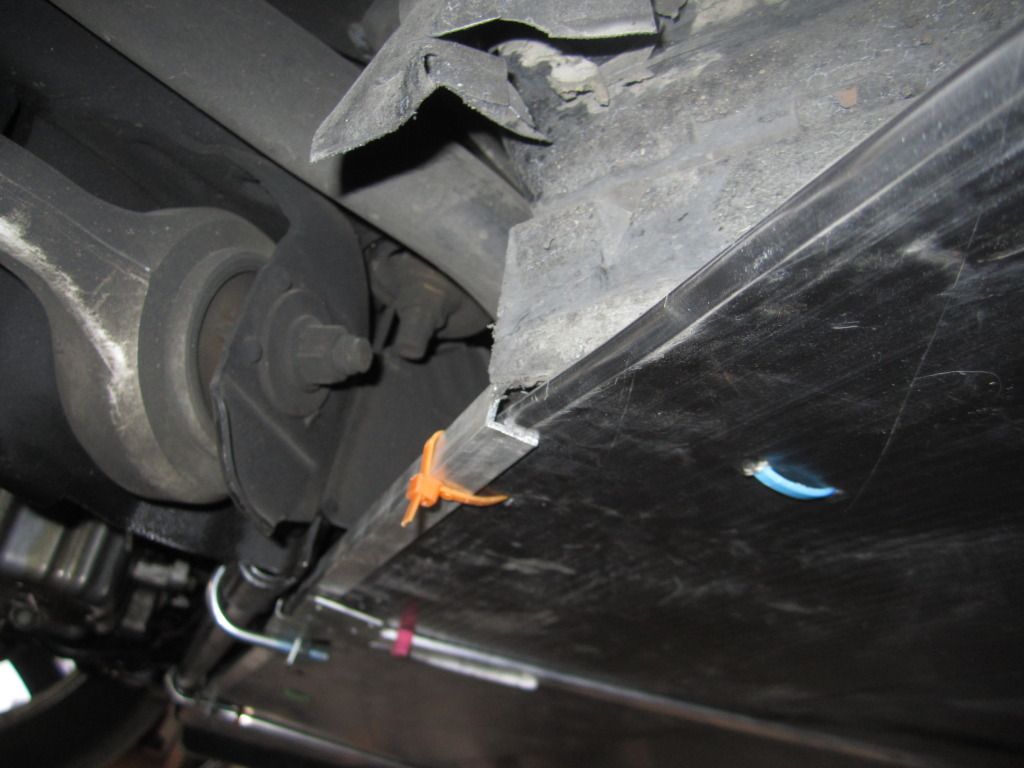
The coroplast is just resting on the top of the front bumper lip.
and then wedged into the channel. there are 3 zip ties to hold the coropast in place on the channel.

I wanted to design a front belly pan that was easy to remove and re-install. the key is to have as few points that HAVE to line up.
since the pan is pretty darn secure wedged into the channel, then the fron is 'presseddown' by the air flowing thru the engine compartment. Igt took two braces to make sure the coroplast didnt get 'blown down'.
__________________
MetroMPG: "Get the MPG gauge - it turns driving into a fuel & money saving game."

ECO MODS PERFORMED:
First: ScangaugeII
http://ecomodder.com/forum/showthrea...eii-23306.html

Second: Grille Block
http://ecomodder.com/forum/showthrea...e-10912-2.html

Third: Full underbelly pan
http://ecomodder.com/forum/showthrea...q45-11402.html

Fourth: rear skirts and 30.4mpg on trip!
http://ecomodder.com/forum/showthrea...tml#post247938

Last edited by mcrews; 08-05-2012 at 07:12 PM..
  Reply With Quote
The Following 4 Users Say Thank You to mcrews For This Useful Post:
aerohead (08-06-2012), BamZipPow (08-06-2012), myrefugeisintheLord (09-13-2012), OG VX (11-13-2014)
Old 08-06-2012, 12:26 AM   #66 (permalink)
T-100 Road Warrior
 
BamZipPow's Avatar
 
Join Date: Apr 2008
Location: The Woodlands, TX
Posts: 1,921

BZP T-100 (2010) - '98 Toyota T-100 ext cab - 3.4L/auto SR5
Last 3: 24 mpg (US)

BZP T-100 (2011) - '98 Toyota T-100 ext cab - 3.4L/auto SR5
Last 3: 23.66 mpg (US)

BZP T-100 (2009) - '98 Toyota T-100 ext cab - 3.4L/auto SR5
Last 3: 19.01 mpg (US)

BZP T-100 (2012) - '98 Toyota T-100 ext cab - 3.4L/auto SR5
Last 3: 25.45 mpg (US)

BZP T-100 (2013) - '98 Toyota T-100 SR5
Last 3: 25.79 mpg (US)

BZP T-100 (2014) - '98 Toyota T-100 SR5
Last 3: 23.18 mpg (US)

BZP T-100 (2015) - '98 Toyota T-100 SR5
Last 3: 23.85 mpg (US)

BZP T-100 (2016) - '98 Toyota T-100 SR5
Last 3: 17.62 mpg (US)

BZP T-100 (2017) - '98 Toyota T-100 SR5
90 day: 20.78 mpg (US)

BZP T-100 (2018) - '98 Toyota T-100 SR5
90 day: 20.19 mpg (US)

BZP T-100 (2019) - '98 Toyota T-100 SR5

BZP T-100 (2020) - '98 Toyota T-100 SR5

2012 Scion iQ - '12 Scion iQ Base
Thanks: 3,502
Thanked 1,395 Times in 968 Posts
Send a message via ICQ to BamZipPow
I'm surprised you didn't use some zipties to ziptie that bracket in place instead of using the U-bolts. Those U-bolts look kinda involved to take off. Maybe you could even try a hose clamp. You might have to shape the bracket so it fits around that tube you are clamping it to.
__________________
Dark Aero-The world's first aerodynamic single wheel boat tail!

  Reply With Quote
Old 08-06-2012, 12:32 AM   #67 (permalink)
Master EcoModder
 
mcrews's Avatar
 
Join Date: Oct 2009
Location: Texas
Posts: 3,523

The Q Sold - '02 Infiniti Q45 Sport
90 day: 23.08 mpg (US)

blackie - '14 nissan altima sv
Thanks: 2,203
Thanked 663 Times in 478 Posts
Bam,
THe ubolt and channel dont ever need to come off.
Only the panel.
I used the ubolts also because the flat portion matched up to the metal bracket.
If the back portion was with zties, it would pivot.
By having the back rock solid, it allows zero mounting points up front for the coroplast
__________________
MetroMPG: "Get the MPG gauge - it turns driving into a fuel & money saving game."

ECO MODS PERFORMED:
First: ScangaugeII
http://ecomodder.com/forum/showthrea...eii-23306.html

Second: Grille Block
http://ecomodder.com/forum/showthrea...e-10912-2.html

Third: Full underbelly pan
http://ecomodder.com/forum/showthrea...q45-11402.html

Fourth: rear skirts and 30.4mpg on trip!
http://ecomodder.com/forum/showthrea...tml#post247938
  Reply With Quote
The Following 3 Users Say Thank You to mcrews For This Useful Post:
aerohead (08-06-2012), BamZipPow (08-06-2012), myrefugeisintheLord (09-13-2012)
Old 08-06-2012, 01:03 PM   #68 (permalink)
EcoModding Lurker
 
Prophecy99's Avatar
 
Join Date: Apr 2012
Location: PA
Posts: 91

Maxima - '02 Nissan Maxima GLE
Thanks: 2
Thanked 20 Times in 14 Posts
thanks for the updates, that metal hanger you used is a type of hurricane uplift clip for wood roof rafter framing, and as you figured out does really provide a nice piece for what you are doing. I may have to take that piece and adapt that to what I am doing. I haven't started mine yet but the coroplast is in the garage once again thanks for the updates.
  Reply With Quote
Old 08-15-2012, 09:31 AM   #69 (permalink)
EcoModding Lurker
 
Prophecy99's Avatar
 
Join Date: Apr 2012
Location: PA
Posts: 91

Maxima - '02 Nissan Maxima GLE
Thanks: 2
Thanked 20 Times in 14 Posts
so i have my template done in cardboard & i have all my supports test fit and pretty much everything is ready to be screwed in. There is one area that bugs me and I couldn't see that you did anything in this area.

The area in the rear wheel well next to the inside of the wheels/the area adjacent to the mudflaps etc. It seems alot of dirt may get inside there since the new pan will act like a table for dirt/ and even snow. Did you do anything to help the pan from collecting the elements? Heres a picture of your first showing the areas on either edge near the wheels.

Quote:
Originally Posted by mcrews View Post


Maybe I can just through a piece of coro vertically to close the wheel well off a little better.

Thanks for your thread! I am excited to get this finsihed this weekend. And I agree a lift would be awesome!
  Reply With Quote
Old 08-16-2012, 11:20 PM   #70 (permalink)
Master EcoModder
 
mcrews's Avatar
 
Join Date: Oct 2009
Location: Texas
Posts: 3,523

The Q Sold - '02 Infiniti Q45 Sport
90 day: 23.08 mpg (US)

blackie - '14 nissan altima sv
Thanks: 2,203
Thanked 663 Times in 478 Posts
on the rear belly pan 2.0 I curved the corplast to fit into the wheel well piece. I used a seprerate piece THen taped it into the main piece. I'll see if I can get a picture.

__________________
MetroMPG: "Get the MPG gauge - it turns driving into a fuel & money saving game."

ECO MODS PERFORMED:
First: ScangaugeII
http://ecomodder.com/forum/showthrea...eii-23306.html

Second: Grille Block
http://ecomodder.com/forum/showthrea...e-10912-2.html

Third: Full underbelly pan
http://ecomodder.com/forum/showthrea...q45-11402.html

Fourth: rear skirts and 30.4mpg on trip!
http://ecomodder.com/forum/showthrea...tml#post247938
  Reply With Quote
Reply  Post New Thread


Similar Threads
Thread Thread Starter Forum Replies Last Post
Honda Fit Belly Pan Project Fit Aerodynamics 17 08-10-2015 09:29 AM
Permanent Aluminum Grill Block and Belly Pan Markmysite EcoModding Central 41 02-27-2014 10:22 PM
Aerodynamic Belly Pan on Toyota Echo jime57 Aerodynamics 23 12-05-2010 07:18 PM
2010 Prius belly pan set up ALS Aerodynamics 12 09-10-2009 07:27 PM
Started on a belly pan brucey Aerodynamics 3 02-03-2009 09:14 AM


Powered by vBulletin® Version 3.8.11
Copyright ©2000 - 2025, vBulletin Solutions Inc.
Content Relevant URLs by vBSEO 3.5.2
All content copyright EcoModder.com