09-18-2016, 01:53 AM
|
#51 (permalink)
|
|
EcoModding Apprentice
Join Date: Aug 2016
Location: Wilson, NC
Posts: 132
Thanks: 66
Thanked 56 Times in 36 Posts
|
Quote:
Originally Posted by me and my metro

I purchased a economy grind cam and a +10 from 3tech many years ago. I was very happy with the cam and gear, it did exactly as advertised. My car gave the best fuel economy with this setup. It is the best way to replicate an Xfi cam.
Mike has a full time job so he can be slow to respond to e-mail.
|
I actually wanted to buy one from him. I totally prefer to support my own community whenever possible/feasible, plus less erroneous calculations to have to come up with  . We all have to work... and he stated in his site that he would be slow getting back to you, so that's understandable... it's just that I'm at that point now so it would be nice to have.
But I want to start driving this thing so that I can actually measure effects of future mods... So I'm thinking that I'm going to degree my cam, make necessary markings on a spare sprocket (so that I can design something at a more leisurely pace later on) and put it back together with factory timing with one of my other sprockets.
This way it will be done properly, besides, I'm already questioning how this custom cam grind is going to pan out in the first place... The sprocket mod would just add one more variable to eliminate if it turns out to be running poorly once I have her running...
And now that I think about what I just wrote... I'm actually going to just take the custom cam completely out of the equation and go back with the factory grind now that it's easier to do, and that way I can actually have a baseline to compare against this specific cam grind, or any future cam / sprockets or engine mods. ")
|
|
|

|
|
The Following 2 Users Say Thank You to MPGeo For This Useful Post:
|
|
 Today Today
|
|
|
|
 Other popular topics in this forum...
|
|
|
|
|
09-19-2016, 10:23 PM
|
#52 (permalink)
|
|
EcoModding Apprentice
Join Date: Aug 2016
Location: Wilson, NC
Posts: 132
Thanks: 66
Thanked 56 Times in 36 Posts
|
So Sunday night I found a few hours to devote to this thing and began to address those issues mentioned in the prior post. But I already had the engine off the stand and flywheel & clutch assembly on... everything but the oil pan.
So here she is after removing the clutch, flywheel, and water tube, I put engine back on the stand, to make the process easier.

I leave the oil pan off until last, this way I can use a piece of wood on the crank as a locking feature to aid in torquing crank bolt as well as flywheel / clutch bolts, then the last thing I install is the oil pan... It's not a problem as long as you make sure you bag your engine while not being worked on. Lucky for me I had not installed pan yet... so it made it easy to break torque on crank bolt.

I needed the crank bolt so that I could properly size hole & modify my motorcycle degree wheel to fit the engine. I simply step-notched the degree wheel's original bolt hole.

Once that was done I needed to make a pointer. I had a scrap metal data tag laying around. I step-notched one of the holes to fit timing stud, bent it, and marked it.


The result was a pin-point accurate  way to degree the cam and make all the necessary mental notes, measurements, etc...

So after doing my mental stuff, I proceeded to remove the custom grind cam and this is me going back together with the factory spec cam, at factory timing. The engine is now completely built, of the stand, flywheel /clutch and oil pan are all on.

 Engine build is finished.
Now i just need to find time and mate the 3.52 tranny and put it all in the car. |
|
|
|
|
The Following 4 Users Say Thank You to MPGeo For This Useful Post:
|
|
|
09-20-2016, 08:10 PM
|
#53 (permalink)
|
|
EcoModding Apprentice
Join Date: Aug 2016
Location: Wilson, NC
Posts: 132
Thanks: 66
Thanked 56 Times in 36 Posts
|
I love working on this little car...
It is so simple. I literally spent only two hours just now and tied a few loose ends on the engine, replaced output shaft seals on tranny and mated the 3.52 tranny and installed engine...
So engine is officially in and supported on it's own, cv axles are in... but that's about it. Ran out of time for tonight, but figured I would share the progress.
Also, just an FYI, I don't recall reading anywhere that the 3.52 tranny has a different location for the stationary linkage stud... Will have to modify to make work, but it should be a fairly simple fix.


|
|
|
|
|
The Following User Says Thank You to MPGeo For This Useful Post:
|
|
|
09-20-2016, 10:37 PM
|
#54 (permalink)
|
|
Master EcoModder
Join Date: Jun 2008
Location: Oregon
Posts: 556
Thanks: 255
Thanked 198 Times in 156 Posts
|
Since all 3.52 transmissions came behind 4 cylinder engines. Most do not have the 3 cylinder location cast into the case. You can offset the support and use the 4 cylinder mounting point.
__________________
02 Saturn L200 5 speed- 265k miles
84 Gmc 6.5 na diesel K30 4x4, TMU
2006 Lincoln Navigator, 215k miles
|
|
|
|
|
The Following User Says Thank You to me and my metro For This Useful Post:
|
|
|
09-27-2016, 10:35 AM
|
#55 (permalink)
|
|
EcoModding Apprentice
Join Date: Aug 2016
Location: Wilson, NC
Posts: 132
Thanks: 66
Thanked 56 Times in 36 Posts
|
OK so I was able to finish the car... But not without it's challenges.
I had it all wired up, almost all plumbed up except for the radiator, and almost done. So I proceeded to adjust the clutch and noticed that it did not feel right. I was getting way too much travel on my release shaft, and didn't seem to be engaging... And then it hit me like a bag of bricks... I turned around and there it was, the release bearing, just staring insults at me 
Yeap... I did it... I forgot to install the release bearing 
So I had to take the starter out, left suspension, axles, mounts... hoist the engine and remove the transmission, all that... because I forgot to put it the bearing! So that set me back about 3hrs, but I got it all back together.
Primed the oil system by disconnecting the ignition coil and the fuel pump wiring, and cranking engine over via the starter several times until I felt comfortable enough that the oil pump had at least primed itself and had began the oiling process.
Then primed the fuel system and cranked the engine, ensuring oil pressure was registering... No leaks... Brought to good operating temp, and adjusted distributor timing to 6deg. adv.
Test drove around the block and let all the oils burn off... and triple checked all systems for leaks, engine temp, fan operation, oil pressure, lights-brakes-signals, wipers, fans...etc.
EVERYTHING CHECKED OUT GOOD!


 |
|
|
|
|
The Following 2 Users Say Thank You to MPGeo For This Useful Post:
|
|
|
09-27-2016, 10:51 AM
|
#56 (permalink)
|
|
...beats walking...
Join Date: Jul 2009
Location: .
Posts: 6,190
Thanks: 179
Thanked 1,525 Times in 1,126 Posts
|
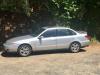
I like the "spartan" look...sorta micro-van functional.
|
|
|
|
|
The Following User Says Thank You to gone-ot For This Useful Post:
|
|
|
09-27-2016, 11:06 AM
|
#57 (permalink)
|
|
Master EcoModder
Join Date: Dec 2011
Location: New Zealand
Posts: 5,018
Thanks: 2,870
Thanked 2,515 Times in 1,555 Posts
|
Sweet ride, what's next?
|
|
|
|
|
The Following User Says Thank You to Ecky For This Useful Post:
|
|
|
09-27-2016, 11:13 AM
|
#58 (permalink)
|
|
Administrator
Join Date: Dec 2007
Location: Germantown, WI
Posts: 11,203
Thanks: 2,501
Thanked 2,586 Times in 1,554 Posts
|
Congrats!
|
|
|
|
|
The Following User Says Thank You to Daox For This Useful Post:
|
|
|
09-27-2016, 01:21 PM
|
#59 (permalink)
|
|
Master EcoModder
Join Date: Aug 2012
Location: northwest of normal
Posts: 27,728
Thanks: 7,784
Thanked 8,591 Times in 7,074 Posts
|
If that interior had a two-piece L-shaped plywood deck over storage compartments, then it would be just like mine.
I do have two holes in the right rear corner I stuck the legs of an aluminum backpack frame into. For a backrest for the [very] occasional passenger. aerohead took a ride there.
|
|
|
|
|
The Following User Says Thank You to freebeard For This Useful Post:
|
|
|
09-27-2016, 02:49 PM
|
#60 (permalink)
|
|
EcoModding Apprentice
Join Date: Aug 2016
Location: Wilson, NC
Posts: 132
Thanks: 66
Thanked 56 Times in 36 Posts
|
Thanks Everyone
Quote:
Originally Posted by freebeard
I do have two holes in the right rear corner I stuck the legs of an aluminum backpack frame into. For a backrest for the [very] occasional passenger.
|
I think I like the backpack frame idea... It's supper light weight, and may come in handy... I'll keep that idea floating around for when I go yard sale hopping with the wife. Thanks 
Quote:
Originally Posted by Ecky
Sweet ride, what's next?
|
So quite literally EVERYTHING is next... Seriously.
Because as it turns out, so far all I have done is a basically a factory engine rebuild w/ new components... but that's about it.
The only "TRUE" FE mods I've done are:
-Automatic-to-Manual transmission conversion
-A/C system delete
-interior weight reduction
That's about it... So I have allot left to do.
|
|
|
|
|