Go Back   EcoModder Forum > EcoModding > Fossil Fuel Free
Register Now
 Register Now
 

Reply  Post New Thread
 
Submit Tools LinkBack Thread Tools
Old 11-12-2010, 04:51 PM   #1441 (permalink)
EcoModding Apprentice
 
Join Date: Oct 2008
Location: Carson City, Nv
Posts: 113
Thanks: 5
Thanked 26 Times in 21 Posts
Should be good for another 0.75 mph on the top end with LED thrust like that!

Good job!

  Reply With Quote
Alt Today
Popular topics

Other popular topics in this forum...

   
Old 02-12-2011, 08:58 PM   #1442 (permalink)
EV test pilot
 
bennelson's Avatar
 
Join Date: Jan 2008
Location: Oconomowoc, WI, USA
Posts: 4,435

Electric Cycle - '81 Kawasaki KZ440
90 day: 334.6 mpg (US)

S10 - '95 Chevy S10
90 day: 30.48 mpg (US)

Electro-Metro - '96 Ben Nelson's "Electro-Metro"
90 day: 129.81 mpg (US)

The Wife's Car - Plug-in Prius - '04 Toyota Prius
90 day: 78.16 mpg (US)
Thanks: 17
Thanked 663 Times in 388 Posts
I did a little more work on the Metro today.

I have always wanted a higher system voltage, but I am pretty maxed out in terms of what I can fit in the back seat battery box.

Since I also want to keep my trunk space (which had also been experimentally filled with the Hybrid System.) that means the only place to add more batteries is under the hood.

Because I have been using Group 31 batteries, they are just a little TOO long to fit in the "radiator rack" going the long direction, leaving me only ONE battery in front.

Today, I removed that one battery, and started experimenting with FOUR shorter batteries to figure out how I would fit them in. It's trickier than one first might think... The way the headlight trim curves around, the center support is off-center, and other odd things made it challenging.

Here's an image with the nose off, trying to squeeze all those batteries in there.


Working around the headlights was difficult. The light trim sticks out way too far.


After much grunt and shoving batteries around, I think I have arranged them in such a way that all four will fit.
I packed up the car for the eventing, and plan on building and installing battery tie-downs and cables tomorrow.

__________________


300mpg.org Learn how to BUILD YOUR OWN ELECTRIC CAR CHEAP
My YouTube Videos
  Reply With Quote
Old 02-12-2011, 09:15 PM   #1443 (permalink)
PaulH
 
MPaulHolmes's Avatar
 
Join Date: Feb 2008
Location: Maricopa, AZ (sort of. Actually outside of town)
Posts: 3,832

Michael's Electric Beetle - '71 Volkswagen Superbeetle 500000
Thanks: 1,368
Thanked 1,202 Times in 765 Posts
Those sears platinum deep cycle batteries have a 3 year warranty for a reason. Nice choice!
__________________
kits and boards
  Reply With Quote
Old 02-12-2011, 09:18 PM   #1444 (permalink)
The $500 Electric Car
 
vpoppv's Avatar
 
Join Date: Aug 2009
Location: Cushing,Oklahoma
Posts: 430
Thanks: 6
Thanked 26 Times in 20 Posts
OMG Ben, you are a packing genius! Remind me never to play Tetris with you! The only way I was able to shoehorn in the four batteries there was by removing the post holding down the hood and seriously cutting into the front bumper, otherwise I hit the motor or the motor mounts- and that's with group 24!!
  Reply With Quote
Old 02-12-2011, 11:13 PM   #1445 (permalink)
EV test pilot
 
bennelson's Avatar
 
Join Date: Jan 2008
Location: Oconomowoc, WI, USA
Posts: 4,435

Electric Cycle - '81 Kawasaki KZ440
90 day: 334.6 mpg (US)

S10 - '95 Chevy S10
90 day: 30.48 mpg (US)

Electro-Metro - '96 Ben Nelson's "Electro-Metro"
90 day: 129.81 mpg (US)

The Wife's Car - Plug-in Prius - '04 Toyota Prius
90 day: 78.16 mpg (US)
Thanks: 17
Thanked 663 Times in 388 Posts
They all barely fit in there.

I'm trying to decide how to do the tie-downs. I had been using two threaded rods on either side of the Group 31 battery. A piece of "unistrut" spanned the battery to either rod, and was tightened down with a nut and washer.

I think for the four battery setup, I can still use threaded rods. One in the middle, between all the batteries, and one on either end near the headlights.

At the Milwaukee Makerspace (my car repair facility and hang-out for the weekend...) there was some nice, beefy, flat bar stock on the misc metals rack. Those pieces were about 17 or 18" long each - just about perfect for this.

Also, I rotated the batteries so that the closest connectors are +,-,+,-......
That makes it so that a hold down bar can go straight across all the batteries, without having to compete with a crossing battery cable.

Then that's the other big thing to do, make batteries cables for this.

Oh, yeah. I also have no real working battery charger right now. Maybe somebody could help me build a variable voltage open source battery charger. Hint, Hint, wink....
__________________


300mpg.org Learn how to BUILD YOUR OWN ELECTRIC CAR CHEAP
My YouTube Videos
  Reply With Quote
Old 02-13-2011, 04:19 AM   #1446 (permalink)
Master EcoModder
 
jackbauer's Avatar
 
Join Date: Sep 2009
Location: Ireland
Posts: 734
Thanks: 26
Thanked 304 Times in 171 Posts
What voltage are you now running? Assuming the dishards are rebadged odysseys then its a great battery. I ran a 120v pack of them for a year. Only complaint was the weight! One thing i would say was when i spoke to enersys on this side of the water they said the warranty only applied to engine starting applications.
__________________
Now, Cole, when you shift the gear and that little needle on the ammeter goes into the red and reads 2000 Amps, that's bad.
www.evbmw.com
  Reply With Quote
Old 02-13-2011, 09:24 AM   #1447 (permalink)
EV test pilot
 
bennelson's Avatar
 
Join Date: Jan 2008
Location: Oconomowoc, WI, USA
Posts: 4,435

Electric Cycle - '81 Kawasaki KZ440
90 day: 334.6 mpg (US)

S10 - '95 Chevy S10
90 day: 30.48 mpg (US)

Electro-Metro - '96 Ben Nelson's "Electro-Metro"
90 day: 129.81 mpg (US)

The Wife's Car - Plug-in Prius - '04 Toyota Prius
90 day: 78.16 mpg (US)
Thanks: 17
Thanked 663 Times in 388 Posts
It will be 9 batteries for a 108V system.

That was really my original voltage goal. Partly because I had a battery charger with a maximum 108V output.

I have heard that these Die Hard batteries are a rebadged "other brand", but haven't had any way to confirm it. I wouldn't think that the 3-year warranty could only apply to engine starting applications because these are deep-cycle marine batteries. The are specifically designed for use running trolling motors and other NON-engine starting uses.
__________________


300mpg.org Learn how to BUILD YOUR OWN ELECTRIC CAR CHEAP
My YouTube Videos
  Reply With Quote
Old 02-13-2011, 10:11 PM   #1448 (permalink)
EV test pilot
 
bennelson's Avatar
 
Join Date: Jan 2008
Location: Oconomowoc, WI, USA
Posts: 4,435

Electric Cycle - '81 Kawasaki KZ440
90 day: 334.6 mpg (US)

S10 - '95 Chevy S10
90 day: 30.48 mpg (US)

Electro-Metro - '96 Ben Nelson's "Electro-Metro"
90 day: 129.81 mpg (US)

The Wife's Car - Plug-in Prius - '04 Toyota Prius
90 day: 78.16 mpg (US)
Thanks: 17
Thanked 663 Times in 388 Posts
More work on the car today.


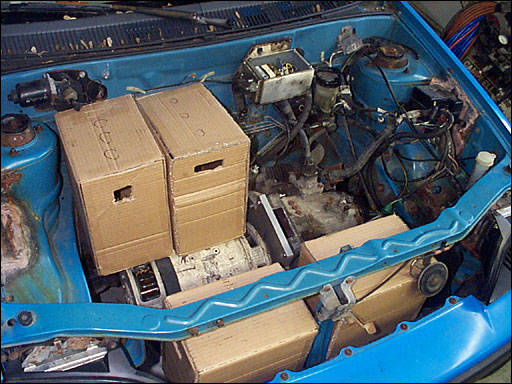
Mostly, it was designing and building the "Tie-Downs" for the batteries.

After more moving everything around, it looked like three sections of vertical threaded rod would work well. The middle threaded rod would be easy to drill a hole for. Oh wait, there's already a hole there, so I just put the rod through and added a nut.

The trouble with the end two rods is that I wouldn't be able to drill through and put a nut on the bottom end of the rod - there was a car frame member under there.

So, I thought maybe I could just WELD a nut there instead.

I cut sections of rod to about 10.5 inches.


I drilled a hole where I wanted the rod to go through. It couldn't go all the way through and have a nut on the other side, but it let me center the rod, and keep it from moving around while working on it.


I ground down the paint off the frame, and then practiced welding nuts to some scrap metal. Once the nuts no longer popped off when I wacked them with a hammer, I was ready to try welding the real ones.

Here is the nut after getting welded in, hit with some paint, and the rod locked in with another nut.


The middle rod was easy, as that one was through-hole, and bolted in place.


Now, before I put all the batteries back in, I was noticing that the motor really was never that level. Scroll back up and look at the first photo. See how the motor isn't level? It's kinda low on the left. Now seemed like a good time to fix that.

I unbolted the motor bolts (with a jack under the motor) jacked the motor into position, and removed the custom mounting plate.
This is something that I always referred to as "The Q".


It has its distinct shape because the end of the motor originally had a tailshaft and has vent-holes as well. The end of the motor can't be covered, but still needs at least two bolts going in to hold it. I originally free-hand cut this shape to fit around all the odd shapes of the end of the motor.

Overall, what was needed was to remove the weld of the Q to the stock motor mount, reposition it, and then weld it back on. It actually went pretty well and fairly straight forward. The worst that I could say was that the welding got hot enough that the rubber in the mount started melting. I had to take the bracket to the men's room and run it under water in the sink to cool it down! Otherwise, just the metal being so heated from the welding would have kept melting the rubber.

I put the bracket back in, ran the motor mount bolt, and the two motor to Q-bracket bolts, and that was it. The motor now sits nicer than it did before.

Back to bolting in the batteries.....
I had some flat steel stock that I wanted to use to span the tops of the batteries. The only trouble is that metal is conductive, and I don't want to ever accidentally short a battery removing or installing the tie-down. I knew there was some extra large heat-shrink tubing around. I checked, and the tubing was just a little too small to slip over the 1.5" wide bar.

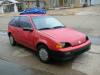
Hmmm.... If only there was some other inexpensive/recycled/salvaged material around that was non-conductive and would shrink to fit for a nice appearance. That's when I remembered this old bike was sitting right there for use as scrap material.


What am I looking at? The tires. Specifically the inner tubes.

I removed the front rim, took off the tire, and pulled out the inner tube. A quick snip or two, and I had a rubber tube.


The hard part was stretching this over the bar. It was a bit of a struggle. I would show you a photo of the process, but I fear it would encourage too many dirty jokes...

Here's the inner tube stretched over the bar. The ends were left long, so they could be folded under.


The rubber cover looks nice, is grippy, and non-conductive! Not bad for an inner tube that never would work on a bike again anyways!


On the right hand side, the spacing was a little different, so I put the rest of the inner tube UNDER the bar as a nice rubbery spacer.


That's it for now.
Next, I need to make up some additional short battery cables for the interconnects between the new batts.


I may also try to design some simple cover/guard across the front, just to keep the batteries from getting all gunked up from the road. I have some black coroplast that I may just run straight across the front.
__________________


300mpg.org Learn how to BUILD YOUR OWN ELECTRIC CAR CHEAP
My YouTube Videos
  Reply With Quote
Old 02-14-2011, 09:45 AM   #1449 (permalink)
Batman Junior
 
MetroMPG's Avatar
 
Join Date: Nov 2007
Location: 1000 Islands, Ontario, Canada
Posts: 22,515

Blackfly - '98 Geo Metro
Team Metro
Last 3: 70.09 mpg (US)

MPGiata - '90 Mazda Miata
90 day: 52.71 mpg (US)

Even Fancier Metro - '14 Mitsubishi Mirage top spec
90 day: 70.75 mpg (US)

Appliance car - '14 Mitsubishi Mirage ES (base)
90 day: 52.48 mpg (US)
Thanks: 4,062
Thanked 6,960 Times in 3,604 Posts
That's a major amount of work, Mr Ben.

I'm assuming you had something in the way that would have prevented this approach for 4 batteries up front? I copied this after seeing another Metro EV in the EV Album.

__________________
Project MPGiata! Mods for getting 50+ MPG from a 1990 Miata
Honda mods: Ecomodding my $800 Honda Fit 5-speed beater
Mitsu mods: 70 MPG in my ecomodded, dirt cheap, 3-cylinder Mirage.
Ecodriving test: Manual vs. automatic transmission MPG showdown


EcoModder
has launched a forum for the efficient new Mitsubishi Mirage
www.MetroMPG.com - fuel efficiency info for Geo Metro owners
www.ForkenSwift.com - electric car conversion on a beer budget
  Reply With Quote
Old 02-14-2011, 09:59 AM   #1450 (permalink)
EV test pilot
 
bennelson's Avatar
 
Join Date: Jan 2008
Location: Oconomowoc, WI, USA
Posts: 4,435

Electric Cycle - '81 Kawasaki KZ440
90 day: 334.6 mpg (US)

S10 - '95 Chevy S10
90 day: 30.48 mpg (US)

Electro-Metro - '96 Ben Nelson's "Electro-Metro"
90 day: 129.81 mpg (US)

The Wife's Car - Plug-in Prius - '04 Toyota Prius
90 day: 78.16 mpg (US)
Thanks: 17
Thanked 663 Times in 388 Posts
That design would have required a fair amount of fabrication for the shelf/bracket for the upper batteries.

Also, I already have my vacuum pump, vacuum tank, motor controller, and electrics box (main contactor, fuse, ammeter, etc.) in front where I would have to move all that around to fit those batteries there.

Also, when I again want to increase system voltage, where would I put THOSE batteries!?!?

As it is, I still need to reposition the controller, and I want to redo/move/clean up a couple other components.

PS: Darin, what size is your motor? Mine is literally as big as would fit in the car. I think last time I measured, I didn't have the HEIGHT between the motor and the hood for batteries.

__________________


300mpg.org Learn how to BUILD YOUR OWN ELECTRIC CAR CHEAP
My YouTube Videos

Last edited by bennelson; 02-14-2011 at 10:00 AM.. Reason: PS
  Reply With Quote
Reply  Post New Thread


Tags
electric car, electro metro, geo, metro


Similar Threads
Thread Thread Starter Forum Replies Last Post
Metro taller transmission swap thread: +5% efficiency gain (taller final drive) MetroMPG EcoModding Central 36 02-11-2015 11:08 AM
Daox's 1997 Paseo Build Thread Daox EcoModding Central 241 11-12-2013 11:23 PM
DPoV's Jeepin' Build Thread DifferentPointofView EcoModding Central 26 12-16-2009 04:31 AM
The UnNamed Wagon's build thread - Let it begin! Work in Progress XFi EcoModding Central 38 08-01-2008 12:21 AM
Margo II: the build (project thread) AndrewJ Alternative Transportation 26 04-23-2008 01:23 PM


Powered by vBulletin® Version 3.8.11
Copyright ©2000 - 2024, vBulletin Solutions Inc.
Content Relevant URLs by vBSEO 3.5.2
All content copyright EcoModder.com