 02-14-2011, 11:05 AM
|
#1451 (permalink)
|
|
Batman Junior
Join Date: Nov 2007
Location: 1000 Islands, Ontario, Canada
Posts: 22,536
Thanks: 4,082
Thanked 6,985 Times in 3,616 Posts
|
Quote:
Originally Posted by bennelson

That design would have required a fair amount of fabrication for the shelf/bracket for the upper batteries.
|
I could have sent plans!

Quote:
|
Also, when I again want to increase system voltage, where would I put THOSE batteries!?!?
|
I predict by the next time you increase system voltage, you'll find some way to use batteries with much greater energy density & will actually have less battery volume in the car.  That thought has crossed my mind, with the number of people doing lithium conversions in the last couple of years. Eventually there will be used packs coming available.
Quote:
|
PS: Darin, what size is your motor? Mine is literally as big as would fit in the car. I think last time I measured, I didn't have the HEIGHT between the motor and the hood for batteries.
|
It's 15" L x 8" Dia.
|
|
|

|
 Today Today
|
|
|
|
 Other popular topics in this forum...
|
|
|
|
 02-14-2011, 11:20 AM
|
#1452 (permalink)
|
|
EV test pilot
Join Date: Jan 2008
Location: Oconomowoc, WI, USA
Posts: 4,435
Thanks: 17
Thanked 663 Times in 388 Posts
|
My motor is 10", so that's another inch less available on the top.
I think the earlier version of the Metro (Forkenswift) is a little box-ier that the later version (Electro-Metro). My hood has a pretty good curve to it. When working with batteries, boxy is good.
I don't know how different the entire engine bay area is between the two different versions of the Metro.
Also, all this really wasn't that much work. Mostly just welding two nuts to the frame of the car for the end tie-downs. I just make it look like a lot of work.....  |
|
|

|
 02-14-2011, 06:40 PM
|
#1454 (permalink)
|
|
Master EcoModder
Join Date: Sep 2010
Location: Denver, CO
Posts: 1,300
Thanks: 315
Thanked 179 Times in 138 Posts
|
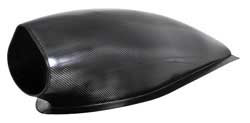
or this ... 

__________________
I'm not coasting, I'm shifting slowly.

|
|
|

|
 02-14-2011, 06:48 PM
|
#1455 (permalink)
|
|
EV test pilot
Join Date: Jan 2008
Location: Oconomowoc, WI, USA
Posts: 4,435
Thanks: 17
Thanked 663 Times in 388 Posts
|
Believe it or not, I actually considered that.....
I still figured it was easier to put four batteries where the radiator was than to start cutting holes in the hood!  |
|
|

|
 02-14-2011, 09:40 PM
|
#1456 (permalink)
|
|
EcoModding Apprentice
Join Date: Feb 2010
Location: Northern Wisconsin
Posts: 137
Thanks: 32
Thanked 39 Times in 23 Posts
|
Thanks for all the pictures Ben!! 
(Jack, this was the icon I was looking for on your comment on the other forum lol)
__________________
Dave  ...
|
|
|

|
 05-14-2011, 05:31 PM
|
#1457 (permalink)
|
|
EV test pilot
Join Date: Jan 2008
Location: Oconomowoc, WI, USA
Posts: 4,435
Thanks: 17
Thanked 663 Times in 388 Posts
|
The Electro-Metro is now running at 108 volts!
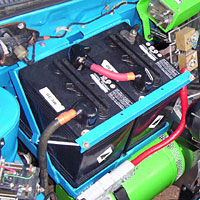
Even though I put 3 more batteries in a while back, (removed the one group 31 in front and added 4 Die Hard Platinums in its place...) I was still running the car at 72 volts.
I had home problems with the Open Revolt "Cougar" controller, so I was still using the Curtis 1221 (500amp, 72V max) I think the trouble I was having was part environmental (humidity, saltwater, etc.) and partly that I am TERRIBLE at building electronics...
I sent the controller over to Paul Holmes for some tender loving care, where he freshened it up and gave it a coat of - what do you call that stuff? - some sort of electronics clear coat.
I got the controller back recently, but have been too busy to do any more work on the car.
Today, I cabled up the additional 3 batteries in front, and wired in the Revolt Controller.
Then, it was off for a test drive!
It definately has more OOMF! at 108 Volts. Hill climbing is greatly improved. I have several hills in the area that my car has never liked. There's one that I don't try to go up because the car just ends up going embarassingly slow, and there's always a lot of traffic in that area.
I'll get some photos or video soon for you guys to see.
I'm also trying to get the car cleaned up a bit today because a documentarian film-maker is coming over tomorrow. Wish me luck on that one!  |
|
|

|
|
The Following 4 Users Say Thank You to bennelson For This Useful Post:
|
|
 05-14-2011, 05:53 PM
|
#1458 (permalink)
|
|
PaulH
Join Date: Feb 2008
Location: Maricopa, AZ (sort of. Actually outside of town)
Posts: 3,832
Thanks: 1,362
Thanked 1,202 Times in 765 Posts
|
That's awesome Ben!!!! Is the documentary going to be on "Ben Nelson: The Myth The Man The Legend" ?! I'd buy it! Nice videos on the Volt, by the way. I wish I had one.
|
|
|

|
 05-14-2011, 05:53 PM
|
#1459 (permalink)
|
|
Moderate your Moderation.
Join Date: Nov 2008
Location: Troy, Pa.
Posts: 8,919
Pasta - '96 Volkswagen Passat TDi 90 day: 45.22 mpg (US)
Thanks: 1,369
Thanked 430 Times in 353 Posts
|
Excellent update!
Looking forward to pics/video.
You guys still make me think about building my own set of e-wheels..
__________________
"¿ʞɐǝɹɟ ɐ ǝɹ,noʎ uǝɥʍ 'ʇı ʇ,usı 'ʎlǝuol s,ʇı"

|
|
|

|
 05-14-2011, 10:24 PM
|
#1460 (permalink)
|
|
EV test pilot
Join Date: Jan 2008
Location: Oconomowoc, WI, USA
Posts: 4,435
Thanks: 17
Thanked 663 Times in 388 Posts
|
Ok, well, here's A photo.

Why is it that my cabling looks fine, and then I take a photo of it, and in the photo the CABLES ARE EVERYWHERE!?!?!?
They don't look that bad in real life... REALLY!
Anywhoo - you can see that there are 4 batteries in the "radiator rack" position. The cables even have heat shrink tubing and everything.
The best spot I ever had for mounting the controller is now taken up by batteries. I tried playing around with some plywood over the top of the motor to mount the controller on, but then it TOTALLY hides the motor!
I had a little bit of plexiglass kicking around, so I put that over the top of the motor and then mounted the controller to that. If you look close in the photo, you can see that the controller is "floating".
Also, the bottom-right corner of the DANGER HIGH VOLTAGE box needed a new mounting point. It used to go to a threaded rod that held in battery #6, but with the new 4 batteries in front configuration, that threaded rod isn't there any more.
The closest solid mounting point is the battery tie-down for the original accessory battery. That is the type where a piece of metal clamps down on the "foot" of the battery to hold it in place. I used a 5" long piece of flat steel with a hole drilled in either end to go to the battery tie-down and the corner of the box. The fender washer is where the support for the box connects to the short piece of bar that then mounts to the base of the 12V accessory battery.
|
|
|

|
|