Go Back   EcoModder Forum > Forum News & Feedback
Register Now
 Register Now
 

Reply  Post New Thread
 
LinkBack Thread Tools
Old 07-25-2011, 04:50 PM   #1 (permalink)
The PRC.
 
Join Date: Oct 2009
Location: Elsewhere.
Posts: 5,304
Thanks: 285
Thanked 536 Times in 384 Posts
HOWTO - Add pictures/photos/images in Ecomodder

Hi,

I've been here for a while and I'm learning on this so I thought I would post a how to on dealing with images here on ecomodder, with pictures. This will be in 3 parts -
1. Linking to images,
2. Including images as attachments and
3. Including images in your albums.
Firstly some house rules - I don't know the policy here on EM but I assume each member takes responsibility for the images they post, so nothing "naughty" please and nothing to be hosted here and displayed elsewhere.

So part 1, linking to images on other websites. This is based on you using FireFox instead of IE. If you aren't it may be worth switching (on Windows) - you can get FireFox here. Also search for FlashBlock - it removes all those ads

1. Find your image.
Google or Bing offer decent image searches so start there. Lets take the Aygo Crazy as an example. Google image search looks like this.


2. Select an image, google shows a preview.


Click on the little cross (see the red circle, above) to close this and go to the page. When you have your image right-click on it and select Copy Image Location from the menu :


If you are using Internet Explorer, see below for instructions on this part.

3. In your original posting, click on the Insert Image button :


4. In the box that appears


press and hold the CTRL button on your keyboard (usually bottom, left) and press V at the same time. A lot of text will appear in the box - click on OK.

5. In your posting some new text will appear, like this

Quote:
[IMG ]http://www.website.com/images/aygo_crazy.jpg[/IMG ]
6. That is the link to your image. Click on Preview Post or Go Advanced at the bottom to view how this will look. If you have done this correctly then your image should appear.

Replacement Internet Explorer instructions for Step 2 above :

a) Right click on you image and select Properties :


b) then on the box that appears, right-click on the text of the entry next to Address(URL) and choose Select All from the menu, so it is all highlighted, then right-click on it again and this time select Copy.


Then continue with step 3.

Note to Microsoft - see above, its much easier

If anyone wishes to update this with screenshots from Linux or (if you are some kind of millionaire rock star ) Apple OSX Tiger, Lion, Kitten or whatever the new one is called then feel free.

EDIT2 - Important - Check the website you are linking to for images, some are copyrighted or have other restrictions.

__________________
[I]So long and thanks for all the fish.[/I]

Last edited by Arragonis; 07-25-2011 at 04:58 PM..
  Reply With Quote
The Following 9 Users Say Thank You to Arragonis For This Useful Post:
Cd (07-26-2011), COcyclist (08-21-2011), ecoTex (01-24-2014), JasonG (07-26-2011), mcrews (07-26-2011), Nati (04-25-2013), rayjay (02-12-2012), Sykomor (10-19-2011), xpedro01 (01-30-2014)
Alt Today
Popular topics

Other popular topics in this forum...

   
Old 07-25-2011, 05:24 PM   #2 (permalink)
Master EcoModder
 
Join Date: Feb 2010
Location: Wisconsin, United States
Posts: 479
Thanks: 6
Thanked 20 Times in 20 Posts
Very good guide. I'm running Ubuntu with Google Chrome and the directions are the same as Firefox in Windows.
This thread should be "stickied".
  Reply With Quote
Old 07-25-2011, 06:53 PM   #3 (permalink)
(:
 
Frank Lee's Avatar
 
Join Date: Jan 2008
Location: up north
Posts: 12,762

Blue - '93 Ford Tempo
Last 3: 27.29 mpg (US)

F150 - '94 Ford F150 XLT 4x4
90 day: 18.5 mpg (US)

Sport Coupe - '92 Ford Tempo GL
Last 3: 69.62 mpg (US)

ShWing! - '82 honda gold wing Interstate
90 day: 33.65 mpg (US)

Moon Unit - '98 Mercury Sable LX Wagon
90 day: 21.24 mpg (US)
Thanks: 1,585
Thanked 3,555 Times in 2,218 Posts
I have had image "hosts" get angry with my linking of images; unknown to me they then change the image to some disgusting porn or something

So I put images in Photobucket and go from there. A bit cumbersome but it avoids all such trickery as noted above.

BTW, I hate thumbnails. I like when the image is right there in the post.

BUT I hate when people reply to posts with large and/or many images by quoting and duplicating all those damned images again... why? Cuz I'm on dial-up and it really SLLOOWWWWWWSSS page loading down. People, please go ahead and quote but if it isn't necessary, edit out the duplicate images in your replies. Thank you.

As far as the EM album, I haven't quite got the hang of that. I tried it once to see if it was less cumbersome than Photobucket, but it posted the dreaded thumbnails I don't want.
__________________


  Reply With Quote
The Following 2 Users Say Thank You to Frank Lee For This Useful Post:
FXSTi (11-28-2011), Xist (02-15-2015)
Old 07-25-2011, 08:32 PM   #4 (permalink)
Master EcoModder
 
euromodder's Avatar
 
Join Date: Jul 2010
Location: Belgium
Posts: 4,683

The SCUD - '15 Fiat Scudo L2
Thanks: 178
Thanked 652 Times in 516 Posts
Quote:
Originally Posted by Arragonis View Post
If anyone wishes to update this with screenshots from Linux or (if you are some kind of millionaire rock star ) Apple OSX Tiger, Lion, Kitten or whatever the new one is called then feel free.
It's just about the same on those fruity computers.

On Apple's own Safari, it's "Copy Image Address" instead of "Location".
On Camino, it's "Copy Image Location".
Attached Thumbnails
Click image for larger version

Name:	safari.jpg
Views:	44
Size:	38.7 KB
ID:	9072   Click image for larger version

Name:	Camino.jpg
Views:	49
Size:	36.9 KB
ID:	9073  
__________________
Strayed to the Dark Diesel Side


Last edited by euromodder; 07-26-2011 at 08:27 AM..
  Reply With Quote
Old 07-26-2011, 12:41 AM   #5 (permalink)
Master EcoModder
 
JasonG's Avatar
 
Join Date: May 2009
Location: Charlotte NC / York SC
Posts: 728

05 DMax - '05 Chevrolet 2500HD
90 day: 18.48 mpg (US)
Thanks: 120
Thanked 56 Times in 52 Posts
Google /Picasa works well too.
Make a public album (mine is labeled "Ecomodder") or a private one with the permission "that have the link" and use the link as shown above.

Nice walkthrough Arragonis.
__________________


I can't understand why my MPG's are so low..........
21,000lb, 41' Toy Haulers are rough on FE!
  Reply With Quote
Old 07-26-2011, 04:23 AM   #6 (permalink)
Cd
Ultimate Fail
 
Cd's Avatar
 
Join Date: Feb 2008
Location: Austin,Texas
Posts: 3,585
Thanks: 2,872
Thanked 1,121 Times in 679 Posts
Can this be a sticky please ?
  Reply With Quote
Old 07-26-2011, 05:25 AM   #7 (permalink)
The PRC.
 
Join Date: Oct 2009
Location: Elsewhere.
Posts: 5,304
Thanks: 285
Thanked 536 Times in 384 Posts
Photo Albums

OK - Part 3 is now part 2 EM Photo Albums.

When you sign up to EM you get a photo album where you can place images for use on EM. As before nothing naughty, make sure you have permission (copyright etc.) and only images for EM.

The advantage of an album is that the images will stay here as long as your album is on EM, so it keeps the "integrity" of the forum. If you link to images elsewhere they may be removed and you will see dead link images instead.

The downside is that it uses EM space so I'm not sure what the policy is in terms of limits.

If you are sensible then it should be OK. - MODs feel free to add to this please.

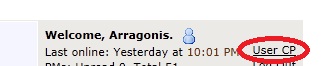
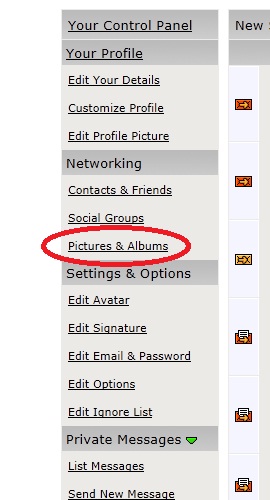
1 - To get to your albums, go to your control panel. Your login at the top of the page includes a link to this :


2 - The link to your albums is on the left hand side.


3 - Once clicked if you have some albums they will be displayed there.


4 - To edit an existing album click on it, otherwise click on Add Album (at the top and bottom of the list) to add a new one. This is the album properties :


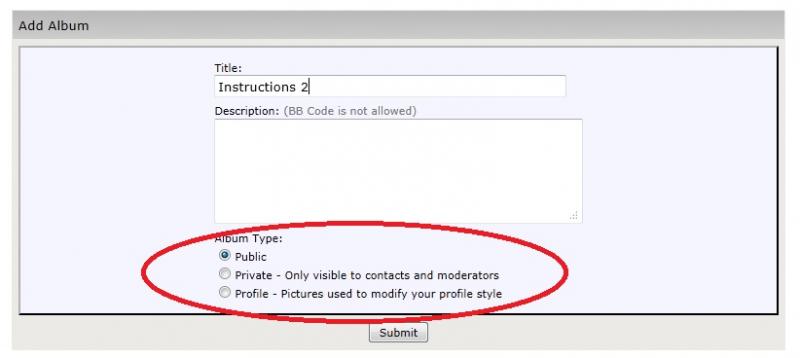
Enter a unique name and decide on the visibility. Public is, er, public - select this if you are putting images into a posting. Private means only you and your friends can see it, and profile is for Avatars, signatures etc. Don't go mad on this last one - no rock god signatures please

Click on Submit to add the album or save changes.

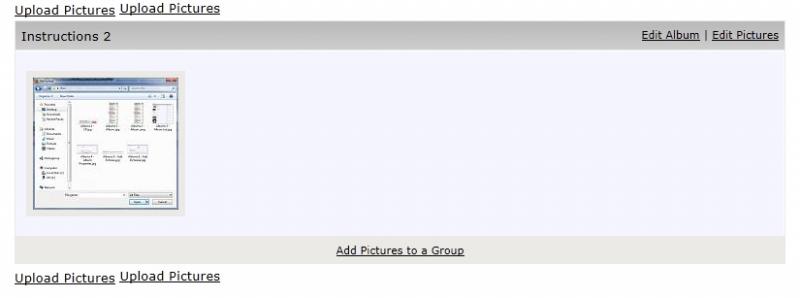
5 - Next the list of photos is shown. In this example I don't have any - yet.


If you look at the top and bottom there are several "Upload Pictures" links. To add a picture click on any of them.

6 - This is where you select your images to upload. You can choose up to 3 at a time, and these must be on your own computer.


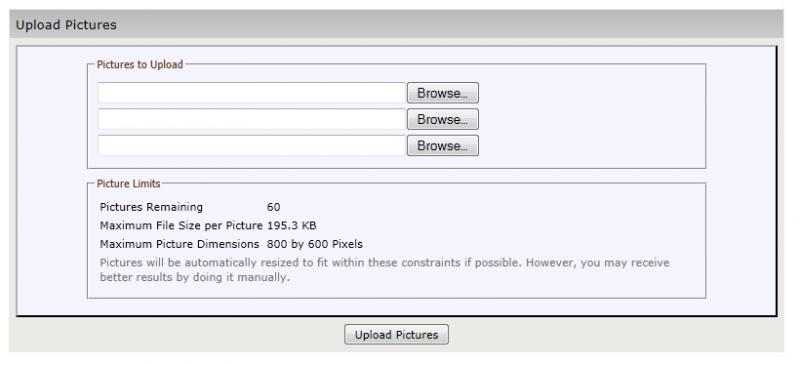
Click on Browse... to select an image. This is the usual file|open window you will see on your computer for other things.


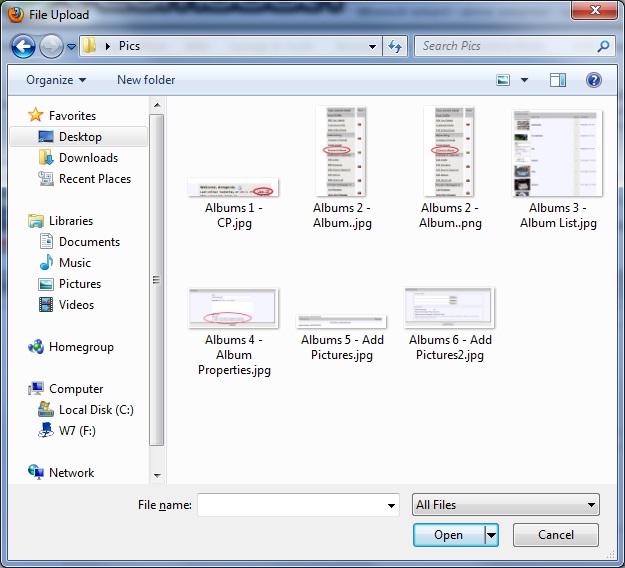
7 - Click on Open and the file name is copied into the window.


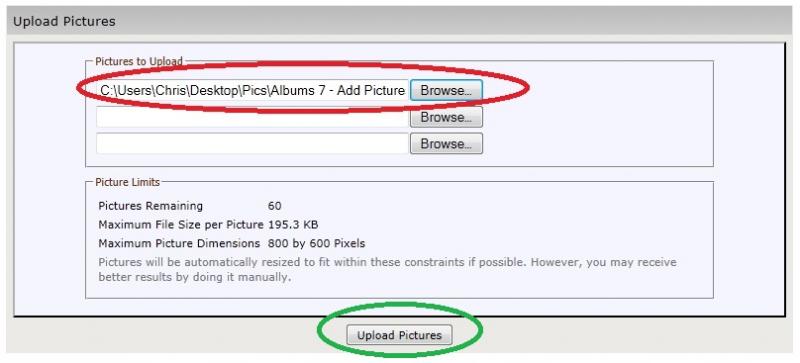
Repeat this for the other two file names if you need to. Note that your Image is not uploaded yet. You must click on the Green button to do the uploading.

8 - Once the images are uploaded, they are displayed in a list. In this example I only uploaded one image, they would appear on top of each other.


Note the options -
Delete This Picture - marks the image to be removed when the Save Changes is clicked.
Move to Album - you can move the image to another album by selecting it here.
This is the Album Cover - this is the image you will see in the list of albums. The first image you upload is the default one.
Save Changes - makes all this happen. Nothing changes until you click on this.

9 - Once uploaded the images are showin the album.


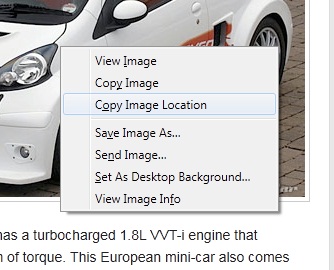
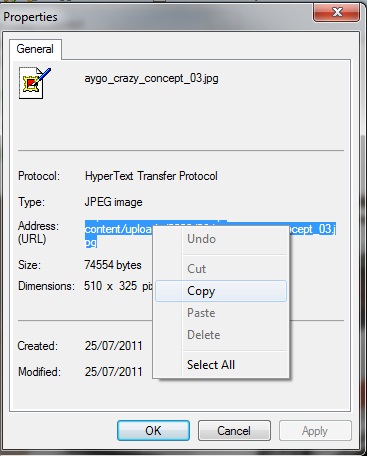
10 - To link an image to a post, see my above instructions. The code you need is made up for you on EM. Click on the image in your album and it is shown full size with the details you need underneath.


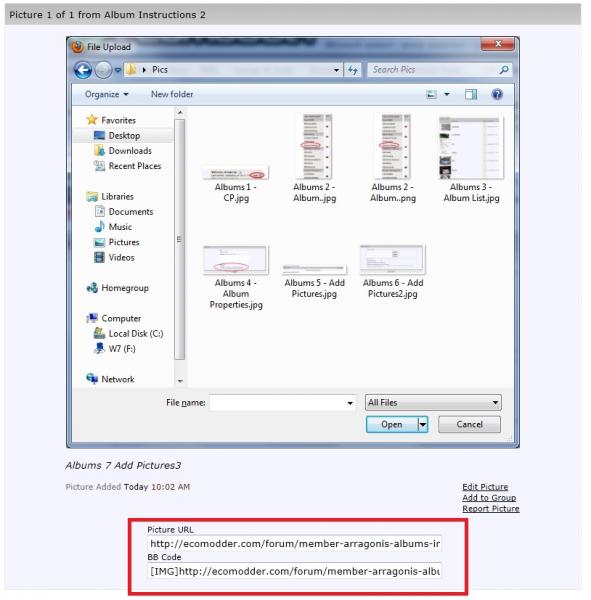
Copy the contents of the second box (Ctrl+C to copy) and paste it (Ctrl+V) into your new posting.
__________________
[I]So long and thanks for all the fish.[/I]

Last edited by Arragonis; 07-26-2011 at 05:38 AM..
  Reply With Quote
The Following 3 Users Say Thank You to Arragonis For This Useful Post:
COcyclist (08-28-2017), pletby (01-06-2016), rayjay (02-12-2012)
Old 07-26-2011, 05:32 AM   #8 (permalink)
The PRC.
 
Join Date: Oct 2009
Location: Elsewhere.
Posts: 5,304
Thanks: 285
Thanked 536 Times in 384 Posts
Quote:
Originally Posted by Frank Lee View Post
...So I put images in Photobucket...

BUT I hate when people reply to posts with large and/or many images by quoting and duplicating all those damned images again... why? Cuz I'm on dial-up and it really SLLOOWWWWWWSSS page loading down.

As far as the EM album, I haven't quite got the hang of that. ...
Frank - if you can get shots of Photobucket (or anyone else can as Frank is on morse code link ) - I'll add them to the instructions I'm going to do on hosting outside.

Each browser should detect the image is the same and only download it once - maybe a standard in the post title such as "Warning Pics" or "56K ? Go make a cup of tea" might be useful.

The album feature is worth a go as it is easy once you get the hang of it. Maybe try somewhere where you have a faster link, I can see 56K being frustrating.

Quote:
Originally Posted by euromodder View Post
On Apple's own Safari, it's "Copy Image Address" instead of location.
If you get me a screen shot, I'll add it to the instructions. If anyone wants to do a Linux one too I'll add it, PM me a link to your Album

Quote:
Originally Posted by JasonG View Post
Google /Picasa works well too.
Make a public album (mine is labeled "Ecomodder") or a private one with the permission "that have the link" and use the link as shown above.
I'm going to do one about image hosting options. I have picassa myself via Google accounts (recommended ) and its free but a little odd in some parts. If someone can do one for Photobucket, ImageBucket or something else that would be good.

Next one will be basic guide to image resizing.

EDIT - All images in JPG format for size / speed pls.
Ta.
__________________
[I]So long and thanks for all the fish.[/I]
  Reply With Quote
Old 07-26-2011, 05:34 AM   #9 (permalink)
The PRC.
 
Join Date: Oct 2009
Location: Elsewhere.
Posts: 5,304
Thanks: 285
Thanked 536 Times in 384 Posts
PS PS - Mods - could someone edit the thread title to include a warning about loads of pics please.
__________________
[I]So long and thanks for all the fish.[/I]
  Reply With Quote
Old 07-26-2011, 06:23 AM   #10 (permalink)
The PRC.
 
Join Date: Oct 2009
Location: Elsewhere.
Posts: 5,304
Thanks: 285
Thanked 536 Times in 384 Posts
Part 3 - Basic Resizing Images with Windows.

Most cameras take images which are very high resolution these days, so you should resize them before uploading to save spave and use less bandwidth. There are packages which can resize loads of images such as Picassa (which is free) and some freeware tools you can download to do it.

This is a guide to resizing single pictures for uploading using only stuff which comes free with Windows. I have screens from XP and Windows 7 as the menus are different (damn you Microsoft...).

1- Open your image. In Explorer right-click on the image and select Edit or Open With and choose Paint.

XP (also Windows 2000 / Me / 98 / 95)


Vista / 7


2. In Paint select the Resize tool. In XP this is on the menu as shown below.


On Vista it is an enigmatic icon on the main menu.


3 - Select how much to resize by. In my copy of XP it only has percentage options and you have to enter both horizontal and vertical - yours may be different.


But the basic idea is to select the scaling you want to apply. So to half the size, select 50% for both.


In Vista / 7 you have the option for pixels or percentage and the option to lock the ratio of height and width


So I chose the max width and paint fills in the height for me.


4 - The image is then resized.


You can then save it and upload as normal.

__________________
[I]So long and thanks for all the fish.[/I]
  Reply With Quote
Reply  Post New Thread


Thread Tools


Powered by vBulletin® Version 3.8.11
Copyright ©2000 - 2024, vBulletin Solutions Inc.
Content Relevant URLs by vBSEO 3.5.2
All content copyright EcoModder.com