Go Back   EcoModder Forum > EcoModding > Aerodynamics
Register Now
 Register Now
 

Reply  Post New Thread
 
Submit Tools LinkBack Thread Tools
Old 09-02-2012, 11:03 PM   #21 (permalink)
Master EcoModder
 
2000neon's Avatar
 
Join Date: Feb 2012
Location: Ontario, Canada
Posts: 596

VX - '94 Honda Civic VX
Team Honda
90 day: 47.95 mpg (US)
Thanks: 133
Thanked 89 Times in 66 Posts
For materials, I used 1/8" X 1" aluminum flat bar. I ended up using about 30' feet total.
To fasten it all together, I used 3/16" X 1/2" aluminum rivets, because it is quick, easy, secure and helps to keep things simple and clean. Also, I already had a rivet gun and a supply of rivets.

The skin is going to be made from a 4'X8' sheet of coroplast. I have not attached the coroplast yet, and I am still debating the best way to make the compound curve required for the back corners. I want to do it all in one piece, but that may not work too well. To attach the skin, it will also be riveted. To attach it along the rear window, I am going to bend up 2 or 3 "L" shaped pieces of aluminum per side to attach to the aluminum frame, and give a good mounting location.

I have all sorts of progress pictures of building the frame, but I won't bore you with those unless you would like to see them to see the order I built it in.

Here is the kammback frame. The hinges are mounted to the frame here already.
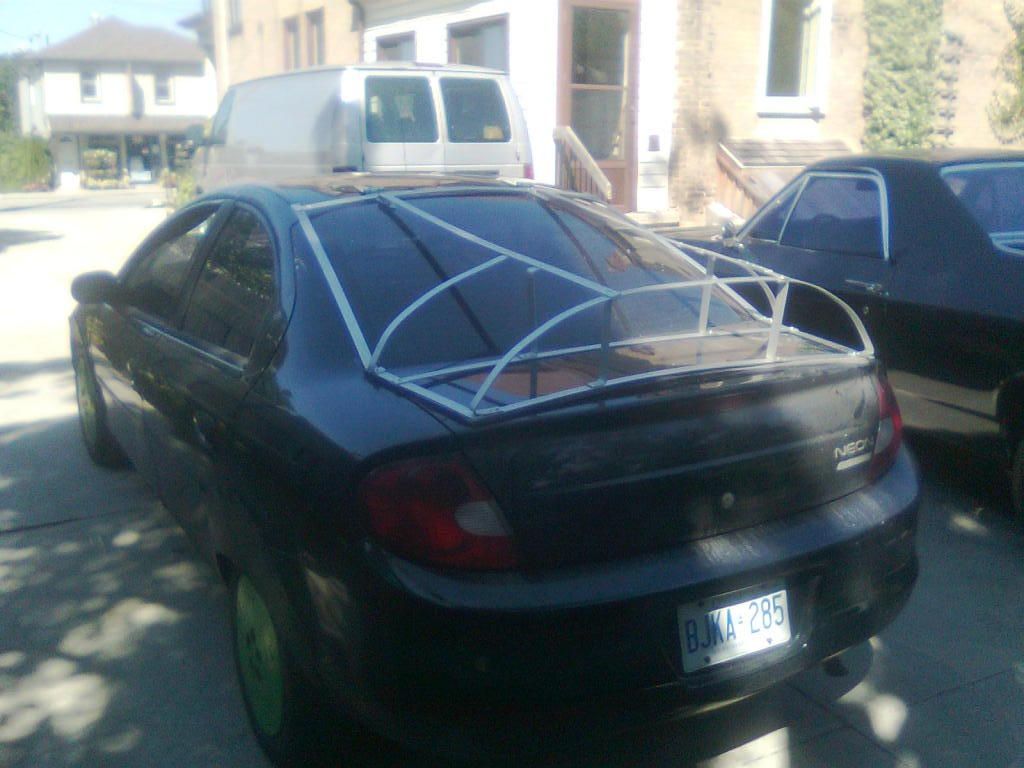


What I learned from my smaller kammback, was that any white or brighter surfaces reflected off the back window and caught focus when looking in the rear view mirror. So when I put the skin on this one, the inside of it will also be painted a flat black. Here you can see that I painted any parts of the aluminum that will be visible, to help with getting a good view out of the back.
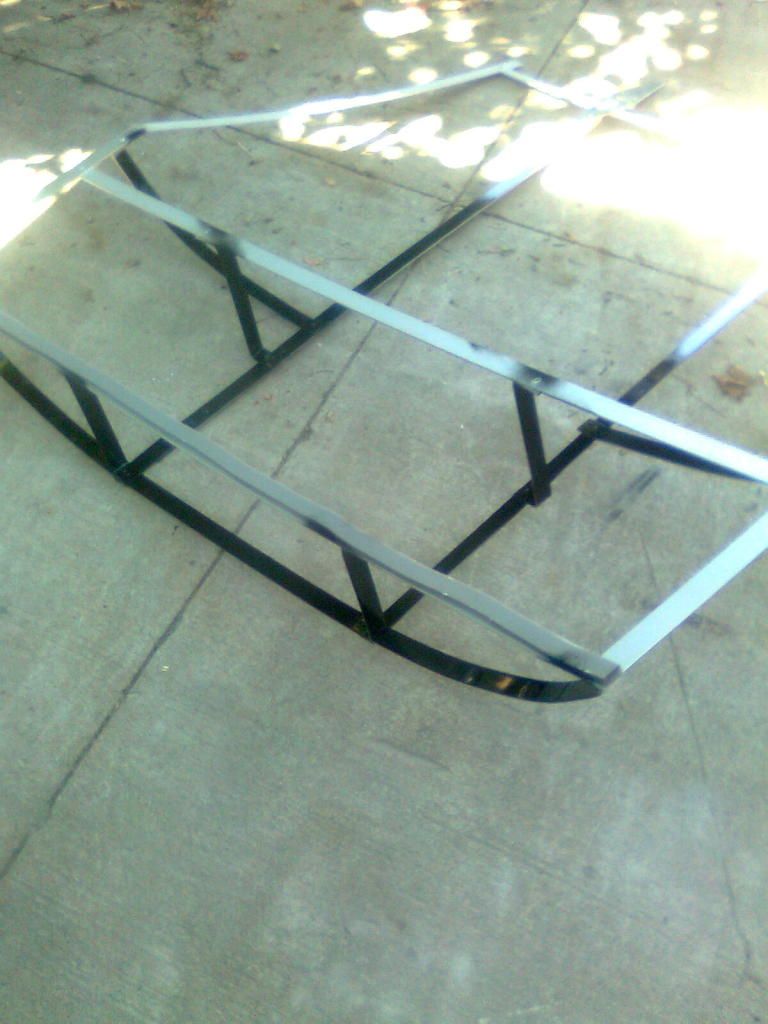


This part of the build went very quickly, probably because I have already built this about 5 or 10 times in my head by the time I touched any metal.

Other than the "L" brackets for attaching the coroplast by the window and actually attaching the coroplast, I'm pretty close to being done. I still need to put a pair of pins in the trunk at the back, which will work basically like hood pins to keep the kamm down, and centered and prevent it from "wiggling". Then all that is left is to mount the hinges to the car and do some testing.

I will be mostly doing tank-to-tank averages for testing. But I'm really excited to get some solid numbers, so I might do some A-B-A tests. The hinges will be mounted to the roof of the car with about a half a dozen rivets. So I might just bring out a drill, a handful of rivets and the rivet gun and do some coastdown testing. But that is for later.

I need to send a huge thank you to everyone here who has helped me out with inspiration, theory, and direct input with my build. I really appreciate it! You guys rock!

  Reply With Quote
The Following 2 Users Say Thank You to 2000neon For This Useful Post:
aerohead (09-04-2012), btracing (09-03-2012)
Alt Today
Popular topics

Other popular topics in this forum...

   
Old 09-03-2012, 07:34 AM   #22 (permalink)
Wiki Mod
 
Weather Spotter's Avatar
 
Join Date: Nov 2009
Location: Midland MI, USA
Posts: 2,042

Max - '14 Ford C-Max SEL
Thanks: 228
Thanked 304 Times in 210 Posts
Looking good

Keep it up!
__________________
  Reply With Quote
Old 09-03-2012, 09:37 AM   #23 (permalink)
Master EcoModder
 
2000neon's Avatar
 
Join Date: Feb 2012
Location: Ontario, Canada
Posts: 596

VX - '94 Honda Civic VX
Team Honda
90 day: 47.95 mpg (US)
Thanks: 133
Thanked 89 Times in 66 Posts
Thanks I'm happy with how well it has turned out so far, all the planning has made this really easy.
  Reply With Quote
Old 09-03-2012, 02:29 PM   #24 (permalink)
Sippin' gasoline
 
btracing's Avatar
 
Join Date: Aug 2011
Location: Netherlands
Posts: 41

ecohok 2 - '94 Volkswagen Polo Steilheck/Breadvan
Thanks: 7
Thanked 6 Times in 6 Posts
This Neon is looking very sweet indeed! Cool mods, the kammbach frame looks very nice.
  Reply With Quote
Old 09-03-2012, 05:16 PM   #25 (permalink)
Master EcoModder
 
2000neon's Avatar
 
Join Date: Feb 2012
Location: Ontario, Canada
Posts: 596

VX - '94 Honda Civic VX
Team Honda
90 day: 47.95 mpg (US)
Thanks: 133
Thanked 89 Times in 66 Posts
Thanks a lot. Its funny that I was originally nervous about the looks of a grill block, and now I step back and look at the car and even the bright green smooth wheel covers seem normal to me ha ha.
  Reply With Quote
Old 09-04-2012, 11:45 AM   #26 (permalink)
Batman Junior
 
MetroMPG's Avatar
 
Join Date: Nov 2007
Location: 1000 Islands, Ontario, Canada
Posts: 22,528

Blackfly - '98 Geo Metro
Team Metro
Last 3: 70.09 mpg (US)

MPGiata - '90 Mazda Miata
90 day: 54.46 mpg (US)

Even Fancier Metro - '14 Mitsubishi Mirage top spec
90 day: 70.75 mpg (US)

Appliance car Mirage - '14 Mitsubishi Mirage ES (base)
90 day: 62.14 mpg (US)
Thanks: 4,078
Thanked 6,977 Times in 3,613 Posts
By the way, 45.7 MPG (US) is really impressive for that car. Congrats.

You should keep a fuel log here as inspiration for other Neon drivers.

Looking forward to seeing the Kammback come together.
__________________
Project MPGiata! Mods for getting 50+ MPG from a 1990 Miata
Honda mods: Ecomodding my $800 Honda Fit 5-speed beater
Mitsu mods: 70 MPG in my ecomodded, dirt cheap, 3-cylinder Mirage.
Ecodriving test: Manual vs. automatic transmission MPG showdown


EcoModder
has launched a forum for the efficient new Mitsubishi Mirage
www.MetroMPG.com - fuel efficiency info for Geo Metro owners
www.ForkenSwift.com - electric car conversion on a beer budget
  Reply With Quote
The Following User Says Thank You to MetroMPG For This Useful Post:
2000neon (09-04-2012)
Old 09-05-2012, 10:57 AM   #27 (permalink)
Master EcoModder
 
2000neon's Avatar
 
Join Date: Feb 2012
Location: Ontario, Canada
Posts: 596

VX - '94 Honda Civic VX
Team Honda
90 day: 47.95 mpg (US)
Thanks: 133
Thanked 89 Times in 66 Posts
Thanks metro, I keep wanting to do a fuel log but always forget.

I have run into an obstacle with the kamm. I have the skin on it now,and am having a problem with a gap at the sides of the rear window, I have about 3/4" gap between the skin and the car. I have some room to pull the skin tighter,but I'm not sure how well I can close that gap. If I was making the kamm stationary I wouldn't be worried because I would just duct tape over the gap and seal it up, but that will stop the kamm from opening for the trunk. I'm worried that with any gap, the low pressure under the kamm will cause significant flow through the gap from the outside in.

Hmm.. Worst case scenario, I can tape it down for now and start some testing while I figure it out.
  Reply With Quote
Old 09-05-2012, 11:07 AM   #28 (permalink)
Batman Junior
 
MetroMPG's Avatar
 
Join Date: Nov 2007
Location: 1000 Islands, Ontario, Canada
Posts: 22,528

Blackfly - '98 Geo Metro
Team Metro
Last 3: 70.09 mpg (US)

MPGiata - '90 Mazda Miata
90 day: 54.46 mpg (US)

Even Fancier Metro - '14 Mitsubishi Mirage top spec
90 day: 70.75 mpg (US)

Appliance car Mirage - '14 Mitsubishi Mirage ES (base)
90 day: 62.14 mpg (US)
Thanks: 4,078
Thanked 6,977 Times in 3,613 Posts
First thing that comes to mind (after duct tape): what about incorporating some of that flat magnetic sheeting?

Might be tricky though if the C-pillars have compound curvature - the magnets won't want to easily form to a compound shape.
__________________
Project MPGiata! Mods for getting 50+ MPG from a 1990 Miata
Honda mods: Ecomodding my $800 Honda Fit 5-speed beater
Mitsu mods: 70 MPG in my ecomodded, dirt cheap, 3-cylinder Mirage.
Ecodriving test: Manual vs. automatic transmission MPG showdown


EcoModder
has launched a forum for the efficient new Mitsubishi Mirage
www.MetroMPG.com - fuel efficiency info for Geo Metro owners
www.ForkenSwift.com - electric car conversion on a beer budget
  Reply With Quote
Old 09-05-2012, 01:00 PM   #29 (permalink)
Master EcoModder
 
2000neon's Avatar
 
Join Date: Feb 2012
Location: Ontario, Canada
Posts: 596

VX - '94 Honda Civic VX
Team Honda
90 day: 47.95 mpg (US)
Thanks: 133
Thanked 89 Times in 66 Posts
Thats a good idea, I think that there might be a bit too much curve though.

I am thinking of maybe even building out coroplast from the bottom of it to get myself as close as possible, and maybe use some foam to seal it off. I have the pins bolted on at the back now, and so as soon as I mount the hinges to the roof it should keep a fair bit of pressure holding it down, so foam should seal I think (hope)

Edit: I just had another idea. I have seen pick up trucks with soft bed covers that have a handful of snaps on them to keep them down. I wonder if I could find and incorporate a few of those at the edges..

Or maybe velcro, but Im not sure if that would be strong enough, and how it would do with canadian winters.

Last edited by 2000neon; 09-05-2012 at 01:40 PM..
  Reply With Quote
Old 09-05-2012, 06:20 PM   #30 (permalink)
EcoModding Smurfer
 
Smurf's Avatar
 
Join Date: Aug 2012
Location: LaX
Posts: 293

Dime - '95 Chevy S10 LS ExtCab RWD
Pickups
90 day: 18.23 mpg (US)

G/A - '96 Pontiac Grand Am
Team Pontiac
90 day: 32.74 mpg (US)
Thanks: 52
Thanked 35 Times in 29 Posts
What about some good 1"-thick rubber weatherstripping? It'll seal, conform to curves, etc. If there's a bit too much of a gap, add a small section of aluminum strip to bring the gap down, then weatherstrip it. With the Kamm being secured on the roof of the car, and pinned into the trunk, I don't think you'd have much issue.

  Reply With Quote
Reply  Post New Thread


Powered by vBulletin® Version 3.8.11
Copyright ©2000 - 2024, vBulletin Solutions Inc.
Content Relevant URLs by vBSEO 3.5.2
All content copyright EcoModder.com