11-06-2011, 02:20 PM
|
#5171 (permalink)
|
|
PaulH
Join Date: Feb 2008
Location: Maricopa, AZ (sort of. Actually outside of town)
Posts: 3,832
Thanks: 1,362
Thanked 1,202 Times in 765 Posts
|
Hi Joe! Holy cow that looks like 10 times better than anything I have ever put together. How did you make the holes for the bus bars in the lexan (or whatever it is?)??? I quit sending lexan with kits since so many people (including me) had a horrible time cutting it.
Check this out for a relay that is triggered at a particular temperature:
Temperature Relay and Switch Sensor.
One of the temperatures is 104 degF hurray!
|
|
|

|
 Today Today
|
|
|
|
 Other popular topics in this forum...
|
|
|
|
|
11-06-2011, 02:21 PM
|
#5172 (permalink)
|
|
EV test pilot
Join Date: Jan 2008
Location: Oconomowoc, WI, USA
Posts: 4,435
Thanks: 17
Thanked 663 Times in 388 Posts
|
Joe,
I would just rig the fans so that they are always on when the controller is. Small fans take very little amperage.
It would just make the whole system very simple, no messing with sensors etc. My controller has just been air-cooled, and been fine, but it does depend on how many amps/volts you are running.
|
|
|
|
|
11-06-2011, 02:38 PM
|
#5173 (permalink)
|
|
EcoModder
Join Date: Mar 2010
Location: New Zealand
Posts: 181
Thanks: 0
Thanked 33 Times in 20 Posts
|
Yeah, just connect them up so they are always on. I'm surprised you bothered with fans as a decent lump of finned heatsink does the job very well. Here's a picture of mine, with the software modified to give over 600A and I've yet to see the heat spreader (mine's Cu) temperature go over 45 deg C even on a warm day (air temp 28 deg C)
The 4 bolts you can see are the ones through the heat spreader and there are 4 more, short ones, that simply clamp the heat sink to the case. Lots of thermal grease between spreader/case and case/heatsink.
You might note that my case is upside down to the original design as I didn't want the mounting flange on the same side as the heatsink - for obvious reasons.
__________________
Sometimes I sits and thinks and sometimes I just sits.
Last edited by harlequin2; 11-06-2011 at 02:43 PM..
Reason: added note
|
|
|
|
|
11-06-2011, 02:57 PM
|
#5174 (permalink)
|
|
EcoModding Lurker
Join Date: Apr 2011
Location: Reseda,Ca
Posts: 22
Thanks: 0
Thanked 7 Times in 4 Posts
|
Hey Paul,
Thanks for the link. That thermal switch was just what I was looking for.
As for cutting the lexan, I drilled 2 3/8 holes to remove most of the material and then used a dremel router to finish the profile. When drilling, you have to be careful when breaking thru, I drill into a piece of wood and use very low rpm to help prevent it from grabbing. One other thing I learned the hard way about the stuff is that loctite destroys it, so you need to keep it away from lexan. It just causes all these little fractures and it just falls apart. It's very sad to see your finished part crumble in front of your eyes.
Ben, thanks for your input.
I was considering leaving them on all the time, the three should use 0.54A, which is not much. In fact at first, I was planning to see if I could get away without using the fans at all.
My Geo is(hopefully) going to be a low Amp draw(144v)/ watt per mile car, at least that is what I'm shooting for. That coupled with the fact I don't drive the freeway much and don't need to climb hills, should keep the controller temps down.
harleqiun2,
Thanks for the temp data. I may not have to use the fans at all.
When I went looking for heatsinks, the large ones were very pricey, and due to building my controller prior to getting my Geo, would not work for my planned installation.
That lead me to the CPU coolers($5.99 ea) that fit directly above the heat spreader and don't get in the way of my mounting brackets.
Thanks again,
Joe
Last edited by JoeG; 11-06-2011 at 03:13 PM..
Reason: added response to post
|
|
|
|
|
11-07-2011, 08:41 AM
|
#5175 (permalink)
|
|
EcoModding Apprentice
Join Date: Nov 2010
Location: Annapolis
Posts: 159
Thanks: 0
Thanked 32 Times in 27 Posts
|
Quote:
Originally Posted by JoeG

Hello all,
I'm just putting the finishing touches on my 500A Revolt controller that I got from Paul & Sabrina. It's seems to be working fine and has turned the wheels on my still unfinished 91 Geo metro conversion using a 12V battery. I haven't got the traction pack yet for final testing.
For cooling I've mounted 3 CPU coolers with heatsinks and fans.
My electrical knowledge is limited and I've been unable to come up with a simple way to have the fans automatically come on at 100deg F(40C) or so.
It seems that all the radiator fan controllers start at 160F, which is higher than I would like.
Does anyone have any suggestions?
Thanks,
Joe
|
Are these two, three or four pin fans?
Two pin fans take just +12V. A few have external thermal sensors on a short wire that influences the speed, but most spin at full speed all of the time.
Three pin fans add a tachometer output so that a fan monitoring circuit can sense how fast they are spinning, and detect when they have failed. The output is open collector, and needs a pull-up to the high logic level.
Four pin fans add a PWM input for speed control. The input expects a 25KHz PWM signal. It has a has a weak internal pull-up to 5V, so if nothing is connected to the pin the input looks like a 100% PWM and the fan runs at full speed.
The input requires little current, and can easily be driven by controller output if you have a spare output pin that is 5V tolerant. Many modern chips run at 3.3V or less, and use a simple open-drain MOSFET as a buffer. But the Revolt uses 5V and could directly drive the fan speed control.
But in the end you'll probably find it simpler to replace the fans with ones that have thermostatic control sensors than add smart fan control to a controller that doesn't have it built in. |
|
|
|
|
The Following User Says Thank You to DJBecker For This Useful Post:
|
|
|
11-07-2011, 10:13 PM
|
#5176 (permalink)
|
|
EcoModding Lurker
Join Date: Apr 2011
Location: Reseda,Ca
Posts: 22
Thanks: 0
Thanked 7 Times in 4 Posts
|
Hey DJ,
You sure know your computer fans.
My fans are 3 pin fans. I guess for $5.99 you don't get top of the line. Which is probably a good thing, because I don't have a clue as to how I would modify/reprogram the revolt controller to drive them.
As it stands, based on the feedback I received above, I'm hoping to get away with the heatsinks only. There is an alure to keep it as simple as possible. The fans might be needed only a few months a year here in LA area of California.
Thanks,
Joe
|
|
|
|
|
11-08-2011, 05:42 PM
|
#5177 (permalink)
|
|
EcoModding Apprentice
Join Date: Nov 2010
Location: Annapolis
Posts: 159
Thanks: 0
Thanked 32 Times in 27 Posts
|
I should have suggested a specific solution.
A simple bi-metallic switch can easily handle the current for a few 12VDC fans. Something like a series 36T Therm-O-Disc, which handles up to 10 amps, would do nicely.
Most are built in large batches for a specific product, but they are easy to find as surplus parts from a production run. There are some on FleaBay right now, 45C N/O (i.e. they close when the temperature gets hotter than 45C) priced at 2 for $2.
|
|
|
|
|
11-08-2011, 09:51 PM
|
#5178 (permalink)
|
|
EcoModding Lurker
Join Date: Apr 2011
Location: Reseda,Ca
Posts: 22
Thanks: 0
Thanked 7 Times in 4 Posts
|
Hey DJ,
Therm-O-Discs are a whole new avenue to research. I went to flea bay and there were alot of them listed. I then went to the company website and down loaded a PDF catalog to help figure out their product codes. At this time there was only normally closed switches available in my temp range, but I'll keep my eye out and see what pops up. Paul posted a link for a bi-metal switch,a few posts back, that is sold retail and I found a 35C closing , normally open, 12V, 1A rated switch for $3.95 at anchor-electronics. It's listed in their PDF catalog. They have a $20 min order, so I won't try that until I need some other stuff also.
Thats one of the great things about this hobby, you never stop learning new things.
Thanks again for the info.
Joe
|
|
|
|
|
11-08-2011, 11:20 PM
|
#5179 (permalink)
|
|
Master EcoModder
Join Date: Apr 2009
Location: Charlton MA, USA
Posts: 463
Thanks: 31
Thanked 183 Times in 94 Posts
|
Uprising 2.0
Hey Everyone,
I have just finished Uprising 2.0. Before I ordered the PCB, I decided to ask a friend what he though. He gave me some ideas and I changed some stuff around.
Changes are:
Full dc-dc power isolation
Full Opto isolation on inputs and outputs
Additional Low Voltage Detection
I also reworked alot of the isolation areas so there shouldn't be any problems.
One other note is I had to remove 1 General input. Total is 5 now.
Here are the updated Schematic and Layout.
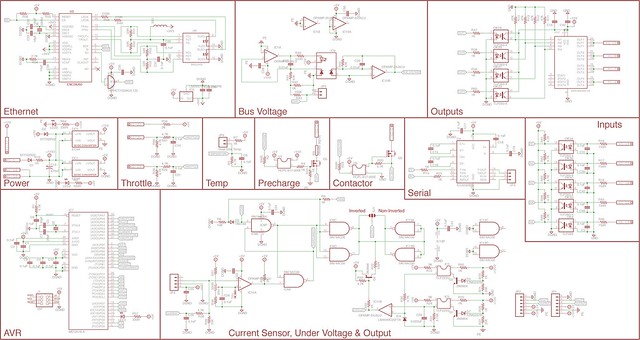 Uprising Rev2 Sch
 by AdamBrunette, on Flickr
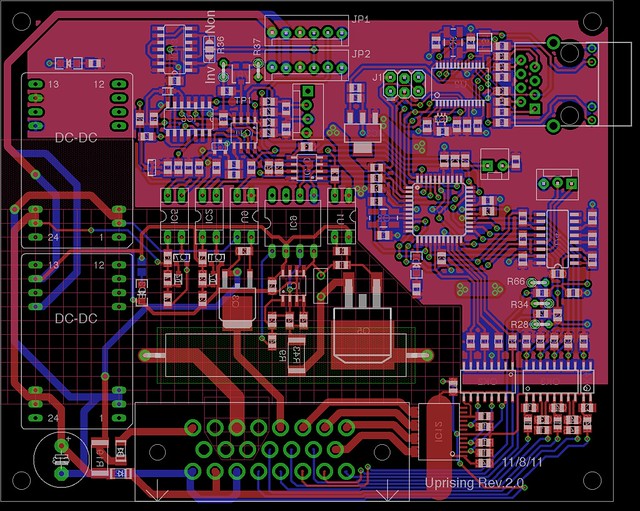 Uprising Rev2
 by AdamBrunette, on Flickr
Also, I have finished the design for the 3 module driver board. This will drive 3 CM400DU-12F IGBT's or similar. It uses 1 VLA-500 Driver module.
The board also makes use of the Desat detection and *SHOULD* be able to generate a fault back to the controller on short circuit. Only way to know if it works, is to test it.
Here is the Schematic and Layout for Rev1.
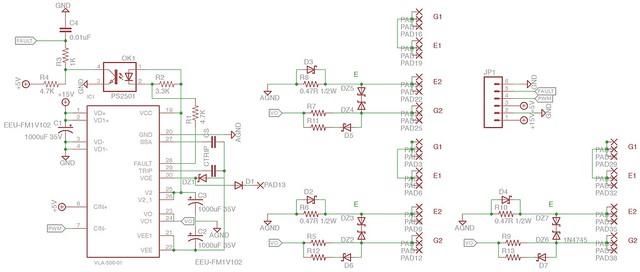 3 Module Driver Sch
 by AdamBrunette, on Flickr
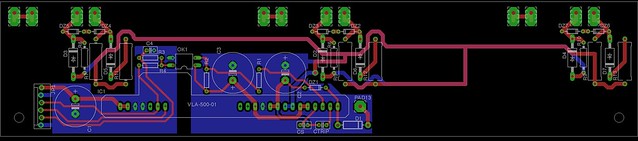 3 Module Driver
 by AdamBrunette, on Flickr
I will be working on the driver board in a few weeks when I can save some more money for getting the board made. I ordered the control board which came to $53 and should be here in a week. The site says $33 each, but they dont tell you about the $20 S&H..... When I can save another $53 I will order the driver board, But for now, Im spending my budget on developing the control board.
Alright, Time for bed. I will be ordering the parts for the control board on Thursday, So I will get some preliminary prices then.
-Adam |
|
|
|
|
The Following 3 Users Say Thank You to adamj12b For This Useful Post:
|
|
|
11-09-2011, 01:10 AM
|
#5180 (permalink)
|
|
EcoModding Apprentice
Join Date: Nov 2010
Location: Annapolis
Posts: 159
Thanks: 0
Thanked 32 Times in 27 Posts
|
Quote:
Originally Posted by JoeG
Hey DJ,
Therm-O-Discs are a whole new avenue to research. I went to flea bay and there were alot of them listed.
|
Try searching for "temperature switch" or "thermostat switch". There are many available that are normally open.
|
|
|
|
|