10-23-2012, 11:01 AM
|
#1 (permalink)
|
|
Master EcoModder
Join Date: Jan 2010
Location: Independence, KY
Posts: 603
Thanks: 89
Thanked 47 Times in 44 Posts
|
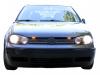
 Skirts on the golf (rear fender skirts: 2002 VW Golf TDI)
I have wanted to add skirts to a car for awhile I finally got to start on them.

This is my first attempt to check clearance and get an idea of how I want to set them up. I only created the one and copied the shape so I can cut a second one. With only the one currently installed I did see some improvement on a downhill glide from 81mph normally at the first overpass I would be at ~72 and would have to be in gear before the next overpass now I'm at ~74.5 at the first and 70 at the end of the second overpass.
It is not the best way to test and will be more dramatic with them on both sides.
A few changes that I can make is in the back it can go about 1-1.5in lower and the front can go 3-4in lower without getting in the way. What I'm not sure of is how I should transition the lower front to the back. Should I make it a straight line (see red line in pic) or curve it some like a flat S (green line)?
I'm still thinking of how I will attach it I have a few ideas but it will depend if I decide to do an external (as depicted) or flush mount.
__________________
 I move at the speed of awesome.
"It's not rocket surgery!" -MetroMPG
Last edited by Phantom; 10-23-2012 at 11:07 AM..
|
|
|

|
 Today Today
|
|
|
|
 Other popular topics in this forum...
|
|
|
|
|
10-23-2012, 05:32 PM
|
#2 (permalink)
|
|
Master EcoModder
Join Date: Jan 2008
Location: Sanger,Texas,U.S.A.
Posts: 16,534
Thanks: 24,520
Thanked 7,438 Times in 4,818 Posts
|
red or green
I suppose the idea is to get as much flow support surface without aggravating frontal area back there,so that said,it would point toward the green line version.
Renault,and one of their VESTA concept cars comes to mind as one car which had the abbreviated skirts with a raked bottom edge.
I ended up with this on the truck,going from a full-coverage skirt,back to a partial-coverage skirt.And then I altered the rocker panels fore and aft,to pick up where the skirt left off. This way,I wasn't adding frontal area.And the truck is indicating it's highest ever mileage,so I don't think it hurts too much.
__________________
Photobucket album: http://s1271.photobucket.com/albums/jj622/aerohead2/
|
|
|
|
|
10-23-2012, 06:08 PM
|
#3 (permalink)
|
|
Master EcoModder
Join Date: Aug 2011
Location: Warren, MI
Posts: 2,456
Thanks: 782
Thanked 669 Times in 411 Posts
|
If you can clear it, or even space out the rear end, get it as low as possible. Horizontal cutoff is probably best. There may be pre-existing holes in the fender lip for you to bolt a structure onto, which means you could go as low as the rocker panels. Check out basjoos's structured skirts for inspiration.
Just don't forget to make sure you can get the wheel/tire out- if not by simple clearance, perhaps by a hinged or removable skirt.
__________________
He gave me a dollar. A blood-soaked dollar.
I cannot get the spot out but it's okay; It still works in the store
|
|
|
|
|
10-24-2012, 04:48 PM
|
#4 (permalink)
|
|
Batman Junior
Join Date: Nov 2007
Location: 1000 Islands, Ontario, Canada
Posts: 22,541
Thanks: 4,085
Thanked 6,989 Times in 3,619 Posts
|
If I'm not mistaken, your Golf has a tricky wheel well "lip" for figuring out an attachment method. (A flat surface, with no 90 degree bend toward the car's centerline like most other cars.) It'll be interesting to see how you work with that.
|
|
|
|
|
10-25-2012, 01:27 PM
|
#5 (permalink)
|
|
Master EcoModder
Join Date: Jan 2010
Location: Independence, KY
Posts: 603
Thanks: 89
Thanked 47 Times in 44 Posts
|
I cannot go much lower in the back since the back curves in more than the front. In the picture above the front edge has about an inch between the skirt and the wheel the back on the other hand only has about a pinky width of extra space.
I drove the car for 3 days with it installed about 400mi with speeds upto 80mph. One thing that I would notice is I would have to retape the back corner after each 90mi trip to work as the air pushed the cardboard out at that corner and the tape would not stick to the card board.
I might think of spacing the back edge out a little leaving a 1/4inch gap to vent the pressure to the back of the car. This option I'm not sure about but I can always add that after the fact to test.
Quote:
Originally Posted by MetroMPG

If I'm not mistaken, your Golf has a tricky wheel well "lip" for figuring out an attachment method. (A flat surface, with no 90 degree bend toward the car's centerline like most other cars.) It'll be interesting to see how you work with that.
|
That is correct and the screws that hold the wheel liner are at the very bottom or are about 3in in from the edge. I think the easiest way to get it to mount will be to cut a few slits in about half an inch from the edge coat a magnet in some glue and shove the magnet into the slit. That way I will have a magnetic attachment method, making it easy to install and remove. I just need to make sure the body is magnetic and figure out how strong/many I will need currently I have 9 magnets that hold 3lbs and I will test with that soon to see how they hold.
__________________
I move at the speed of awesome.
"It's not rocket surgery!" -MetroMPG
|
|
|
|
|
10-25-2012, 02:10 PM
|
#6 (permalink)
|
|
T-100 Road Warrior
Join Date: Apr 2008
Location: The Woodlands, TX
Posts: 1,921
Thanks: 3,502
Thanked 1,395 Times in 968 Posts
|
While magnets seem like a good idea, mechanical fasteners are a better bet to keep things in place. How many external panels do you find vehicles (airplanes, trucks, cars, buses, trains, boats, or helicopters) that are magnetic? All of them use some sort of mechanical fastener to keep things locked down and from gitting blown/ripped off if/when the air gits under the panel and catches it. 
__________________
Dark Aero-The world's first aerodynamic single wheel boat tail!

|
|
|
|
|
10-25-2012, 04:56 PM
|
#7 (permalink)
|
|
Master EcoModder
Join Date: Aug 2012
Location: northwest of normal
Posts: 29,422
Thanks: 8,369
Thanked 9,128 Times in 7,537 Posts
|
Sorry for the bad photo-chopping; I'm forcing myself to learn GIMP 2.8:

You will need a stiffening bead or rib at the bottom of your sheet material. Given that you could curve the edge up and in abaft the wheel centerline.
Those three dots? Dzus fasteners on tabs riveted to the lip.
If you cut your material out of an old car top you can get compound curve for free. It will catch highlights better, flat skirts and moon disks look funny.
Last edited by freebeard; 10-25-2012 at 05:00 PM..
Reason: addendum
|
|
|
|
|
10-26-2012, 02:27 PM
|
#8 (permalink)
|
|
Master EcoModder
Join Date: Jan 2010
Location: Independence, KY
Posts: 603
Thanks: 89
Thanked 47 Times in 44 Posts
|
Quote:
Originally Posted by BamZipPow
While magnets seem like a good idea, mechanical fasteners are a better bet to keep things in place. How many external panels do you find vehicles (airplanes, trucks, cars, buses, trains, boats, or helicopters) that are magnetic?
|
Almost all cars have magnetic panels on the outside unless they are made of a non-ferrous material ") . I know what you mean though.
For the attachment though I am not willing to drill into the body. I have thought about having a little U groove attached near the top back and then creating a clamp to hold it on.
If I go the clamp rout it would probably be built like this:
1. Bolt
2. Metal washer
3. rubber washer
4. Cut washer (for use as a spacer that will be even with body)
5. rubber washer
6. Wheel skirt
7. Metal washer
8. nut
The nut and bolt might be replaced with something like a hood pin.
I could also mount it from the inside so the air pressure will push it tighter to the car.
__________________
I move at the speed of awesome.
"It's not rocket surgery!" -MetroMPG
|
|
|
|
|
10-26-2012, 04:02 PM
|
#9 (permalink)
|
|
Master EcoModder
Join Date: Aug 2012
Location: northwest of normal
Posts: 29,422
Thanks: 8,369
Thanked 9,128 Times in 7,537 Posts
|
Quote:
|
Almost all cars have magnetic panels on the outside unless they are made of a non-ferrous material .
|
I have a car. Where should I look for "magnetic panels on the outside" on mine?
Quote:
|
For the attachment though I am not willing to drill into the body.
|
Fair enough.
Quote:
I have thought about having a little U groove attached near the top back and then creating a clamp to hold it on.
If I go the clamp rout it would probably be built like this:
1. Bolt
2. Metal washer
...
7. Metal washer
8. nut
|
I'm having trouble picturing this. Bolt to the outside ...or nut?
Quote:
|
The nut and bolt might be replaced with something like a hood pin.
|
At the risk of repeating myself: Dzus fastener

Quote:
|
I could also mount it from the inside so the air pressure will push it tighter to the car.
|
I'm also having trouble imagining this.
|
|
|
|
|
10-27-2012, 06:52 PM
|
#10 (permalink)
|
|
Aero Wannabe
Join Date: Dec 2007
Location: NW Colo
Posts: 738
Thanks: 705
Thanked 219 Times in 170 Posts
|
I have the same car and have been looking at this for some time. There are three screws that hold the fender liner in. One at the top, one low in the front and one high in the back. I cut and bent an aluminum piece that goes under the factory screw head and extends down below the fender lip to take a screw or Dzus fastener. That is as far as I got so I'll be watching your build with interest. Incedently, the fender liner bolts are right where Freebeard shows them in his illustration.
__________________
60 mpg hwy highest, 50+mpg lifetime
TDi=fast frugal fun  https://ecomodder.com/forum/showthre...tml#post621801

Quote:
Originally Posted by freebeard
The power needed to push an object through a fluid increases as the cube of the velocity. Mechanical friction increases as the square, so increasing speed requires progressively more power.
|
|
|
|
|
|
The Following 3 Users Say Thank You to COcyclist For This Useful Post:
|
|
|