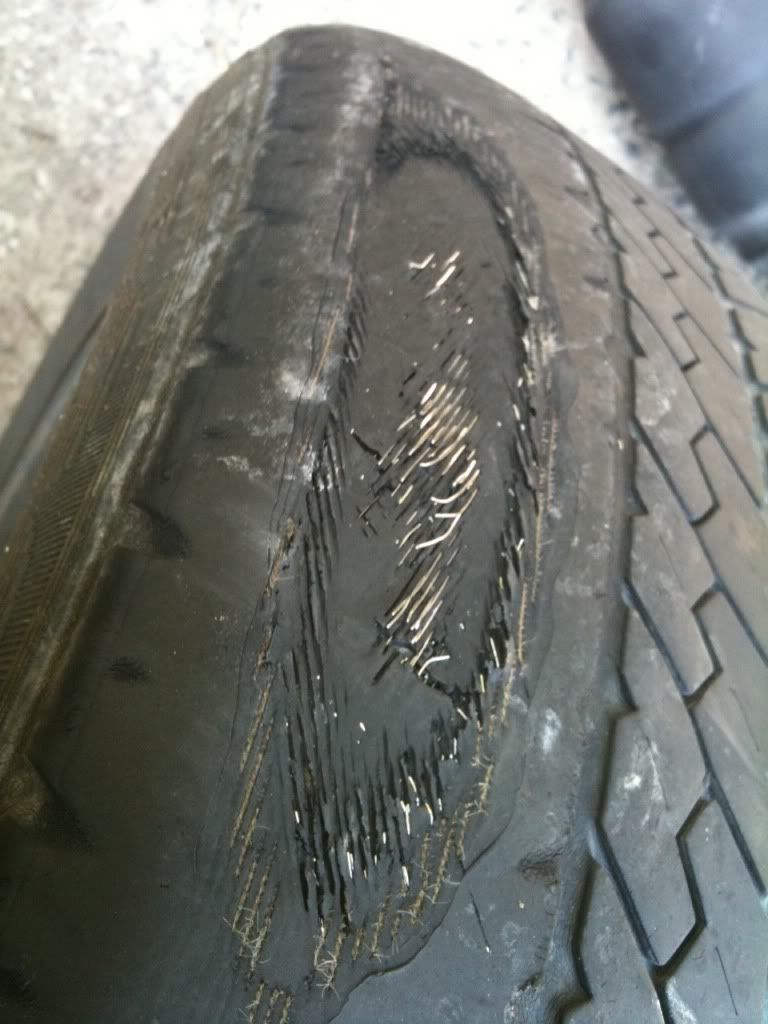
Solution to rear tire inside edge wear on Ford Focus all models, all years:
If you are being told the rear tires are aligned within spec, but still wearing inside edge of rear tires, this can be the answer.
The primary reason is too much negative camber for too little weight. This causes the rear tires to travel on the inside edges rather than on the tread surface. The most typical solution offered by Ford and Tire Retailers is to rotate more frequently, but this just wears 4 edges rather than 2 when alignment is within spec. Ford did not make rear camber setting adjustable, so you have to modify a suspension component, the upper control arm to hub connection point. Ford will not do this for you.
Purchase an aftermarket camber bolt set; <$35. I used the Specialty Products Company part number 81310. I think this is the most common and found at local auto parts retailers, and on the internet. The following instructions are for this bolt, to remove negative camber; i.e. make the wheel perpendicular to the ground (or almost).
The kit comes with 2 bolts, each with 2 washers, and nuts. The bolt is installed in the upper control arm where it joins with the hub, one on each side of the car. The installation is as follows:
1. Set the parking brake. Break the lug nuts free on rear wheels. Block (chock) the front wheels.
2. Jack up the rear of the car, and support with floor jack stands. I placed stands under lower control arm bracket.
3. Remove the rear wheels
4. Remove the bolt from the upper control arm at the hub. (Repeat these steps on the other side of the car)
5. The weld nut is still on the hub frame, and must be removed. This is the only tricky part, so take your time. I used a Dremel tool with a cut-off wheel. I had a 90 degree drive on the dremel tool as it improved control, and allowed easier access. Wear safety glasses. The weld nuts have 3 points where they are welded, as seen by imprints on the collar of the nut. The object is to cut only 1 weld free. Cut where the weld nut joins the hub, in effect, sliding the cut-off wheel between the hub frame and the weld nut edge. After making as deep a groove as possible without getting close to the brake line (be careful); use a hacksaw. Remove the blade from the hacksaw and reassemble in place with the blade below the brake line and hacksaw frame above the brake line. Take your time and saw carefully between the weld nut and hub frame. Eliminating 1 weld spot and making a grove is the objective. When you have sawn as much as possible, remove the hacksaw. Take a small cold chisel that fits down into the grove, and give it a whack. The cold chisel acts as a wedge to separate the parts (objective is side-ways pressure). The other 2 weld spots will pop loose. Weld nut gone, hard part done.
6. With the dremel tool cut a notch on the top edge of bolt head, aligned with the high-cam lobe on the bolt shaft, so you know where high-cam is after installation (Also, in the future ,to make sure it hasnt moved for some reason).
7. Coat the bolt shaft and cam with anti-seize lubricant. Leaving the washer on the bolt, with the big tab pointing out, install the bolt. Make sure the little tab on the washer fits into the hole on the hub frame (this is the adjustment mechanism). The cam on the bolt now sits inside the upper control arm bolt hole.
8. Install the other washer (big tab out, little tab in hub frame bolt hole) and nut. Thread on the nut until the little tabs cannot escape from the hub bolt holes (snug but not tight). Positioning adjustments are ready to be made to reduce negative camber.
9. Rotate the bolt head until the notch you made (high-cam) points to the center of the car (away from you). Keep it in this position while doing the next 2 steps.
10. Rotate both washers big tabs by tapping with a pin-punch and hammer. Take your time. The little tab has to stay inside the hub frame bolt hole. Be careful of brake line and brake bleeder valve. If the big tabs are toward the center of the car (away from you on the back side of the bolt), the hub frame hole has been extended to its maximum outward position (via the little tab). In effect the control arm has been lengthened, making the hub more vertical.
11. Tighten the bolt. Hold the bolt head, so cam position does not change, and tighten nut. Youre done.
Now would you like to know what the new camber setting is? If yes, heres a shade-tree mechanics way of checking. If done properly I bet its more accurate than a 4 wheel alignment for $80.
1. Take the car around the block to allow everything to settle in.
2. Park the car on level ground. (My garage cement floor is perfect)
3. Take a 2-foot carpenters level (plumb-bob string?) . Stand it on-end next to the wheel. Make sure the bubble, perpendicular to wheel, shows it is absolutely vertical. Holding in vertical position, on the center-line of the wheel, measure the distance to the bottom edge of the wheel; measure the distance to the top edge of the wheel. The wheel edge may have some surface contours so position the car so the same contour on top and bottom align vertically through the center-line of the wheel. There should be some measurable difference. In my case, the top distance measured 1/8 greater than the bottom on each rear wheel. I have 16 wheels, so multiplying each by 8 gave a ratio of 1:128. The question is what degree of negative camber does this represent?
4. Im terrible at math, so I went to the web
this stupid site will not let me include the link but search for "Gradient calculation", "Rise Over Run Ratio Calculator" Select RATIO.
Enter Input rise = 1; Input run = 128. Select Calculate. My car now has a negative camber of .447 degree. For the 2009 Focus the range is 0.0 2.0 according to local alignment shop.
If the results are not enough negative camber, loosen the bolts and tap the washers around until correct degree is achieved. To my knowledge it is not required both rear wheels have exactly the same camber (shops only seem to care that each is within range). If you would like to know how successful this process is, you could perform this same measurement before starting the job; allowing comparison of before and after.
There are many considerations for the desired amount of negative camber including weight typically carried in the rear, aggressiveness of driving, etc. The internet is full of good articles.
If the inside edge of the tire is not only wearing but also cupping (also called feathering); then worn suspension parts may be the cause. Most common is the shock absorber. My opinion is, with an entry level vehicle, Ford did not spend too much on the rear shocks. These are easily changed to an aftermarket product with more responsive characteristics. But, removing negative camber will always help as the entire tread surface is now in contact with the road, not just the inside edge.
If this method did not provide enough correction, there is a more expensive alternative. Moog offers an adjustable upper control arm replacement; approximately $275 for the pair. These are usually used when the car is lowered. I have not tried these, as it was not necessary in my case. Frankly, I think maybe this is used to shorten the control arm, not lengthen it, so Im not sure if this is a solution for a stock Focus.
It takes a long time to describe, but I can do the entire job in < 2 hours. The first time it took >4 hours because I was figuring out all the stuff I just described. In my case, visually from the rear, confirms the tires are now vertical, compared to before when they looked slanted to the inside
like this / \ (well, not quite THAT bad).
Hmmm
I wonder if I turned the washers so big tabs were in opposite directions (1 in, 1 out), could toe-in be changed? Not that I would, but interesting thought. Seems knowledge just raises more questions.

Good Luck,


 Today
Today