Go Back   EcoModder Forum > EcoModding > Fossil Fuel Free
Register Now
 Register Now
 

Reply  Post New Thread
 
Submit Tools LinkBack Thread Tools
Old 11-27-2012, 12:54 PM   #41 (permalink)
Super Lurker!
 
Slow_s10's Avatar
 
Join Date: Sep 2012
Location: Chesapeake, VA
Posts: 88

Rusty - '88 Chevrolet S10 base
90 day: 23.72 mpg (US)

Doc - '08 Honda Civic EX-L
90 day: 29.6 mpg (US)
Thanks: 4
Thanked 14 Times in 11 Posts
Yeah I hear ya about wanting to practice with foam and fiberglass by making something simple first like a tonneau.

Also for what it's worth the tonneau that I have now is also a fiberglass/foam composite. It was manufactured by a company called Checkmate. The foam that they used in it's construction is the same bead style foam that you are using and the core is only about an inch thick. I have no idea if they used any coating on it or what kind of resin they used but I just thought I would throw that out there. Also for what it's worth considering it's very lightweight construction it is actually very strong.

__________________
-Kevin
  Reply With Quote
Alt Today
Popular topics

Other popular topics in this forum...

   
Old 11-27-2012, 07:19 PM   #42 (permalink)
EV test pilot
 
bennelson's Avatar
 
Join Date: Jan 2008
Location: Oconomowoc, WI, USA
Posts: 4,435

Electric Cycle - '81 Kawasaki KZ440
90 day: 334.6 mpg (US)

S10 - '95 Chevy S10
90 day: 30.48 mpg (US)

Electro-Metro - '96 Ben Nelson's "Electro-Metro"
90 day: 129.81 mpg (US)

The Wife's Car - Plug-in Prius - '04 Toyota Prius
90 day: 78.16 mpg (US)
Thanks: 17
Thanked 663 Times in 388 Posts


Did some carving today… Not Turkey, styrofoam!

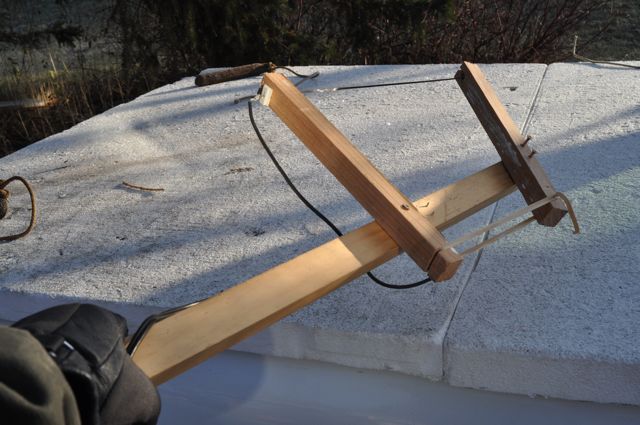
I took a look at a few different ways of cutting the foam. I started with a home-built hot wire cutter. It didn’t work as well as I hoped. I used a heating wire from an old electric space heater. That is a flat wire. It cut great on edge, but would always kinda fold over, so it was hard for me to cut a straight line with it.

I also tried just a plain old hand saw. That actually worked great (other than the great snow-storm of white plastic dust!) Foam is so easy to cut that a power tool doesn’t really have any advantage, and a manual hand tool has better control over speed and direction.

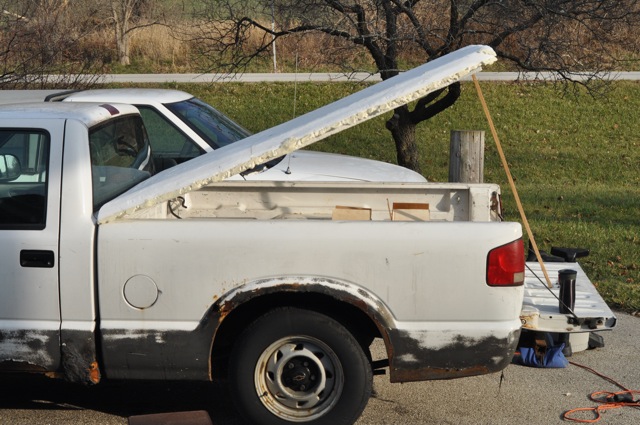
I used the hand-saw to cut an angle on both sides of the foam cover.

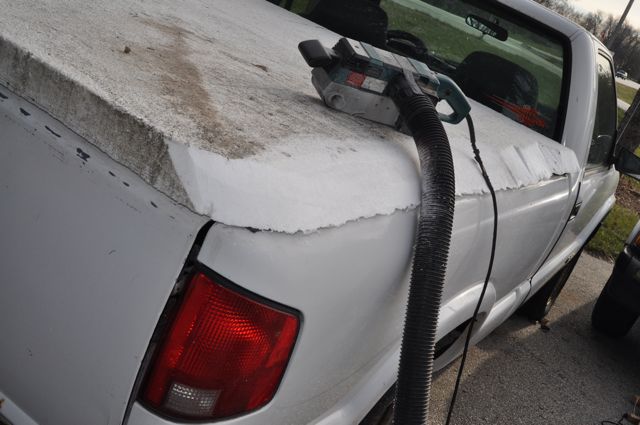
To start smoothing it out, I borrowed a belt sander and hooked it up to my shop vac. The dust port on the sander was a completely different size than my vac hose, so connecting the two wasn’t ideal. Still, it worked well enough to do some sanding while controlling the dust.


Also, when I borrowed the sander from my Dad, he gave me what was left of some fiberglassing supplies from when he glassed his duck-boat. That was most of a gallon of resin and a pretty-good-sized piece of cloth.


The edge of the foam, where it rested on the side of the truck wasn’t as good as I’d like it to be. Ideally, it would be nice for the cover to have a bit of a lip to it. I also hacked the one side a bit, so I thought it would be nice if I could somehow extend the edge a small amount. I still needed to glue the two halves together, so I decided to kill two birds with one stone by getting a can of Great-Stuff, glueing both parts with it, and adding a lip to the edge of my white foam board.

I recently heard about using aluminum foil and a release agent to use as a form for making fiberglass shapes. Since I was already in the kitchen getting the aluminum foil, I grabbed some PAM brand cooking spray for the release agent.

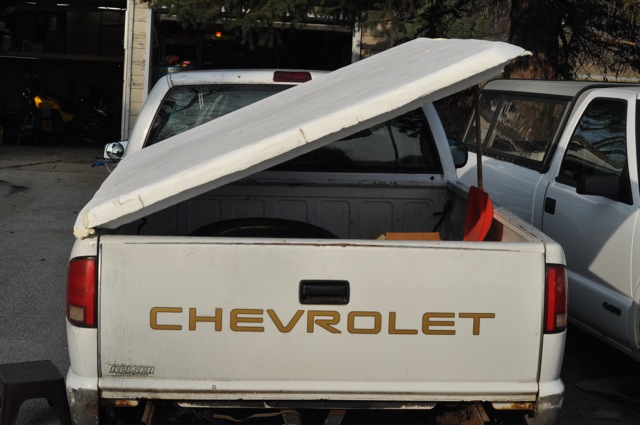
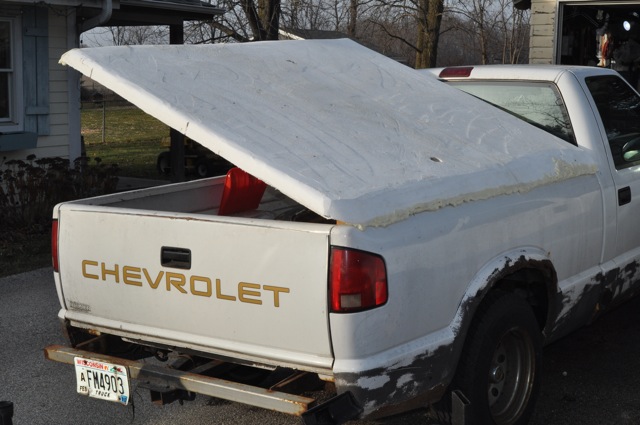
I put a layer of aluminum foil on the rails of the truck, and sprayed it with PAM, the set down the foam cover and ran a bead of Great Stuff in the seam and down both edges.


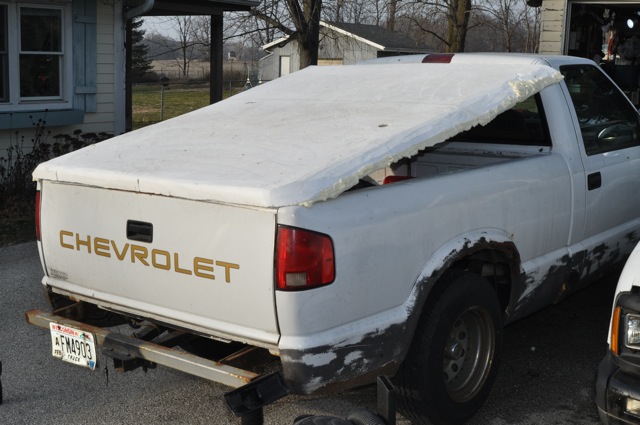
I then set a few weights on the cover to hold everything in place while it cures.

My small test with white school glue worked well as a sealant. While I was at the hardware store getting the spray foam, I priced out a gallon of glue. The fancy weather resistant glue was $30 a gallon – still far cheaper than urethane resin!

My Dad also had some sealant he used to seal up some walls before applying a fancy drywall finish. He gave me the rest of the gallon to test with my fiberglass experiments. It’s called GARDZ, and is very thin and easy to spread. Much easier to work with than glue. I brushed some on a a piece of test foam. It’s drying even as I type this.

I’m hoping that I should be able to carve and sand the Great Stuff once it’s cured and fiberglass over the GARDZ sample.

I’m still not sure what method I’ll use to actually attach the cover to the truck. I’d like to make it easy to both flip up OR completely remove, without making too many screw and bolt holes in the truck!

__________________


300mpg.org Learn how to BUILD YOUR OWN ELECTRIC CAR CHEAP
My YouTube Videos
  Reply With Quote
Old 11-27-2012, 10:40 PM   #43 (permalink)
It's all about Diesel
 
cRiPpLe_rOoStEr's Avatar
 
Join Date: Oct 2012
Location: Porto Alegre, Rio Grande do Sul, Brazil
Posts: 12,548
Thanks: 0
Thanked 1,622 Times in 1,447 Posts
Quote:
Originally Posted by bennelson View Post
I've never bump-started a diesel before. Not sure it works quite as well as a gasser does, with the higher compression, etc.
Only problem would be a cold-start without the glowplugs working. An uncle of mine had to bump-start his former Volkswagen-powered Diesel Suzuki Vitara a few times due to a failing starter, but at least it had the glowplugs working.
  Reply With Quote
Old 11-28-2012, 09:09 AM   #44 (permalink)
EV test pilot
 
bennelson's Avatar
 
Join Date: Jan 2008
Location: Oconomowoc, WI, USA
Posts: 4,435

Electric Cycle - '81 Kawasaki KZ440
90 day: 334.6 mpg (US)

S10 - '95 Chevy S10
90 day: 30.48 mpg (US)

Electro-Metro - '96 Ben Nelson's "Electro-Metro"
90 day: 129.81 mpg (US)

The Wife's Car - Plug-in Prius - '04 Toyota Prius
90 day: 78.16 mpg (US)
Thanks: 17
Thanked 663 Times in 388 Posts
I'm planning on upgrading the glow plugs in this engine to the latest and greatest ones.

I'll have a block heater on it as well.
__________________


300mpg.org Learn how to BUILD YOUR OWN ELECTRIC CAR CHEAP
My YouTube Videos
  Reply With Quote
Old 11-29-2012, 01:52 PM   #45 (permalink)
Administrator
 
Daox's Avatar
 
Join Date: Dec 2007
Location: Germantown, WI
Posts: 11,203

CM400E - '81 Honda CM400E
90 day: 51.49 mpg (US)

Daox's Grey Prius - '04 Toyota Prius
Team Toyota
90 day: 49.53 mpg (US)

Daox's Insight - '00 Honda Insight
90 day: 64.33 mpg (US)

Swarthy - '14 Mitsubishi Mirage DE
Mitsubishi
90 day: 56.69 mpg (US)

Daox's Volt - '13 Chevrolet Volt
Thanks: 2,501
Thanked 2,585 Times in 1,553 Posts
What is the main hangup for getting the drivetrain into the vehicle? Coupling everything together?
__________________
Current project: A better alternator delete
  Reply With Quote
Old 11-29-2012, 04:50 PM   #46 (permalink)
EV test pilot
 
bennelson's Avatar
 
Join Date: Jan 2008
Location: Oconomowoc, WI, USA
Posts: 4,435

Electric Cycle - '81 Kawasaki KZ440
90 day: 334.6 mpg (US)

S10 - '95 Chevy S10
90 day: 30.48 mpg (US)

Electro-Metro - '96 Ben Nelson's "Electro-Metro"
90 day: 129.81 mpg (US)

The Wife's Car - Plug-in Prius - '04 Toyota Prius
90 day: 78.16 mpg (US)
Thanks: 17
Thanked 663 Times in 388 Posts
Two things - equipment and people power.
I dont have a motor right now. I was originally going to use one that ended up in a friends electric pickup truck.

I have a lead on a pair of matched 12" forklift motors offered to me, but those are both in the fork trucks, the guy hasn't pulled them out yet.

My friend who is the diesel mechanic and machinist has gotten very busy lately, so I havent been able to get help from him either.

I really do want to work on the driveline first, as nothing else really matters if that doesnt work. I figure that aeromods are another parallel part of this project. I can at least work on that independent of anything else.

If anyone wants to start building a 1000 amp motor controller or multi-voltage charger, just let me know!
__________________


300mpg.org Learn how to BUILD YOUR OWN ELECTRIC CAR CHEAP
My YouTube Videos
  Reply With Quote
Old 11-30-2012, 07:29 AM   #47 (permalink)
Doesn't do, "normal"
 
Join Date: Nov 2012
Location: Austin Tx
Posts: 49

Project UpCycle - '01 Honda Rebel Streamliner Build
Team Streamliner

Homers Hybrid - '08 Toyota Highlander Hybrid

moms car - '97 honda accord lx
90 day: 34.93 mpg (US)

Adventure - '98 Mazda Protege
90 day: 33.11 mpg (US)

The Silver Civic - '02 Honda Civic
90 day: 36.15 mpg (US)
Thanks: 2
Thanked 3 Times in 3 Posts
"Don't throw hats on roof" Dude this is freaking brilliant thank you! I have this thread bookmarked for my electric conversion of my bike/trike in the distant future, after I get the aeromods and other "conversion hybrids" experiments down. More after the wake but thank you
  Reply With Quote
Old 11-30-2012, 10:19 PM   #48 (permalink)
home of the odd vehicles
 
rmay635703's Avatar
 
Join Date: Jun 2008
Location: Somewhere in WI
Posts: 3,874

Silver - '10 Chevy Cobalt XFE
Thanks: 495
Thanked 863 Times in 650 Posts
Quote:
Originally Posted by bennelson View Post
I have a lead on a pair of matched 12" forklift motors offered to me, but those are both in the fork trucks, the guy hasn't pulled them out yet.
It always amazes me that you can find those big motors.

Hmm, I wonder if I could fit a big 12" in my fathers zx40 (in place of the 6.5"), coupled with a 5 speed XMSN that would make a real mover, I have long since wanted a trailer hitch on the zx40 especially with the longer distance to the yard waste place maybe an upgrade would make it more worthwhile to put in the effort.

55mph at 48v would be quite refreshing.
  Reply With Quote
Old 12-02-2012, 09:43 PM   #49 (permalink)
EV test pilot
 
bennelson's Avatar
 
Join Date: Jan 2008
Location: Oconomowoc, WI, USA
Posts: 4,435

Electric Cycle - '81 Kawasaki KZ440
90 day: 334.6 mpg (US)

S10 - '95 Chevy S10
90 day: 30.48 mpg (US)

Electro-Metro - '96 Ben Nelson's "Electro-Metro"
90 day: 129.81 mpg (US)

The Wife's Car - Plug-in Prius - '04 Toyota Prius
90 day: 78.16 mpg (US)
Thanks: 17
Thanked 663 Times in 388 Posts
Did a little more work on the fiberglass and foam flat cover.

I cut the front flush with the front of the bed, and then sanded it. I also sanded the back flat and then put a little curve to it.

At this point, I'm really trying to figure out the best/simplest way to attach the cover.

After some out-of-the-box thinking, I've come up with this: MAGNETS!

Now before you start thinking I'm crazy... Wait, you already know I'm crazy.. Let's get past that.

A magnet will simply stick to the truck bed. I don't need to make any permanent holes. The magnet can also act as both a latch AND a hinge. By putting a pair of magnets on each of the four sides, I'll be able to simply hold the cover down with no other attachments, but I'll also be able to OPEN the cover from any side!

The two magnets on the opposite side will act as a hinge.
The magnets I plan to use are recycled components from computer hard-drives they are "OW! OW! Why-did-I-put-My-hand-there!?!!?"-powerful, and should probably come with some sort of warning label.

Here's a couple of photos showing the different ways the flat cover will be able to open.


When I had the cover flipped up so that it was hinged at the rear and up near the cab, it's a similar shape to what the long-term aero-cap will be shaped like. I also hopped in the cab and took a photo pointing backwards because I wanted to check the blind-spot.

A flat cover gives excellent sight-lines, whereas a solid cap is going to make it hard to check the blind spots. I figure that when I do the aero-cap, I want to put triangular windows in the sides so that I can still check the blind-spot.


Not quite sure how I'll hold the cover up. I think a simple prop stick, similar to how a hood is held up would work well.
__________________


300mpg.org Learn how to BUILD YOUR OWN ELECTRIC CAR CHEAP
My YouTube Videos

Last edited by bennelson; 12-02-2012 at 10:09 PM.. Reason: typos making me sound like a caveman
  Reply With Quote
Old 12-03-2012, 08:26 AM   #50 (permalink)
Super Lurker!
 
Slow_s10's Avatar
 
Join Date: Sep 2012
Location: Chesapeake, VA
Posts: 88

Rusty - '88 Chevrolet S10 base
90 day: 23.72 mpg (US)

Doc - '08 Honda Civic EX-L
90 day: 29.6 mpg (US)
Thanks: 4
Thanked 14 Times in 11 Posts
That is a stroke of genius! That is actually a really good idea to use magnets to attach the cover. I may just have to steal this idea for my tonneau cover. Right now mine is just mounted with traditional hinges but it becomes a pain because I take it off all the time and for me that means having to unbolt the hinges every time. This way just mkes so much more sense. My only question is would the magnets be strong enough to hold the cover on with it partially open? Ocasionally I need to haul something without time to remove the cover so I just prop it open, and I definitely wouldn't want it to blow off while driving.

Hmmm. Oh and I know you are planning on re-purposing some hard drive magnets but if you need somewhere to get more magnets them there is a website K&J Magnetics that sell all shapes, sizes and stregenths of neodymium magnets. I have ordered magnets from them before and as you mentioned a lot of theirs actually do come with warning lables, these types of magnets are STRONG!

But looking at your pictures it seems like trying to find a way to install the biggest possible window on the sides of an aero cap clear would be a very good idea. Honestly that's the one thing that concerns me about building an aero cap is losing visibility. Traffic where I live is usually pretty nuts. But if I had good windows on both sides and a window facing the rear I would definitely feel a lot more comfortable with one.

__________________
-Kevin
  Reply With Quote
Reply  Post New Thread


Tags
diy, electric, open revolt, open source, truck

Thread Tools


Powered by vBulletin® Version 3.8.11
Copyright ©2000 - 2024, vBulletin Solutions Inc.
Content Relevant URLs by vBSEO 3.5.2
All content copyright EcoModder.com