12-09-2012, 09:24 PM
|
#1 (permalink)
|
|
OCD Master EcoModder
Join Date: Dec 2007
Location: Eastern CT, USA
Posts: 1,936
Thanks: 431
Thanked 396 Times in 264 Posts
|
Engine Block Heater for '97 Civic (Gen 6)
Outside temperatures here are between 30-50 degrees these days (early December in New England), but when I get into the car the engine is anywhere between 70-90 degrees thanks to my newly installed "circulating type" engine heater. I'd call the project a success, though I'm still working to increase the system's efficiency so I can achieve higher temperatures before startup.
This thread in the "Success Stories" subforum gave some information on my recent block heater project. I promised to write it up fully sooner or later so here goes. I don't expect to get it all in here in one sitting so please be patient.
Background - what didn't work for me:
I've been wanting a block heater for this car for a few years but needed some determination to get past several hurdles that blocked my first attempts.
Heaters that install into a freeze plug opening are probably the most efficient of all. But I'm not that much of a mechanic and don't really want to open up things like exhaust gaskets, not to mention freeze plugs that have been in place for 15 years/270,000 miles. So that route was out for me.
Another solution that might have worked for an engine that had a recent overhaul, aka clean threads and surfaces all around: I found that ZeroStart makes a very nice heater that installs in the D16 series engine block drain, located just to the driver's side of the oil filter mount location. Part number 3100006. Perfect, I thought. Ordered and found my socket to fit the drain plug hex. As I recall it took a 17 mm. socket. However the drain plug's hex had only about 1/4" of "reach" into the open socket, not much to grip on. And even with a breaker bar, tapping on it with a hammer after spraying PB Blaster in the general area, I could not budge the plug. After 15 years and 270,000 miles the plug was in solidly.
What I did use:
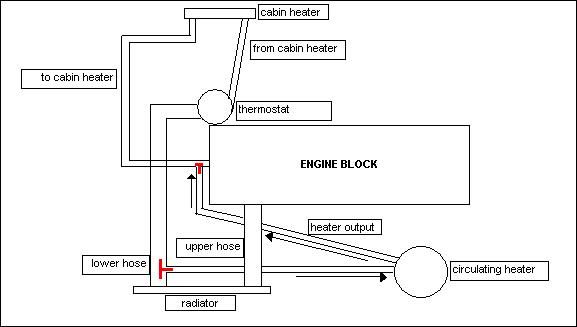
I decided on a circulating type heater, one that uses a small tank with a heater element inside. These heaters circulate coolant by convection: heated antifreeze rises in a hose, causing a suction effect in the heater's input hose. This puts requirements on the hose layout: the output hose needs a consistent rise leading to where it enters the head. Any situation where the hose forms an upside down "U" will likely create an air pocket at the top of the bend, which defeats the siphoning action.
I used ZeroStart circulating type heater #330-8001.
It is rated 750 watts. Having seen it in action I think I'd rather be using the next more powerful model, #330-8002, at 1000 watts.
This series has a built in thermostat cutoff at 245ºF, and a backflow prevention valve. Depending on your chosen plumbing path, you could create a "short circuit" that would bypass or disable the normal intended coolant flow in your car. The backflow preventer ensures that coolant will only flow through the heater in one direction.
The drawing below shows two red "Tees" where I connected to the existing hose layout. The tee into the lower radiator hose is model 28113 from Kats Heaters. The tee into the heater hose was from an old-school NAPA parts store, made by Gates (the hose people).
Here's the layout I used:
I'll write more later...
__________________
Coast long and prosper.
Driving '00 Honda Insight, acquired Feb 2016.

Last edited by brucepick; 12-10-2012 at 05:25 AM..
|
|
|

|
|
The Following 3 Users Say Thank You to brucepick For This Useful Post:
|
|
 Today Today
|
|
|
|
 Other popular topics in this forum...
|
|
|
|
|
12-11-2012, 01:54 PM
|
#2 (permalink)
|
|
OCD Master EcoModder
Join Date: Dec 2007
Location: Eastern CT, USA
Posts: 1,936
Thanks: 431
Thanked 396 Times in 264 Posts
|
What you need:
Heater Unit: ZeroStart circulating type heater #330-8001 or #330-8002
(1) Tee model 28113 from Kats Heaters, this tees a 5/8" hose into a 1" radiator hose.
(1) Tee for 5/8" hose into 5/8" hose. Must be compact, not one with fittings for 5/8 AND 3/4 combined in one tee. Mine is by Gates.
(2) pieces of heater hose, 5/8" inner diameter, one each 2' and 3' long
(1) 6' length of Armaflex closed cell pipe insulation, 7/8" I.D., about $6.
- - do not try using the cheaper foam stuff, it will melt where it passes near the exhaust manifold. BTDT.
(10) hose clamps for 5/8" I.D. hose
[EDIT]Hose clamps need to be the wide-strap, sturdy kind. I used a couple narrow-band ones and they couldn't be cranked tight enough to do the job. OEM spring type clamps are OK too, and you'll never wonder if they are tightened properly.[/EDIT]
(2) hose clamps for 1" I.D. hose
More clamps if you're replacing any of the existing ones.
(2) 45º copper elbows for 1/2" pipe. These will be inserted into the 5/8" hose.
(1 or 2) copper caps for 1/2" pipe. One will be inserted into heater unit's supply 5/8" hose after drilling a 3/16" hole in the cap. For flow restriction. Extra cap in case you want to redo it with a smaller or larger drilled hole.
Optional but recommended:
(1) replacement o-ring seal for the distributor shaft. Not a requirement but if you replace it now, it won't leak for a long time. I got mine from Honda, all other parts stores had a hard time figuring out what size ring I needed.
New heater hose (head to heater control valve) and lower radiator hose. My heater hose was kinda brittle when I cut into it, I should have replaced it with new. Lower rad hose is likely well aged because it's not so easy to get to. I did replace mine.
Other:
Gallon of antifreeze - I'm partial to the premixed type.
Jack, jack stands, misc tools.
__________________
Coast long and prosper.
Driving '00 Honda Insight, acquired Feb 2016.
Last edited by brucepick; 03-03-2013 at 10:05 PM..
|
|
|
|
|
12-11-2012, 02:13 PM
|
#3 (permalink)
|
|
OCD Master EcoModder
Join Date: Dec 2007
Location: Eastern CT, USA
Posts: 1,936
Thanks: 431
Thanked 396 Times in 264 Posts
|
OK, getting started.
Figure out where the heater canister will go. It's about 3.5" diam by 7" tall, thereabouts.
Heater unit, in empty bay next to radiator, former home of a/c condenser + fan:
I used an existing hole for the screw to attach the canister bracket to the radiator support framing. In reality that screw doesn't come close to the radiator.
My a/c compressor froze up last summer so I made room by removing the a/c condenser and fan assembly. Remove the two screws that secure the condenser's upper hold down bracket, disconnect various refrigerant lines and electrical connectors, and the condenser + fan will pull out as a unit.
Instead, it may be possible to install the heater near the air intake snorkel on the right side of the engine bay. It will have to be down at the level of the (lower) radiator support bracket, if not lower, to enable proper circulation of the heated antifreeze.
Whatever location you determine, it MUST allow for the heater's output hose to exit the top of the heater canister and then have a continuous rise to where it meets the head. Any upside-down "U" in the hose will allow an air pocket to form, and your heated antifreeze will not circulate through the system. The connection as shown in the drawing in post #1 here provides that continuous rise. Well OK, the last two inches of hose are approximately level, but it works. The other hoses to the Civic head, in OEM configuration, all have upward loops in their design so can't be used as heater output connections.
Drain the coolant.
The radiator petcock is at center of the radiator, at the bottom rear. The Civic has a plastic baffle below the radiator, with a rectangular cutout just big enough to get a hand and a pair of pliers up there to turn the petcock. It's plastic so I think it should turn OK even if its the original one. With the car on jack stands, you can line up an empty antifreeze jug under the spigot and it will drain into the jug. No hose or funnel etc. needed. You might need more than one jug for a full drain. Remember you'll be opening up the lower radiator hose so you want the system empty.
Get the canister in position in its location but not firmly locked down yet. You will need it in place to set up the feed and output hoses for the canister.
__________________
Coast long and prosper.
Driving '00 Honda Insight, acquired Feb 2016.
Last edited by brucepick; 12-11-2012 at 04:58 PM..
|
|
|
|
|
12-11-2012, 02:52 PM
|
#4 (permalink)
|
|
OCD Master EcoModder
Join Date: Dec 2007
Location: Eastern CT, USA
Posts: 1,936
Thanks: 431
Thanked 396 Times in 264 Posts
|
Building the hose routing
As I recall, the shorter 2' 5/8" hose you bought becomes the lower supply hose to the heater canister. Cut it to size after checking it in position between the lower rad hose's tee and the canister.
Install drilled out plug into lower supply hose:
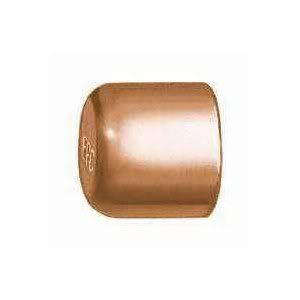
Drill out a 3/16" hole in the copper end cap plumbing fitting I told you to get. Install the fitting down into the trimmed heater canister supply hose. You'll probably need a bit of grease on the outside of the fitting to get it into the hose.
Why the drilled out end cap?
Because otherwise your heater won't blow fully heated air.
As great as it is to have your engine preheated, this layout creates a feed from the lower rad hose to the oem heater hose that supplies the cabin heater. This doesn't alter the direction of flow of coolant, no problem there. The problem is that the heater is now getting a mix of water that's already been cooled by the radiator, along with the fully heated water it normally gets. In its normal configuration, it only gets water that's fresh from the "hot" end of the engine's water jacket.
Confession time: I didn't do this. I only realized after I'd built it all that it would be an issue. I did try putting a flat nose Vise-Grip pliers on the canister's output hose to squeeze it shut, that worked and the heater blew very hot again.
Due to the upside down "U"s in the other available hoses, I think you are limited to the hose layout in the drawing in post #1. I suppose a more drastic revision of the hose layout (custom hose routing) might avoid the issue but for my money, a restriction in the canister's lower supply hose is a good deal. Another possibility would be to install a heater control valve, either in the heater's supply or output. Of course you'd need to open it before running the engine heater.
Slip insulation over hose, preferably before installing the hose. Trim to fit. As I noted earlier, the more expensive rubber hose holds up OK where it goes past the exhaust manifold. The cheap foam stuff melts.
Installing hoses
I installed the lower rad hose and it's tee to feed the heater canister. The tee has to be inserted in a straight section of rad hose, fortunately there's one very close to the bottom of the hose, just above the right angle bend. When installing a tee, you remove a length of hose equal to what will be replaced by the tee.
Below is the lower radiator hose, rising off to the upper right, with the tee installed. Radiator fan is at left of photo, transmission housing and bracket are at right side. Also visible: white coroplast belly pan.
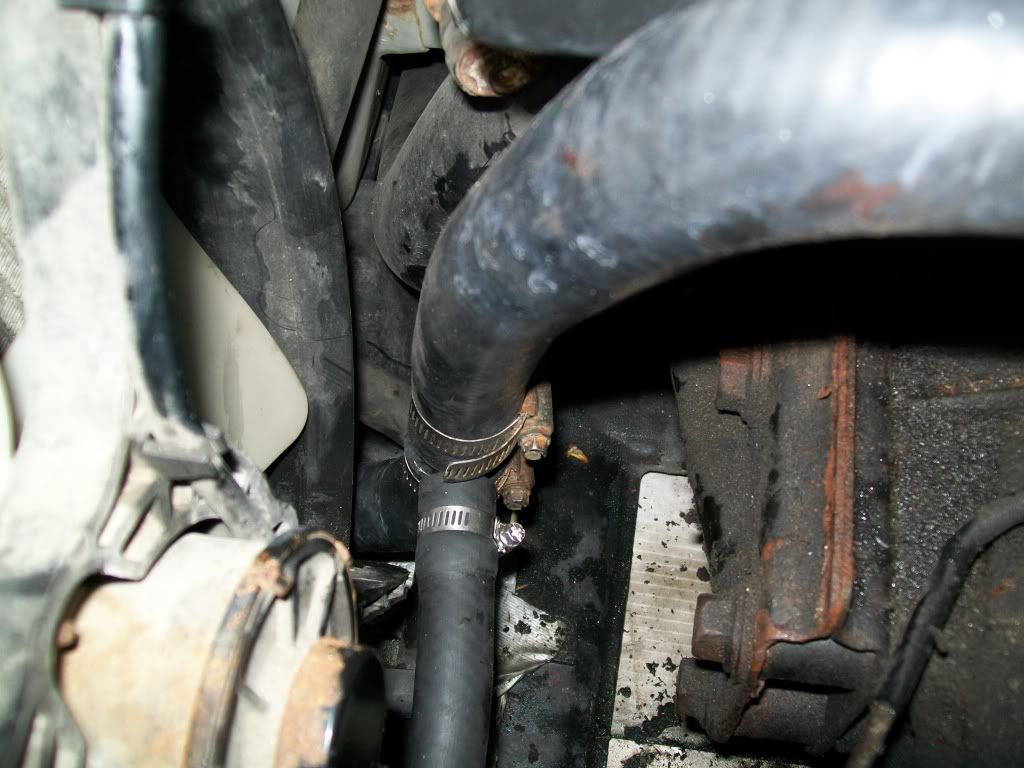
With the belly pan blocking convenient access from below, I decided to remove the radiator+fan as well as the lower rad hose, to build the tee into the lower rad hose.
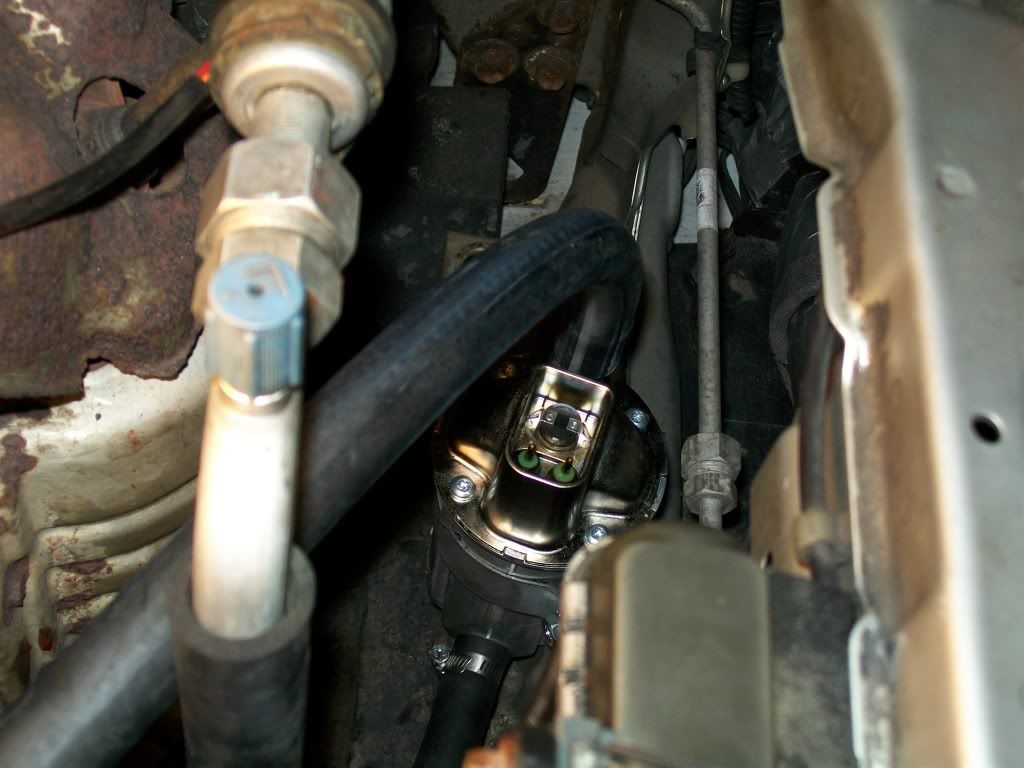
Below is the heater unit with feeder hose barely visible at the bottom and output hose at the top. Exhaust manifold/cat is at left and empty a/c condenser bay is at right. Insulation not yet installed on either hose. This is NOT the final setup of the output hose, more on that later.
__________________
Coast long and prosper.
Driving '00 Honda Insight, acquired Feb 2016.
Last edited by brucepick; 12-11-2012 at 08:18 PM..
|
|
|
|
|
12-11-2012, 03:37 PM
|
#5 (permalink)
|
|
Burn lean and prosper\\//
Join Date: Jul 2012
Location: scranton pa
Posts: 576
Thanks: 55
Thanked 65 Times in 54 Posts
|
Very cool! Can't wait to see it done
|
|
|
|
|
12-11-2012, 07:19 PM
|
#6 (permalink)
|
|
OCD Master EcoModder
Join Date: Dec 2007
Location: Eastern CT, USA
Posts: 1,936
Thanks: 431
Thanked 396 Times in 264 Posts
|
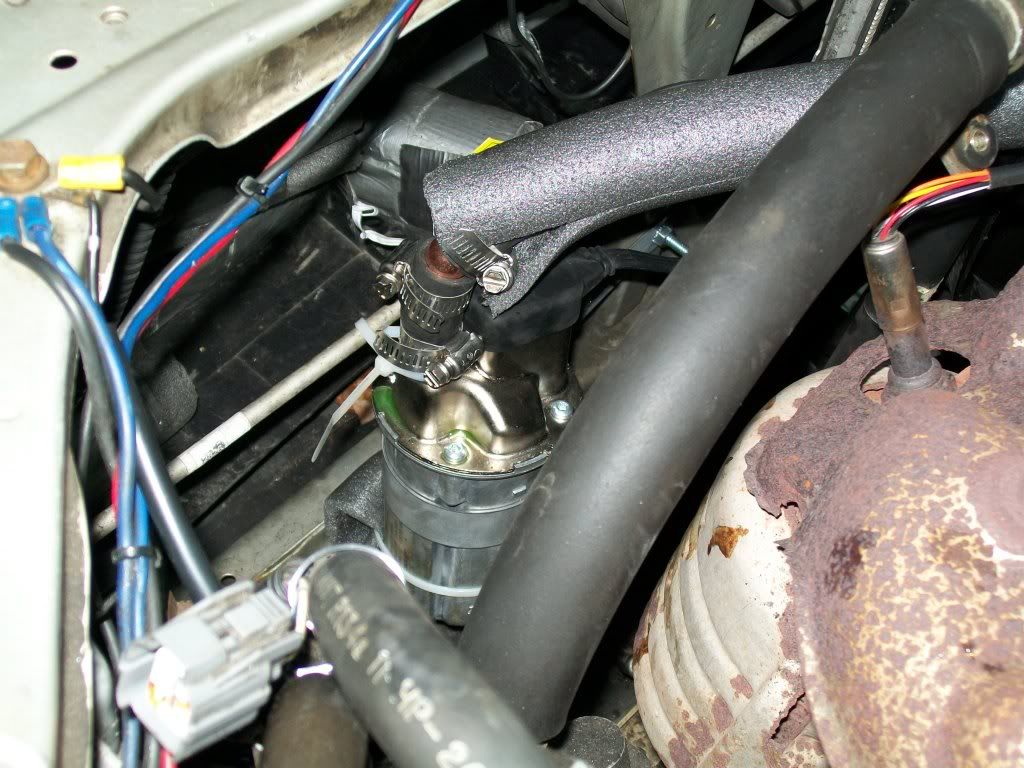
Assembling the Heater Output Hose
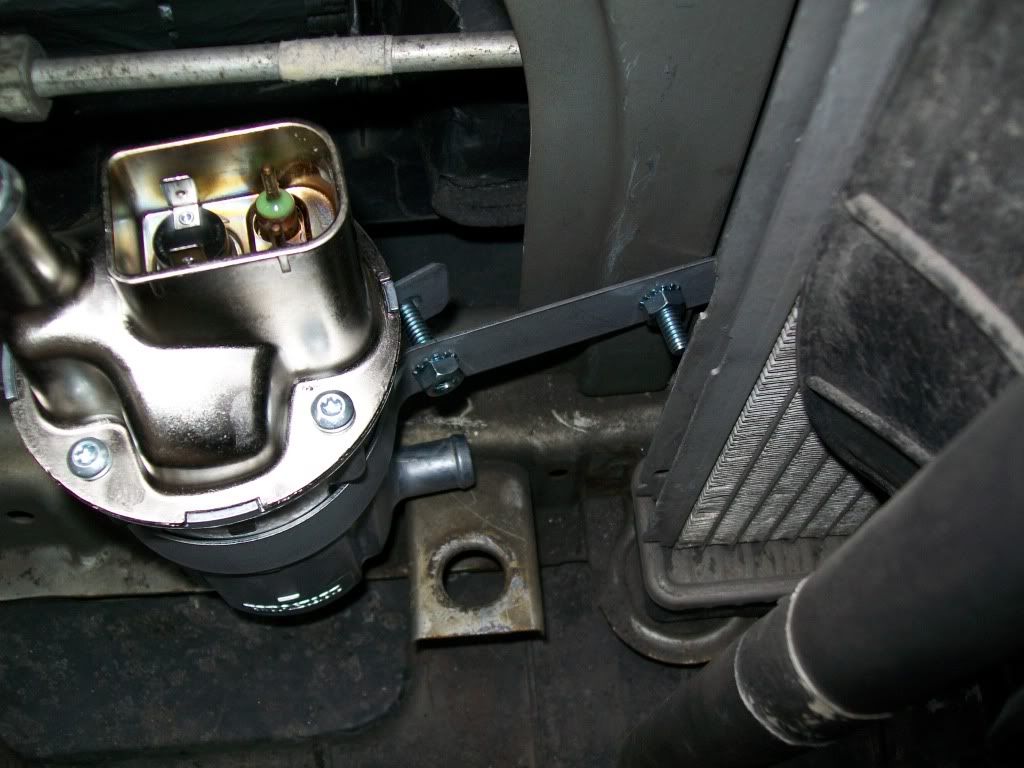
The output hose exits the canister straight upwards and connects to the car's heater hose, at a tee to be inserted just below the distributor.
Pic of oem hose, with distributor removed for working access:
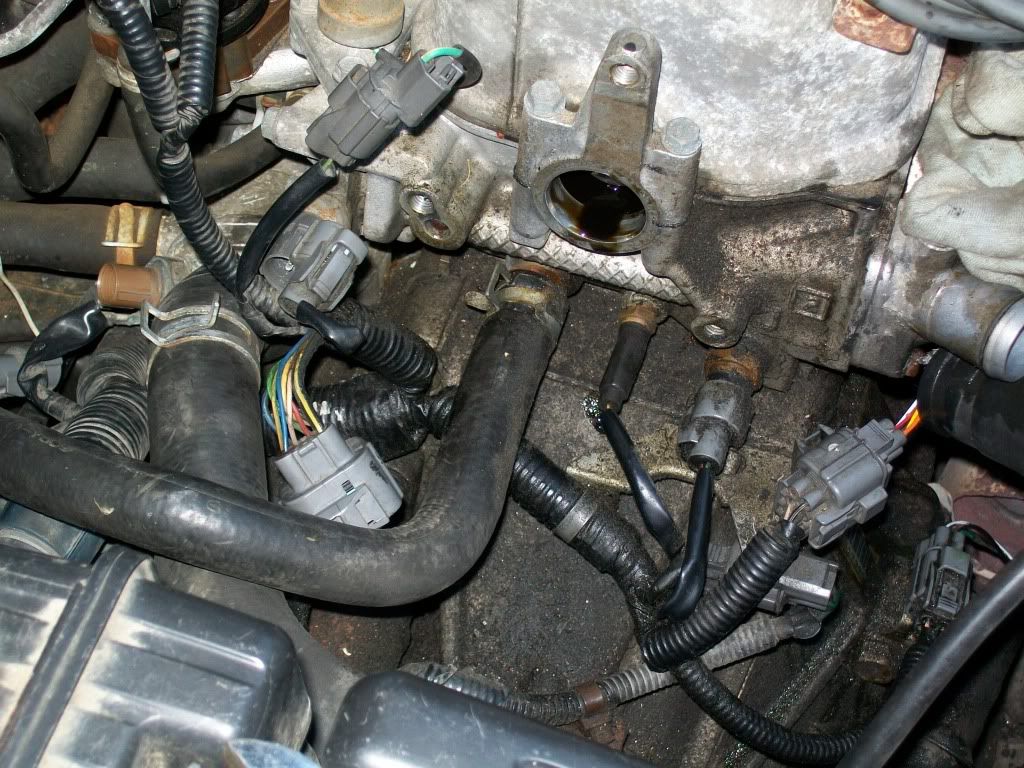
Pic of tee installed, with distributor removed for working access. Copper elbow not yet installed:
 Notes on distributor removal:
Undo two electrical connectors at rear of distributor. Pull out on the metal spring clips to release them, squeeze down on plastic tabs to release them.
Remove three small screws holding distributor cap on the distributor. Remove dizzy cap with ignition wires still attached and set aside out of your way. You'll likely need to remove one wire to get the cap out of there.
Note the position of the rotor. After you remove distributor the rotor can move freely; you want to keep it in the same orientation when you reinstall. You almost can't reinstall it wrong - but you CAN force it into place with the rotor 180 degrees out of position. BTDT, not a good thing.
Mark the position on the distributor mount ear where it meets the engine. That will save you time getting the ignition timing set after you reinstall it.
Remove the three bolts (12 mm. hex??) that hold the dizzy to the engine. Don't drop them (duh).
Now you can pull the distributor away from the engine. There's a rubber o-ring seal where the dizzy shaft enters the engine. This is a good time to replace the seal; you've already done all the work to get access to it. The o ring just slips onto the shaft. Lube it up with some engine oil.
Hose Routing:
The oem heater hose carries hot coolant to the heater via the heater control valve, which you can see at the end of the hose before it goes through the firewall.
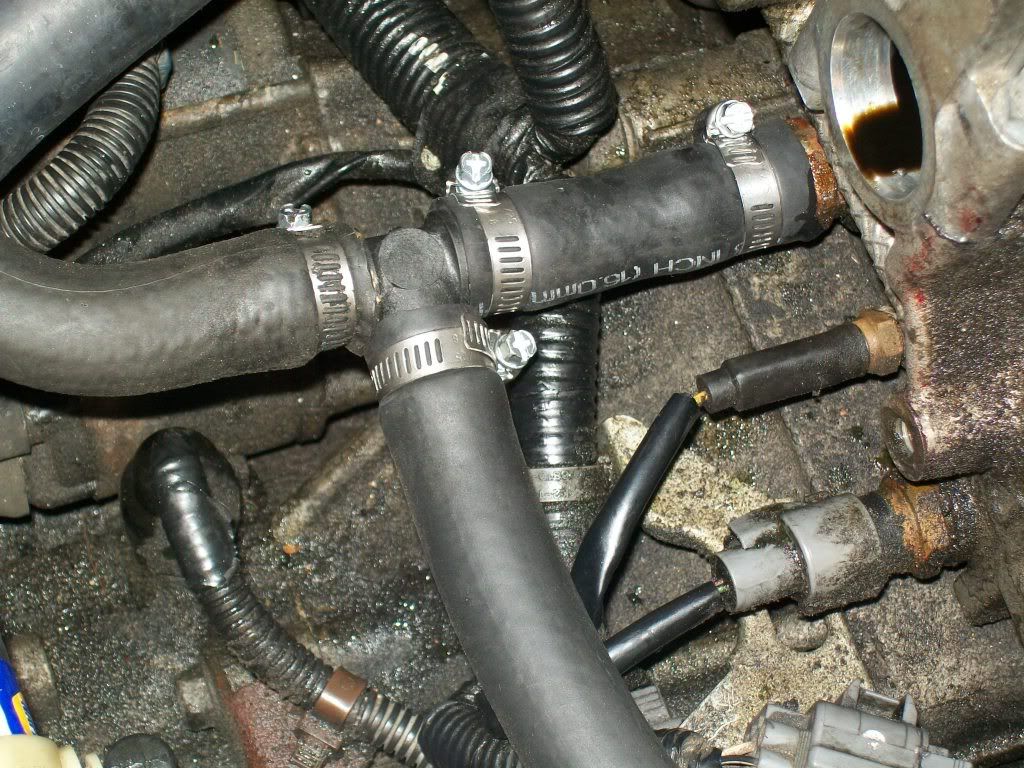
The output hose gets two 45º copper elbow fittings installed.
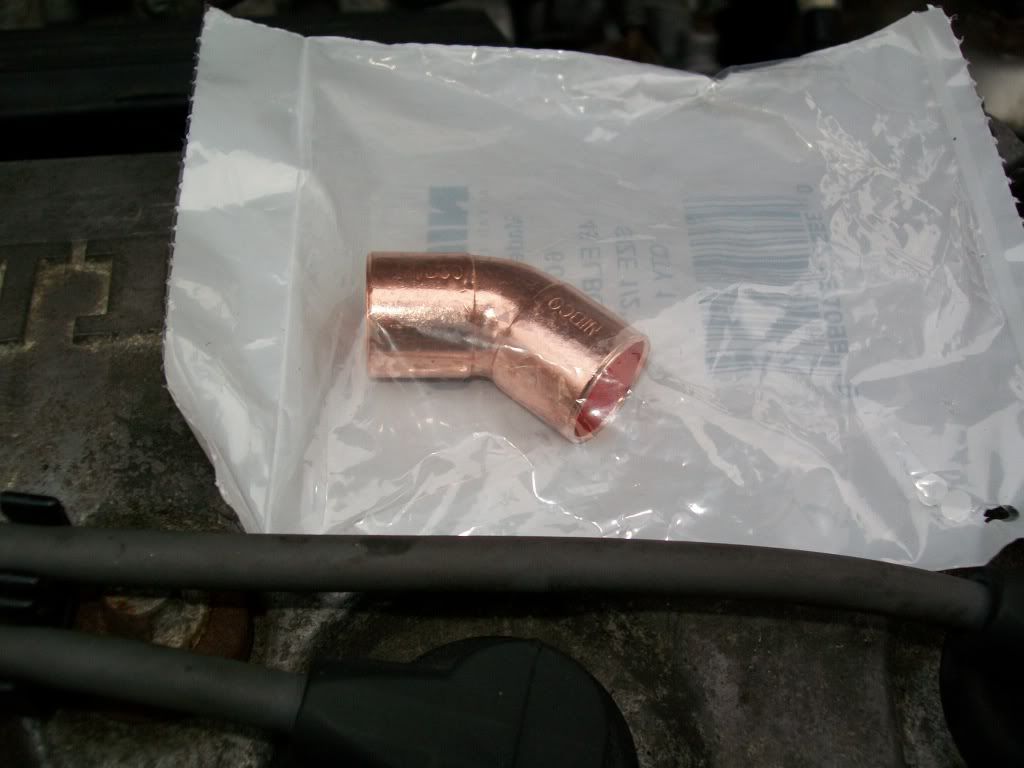
One of these elbows is shown in the drawing in post #1. The other goes at the start of the hose where it exits the heater canister. See pic below. Set that elbow so the hose is aimed towards its destination below the distributor.
Using the elbows enables a controlled path for your hose with a nice steady rise. You need that so the heated coolant will rise through the hose and enter the head. This creates a suction at the heater's feeder hose, which ultimately sucks coolant from the head towards the heater. The system will heat up without the elbows but it will heat more efficiently with a good clean rise all the way to the distributor area.
Output hose at canister. Shows copper elbow and foam hose. This foam hose melted and was replaced with the rubber Armaflex hose later, about $6 per six foot piece at Home Depot.
__________________
Coast long and prosper.
Driving '00 Honda Insight, acquired Feb 2016.
Last edited by brucepick; 12-12-2012 at 01:23 PM..
|
|
|
|
|
The Following User Says Thank You to brucepick For This Useful Post:
|
|
|
12-11-2012, 07:37 PM
|
#7 (permalink)
|
|
Master EcoModder
Join Date: Mar 2012
Location: Salt Lake City
Posts: 292
00C - '00 Toyota Corolla 90 day: 43.54 mpg (US)
Thanks: 147
Thanked 190 Times in 73 Posts
|
Great work! I have a similar Civic, and have been thinking about this.
About how much time did this take? It seems more complicated than I expect. I estimate it took 3.5 hours for the freeze-plug heater in my Corolla (not including planning, procurement, and cleanup) http://ecomodder.com/forum/showthrea...9-a-23864.html.
It's funny to me how everyone seems to prefer higher power heaters. Running 2 hr on a timer, 350-380W (supposed to be 400W) gets my engine from 30 to 83°F. To me that seems like 80% of the value of a block heater. |
|
|
|
|
12-11-2012, 07:51 PM
|
#8 (permalink)
|
|
OCD Master EcoModder
Join Date: Dec 2007
Location: Eastern CT, USA
Posts: 1,936
Thanks: 431
Thanked 396 Times in 264 Posts
|
Thanks.
I tend to find the more complicated ways to do things. I like to think that it's because I do them thoroughly. Those who measure only by completion time disagree.
Not counting planning and parts acquisition -
If I recall, I started just before noon and it was dark when I was done. That was the first time I did it. The next day I drained it again so I could put the copper elbows in the output hose.
I wouldn't be surprised if a 350-400 watt block heater gave you those results. It heats the coolant directly. Mine heats the coolant that goes through a hose, and what's worse, the path leads the coolant through the radiator before entering the heater. So even with a grill block and the fan not running, some heat is lost through the hoses and at the radiator.
Lastly though, I'm shooting for even higher block temperatures than 80-85ºF. I'd love to see the block at 150ºF or more before startup. But I can see I'm not going to achieve that with this heater; the highest temperatures I've seen from it were a bit over 100ºF.
I'm planning some insulation around the valve cover (a hat for the head, so to speak) and maybe hood insulation, to cut the losses. And maybe for next year, the 1000 watt version of the heater.
__________________
Coast long and prosper.
Driving '00 Honda Insight, acquired Feb 2016.
|
|
|
|
|
12-13-2012, 09:31 AM
|
#9 (permalink)
|
|
OCD Master EcoModder
Join Date: Dec 2007
Location: Eastern CT, USA
Posts: 1,936
Thanks: 431
Thanked 396 Times in 264 Posts
|
Today's morning commute
Today's morning commute
Drove 57.84 miles at 53.57 avg mpg.
Heater unit ran 8 hours prior to engine start. Also simultaneously ran 125W oil pan heater.
Ambient temp at start: 24 deg
Ambient temp at end: 27 deg
Engine at start: 96 deg F
Achieved 195 deg F engine after 2.5 miles, approx 50% of that distance was EOC.
Typical intake air temp for trip: 90 deg
Typical engine temp for trip: 198-207
__________________
Coast long and prosper.
Driving '00 Honda Insight, acquired Feb 2016.
Last edited by brucepick; 12-13-2012 at 09:36 AM..
|
|
|
|
|
12-13-2012, 09:55 AM
|
#10 (permalink)
|
|
Cyborg ECU
Join Date: Mar 2011
Location: Coastal Southern California
Posts: 6,299
Thanks: 2,373
Thanked 2,174 Times in 1,470 Posts
|
The write-up is wonderful! Thanks. Pics and details make it easier to imagine doing. It looks like you picked up two or three MPG in your fuel log since the mod. Any sense of how much of that is the mod?
__________________
See my car's mod & maintenance thread and my electric bicycle's thread for ongoing projects. I will rebuild Black and Green over decades as parts die, until it becomes a different car of roughly the same shape and color. My minimum fuel economy goal is 55 mpg while averaging posted speed limits. I generally top 60 mpg. See also my Honda manual transmission specs thread.


|
|
|
|
|