09-12-2012, 07:53 AM
|
#51 (permalink)
|
|
Master EcoModder
Join Date: May 2008
Location: Maynard, MA Eaarth
Posts: 7,908
Thanks: 3,475
Thanked 2,953 Times in 1,846 Posts
|
I do not have a heater in my garage -- I'm hoping to have all the gluing done before it gets too cold. Then I'll do lots of shaping and continue with fiberglass gluing in the spring?
If I get sponsor(s) then I'll get a heated garage space?
|
|
|

|
 Today Today
|
|
|
|
 Other popular topics in this forum...
|
|
|
|
|
09-12-2012, 02:18 PM
|
#52 (permalink)
|
|
Master EcoModder
Join Date: Dec 2008
Location: Southern WI
Posts: 829
Thanks: 101
Thanked 563 Times in 191 Posts
|
Quote:
Originally Posted by NeilBlanchard

I do not have a heater in my garage -- I'm hoping to have all the gluing done before it gets too cold. Then I'll do lots of shaping and continue with fiberglass gluing in the spring?
If I get sponsor(s) then I'll get a heated garage space?
|
Neil,
I don't know how well this would work, but here goes......
About six months ago, I was invited to show my car at the local high school, during the "tech" class.
During the demonstration, we talked about foam and fiberglass application, sanding, and so on.
After the kids had left, the class instructor and I were chatting about various things and he mentioned something that I had not yet tried.
Instead of using Elmers Glue, or even Epoxy to glue foam blocks together, he asked if I used a hot glue gun. I mentioned no, and further explained that I though the glue would end up being hot enough to "melt" the foam during application.
He went on to say that he thought there were glue melt sticks with extra low melt points, and suggested I look for them.
So Neil, I don't know if this would help or not, but a low melt point glue gun and sticks *might* help you put together foam blocks even when the temps are too cold for normal adhesives.
Just a thought, Jim. |
|
|
|
|
09-12-2012, 07:43 PM
|
#53 (permalink)
|
|
Master EcoModder
Join Date: May 2008
Location: Maynard, MA Eaarth
Posts: 7,908
Thanks: 3,475
Thanked 2,953 Times in 1,846 Posts
|
There are pretty large surfaces, so I think hot glue would not stay hot long enough to cover the large pieces I have. I'm thinning the Titebond waterproof glue a little to make it spread thinner and to help it stay wet a bit longer, too. I apply a bead with the bottle and then spread it with a brush. On "normal" days it dries in about an hour enough to remove the brick/weights.
I'm running through my second gallon of glue quickly. That would be a whole bunch of glue sticks!
Three more sections (R3, R4, and R5) got glued on today -- one more section (R6) and that will be the beginning of the hatch door!
|
|
|
|
|
09-14-2012, 11:30 PM
|
#54 (permalink)
|
|
Master EcoModder
Join Date: May 2008
Location: Maynard, MA Eaarth
Posts: 7,908
Thanks: 3,475
Thanked 2,953 Times in 1,846 Posts
|
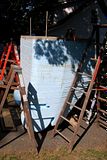
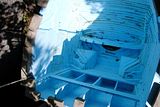
I glued another 6 layers since the last update. Here it is sitting nose down on a platform -- the brace is on the windshield area. You can see the beginning of the opening for the main hatch door at the top:

Side view of the main piece of CarBEN EV5 (~5'-6" long) with front wheel in the lower foreground. The stepladders are 5', 6' and 8' tall, for reference.
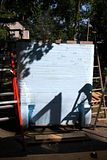
View of the underside...
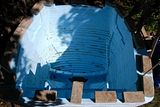
View from above, looking down inside the passenger compartment, at the windshield area.
View from above, looking down at the battery bays; which will have 1" thick floor panels covering them.
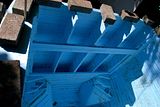
Another view of the passenger compartment, showing the front wheel wells and the dashboard.
 |
|
|
|
|
The Following User Says Thank You to NeilBlanchard For This Useful Post:
|
|
|
09-15-2012, 10:43 AM
|
#55 (permalink)
|
|
Master EcoModder
Join Date: May 2008
Location: Maynard, MA Eaarth
Posts: 7,908
Thanks: 3,475
Thanked 2,953 Times in 1,846 Posts
|
Greetings,
Quote:
|
Cool. So, what's the next step?
|
Quote:
|
Very interesting, but I'm not sure what you are making here. There don't appear to be any points of attachment, or even any place for the structure to go. I see a couple of wheels. Is this a full size mockup for a wind tunnel?
|
After I cut the rest of the sections, and glue them all together, the whole things has to get shaped -- the outside first and the inside afterward, if I can figure out how to get in there without doing damage. The foam is pretty sturdy after it has been glued together. Otherwise, I'll buy a windshield and dry fit it, and then cut out the side windows, shape the wheel openings and fit the skirts to them. Then fiberglass the outside, then shape the inside. Then fiberglass the inside -- which could be a real challenge?
Then the foam wheels get cut off -- they are just place holders so I can see the car as it will be sitting on the road. Reinforcing gussets and plates and anchor points (and possible front subframe?) get cut into the foam inside the motor bay and the rear wheel wells. It is likely the battery bays will need long metal box channels inserted in them, to stiffen the structure. Floor panels need to be constructed and fitted.
My intention is to use the foam as the core in a full composite sandwich monocoque structure. It will double as thermal insulation, which is a second very important function.
Then real wheels and suspension will have to be installed -- likely the front can be from a typical front wheel drive car. The rear will probably have to be custom made to fit and work within the spaces I have designed.
Another major area of work will be the hinges for the main hatch door and the two small rear doors, and the front wheel skirts. The hood could be hinged, or it could just be bolted in place with quarter-turn fasteners along the edges.
Then the windshield and the side windows (which I want to have two layers of glazing) can be installed. The windshield will come from a Smart ForTwo, along with the wiper system (so if I can find a rear-ended Smart, then it could also provide the VIN).
Then a driver's seat needs to be constructed and installed -- Dick Horowitz is looking into this for me. And a steering wheel and steering system -- I hope to find a way to use manual steering, or worst case electric assist steering. This will need to be connected to the front wheel skirts, as well.
At this point I will have a rolling chassis! My hope is to get to this point in a year or so.
Then the BIG step is to install a battery pack and drivetrain, and all the support systems like the charger and battery management and motor(s) controller. This will end up as a full working prototype, that I can test in the real world. This will be the lion's share of the expense, but if I have a working rolling chassis, I think there will be plenty of financial support.
++++
Plan B is to use this as a mold for FRP panels around a tube steel chassis, as I seriously contemplated early on in the design process. The foam is something I am able to produce though, using the PhlatPrinter 3 CNC machine, and so I decided to do it the way I am, unless and until it becomes structurally unworkable. Doing this requires serious fabrication and welding skills, and doing the foam will provide a critical full 3D form to follow.
++++
I may still make a more accurate quarter scale model for wind tunnels testing -- it would awesome to be able to say "It has a Cd of 0.XX", but it is also very important to test it full size in the real world. Crosswinds on the actual car with the actual Cg and actual conditions are important hurdles; and the actual performance on the road is the only way to really know how it will work. |
|
|
|
|
09-17-2012, 03:43 PM
|
#56 (permalink)
|
|
Master EcoModder
Join Date: Apr 2012
Location: Evensville, TN
Posts: 676
Thanks: 237
Thanked 580 Times in 322 Posts
|
It may be to late, but I am building a superinsulated house and I needed to purchase a lot of XPS foam to go in my walls. I purchased some "factory seconds" foam for about one third the price of what the foam sold for retail. Most of the foam sheets were in very good condition, with minor errors in printing or some "holes" on the surface. Some were so good I still don't know why they weren't retail. I did have some sheets with "waves" in the surface which still worked for me but wouldn't in your application. If you still have a lot of foam to buy it may be worth your time to check on getting some, just make sure they don't have waves.
|
|
|
|
|
09-17-2012, 04:41 PM
|
#57 (permalink)
|
|
EcoModding Smurfer
Join Date: Aug 2012
Location: LaX
Posts: 293
Thanks: 52
Thanked 35 Times in 29 Posts
|
When I was contemplating a 2F1R reverse trike build, I had planned a simple tube frame with foam between the pipes, then thin foam over the actual pipe to smooth it all out. I would think some sort of solid structure would be of benefit, even with the weight gain it would add.
But, since you have most of a car already foamed up, you obviously know much more than I do on the subject  |
|
|
|
|
09-17-2012, 10:41 PM
|
#58 (permalink)
|
|
Master EcoModder
Join Date: May 2008
Location: Maynard, MA Eaarth
Posts: 7,908
Thanks: 3,475
Thanked 2,953 Times in 1,846 Posts
|
I'm paying about $11.40 per sheet, so I'm not complaining.
I am not skilled at bending tubes, or welding so I am do it with the CNC machine to cut the foam (relatively accurately) straight from the 3D model. There is a lot of 3D information that I could not otherwise move from the virtual world to the real one.
Today I helped my brother Nathan strip shingles off his roof (two layers!) so I will be sleeping very well tonight. Tomorrow brings more sheet cutting and g-code generation. Wednesday and Thursday are possible roofing days -- he is adding sistered rafters and new plywood sheathing, so they can install solar PV panels. He and his wife each drive EV's, so after the system is installed, they can drive for free!
|
|
|
|
|
The Following User Says Thank You to NeilBlanchard For This Useful Post:
|
|
|
09-17-2012, 11:19 PM
|
#59 (permalink)
|
|
Master EcoModder
Join Date: Aug 2011
Location: Warren, MI
Posts: 2,456
Thanks: 782
Thanked 669 Times in 411 Posts
|
Holy crapola. I haven't seen this in awhile and must say it's coming together amazingly.
__________________
He gave me a dollar. A blood-soaked dollar.
I cannot get the spot out but it's okay; It still works in the store
|
|
|
|
|
The Following User Says Thank You to Sven7 For This Useful Post:
|
|
|
09-19-2012, 12:58 AM
|
#60 (permalink)
|
|
Master EcoModder
Join Date: Aug 2012
Location: northwest of normal
Posts: 29,090
Thanks: 8,256
Thanked 9,020 Times in 7,453 Posts
|
I should wander into the DIY forum more often...
Quote:
|
...likely the front can be from a typical front wheel drive car.
|
What do you expect for all-up weight? 'Typical' would be somewhere between a Honda 600 and an Olds Toronado. Are you planning on the batteries bringing the weight up to spec?
I like the way you are sculpting the body without a clear idea where the suspension attachment points are. They build skyscrapers that way, start the foundation and design the top floors later. I think it's called fast-track design.
How much do you think electric drive-train design will advance before you are ready for one? You'll probably have the body fiberglassed by the time this stuff is available, but oh man! Cellulose Nanocrystals
Eventually you will need paint. You could finish of with a coat of Nanoclear. Keep it nice for the 'show and tell's.
|
|
|
|
|