Go Back   EcoModder Forum > EcoModding > DIY / How-to
Register Now
 Register Now
 

Reply  Post New Thread
 
Submit Tools LinkBack Thread Tools
Old 11-13-2012, 01:29 PM   #1 (permalink)
Busting Knuckles Often
 
Join Date: Aug 2012
Location: SE Michigan
Posts: 135

Blue Maxx - '04 Chevrolet Malibu Maxx LT
Team Chevy
90 day: 26.96 mpg (US)

Tink's Van - '08 Chrysler Town & Country Touring
90 day: 19.09 mpg (US)

2004 5 Speed Goldrolla - '04 Toyota Corolla CE
Team Toyota
90 day: 36.3 mpg (US)
Thanks: 313
Thanked 28 Times in 20 Posts
Pizza Pan covers over 16" GM alloy OEM wheels

Fuel Economy, Hypermiling, EcoModding News and Forum - EcoModder.com - WesternStarSCR's Album: Smooth Wheel Covers

This thread will document my materials and steps to add aluminum pizza pans my 2004 Chevy Malibu Maxx LT with 16 inch stock wheels.

WARNING: I plan on drilling 5 very small holes directly through each wheel for #8-32 tapped screws. I make no assumption as to the suitability of doing the same to your own wheels. I know the size and thickness of my wheels, and I have ZERO saftey concerns with this process. Proceed at your own comfort level.

I will edit this post as I go. I will keep the Bill of Material (BOM) as straighforward as possible, using item numbers from the store where purchased from.

Why do this?
http://ecomodder.com/forum/showthrea...html#post63787

How to do this?:
65+ Vehicle modifications for better fuel economy - EcoModder.com

http://ecomodder.com/forum/showthrea...ers-23563.html

http://ecomodder.com/forum/showthrea...orn-14306.html

Reasons for my own variation:
I liked the concept of a semi-permanent stud that 'raylit20' came up with in his solution. However, I did not want the concern of perhaps having to take off the center plastic cap at some point for a mounting or balancing machine at a tire store. I would also not be confident in my own epoxying abilities to have just one point of failure.

So, 'NachttRitter' used the acorn caps of the lugnuts themselves, to have multiple attachement points. However, it seemed that I would have to purchase different lug nuts to try this one. Also, I tought it best to have the studs mounted on the wheels, so that when it is re-balanced, the weight is already there. Making the bolts be the part that comes off means they are not on the wheel during balancing.

Summary of my Plan:
1. Studs
Use Stainless Steel #8-32 Machine Screws.
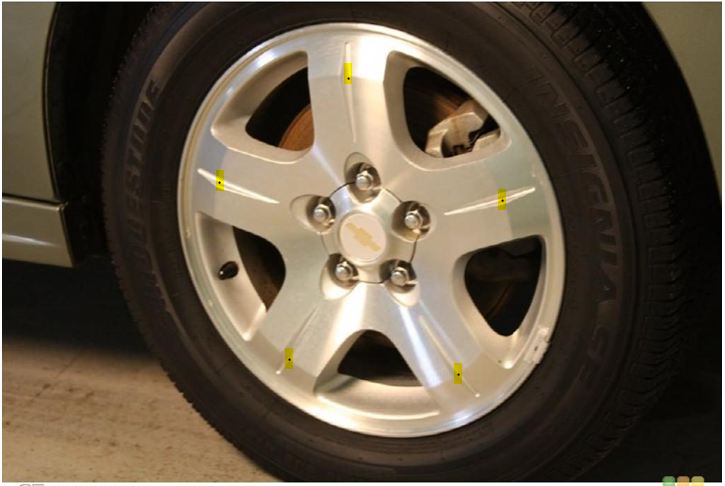
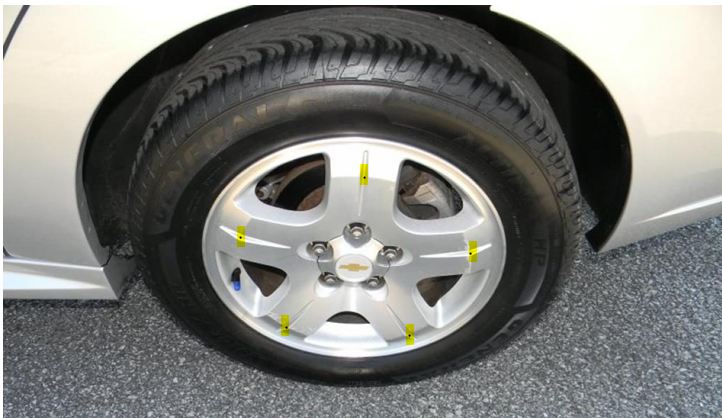
Drill #29 pilot hole in each wheel at each spoke, in the groove that is already in the design.
Tap from the back side with an 8 - 32 tap.
Insert screw, with external lock washer, from behind with some blue Loctite.

2. Discs
Use 17" Aluminum Pizza pans (proper size for 16" wheels)
Drill 5 holes for rubber grommets, lined up with studs.
Drill a 6th hole to a larger grommet, to protect the air valve & extension
Insert grommets into the holes on pizza pan.
Use nylon retaining washers and SS fender washers on both sides, put disc onto studs.
Secure with hex lock nut using 11/32" socket (correct for #8 size nut).
Put 11/32" combo wrench in glove box so that they can be removed during a tire change.

BOM:
Most items came from Grainger (you need a business account with them, or may may find a retail source for similar item)


Slime brand metal Air Valve extensions - Auto Zone
#8-32 SS Pan Head Phillips Machine Screws (2" LONG) - Lowes
SS Lock washers- Lowes
17" Aluminum Pizza Pans - Grainger - Item # 20W867
Nylon Retaining Washers - Grainger - Item # 3XYX9
SS Fender Washers - Grainger - Item # 4ARR3
SS Lock nuts - Grainger - Item # 3PDG1
Weather resistant grommets for stud holes - Grainger - Item # 3MRP7
Weather resistant grommets for air valve holes - Grainger - Item # 3MRT1

Build Log:
11-10-2012 - Began acquiring material
11-13-2012 - Began this thread
11-14-2012 - Found pictures on internet to mark up location
11-15-2012 - Changed idea from thru hole w/ locknut to a tapped hole.
05-1402013 - Began Mocking up the stud assembly

__________________


Last edited by WesternStarSCR; 05-14-2013 at 07:49 PM.. Reason: Settled on the stud assembly order, will begin project soon
  Reply With Quote
Alt Today
Popular topics

Other popular topics in this forum...

   
Old 11-13-2012, 03:52 PM   #2 (permalink)
Batman Junior
 
MetroMPG's Avatar
 
Join Date: Nov 2007
Location: 1000 Islands, Ontario, Canada
Posts: 22,513

Blackfly - '98 Geo Metro
Team Metro
Last 3: 70.09 mpg (US)

MPGiata - '90 Mazda Miata
90 day: 52.71 mpg (US)

Even Fancier Metro - '14 Mitsubishi Mirage top spec
90 day: 70.75 mpg (US)

Appliance car - '14 Mitsubishi Mirage ES (base)
90 day: 60.16 mpg (US)
Thanks: 4,058
Thanked 6,957 Times in 3,602 Posts
I'll be following this project.

---

I'd also like to mention my "bad" experience with valve stem extensions for others' interest.

I bought a set of extensions for the Firefly (Metro) when I glued flat plastic over the openings in the OEM wheel covers and needed a longer stem.

A day or 2 later I had four flat (or very low) tires!

When tightened down snugly, apparently the extensions put just enough pressure on the original valves to let a bit of air leak past. Backing the extensions off slightly fixed the problem.
__________________
Project MPGiata! Mods for getting 50+ MPG from a 1990 Miata
Honda mods: Ecomodding my $800 Honda Fit 5-speed beater
Mitsu mods: 70 MPG in my ecomodded, dirt cheap, 3-cylinder Mirage.
Ecodriving test: Manual vs. automatic transmission MPG showdown


EcoModder
has launched a forum for the efficient new Mitsubishi Mirage
www.MetroMPG.com - fuel efficiency info for Geo Metro owners
www.ForkenSwift.com - electric car conversion on a beer budget
  Reply With Quote
The Following User Says Thank You to MetroMPG For This Useful Post:
WesternStarSCR (11-13-2012)
Old 11-13-2012, 04:00 PM   #3 (permalink)
Busting Knuckles Often
 
Join Date: Aug 2012
Location: SE Michigan
Posts: 135

Blue Maxx - '04 Chevrolet Malibu Maxx LT
Team Chevy
90 day: 26.96 mpg (US)

Tink's Van - '08 Chrysler Town & Country Touring
90 day: 19.09 mpg (US)

2004 5 Speed Goldrolla - '04 Toyota Corolla CE
Team Toyota
90 day: 36.3 mpg (US)
Thanks: 313
Thanked 28 Times in 20 Posts
Thanks you

Quote:
Originally Posted by MetroMPG View Post
I'll be following this project.

---

I'd also like to mention my "bad" experience with valve stem extensions for others' interest.

I bought a set of extensions for the Firefly (Metro) when I glued flat plastic over the openings in the OEM wheel covers and needed a longer stem.

A day or 2 later I had four flat (or very low) tires!

When tightened down snugly, apparently the extensions put just enough pressure on the original valves to let a bit of air leak past. Backing the extensions off slightly fixed the problem.
I put the valve extensions on over the weekend. I will check my PSI when I get home from work... had not thought of that!
__________________


  Reply With Quote
Old 11-13-2012, 04:22 PM   #4 (permalink)
Master EcoModder
 
Join Date: Jan 2011
Location: na
Posts: 1,025
Thanks: 277
Thanked 218 Times in 185 Posts
To avoid balancing issues you could use Dyna Beeds or Counteract balance beeds. Oriely's can get the counteract the next day usually, I buy a pound($30) and put 1/4 in each wheel when changing tires or thru the valve stem. Buy it once and reuse it. With TPS seems to take a little more 5-6 onces or leave a weight opposite the valve stem and can't install thru the valve stem.
  Reply With Quote
Old 11-13-2012, 05:12 PM   #5 (permalink)
Wiki Mod
 
Weather Spotter's Avatar
 
Join Date: Nov 2009
Location: Midland MI, USA
Posts: 2,042

Max - '14 Ford C-Max SEL
Thanks: 228
Thanked 304 Times in 210 Posts
subscribed
__________________
  Reply With Quote
Old 11-14-2012, 12:23 PM   #6 (permalink)
Busting Knuckles Often
 
Join Date: Aug 2012
Location: SE Michigan
Posts: 135

Blue Maxx - '04 Chevrolet Malibu Maxx LT
Team Chevy
90 day: 26.96 mpg (US)

Tink's Van - '08 Chrysler Town & Country Touring
90 day: 19.09 mpg (US)

2004 5 Speed Goldrolla - '04 Toyota Corolla CE
Team Toyota
90 day: 36.3 mpg (US)
Thanks: 313
Thanked 28 Times in 20 Posts
Pictures of stock 2004 Maxx LT wheels (like mine)

Marked and highlighted location of where holes will go:

The existing groove in the design, right at the 'highest' point of each spoke.

I will square up the existing rounded groove, to let the locknut sit flush against the wheel, and to 'capture' it so it does not spin.

Screw will insert from the back. Not sure on length of screw yet (1.5" or 2").


__________________


  Reply With Quote
Old 11-14-2012, 12:29 PM   #7 (permalink)
EcoModding Apprentice
 
Join Date: Apr 2012
Location: Anaheim, CA
Posts: 115
Thanks: 4
Thanked 45 Times in 25 Posts
Thanks for this thread. I am following it as well.
  Reply With Quote
Old 11-14-2012, 03:15 PM   #8 (permalink)
Master EcoModder
 
Join Date: Sep 2009
Posts: 5,927
Thanks: 877
Thanked 2,024 Times in 1,304 Posts
Use the valve extension when you put air in the tire, then take it off. One extension serves all 4 wheels.

regards
Mech
  Reply With Quote
The Following User Says Thank You to user removed For This Useful Post:
WesternStarSCR (11-14-2012)
Old 11-14-2012, 03:17 PM   #9 (permalink)
EcoModding Apprentice
 
Join Date: Apr 2012
Location: Anaheim, CA
Posts: 115
Thanks: 4
Thanked 45 Times in 25 Posts
Once hole have been drilled to the depth of the screws, why not tap the hole for the threads of the screws? That would eliminate the need to drill all the way through the wheel. Thoughts?
  Reply With Quote
The Following User Says Thank You to Beau For This Useful Post:
WesternStarSCR (11-14-2012)
Old 11-14-2012, 03:33 PM   #10 (permalink)
Super Lurker!
 
Slow_s10's Avatar
 
Join Date: Sep 2012
Location: Chesapeake, VA
Posts: 88

Rusty - '88 Chevrolet S10 base
90 day: 23.72 mpg (US)

Doc - '08 Honda Civic EX-L
90 day: 29.6 mpg (US)
Thanks: 4
Thanked 14 Times in 11 Posts
That was my thought too. to drill and tap the holes in the wheels instead of trying to use nuts and JB weld and everything else. Then just use some machine screws to attach the covers. I think it would be a much more elegant solution and with the covers off it would look competely stock. Also doing it this way should not have any significant effect on the wheel's balance.

__________________
-Kevin
  Reply With Quote
The Following User Says Thank You to Slow_s10 For This Useful Post:
WesternStarSCR (11-14-2012)
Reply  Post New Thread


Tags
aluminum, chevy, malibu, pizza, wheel cover

Thread Tools


Powered by vBulletin® Version 3.8.11
Copyright ©2000 - 2024, vBulletin Solutions Inc.
Content Relevant URLs by vBSEO 3.5.2
All content copyright EcoModder.com