03-07-2011, 01:58 PM
|
#111 (permalink)
|
|
EcoModding Jack
Join Date: Nov 2010
Location: Sacramento
Posts: 335
Thanks: 12
Thanked 58 Times in 40 Posts
|
The entire exhaust from the collector back will be wrapped with heat wrap,
so it should be OK. Given this car has no heater, it might be removed around the footwell during winter. 
Quote:
Originally Posted by MetroMPG

Too bad the exhaust wasn't on the passenger side on this motor. That footwell & tunnel is going to be warm!
|
|
|
|

|
 Today Today
|
|
|
|
 Other popular topics in this forum...
|
|
|
|
|
03-07-2011, 02:01 PM
|
#112 (permalink)
|
|
Moderate your Moderation.
Join Date: Nov 2008
Location: Troy, Pa.
Posts: 8,919
Pasta - '96 Volkswagen Passat TDi 90 day: 45.22 mpg (US)
Thanks: 1,369
Thanked 430 Times in 353 Posts
|
How about a simple reflective blanket under the floor covering to keep theheat in check when necessary, and you can remove it easily when you would like the heat.
__________________
"¿ʞɐǝɹɟ ɐ ǝɹ,noʎ uǝɥʍ 'ʇı ʇ,usı 'ʎlǝuol s,ʇı"

|
|
|
|
|
03-07-2011, 02:08 PM
|
#113 (permalink)
|
|
EcoModding Jack
Join Date: Nov 2010
Location: Sacramento
Posts: 335
Thanks: 12
Thanked 58 Times in 40 Posts
|
not a bad idea, the only issue would be the space taken up by the blanket, the car is quite small, and moving the engine back like I have has taken up even more footwell space, I don't think there is even room for carpet!
I do need to shield the transmission from heat too, but may put in some alum sheild on that side along with the wrap, but once again, there is little room. Tight fit everywhere.
Quote:
Originally Posted by Christ
How about a simple reflective blanket under the floor covering to keep theheat in check when necessary, and you can remove it easily when you would like the heat.
|
|
|
|
|
|
03-07-2011, 02:35 PM
|
#114 (permalink)
|
|
Aero Wannabe
Join Date: Dec 2007
Location: NW Colo
Posts: 738
Thanks: 705
Thanked 219 Times in 170 Posts
|
I keep checking in for the next installment of this build. Great stuff!
__________________
60 mpg hwy highest, 50+mpg lifetime
TDi=fast frugal fun  https://ecomodder.com/forum/showthre...tml#post621801

Quote:
Originally Posted by freebeard
The power needed to push an object through a fluid increases as the cube of the velocity. Mechanical friction increases as the square, so increasing speed requires progressively more power.
|
|
|
|
|
|
03-07-2011, 05:48 PM
|
#115 (permalink)
|
|
EcoModding Jack
Join Date: Nov 2010
Location: Sacramento
Posts: 335
Thanks: 12
Thanked 58 Times in 40 Posts
|
E85 compatible fuel level sender
Wanted to add a note for future reference, having spent half the weekend researching fuel level sensors, that for E85, there is really only one choice,
and that is a WEMA stainless-steel magnetic float sensor.
Fuel Tank Senders, Gas Tank Senders, Water Tank Senders, Holding Tank Senders by WEMA USA, Inc.
This unit I ordered was only $32 and are available in 1/2 increments, my tank is only 7in high, so the Jegs/Jaz/VDO tube senders that are $100 and limited sizes. These designs seem to be the same as the ISSPRO senders that use aluminum and are not good for E85. The ISSPRO senders are available in inch increments, and are $64, ISSPRO Product Categories
And finally there is the Centroid CENTROID PRODUCTS - Computerized Tank Display - Electronic Senders - capacitive fuel gauges
sensor that uses capacitance, so no moving parts and about $60, but it uses aluminum and brass to measure capacitance, and the signal varies by what type of fuel, so not good for E85 or E anything as the signal changes.
Hope this saves someone some time. Was thinking of making my own until I found the WEMA units.
And also let me add that I'm not done with this tank install shown in the pics, so if it looks like its unsafe, it hasn't been strapped down rubber insulated, etc, yet.
Quote:
Originally Posted by nimblemotors
There is nothing "improper" about this fuel tank, in fact I believe it is superior, in its location and its support. I take safety seriously, and that is why this tank is where it is, in the strongest part of the chassis and the most protected location. The fuel sloshing isn't really bad for such a small tank,
I had no foam in my 8-gallon tank in my Falcon no problems at all.
However I do think it may cause the Geo sender to fail as it is a quite weak device, I will probably replace it with a tube type sender, or perhaps something else. I had braided line on my falcon and did not like it, and will not use it again, hard to handle it and it eventually leaked, but you could not find out where because of the braid, but in any case, NHRA rules allow only 6or 12in of it if I recall. I have to run about 4-5ft from tank to engine.
PEX line should last forever, if not in sunlight, which it isn't, and will likely wrap it with aluminum tape, and run it through an alum conduit as well, since I will have the exhaust pipe going through the trans tunnel (which will be heat sheilded as well)
I'd use alum tubing if not for E85. Having trouble finding fittings for small size PEX. I don't know what the PSI is for the Geo, I think the TBI design uses less pressure than port injectors, the PEX is rated at 100psi.
McMasterCarr has Buna-N braided hose, that is good for E85.
McMaster-Carr might get some of this. |
|
|
|
|
|
03-25-2011, 02:43 AM
|
#116 (permalink)
|
|
EcoModding Jack
Join Date: Nov 2010
Location: Sacramento
Posts: 335
Thanks: 12
Thanked 58 Times in 40 Posts
|
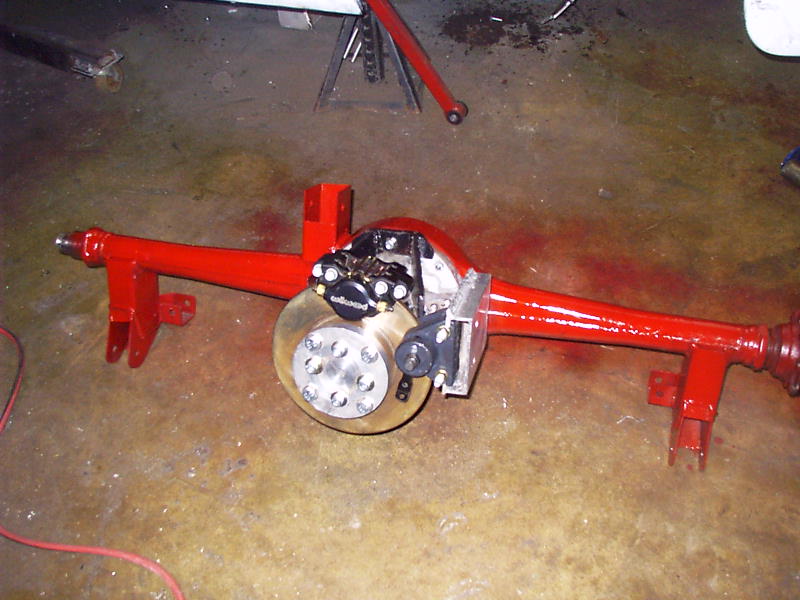
Rear Diff Brake
Finally got pretty all the fab work done on the rear brakes, oops I mean brake.
Bring on the safety warnings... 
I have eliminated all the drum brake components, the drums, the backing plates, the cylinders, the mounts. At the wheels there is nothing but the bearings. My guess is 50lbs less with the pinion disk brake. The brake disk itself is from a early geo metro, the caliper Wilwood just like I have on the front. Parking brake is the Wilwood manual disc caliper. I still need to confirm the midget brake cable will work and fab a mount for it or another cable.
The rear brakes only do 33% of braking, so really a third disk brake like the fronts is the right proportion. The issue besides the disk spinning 4 times faster than the wheel, is the braking will tend to lift the right rear wheel, as accelerating tends to lift the left rear wheel. I don't see it as an issue, but will see how it goes when its one the road.
 |
|
|
|
|
03-25-2011, 02:51 AM
|
#117 (permalink)
|
|
EcoModding Jack
Join Date: Nov 2010
Location: Sacramento
Posts: 335
Thanks: 12
Thanked 58 Times in 40 Posts
|
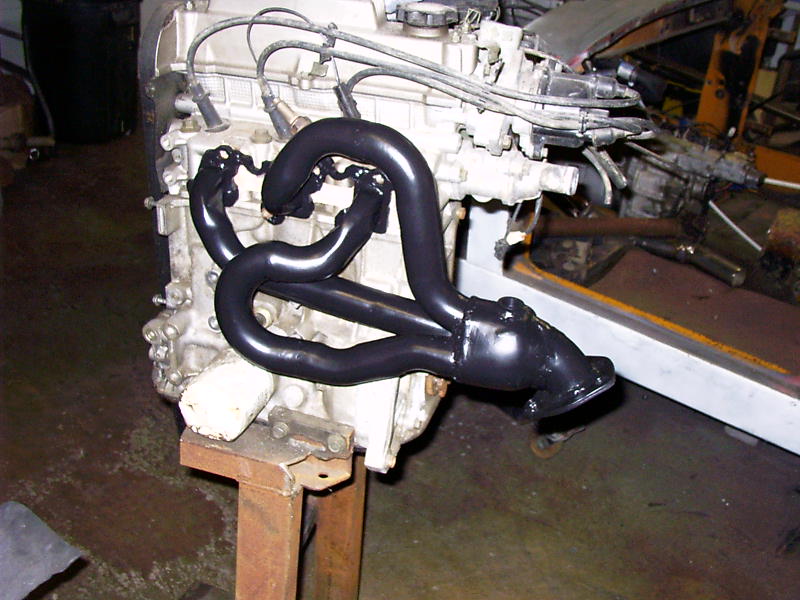
header and muffler
Got the header back from powder coating, looks pretty good, high temp ceramic inside and out. should keep the heat in the exhaust.
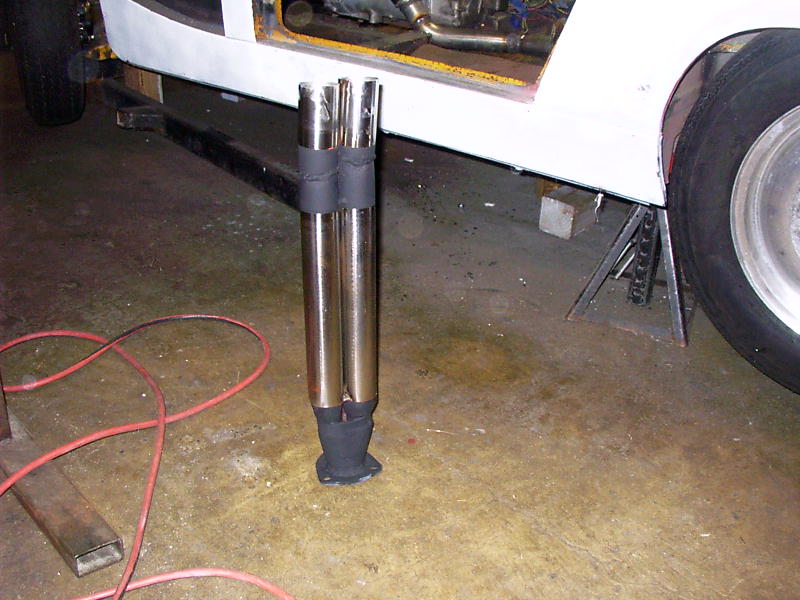
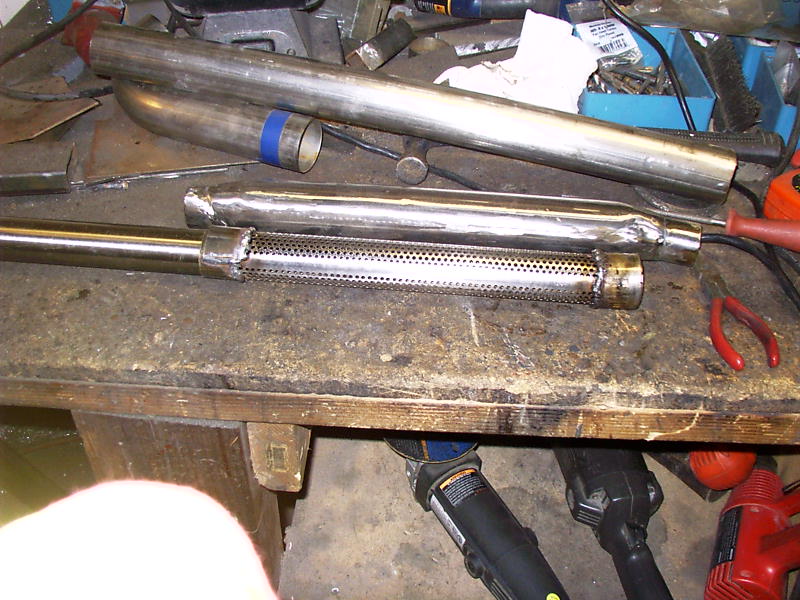
Also finished the rest of the stainless steel exhaust system, 2" tubing,
and making the stainless glass-pac muffler, with dual 1.5in inside tubiing.
I polished up the muffler and the rear tubing, but I may wrap it all the way back to the muffler.
 |
|
|
|
|
03-25-2011, 03:06 AM
|
#118 (permalink)
|
|
EcoModding Jack
Join Date: Nov 2010
Location: Sacramento
Posts: 335
Thanks: 12
Thanked 58 Times in 40 Posts
|
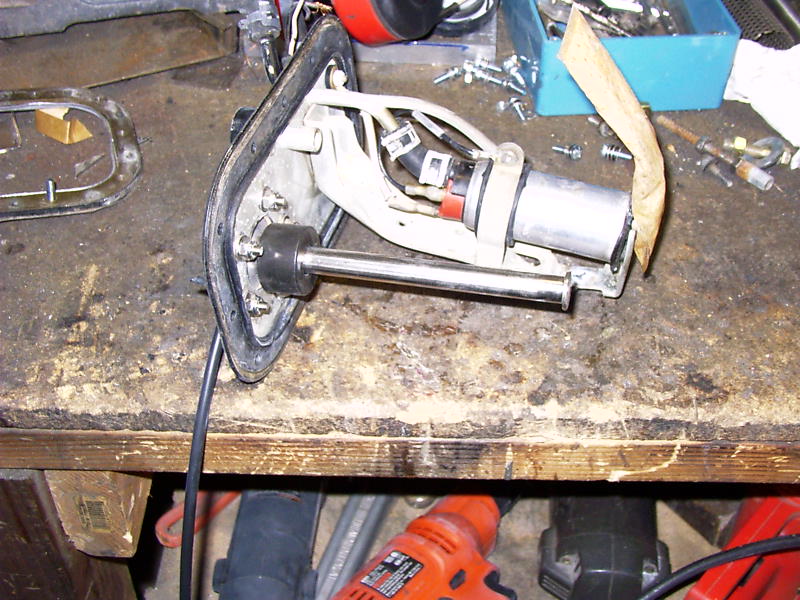
tank float
Got the new tank float and installed it. When I pressure tested the tank, it was leaking along the seal as the hdpe wasn't smooth after I reformed it.
So I just did another one from scratch and like most things, the second time works better than the first. It seals up well.
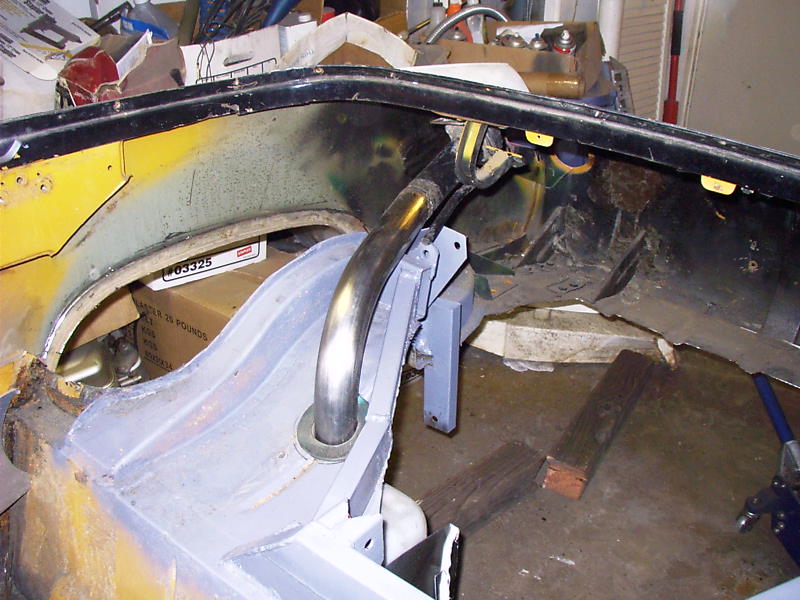
I also fabbed up the filler tube from 2" stainless, and welded in the filler part from the metro.
The tank fills from inside the trunk, which is good and bad.
The stock midget filled below the trunk, that is really very low to the ground, my stock Falcon filled behind the license plate under the trunk, and I found that to be very inconvient. I'm going to have to seal the trunk area from the filler area when I finish fabbing the trunk lid. Been very time consuming this tank effort, but it does save a lot of weight and is a much better setup,
and having removed the stock tank, it was not in good shape, rusted, etc.
Here is the stock metro (modified) fill level sensor compared to the new one
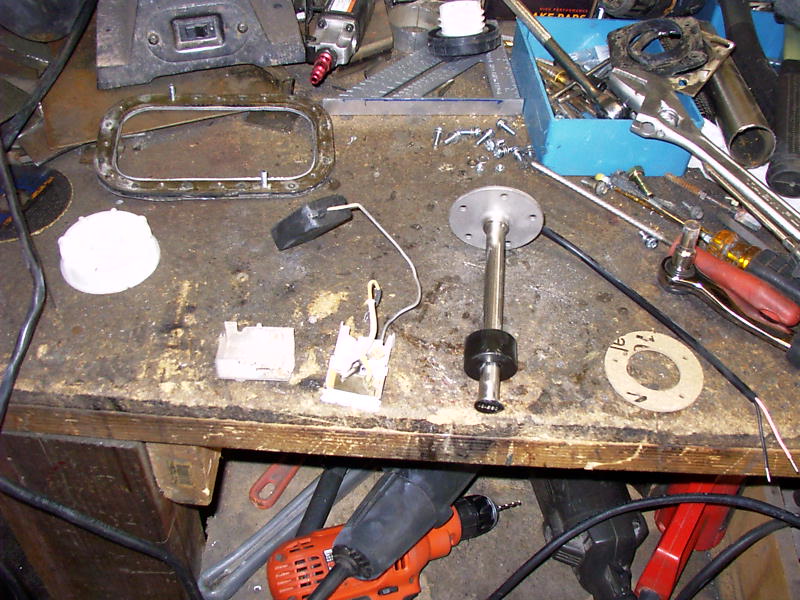
and it installed into the tank cover with the fuel pump (modified to reach the bottom of the tank)
Preliminary fill tube setup, I'm working on finishing up the tank and lines completely and vent. Oh you might notice I added the frame structure to support the upper third control arm for the rear end, and raised the driveshaft tube crossover as the whole drivetrain has been moved vertically about 4 inches.
Last edited by nimblemotors; 03-25-2011 at 03:13 AM..
|
|
|
|
|
The Following User Says Thank You to nimblemotors For This Useful Post:
|
|
|
03-25-2011, 09:40 AM
|
#119 (permalink)
|
|
EcoModding Apprentice
Join Date: Feb 2010
Location: Sussex/Kent, UK
Posts: 108
Thanks: 4
Thanked 23 Times in 12 Posts
|
That rear brake is genius, I've never seen it done that way before. Great project, Nimble, keep up the good work.
__________________
Spoken like a champion. Oh no, disaster!
|
|
|
|
|
The Following User Says Thank You to piers.singer For This Useful Post:
|
|
|
03-25-2011, 06:51 PM
|
#120 (permalink)
|
|
Master EcoModder
Join Date: Jul 2008
Location: Silly-Con Valley
Posts: 1,479
Thanks: 201
Thanked 262 Times in 199 Posts
|
I really like that you have used a completely separate caliper for the hand-brake/e-brake. Good to have just in case the hydraulics get unhappy.
It's an interesting way to reduce weight, including unsprung and rotating weight. Hopefully the torque applied won't turn out to be a problem.
For economy, you should note that disk brakes will drag on the rotor slightly. Drum brakes will not. I don't know that it will make a noticeable difference, but it might have just the tiniest bit less rolling resistance if you had used a drum back there instead.
If you're going to be using your brakes heavily, you will want to at least think about cooling that single rear brake. A bit of ducting would likely be enough, but you're still working in a pretty confined space back there. Seems pretty neat, though!!
-soD
|
|
|
|
|