Go Back   EcoModder Forum > EcoModding > Aerodynamics
Register Now
 Register Now
 

Reply  Post New Thread
 
Submit Tools LinkBack Thread Tools
Old 09-28-2012, 02:26 AM   #41 (permalink)
Learning Aeromodding
 
myrefugeisintheLord's Avatar
 
Join Date: Feb 2011
Location: Spokane, WA.
Posts: 199

Metro - '93 Geo Metro 4 door hatchback
90 day: 35.26 mpg (US)
Thanks: 59
Thanked 45 Times in 32 Posts
Gealii, I don't understand how I would use the template for the underside. Here's a picture of RAVadoodle flipped upside down. And the original too. I tried to use the template, but it wasn't making sense.

I also added the approximate location of the belly pan. The sides of the RAV, below the doors, has a little plastic lip. So what you see, isn't necessarily what you get.


(A level spot, from front to back, not side to side.)


<><><><><><><><><><><><><><><><><><><><><><><><><> <><><><>


The main parts of the belly pan are pretty much finished.

Because I was running out of large coro pieces, I used scrap to finish the wheel well area. It wasn't quite long enough. I have an idea for sealing up the wheel well area, so it'll get fixed later.


It was getting dark. The pictures aren't very good, but hopefully well enough.


The middle of the back, about 12" in, sags around 2". I want to add a bracket, or something to pick it up at least 1.5" - 2".


Edit: Pretty goofy looking!


Last edited by myrefugeisintheLord; 12-17-2012 at 01:14 AM.. Reason: reloaded pictures
  Reply With Quote
Alt Today
Popular topics

Other popular topics in this forum...

   
Old 09-28-2012, 06:32 AM   #42 (permalink)
The Dirty330 Modder
 
Gealii's Avatar
 
Join Date: Dec 2011
Location: North East Ohio, USA
Posts: 642

CruzeRS - '15 Chevy Cruze LT RS
90 day: 41.29 mpg (US)
Thanks: 10
Thanked 67 Times in 59 Posts
i was more explaining the optimum shape beings the only way to get it would be to build a custom car, so with your belly pan you would want the beginning of the template which would mean to angle it slightly upwards
__________________


"The only real mistake is the one from which we learn nothing."
- Henry Ford
  Reply With Quote
Old 09-28-2012, 12:22 PM   #43 (permalink)
Wiki Mod
 
Weather Spotter's Avatar
 
Join Date: Nov 2009
Location: Midland MI, USA
Posts: 2,042

Max - '14 Ford C-Max SEL
Thanks: 228
Thanked 304 Times in 210 Posts
What you have seems to be about right. The idea of the template is to slowly slope up the bottom to meet the top. Google some pics of the Buckminster Fuller car.
__________________
  Reply With Quote
Old 09-28-2012, 12:24 PM   #44 (permalink)
Master EcoModder
 
Join Date: Mar 2008
Location: USA
Posts: 568
Thanks: 1
Thanked 73 Times in 58 Posts
Please tell me again why the rearmost coro. sheet does not curve up and tuck into the rear bumper cover. In other words, why the sharp box instead? I missed something.
  Reply With Quote
Old 09-28-2012, 01:02 PM   #45 (permalink)
Learning Aeromodding
 
myrefugeisintheLord's Avatar
 
Join Date: Feb 2011
Location: Spokane, WA.
Posts: 199

Metro - '93 Geo Metro 4 door hatchback
90 day: 35.26 mpg (US)
Thanks: 59
Thanked 45 Times in 32 Posts
Otto, The "box" was not what I was planning, but it was easy to achieve. I'm reevaluating the situation. Possibly incorporating the wheel skirt into the belly pan. The main reason for the "box", is because my sheets are only 2'x4'. Also, in between the wheels is more narrow. So if I was going to have it spread back out, I would think that it would be catching more wind?

Preferably, I would have it look like an upside down kamm, that is closed in. But trying to keep a 0 degree diffuser angle, it was easier to cut it off sharp which also helped to keep the coro in place to keep the ~0 degree angle.

I'm photoshop editing right now for a better design. Any help or suggestions on what I should do would be VERY VERY appreciated!!
  Reply With Quote
Old 09-28-2012, 03:15 PM   #46 (permalink)
Learning Aeromodding
 
myrefugeisintheLord's Avatar
 
Join Date: Feb 2011
Location: Spokane, WA.
Posts: 199

Metro - '93 Geo Metro 4 door hatchback
90 day: 35.26 mpg (US)
Thanks: 59
Thanked 45 Times in 32 Posts
I've read in plenty of places that straight cut off edges, especially from side to top, or in this case bottom to side, is not a good thing. So the "box" isn't staying. I'm actually planning a complete redo of the entire middle to back belly pan. I've learned a ton by getting in there and doing it. But I want it as level as possible, and easier to remove if needed. I also don't like the openings for the exhaust pipe. Even with a grate to act as a wind block, I can just imagine all the snow I'll be scooping up in there. It will melt with all the heat, and then freeze later in the many low spots. What a headache!

I'm thinking it will be worth the exchange of 1" lower belly pan to have enough clearance around the exhaust pipe, to not have the openings. And I'm going to be persistent in getting some 4'x8' sheets of coro. That will put me 2" short on one side, but I'm sure I can make it work.

<<>><<>><<>><<>><<>><<>><<>><<>><<>><<>><<>><<>><< >><<>>

But back to the task at hand. I need to figure out this back end part, and especially get all the wheel well areas sealed up before Winter is here!

I need some help deciding what to do with the wheel well areas. On the first rear wheel well area that I added coro to, the top part of the opening, for the suspension bar, is crinkled. Like the bar didn't have enough room. I thought it would be enough, but obviously I need the entire factory allowed room. The problem with that, is allowing room for movement means there's larger openings for snow and what-have-you.

1. Most promising idea. Is using a long/flat rubber piece, attached vertically to the coro on either side of the suspension, so the bars can move freely between. But stiff enough to keep snow out. Kind of like the cover for an auto with the shifter on the floor.

2. Another thought I had this morning was to make an inward curved shape out of coro. Hopefully that would keep the majority of snow out of the main parts of the belly pan. By having it curve in, I would be able to go through a section of the suspension that wouldn't move as much as it does by the tire.

3. And lastly I was thinking of attaching one, or a couple of pieces of coro to the suspension bars themselves, that would move up and down with the suspension, and hopefully close off the openings enough to keep snow out. Least likely to work, because of room restrictions for the moving coro piece, and attachment to the bars.


<<>><<>><<>><<>><<<>><<>><<>><<<>><<>><<>><<>><<>> <<>><<>>


Another area I need some help with: The wheel skirts. My original plan was quite simple.
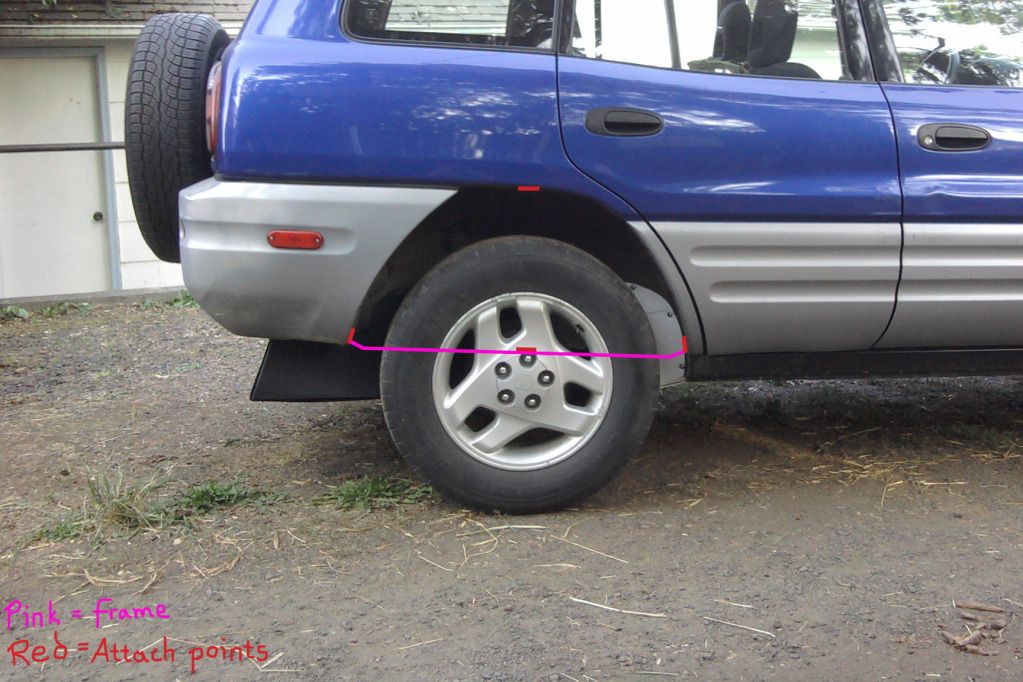

But now, I'm thinking I'd like to make the belly pan wider in the back, curved, and lined up with the future wheel skirts. Here's a VERY rough draft:
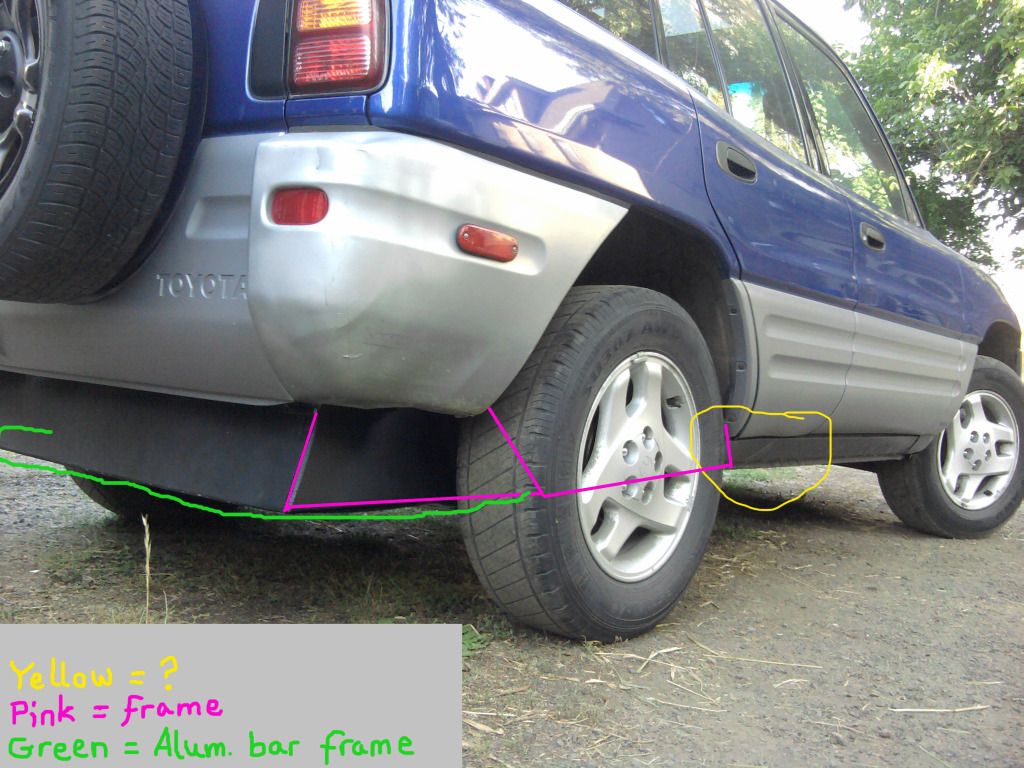

The area in front of the wheel, down low, looks difficult. Gradual is better, so I'm wondering if some side paneling would be a good thing? Like BamZipPow's, but not as low. Like I said, I don't want to lower RAVadoodle much, if any. But they might add as a better transition?
I'd consider "loosing" the rear side bumper pieces. if it would be better.

I'll keep searching around for ideas/answers. Any that you guys want to directly add (or even helpful links), is always HIGHLY appreciated!

Last edited by myrefugeisintheLord; 12-17-2012 at 01:15 AM..
  Reply With Quote
Old 09-28-2012, 04:22 PM   #47 (permalink)
Batman Junior
 
MetroMPG's Avatar
 
Join Date: Nov 2007
Location: 1000 Islands, Ontario, Canada
Posts: 22,534

Blackfly - '98 Geo Metro
Team Metro
Last 3: 70.09 mpg (US)

MPGiata - '90 Mazda Miata
90 day: 54.46 mpg (US)

Appliance car Mirage - '14 Mitsubishi Mirage ES (base)
90 day: 57.73 mpg (US)
Thanks: 4,082
Thanked 6,979 Times in 3,614 Posts
Quote:
Originally Posted by myrefugeisintheLord View Post
Preferably, I would have it look like an upside down kamm, that is closed in. But trying to keep a 0 degree diffuser angle, it was easier to cut it off sharp which also helped to keep the coro in place to keep the ~0 degree angle.
I think that's what Otto was asking about: why did you aim for 0 degrees? An upward taper is more ideal -- better to make the rear of the pan upswept, if you can. Not too much, or too abruptly. (The extent of the curve/angle depends on how much distance from the beginning of the upward taper to the end of the belly pan.)

EDIT: green line shows a better "box" - upswept and extended further aft to gain more length for tapering.

(PS: It's OK to want to kick people like me for offering suggestions so late in your progress. )

Attached Thumbnails
Click image for larger version

Name:	rav4-diffuser.jpg
Views:	471
Size:	33.0 KB
ID:	11565  
__________________
Project MPGiata! Mods for getting 50+ MPG from a 1990 Miata
Honda mods: Ecomodding my $800 Honda Fit 5-speed beater
Mitsu mods: 70 MPG in my ecomodded, dirt cheap, 3-cylinder Mirage.
Ecodriving test: Manual vs. automatic transmission MPG showdown


EcoModder
has launched a forum for the efficient new Mitsubishi Mirage
www.MetroMPG.com - fuel efficiency info for Geo Metro owners
www.ForkenSwift.com - electric car conversion on a beer budget
  Reply With Quote
The Following User Says Thank You to MetroMPG For This Useful Post:
myrefugeisintheLord (09-29-2012)
Old 09-28-2012, 04:55 PM   #48 (permalink)
Batman Junior
 
MetroMPG's Avatar
 
Join Date: Nov 2007
Location: 1000 Islands, Ontario, Canada
Posts: 22,534

Blackfly - '98 Geo Metro
Team Metro
Last 3: 70.09 mpg (US)

MPGiata - '90 Mazda Miata
90 day: 54.46 mpg (US)

Appliance car Mirage - '14 Mitsubishi Mirage ES (base)
90 day: 57.73 mpg (US)
Thanks: 4,082
Thanked 6,979 Times in 3,614 Posts
As for what to do behind the rear wheels, think about tapering or "boat tailing" there too. It'll be harder to do on the left side because of the tail pipe though.

Here's an example in cardboard of what you could think about doing in coro:


Above: radiused the leading edge of the wheel boat tail.


I realize it's not very practical, in terms of hitting stuff. But wanted to go big or go home.


Surprise, surprise, attached flow behind the wheel (at least on the outside - didn't capture the inside).

from: http://ecomodder.com/forum/showthrea...tml#post143382
__________________
Project MPGiata! Mods for getting 50+ MPG from a 1990 Miata
Honda mods: Ecomodding my $800 Honda Fit 5-speed beater
Mitsu mods: 70 MPG in my ecomodded, dirt cheap, 3-cylinder Mirage.
Ecodriving test: Manual vs. automatic transmission MPG showdown


EcoModder
has launched a forum for the efficient new Mitsubishi Mirage
www.MetroMPG.com - fuel efficiency info for Geo Metro owners
www.ForkenSwift.com - electric car conversion on a beer budget
  Reply With Quote
The Following 3 Users Say Thank You to MetroMPG For This Useful Post:
aerohead (09-28-2012), myrefugeisintheLord (09-29-2012), Weather Spotter (09-29-2012)
Old 09-28-2012, 04:57 PM   #49 (permalink)
Batman Junior
 
MetroMPG's Avatar
 
Join Date: Nov 2007
Location: 1000 Islands, Ontario, Canada
Posts: 22,534

Blackfly - '98 Geo Metro
Team Metro
Last 3: 70.09 mpg (US)

MPGiata - '90 Mazda Miata
90 day: 54.46 mpg (US)

Appliance car Mirage - '14 Mitsubishi Mirage ES (base)
90 day: 57.73 mpg (US)
Thanks: 4,082
Thanked 6,979 Times in 3,614 Posts
If those plastic "side" bumpers behind the rear wheel are easy to remove, you could modify them to taper more than they do as well. Worth doing in combination with rear wheel skirts because they'll be able to work with attached flow. They probably have pretty turbulent if not detached flow over much of that surface as-is.
__________________
Project MPGiata! Mods for getting 50+ MPG from a 1990 Miata
Honda mods: Ecomodding my $800 Honda Fit 5-speed beater
Mitsu mods: 70 MPG in my ecomodded, dirt cheap, 3-cylinder Mirage.
Ecodriving test: Manual vs. automatic transmission MPG showdown


EcoModder
has launched a forum for the efficient new Mitsubishi Mirage
www.MetroMPG.com - fuel efficiency info for Geo Metro owners
www.ForkenSwift.com - electric car conversion on a beer budget
  Reply With Quote
Old 09-28-2012, 05:27 PM   #50 (permalink)
Learning Aeromodding
 
myrefugeisintheLord's Avatar
 
Join Date: Feb 2011
Location: Spokane, WA.
Posts: 199

Metro - '93 Geo Metro 4 door hatchback
90 day: 35.26 mpg (US)
Thanks: 59
Thanked 45 Times in 32 Posts
Quote:
Originally Posted by MetroMPG View Post
I think that's what Otto was asking about: why did you aim for 0 degrees? An upward taper is more ideal -- better to make the rear of the pan upswept, if you can. Not too much, or too abruptly. (The extent of the curve/angle depends on how much distance from the beginning of the upward taper to the end of the belly pan.)

EDIT: green line shows a better "box" - upswept and extended further aft to gain more length for tapering.

(PS: It's OK to want to kick people like me for offering suggestions so late in your progress. )
Darin, I was going with the 0 degree angle because of what Sven said on the first page. I'm really confused about that whole thing!

"The diffuser should be flat and level to the ground." - Sven7


I realize every type of vehicle needs certain things to improve efficiency. Knowing what info to use for my application has been difficult. I found MTrenk's thread about the underbody airfoil stuff today. ( The underbody (flat belly pan suboptimal - explanation & solutions offered) ) Very interesting. I'm kind of grasping his points. (I particularly enjoyed the EV RAV4 video! )

Here's a better example of the location of the belly pan. The green line represents the unchangeable part. At least if I go around the suspension.

From there, I'm not sure what angle to do. ??? 10 degrees??? I have no clue.

I wish I could make the back part out of paper mache. That way it would be moldable into any shape I want. I think fiberglass would be similar. I've never used it before, so it's a bit daunting. I really like what 3-wheeler has done for his belly pan. ( 3-Wheeler's belly pan thread )

I really like what you have done to your little Metro! I have a lot of questions on how, and what, but I bet my questions would be answered if I read the info on your mods. I've been wanting to do that for a while now.

The added piece behind the wheels is interesting. That might help in my situation. I'll have to take off the rear bumpers to see what I can do.

The more I get into this aero stuff, the more a boat tail seems like a possibility. Lol, though I guess if she is going to be a loaner so I can fix friends/family vehicles, then I had better not add a boat tail. I wouldn't want people saying I can't take their vehicle home to fix, because they don't want to barrow the "crazy" looking vehicle!


Last edited by myrefugeisintheLord; 12-17-2012 at 01:15 AM.. Reason: reloaded pictures
  Reply With Quote
Reply  Post New Thread


Powered by vBulletin® Version 3.8.11
Copyright ©2000 - 2025, vBulletin Solutions Inc.
Content Relevant URLs by vBSEO 3.5.2
All content copyright EcoModder.com