Go Back   EcoModder Forum > EcoModding > Aerodynamics
Register Now
 Register Now
 

Reply  Post New Thread
 
Submit Tools LinkBack Thread Tools
Old 08-28-2010, 10:40 PM   #51 (permalink)
EcoModding Apprentice
 
Join Date: Jun 2010
Location: CT usa
Posts: 224
Thanks: 11
Thanked 7 Times in 6 Posts
wrap wire around the slider and clamp it to something??

I have a clamptite so im always clamping things.

edit: clamp it with wire and then epoxy it again?

  Reply With Quote
Alt Today
Popular topics

Other popular topics in this forum...

   
Old 08-28-2010, 10:43 PM   #52 (permalink)
Master EcoModder
 
Patrick's Avatar
 
Join Date: Apr 2008
Location: Northern Florida, USA
Posts: 510

Hot Tamale - '10 Toyota Prius III
Thanks: 27
Thanked 96 Times in 70 Posts
Also, if the actuator rod is not too brittle, you might be able to bend an "S" shape into it at the point where it would fit into the vent bar. Make sure the hole in the vent bar is large enough for the rod to go through, then snake the rod into the hole before inserting the whole assembly into the car. Make sure the horizontal part of the rod stays in the vent bar hole while installing. Lots of carburetor actuator rods were set up this way - there was nothing else holding the rods into the arms.
  Reply With Quote
The Following User Says Thank You to Patrick For This Useful Post:
Weather Spotter (08-29-2010)
Old 08-28-2010, 11:15 PM   #53 (permalink)
Wiki Mod
 
Weather Spotter's Avatar
 
Join Date: Nov 2009
Location: Midland MI, USA
Posts: 2,042

Max - '14 Ford C-Max SEL
Thanks: 228
Thanked 304 Times in 210 Posts
Quote:
Originally Posted by Patrick View Post
Also, if the actuator rod is not too brittle, you might be able to bend an "S" shape into it at the point where it would fit into the vent bar. Make sure the hole in the vent bar is large enough for the rod to go through, then snake the rod into the hole before inserting the whole assembly into the car. Make sure the horizontal part of the rod stays in the vent bar hole while installing. Lots of carburetor actuator rods were set up this way - there was nothing else holding the rods into the arms.
I could do that, the actuator end has a 90 in it and then a wide spot to hold it from coming out.

I might make it in two pieces, with the clamp to hook them together then I do not have to remove a lot to get it to work.

miket:
the slider is thin, touches the grate, and is not held to the grate by much. I think the epoxy held but that the actuator has a 3/4 to 1" travel, the grate has .5-.6. I think the actuator just pushed passed the end of travel on the slider and side loaded the epoxy too far.

What is a clamptite?
__________________
  Reply With Quote
Old 08-29-2010, 01:29 PM   #54 (permalink)
Wiki Mod
 
Weather Spotter's Avatar
 
Join Date: Nov 2009
Location: Midland MI, USA
Posts: 2,042

Max - '14 Ford C-Max SEL
Thanks: 228
Thanked 304 Times in 210 Posts
well I do not think this will work, I could get it hooked up, but it would be a hassle. The other issue is that I need it open most of the time and the current set up the default is closed. The actuators do not have any hold force when the power is removed. So I would need to come up with a spring set up or a lock mechanism to hold it open.

All this work for a faster warm up?

I might try some slots, with a 3/4" travel I can make some nice slots. This would still have 1/2 of the flow blocked but I might make a bypass area.

Ideas?
__________________
  Reply With Quote
Old 08-29-2010, 02:18 PM   #55 (permalink)
Master EcoModder
 
Patrick's Avatar
 
Join Date: Apr 2008
Location: Northern Florida, USA
Posts: 510

Hot Tamale - '10 Toyota Prius III
Thanks: 27
Thanked 96 Times in 70 Posts
If you flip the vents upside down would that make the default position open?
  Reply With Quote
Old 08-29-2010, 02:27 PM   #56 (permalink)
Master EcoModder
 
Patrick's Avatar
 
Join Date: Apr 2008
Location: Northern Florida, USA
Posts: 510

Hot Tamale - '10 Toyota Prius III
Thanks: 27
Thanked 96 Times in 70 Posts
If you have a welder, you could weld the rod clamp directly to the vent bar as shown in this pic. Then if you turn the vents around you should have a straight shot down with the rod from the actuator to the clamp. Turning the vents upside down should make the default the open position.
Attached Thumbnails
Click image for larger version

Name:	GEDC0153--6-2.jpg
Views:	42
Size:	113.9 KB
ID:	6738  
  Reply With Quote
Old 08-29-2010, 04:07 PM   #57 (permalink)
Wiki Mod
 
Weather Spotter's Avatar
 
Join Date: Nov 2009
Location: Midland MI, USA
Posts: 2,042

Max - '14 Ford C-Max SEL
Thanks: 228
Thanked 304 Times in 210 Posts
thanks for the idea, I do have a welder but it is in Texas with my brother and will not be back for 3 weeks.

You are right about the grate position, I will have to think about that. I am also working on a slot grill block for now though.
__________________
  Reply With Quote
Old 08-29-2010, 06:53 PM   #58 (permalink)
Wiki Mod
 
Weather Spotter's Avatar
 
Join Date: Nov 2009
Location: Midland MI, USA
Posts: 2,042

Max - '14 Ford C-Max SEL
Thanks: 228
Thanked 304 Times in 210 Posts
Update:

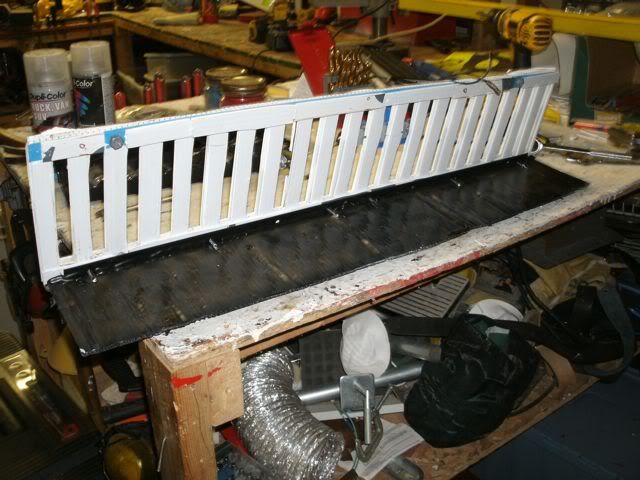
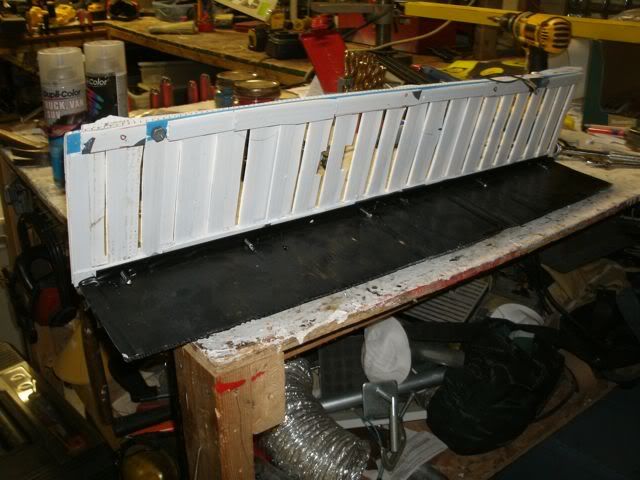
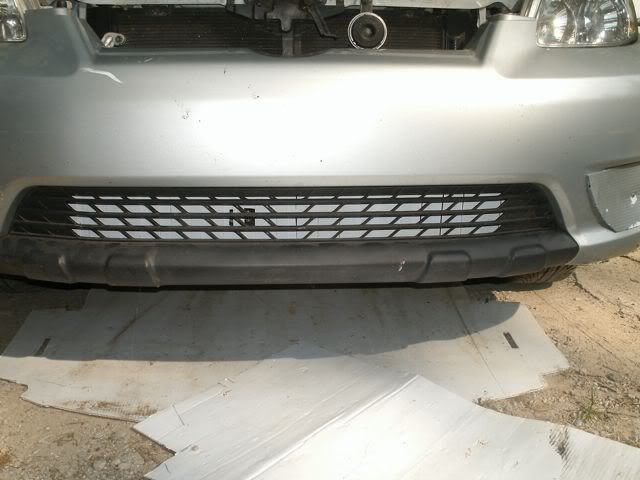
I got myself a movable grill block!

On the car:

Closed:

Open:
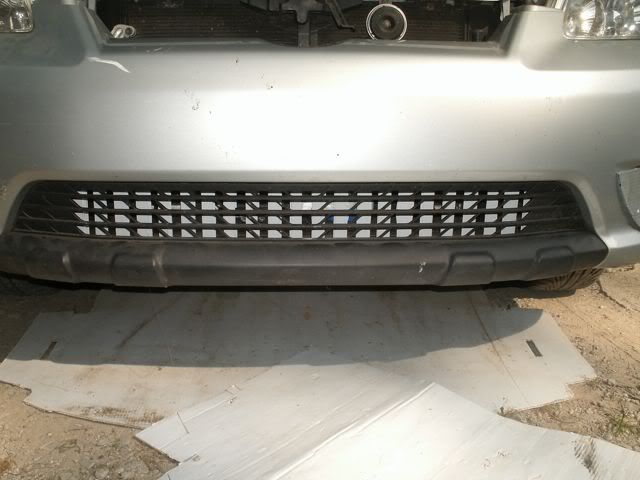

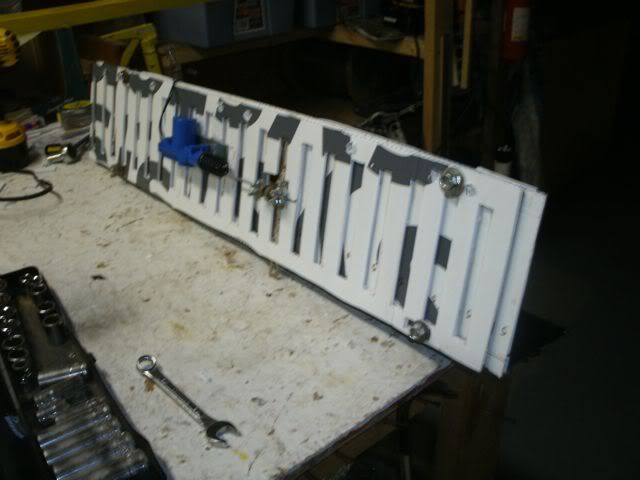
I took the easy way out and made a sliding grill block. I compromised and just replaced the grates with the slider. It is still stealth

The OEM grill has an opening of 94 sq". Mine has about 75 sq" or 80% of OEM I did this by keeping it back and then I can make it taller than the OEM one. It is also wider by 3 ".

How I made it:

I cut some colorplast to the size I wanted. I measured the actuation length to be .75" so that is how wide I made the slats. I marked them all out before cutting:
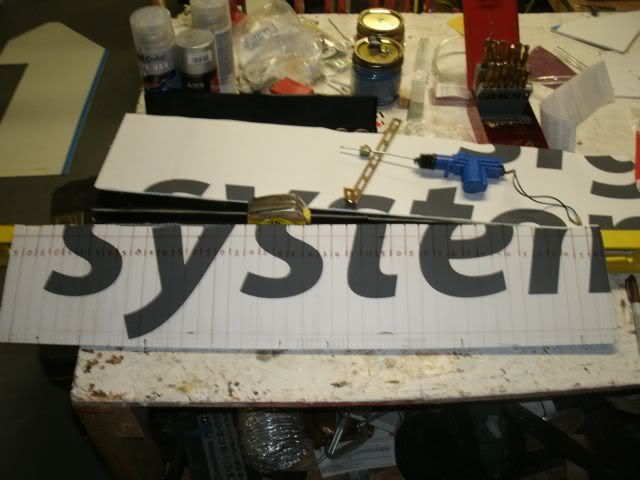
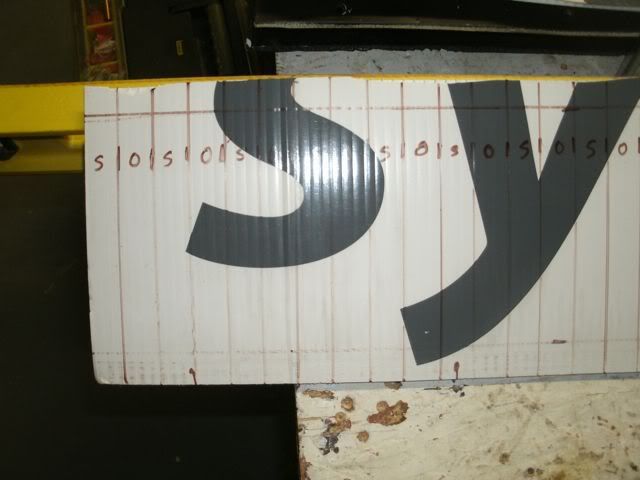


One cut out:


and #2:
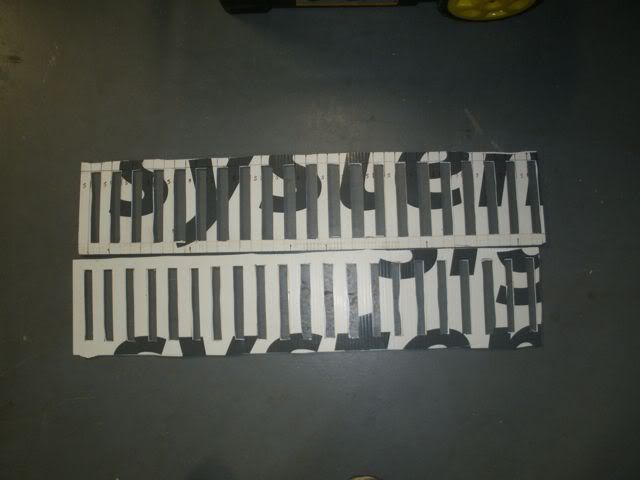

I cut some slots for bolts and put the bolts in. I saw that I needed spacers on the back side:
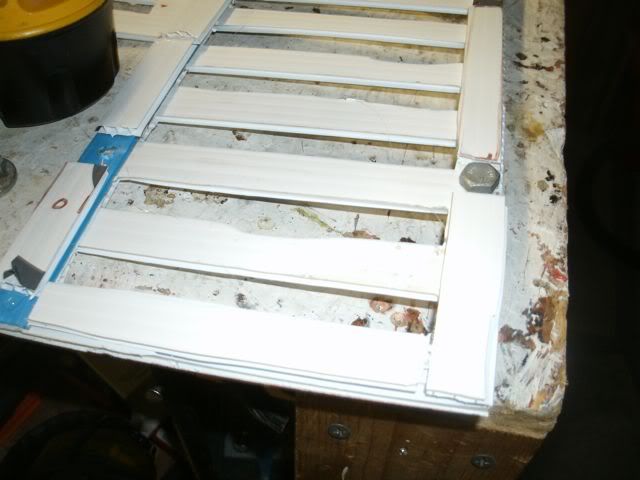

Assembled open:
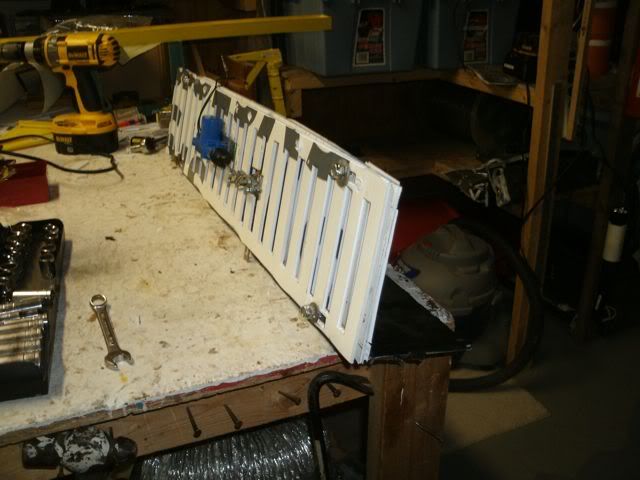


Closed:


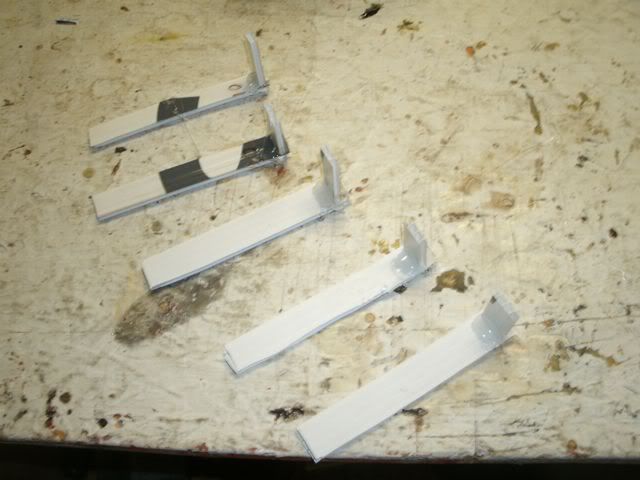
Once I put it on I found that I had too much play in the pices (away from each other). So I made some brackets to allow sliding but not in and out from air pressure:

On the car:
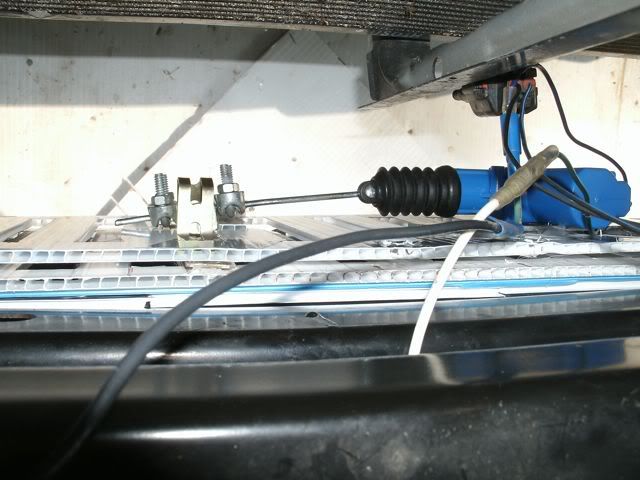

I just used the clamps for now, I will likely epoxy in on but for testing and my trip tomorrow this should work. The actuator and mounts are just hot glued onto the colorplast.

I still need to paint it but I can do that after my trip.

What do you think?
__________________
  Reply With Quote
Old 08-29-2010, 07:15 PM   #59 (permalink)
Master EcoModder
 
Patrick's Avatar
 
Join Date: Apr 2008
Location: Northern Florida, USA
Posts: 510

Hot Tamale - '10 Toyota Prius III
Thanks: 27
Thanked 96 Times in 70 Posts
Looks good. Let us know how it works.
  Reply With Quote
Old 08-29-2010, 07:21 PM   #60 (permalink)
Wiki Mod
 
Weather Spotter's Avatar
 
Join Date: Nov 2009
Location: Midland MI, USA
Posts: 2,042

Max - '14 Ford C-Max SEL
Thanks: 228
Thanked 304 Times in 210 Posts
I tested it out (not moving on the road) and it opens and closes just fine

__________________
  Reply With Quote
Reply  Post New Thread


Similar Threads
Thread Thread Starter Forum Replies Last Post
Arduino controlled automatically actuated grill block Daox Aerodynamics 167 11-08-2016 12:23 PM
Piwoslaw's Peugeot 307sw modding thread Piwoslaw EcoModding Central 295 03-28-2016 04:25 PM
Permanent Aluminum Grill Block and Belly Pan Markmysite EcoModding Central 41 02-27-2014 10:22 PM
Spring mounted Grill Block cfg83 EcoModding Central 32 04-19-2009 07:00 PM
another project idea: electronically controlled grill block rjacob Aerodynamics 3 07-10-2008 05:36 PM


Powered by vBulletin® Version 3.8.11
Copyright ©2000 - 2024, vBulletin Solutions Inc.
Content Relevant URLs by vBSEO 3.5.2
All content copyright EcoModder.com