Go Back   EcoModder Forum > EcoModding > Fossil Fuel Free > Open ReVolt: open source DC motor controller
Register Now
 Register Now
 

Reply  Post New Thread
 
Submit Tools LinkBack Thread Tools
Old 09-08-2014, 04:06 AM   #6881 (permalink)
EV Connoisseur
 
Join Date: Aug 2010
Location: Amsterdam
Posts: 309
Thanks: 70
Thanked 109 Times in 90 Posts
Quote:
Originally Posted by flores View Post
okay.. I was away for two weeks (holiday in Tuscany Italy) but now I'm working full force on the raspberry software.. saving settings now works.. and i'm adding logging of the rtd data to a file for analysis.

This weekend the controller is going back in the car !!
Well, so much for that plan.. two sick children messed up that plan.. this week retry!

  Reply With Quote
Alt Today
Popular topics

Other popular topics in this forum...

   
Old 09-08-2014, 04:10 AM   #6882 (permalink)
EV Connoisseur
 
Join Date: Aug 2010
Location: Amsterdam
Posts: 309
Thanks: 70
Thanked 109 Times in 90 Posts
Quote:
Originally Posted by duncan View Post
Hi Paul,
What is the other board for???
(the one that came completely loose in transit)
That's the DC-DC I guess. I've mounted it above the controller board. It takes 12V input and outputs 24V for the board, there should be a connector that fits the 24V input of the controller board on one side the other side takes 12V input of the car.
  Reply With Quote
The Following User Says Thank You to flores For This Useful Post:
MPaulHolmes (09-09-2014)
Old 09-09-2014, 01:47 PM   #6883 (permalink)
PaulH
 
MPaulHolmes's Avatar
 
Join Date: Feb 2008
Location: Maricopa, AZ (sort of. Actually outside of town)
Posts: 3,832

Michael's Electric Beetle - '71 Volkswagen Superbeetle 500000
Thanks: 1,362
Thanked 1,202 Times in 765 Posts
Yes, that's right, Flores. It's a dc-dc. 9-18v input, 24v output. The 24v output goes to the power on the control board.
__________________
kits and boards
  Reply With Quote
Old 09-24-2014, 06:21 AM   #6884 (permalink)
EcoModding Apprentice
 
Join Date: Oct 2010
Location: southland NZ
Posts: 153
Thanks: 38
Thanked 86 Times in 55 Posts
wiring

Hi Paul

Finally time to work on the controller -
so much stuff to do had built up while I was crook!

I have two pictures here
One has the two positions that the DC-DC can connect to the control board
(1) and (2)
Which one is it????

Other picture
I have the throttle
A funny four way cable (1)
The serial cable (2)
This one has an LED on it (3)
No idea (4)
No idea (5)

Also in on this end will be the 12v for the DC-DC


The other end has
Three power cables - to be joined together to go to motor

Four other power cables ????
What are they? - where do they go?

I'm making up a slightly different case - along with the cooling things I got from Hobbyking
Attached Thumbnails
Click image for larger version

Name:	CCF24092014_00002.jpg
Views:	170
Size:	114.9 KB
ID:	15909   Click image for larger version

Name:	CCF24092014_00001.jpg
Views:	138
Size:	109.6 KB
ID:	15910  
  Reply With Quote
The Following User Says Thank You to duncan For This Useful Post:
MPaulHolmes (09-24-2014)
Old 09-24-2014, 11:48 AM   #6885 (permalink)
PaulH
 
MPaulHolmes's Avatar
 
Join Date: Feb 2008
Location: Maricopa, AZ (sort of. Actually outside of town)
Posts: 3,832

Michael's Electric Beetle - '71 Volkswagen Superbeetle 500000
Thanks: 1,362
Thanked 1,202 Times in 765 Posts
OK, J6 is for powering the main contactor coil.
J5 is for powering the precharge relay coil (J5 is NOT the precharge relay, just for powering the precharge relay coil. The precharge relay must exist somewhere off the board).
J4 is the +24v power. The right pin is +24v. The left pin is ground.
J3 is the valet mode option. But the controller is so dang smooth, that you may not need it! haha

The 5 wire ribbon cable is for reprogramming the microcontroller with the pickit3.

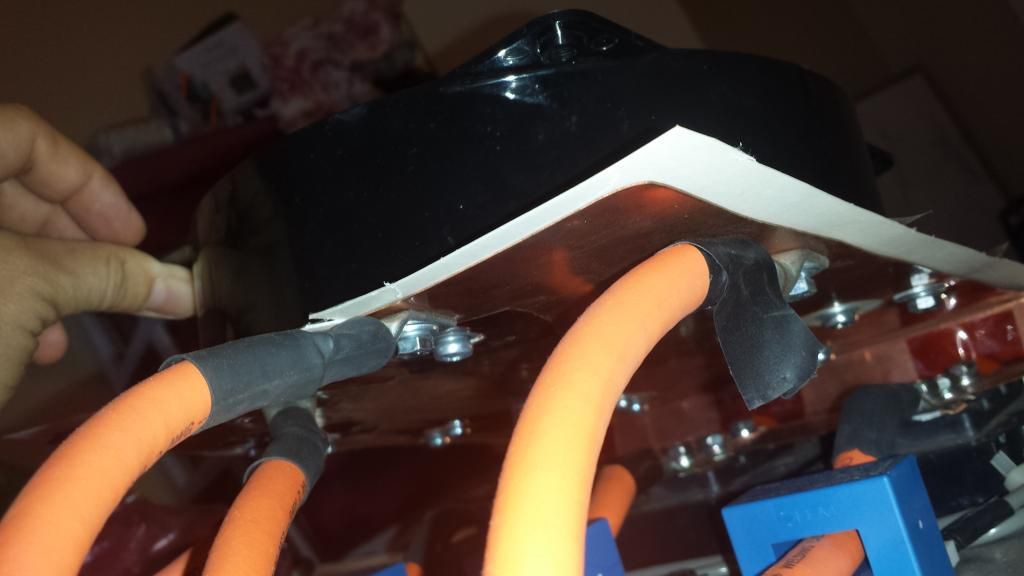
With the big cables facing you, the 3 long cables all get connected to M+ (motor plus). The 2 cables close together on the left are B+, and must be connected to the battery pack b+ (through a contactor/fuse etc...)
The 2 cables close together on the right are B-, and must be connected to the battery pack B-, AND ALSO M-. Well, I'm pretty sure that's how I did B+ and B-. You may want to check that it looks like this:
RIGHT SIDE IS B- IN THIS PICTURE (notice where the cables are connected):
__________________
kits and boards
  Reply With Quote
The Following User Says Thank You to MPaulHolmes For This Useful Post:
duncan (09-24-2014)
Old 09-29-2014, 06:50 PM   #6886 (permalink)
PLUGnGO
 
jedsmd's Avatar
 
Join Date: Sep 2012
Location: Olympia Wa
Posts: 137
Thanks: 75
Thanked 82 Times in 54 Posts
Quote:
Originally Posted by MPaulHolmes View Post

....
J3 is the valet mode option. But the controller is so dang smooth, that you may not need it! haha

....
Paul is right about the controller being smooth. It responds to the pedal beautifully - even when creeping along with the motor barely turning. The controller also responds well to sudden throttle changes - keeps right up with no overshoot.

850 miles on my controller now

Just a few notes for anyone considering the controller for their vehicle:
  • It works well, but it is in beta version so still a little rough around the edges, Fortunately it has really great tech support.
  • It is big, about 15" x 12" x 5". Okay for my pickup truck, but would be tough to get into a tight engine compartment.
  • It is powerful, I limit it to 900 amps but it can do 1500 or so (waiting to read reports from the guys running full power). I use it with a LiFePo4 battery pack, I think it would be pretty hard on a lead acid pack.
  • For me it works much better with a Hall sensor throttle than a resistance pot.
  • Paul's spread spectrum PWM make a rushing water sound on acceleration. I like it, YOMV. Other options can be programed.
  • Air cooling seems to be adequate for daily commute type driving. (Again waiting to hear from the guys running higher power)
  Reply With Quote
The Following 4 Users Say Thank You to jedsmd For This Useful Post:
Astro (09-30-2014), flores (09-30-2014), MPaulHolmes (09-29-2014), thingstodo (09-30-2014)
Old 09-30-2014, 04:20 AM   #6887 (permalink)
EcoModding Apprentice
 
Join Date: Oct 2010
Location: southland NZ
Posts: 153
Thanks: 38
Thanked 86 Times in 55 Posts
Hi Paul
Slowly getting my act together,

J5 and J6 - I assume I can simply cut them off short
I control the pre-charge and contactor in my car (gives me something that looks "technical" to do)

The LED - I was going to connect it to the external wiring thing - but I think I'm out of connectors
Is it OK to remove it? or should I mount it on the case?
What does it tell me?

The five wire ribbon cable and the PiCkit
The PiCkit has six wires - do I just ignore one of them?
Which one?

Can I connect the PiCkit through one of those external wiring things?

Now when its all together - I will send a picture
What is it set to?
Current at 5Kohms throttle?? -
Ramp speed?

I'm asking this because that PiCkit thing looks terrifying and if I can run without messing with it I will

Thanks
Duncan
  Reply With Quote
Old 09-30-2014, 10:14 AM   #6888 (permalink)
PaulH
 
MPaulHolmes's Avatar
 
Join Date: Feb 2008
Location: Maricopa, AZ (sort of. Actually outside of town)
Posts: 3,832

Michael's Electric Beetle - '71 Volkswagen Superbeetle 500000
Thanks: 1,362
Thanked 1,202 Times in 765 Posts
You can cut off the precharge and contactor wire and LED wire. The LED does nothing at this point. Cut it off too if you want. I think your code is fine except the temperature sensing is disabled. If you want to jack into the temperature probe wire pair, and monitor its resistance, that would be fine and dandy.

Oh yes, the 6th pin (furthest away from the pin with the arrow on the pickit3) is unused.
__________________
kits and boards
  Reply With Quote
The Following 2 Users Say Thank You to MPaulHolmes For This Useful Post:
duncan (09-30-2014), thingstodo (09-30-2014)
Old 09-30-2014, 10:28 AM   #6889 (permalink)
EcoModding Apprentice
 
Join Date: Oct 2010
Location: southland NZ
Posts: 153
Thanks: 38
Thanked 86 Times in 55 Posts
Hi Paul
That's great
I will make the second end piece with;

12v +/- power
Throttle
Both on one black connector thing

The five PiCkit connections
On the second black connector thing

The serial connector.

I think your code is fine except the temperature sensing is disabled

Do you mean the sensing for a separate gauge is disabled?
Is the current reduction for if it gets too hot active?

1000amps at full throttle????
  Reply With Quote
Old 09-30-2014, 10:44 AM   #6890 (permalink)
PaulH
 
MPaulHolmes's Avatar
 
Join Date: Feb 2008
Location: Maricopa, AZ (sort of. Actually outside of town)
Posts: 3,832

Michael's Electric Beetle - '71 Volkswagen Superbeetle 500000
Thanks: 1,362
Thanked 1,202 Times in 765 Posts
Oh crap, it might be 300 amps at full throttle. Haha. I also think the serial reprogramming isnt enabled on the code you have. And no thermal cutback enabled. You need the latest code. Do you have mplab installed?

__________________
kits and boards
  Reply With Quote
The Following 2 Users Say Thank You to MPaulHolmes For This Useful Post:
duncan (10-01-2014), thingstodo (09-30-2014)
Reply  Post New Thread


Similar Threads
Thread Thread Starter Forum Replies Last Post
Paul and Sabrina's Cheap 3 Phase Inverter (AC Controller) with Field Oriented Control MPaulHolmes Fossil Fuel Free 3431 05-04-2022 06:43 PM
Paul & Sabrina's Cheap EV Conversion MPaulHolmes Fossil Fuel Free 542 11-12-2016 10:09 PM
Three Dirt Cheap DIY Electric Cars - Part 5 SVOboy EcoModder Blog Discussion 0 12-12-2008 05:10 PM


Powered by vBulletin® Version 3.8.11
Copyright ©2000 - 2024, vBulletin Solutions Inc.
Content Relevant URLs by vBSEO 3.5.2
All content copyright EcoModder.com